


概述
搭建Spring + SpringMVC + MyBatis集成环境。
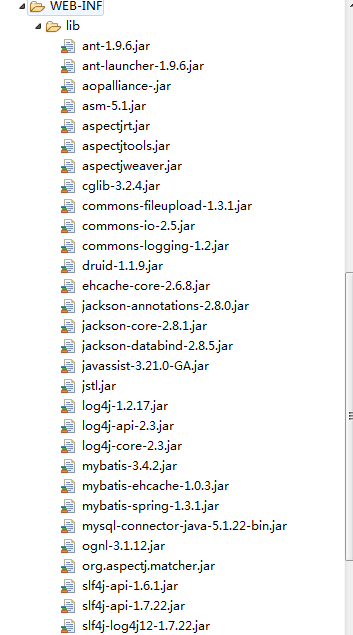
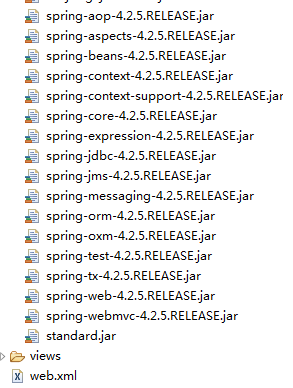
一,依赖的jar
二,配置web.xml
 <!-- 开启编码过滤器 -->
    <filter>
        <description>字符集过滤器</description>
        <filter-name>encodingFilter</filter-name>
            <filter-class>
                org.springframework.web.filter.CharacterEncodingFilter
            </filter-class>
        <init-param>
            <description>字符集编码</description>
            <param-name>encoding</param-name>
            <param-value>UTF-8</param-value>
        </init-param>
    </filter>
    <filter-mapping>
    <filter-name>encodingFilter</filter-name>
    <url-pattern>/*</url-pattern>
    </filter-mapping>

    <!-- Spring的监听器 -->
    <context-param>
    <param-name>contextConfigLocation</param-name>
    <param-value>classpath:spring.xml</param-value>
    </context-param>

    <listener>
        <listener-class>
            org.springframework.web.context.ContextLoaderListener
        </listener-class>
    </listener>

    <!-- 配置SpringMVC的处理请求的Servlet -->
    <servlet>
        <servlet-name>dispatcherServlet</servlet-name>
        <servlet-class>
            org.springframework.web.servlet.DispatcherServlet
        </servlet-class>
        <init-param>
            <param-name>contextConfigLocation</param-name>
            <param-value>classpath:springmvc.xml</param-value>
        </init-param>
        <!-- 表示系统启动时自动加载这个servlet -->
        <load-on-startup>1</load-on-startup>
    </servlet>
    <servlet-mapping>
        <servlet-name>dispatcherServlet</servlet-name>
        <url-pattern>/</url-pattern>
    </servlet-mapping>

    <!-- 设置是否支持put和delete请求 -->
    <filter>
        <filter-name>HiddenHttpMethodFilter</filter-name>
        <filter-class>
             org.springframework.web.filter.HiddenHttpMethodFilter
        </filter-class>
    </filter>
    <filter-mapping>
        <filter-name>HiddenHttpMethodFilter</filter-name>
        <url-pattern>/*</url-pattern>
    </filter-mapping>
    <!-- 实现druid监控 -->
    <servlet>
      <servlet-name>DruidStatView</servlet-name>
      <servlet-class>com.alibaba.druid.support.http.StatViewServlet</servlet-class>
    </servlet>
    <servlet-mapping>
      <servlet-name>DruidStatView</servlet-name>
      <url-pattern>/druid/*</url-pattern>
    </servlet-mapping>
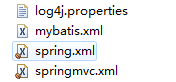
之后添加四个配置文件分别是如下:
1.由于MyBatis依赖与log4j输出sql语句信息,所以需要配置log4j.properties配置文件。
#设置输出级别和输出位置
log4j.rootLogger=debug,Console
#设置控制台相关的参数
log4j.appender.Console=org.apache.log4j.ConsoleAppender
log4j.appender.Console.layout=org.apache.log4j.PatternLayout
log4j.appender.Console.layout.ConversionPattern=%d [%t] %-5p [%c] - %m%n
#设置MyBatis的输出内容
log4j.logger.java.sql.ResultSet=INFO
log4j.logger.org.apache=INFO
log4j.logger.java.sql.Connection=DEBUG
log4j.logger.java.sql.Statement=DEBUG
log4j.logger.java.sql.PreparedStatement=DEBUG
2.添加springmvc.xml的配置文件,设置自动扫描包路径,静态资源处理,视图解析器等。
<?xml version="1.0" encoding="UTF-8"?>
<beans xmlns="http://www.springframework.org/schema/beans"
    xmlns:xsi="http://www.w3.org/2001/XMLSchema-instance"
    xmlns:aop="http://www.springframework.org/schema/aop"
    xmlns:context="http://www.springframework.org/schema/context"
    xmlns:mvc="http://www.springframework.org/schema/mvc"
    xsi:schemaLocation="http://www.springframework.org/schema/beans http://www.springframework.org/schema/beans/spring-beans.xsd
        http://www.springframework.org/schema/aop http://www.springframework.org/schema/aop/spring-aop-4.2.xsd
        http://www.springframework.org/schema/context http://www.springframework.org/schema/context/spring-context-4.2.xsd
        http://www.springframework.org/schema/mvc http://www.springframework.org/schema/mvc/spring-mvc-4.2.xsd">

        <!-- 关闭默认的包扫描,限定智能扫描指定的包 -->
        <context:component-scan base-package="com.znsd.ssm" use-default-filters="false">
            <!-- 扫描@Controller注解扫描的包 -->
            <context:include-filter type="annotation" expression="org.springframework.stereotype.Controller"/>
            <!-- 扫描@ControllerAdvice注解扫描的包 -->
            <context:include-filter type="annotation" expression="org.springframework.web.bind.annotation.ControllerAdvice"/>
        </context:component-scan>
        <!-- 视图解析器:将逻辑视图转发到对应的物理视图 -->
        <bean class="org.springframework.web.servlet.view.InternalResourceViewResolver">
            <property name="prefix" value="/WEB-INF/views/" />
            <property name="suffix" value=".html" />
        </bean>

        <!-- 配置文件上传组件 -->
        <bean id="multipartResolver"
            class="org.springframework.web.multipart.commons.CommonsMultipartResolver">
        <!-- 指定默认的编码格式 -->
        <property name="defaultEncoding" value="UTF-8" />
        <!-- 指定允许上传的文件大小,单位Byte-->
        <property name="maxUploadSize" value="512000" />
        </bean>


        <!-- 将静态资源交由tomcat来处理 -->
        <mvc:default-servlet-handler />

        <!-- 注册类型转换器 -->
        <mvc:annotation-driven />

</beans>
3.添加spring.xml配置文件,在Spring中提供Service,Dao,事务,连接池等信息。
<?xml version="1.0" encoding="UTF-8"?>
<beans xmlns="http://www.springframework.org/schema/beans"
    xmlns:xsi="http://www.w3.org/2001/XMLSchema-instance"
    xmlns:aop="http://www.springframework.org/schema/aop"
    xmlns:context="http://www.springframework.org/schema/context"
    xmlns:jdbc="http://www.springframework.org/schema/jdbc"
    xmlns:tx="http://www.springframework.org/schema/tx"
    xsi:schemaLocation="http://www.springframework.org/schema/beans http://www.springframework.org/schema/beans/spring-beans.xsd
        http://www.springframework.org/schema/aop http://www.springframework.org/schema/aop/spring-aop-4.2.xsd
        http://www.springframework.org/schema/context http://www.springframework.org/schema/context/spring-context-4.2.xsd
        http://www.springframework.org/schema/jdbc http://www.springframework.org/schema/jdbc/spring-jdbc-4.2.xsd
        http://www.springframework.org/schema/tx http://www.springframework.org/schema/tx/spring-tx-4.2.xsd">

    <!-- 指定不扫描的包 -->
    <context:component-scan base-package="com.znsd.ssm">
        <!-- 排除@Controller注解的包 -->
        <context:exclude-filter type="annotation" expression="org.springframework.stereotype.Controller"/>
        <!-- 排除@ControllerAdvice注解的包 -->
        <context:exclude-filter type="annotation" expression="org.springframework.web.bind.annotation.ControllerAdvice"/>
    </context:component-scan>

     <bean id="dataSource" class="com.alibaba.druid.pool.DruidDataSource" init-method="init" destroy-method="close">
         <property name="url" value="jdbc:mysql://localhost:3306/mybatis" />
         <property name="username" value="root" />
         <property name="password" value="100" />
         <property name="filters" value="stat" />
         <property name="maxActive" value="20" />
         <property name="initialSize" value="1" />
         <property name="maxWait" value="60000" />
         <property name="minIdle" value="1" />
         <property name="timeBetweenEvictionRunsMillis" value="60000" />
         <property name="minEvictableIdleTimeMillis" value="300000" />
         <property name="testWhileIdle" value="true" />
         <property name="testOnBorrow" value="false" />
         <property name="testOnReturn" value="false" />
         <property name="poolPreparedStatements" value="true" />
         <property name="maxOpenPreparedStatements" value="20" />
         <property name="asyncInit" value="true" />
      </bean>

    <!-- Spring扫描所有的mapper文件 -->
    <bean id="sqlSessionFactory" class="org.mybatis.spring.SqlSessionFactoryBean">
      <!-- 设置连接池对象 -->
      <property name="dataSource" ref="dataSource" />
      <!-- Mappper所在的包路径 -->
      <property name="mapperLocations" value="classpath:com/znsd/ssm/dao/mapper/*.xml" />
      <!-- 指定mybatis的配置文件 -->
      <property name="configLocation" value="classpath:mybatis.xml"></property>
    </bean>
    <!-- Spring 扫描DAO包 -->
    <bean class="org.mybatis.spring.mapper.MapperScannerConfigurer">
        <!-- DAO包所在的包路径 -->
        <property name="basePackage" value="com.znsd.ssm.dao" />
        <property name="sqlSessionFactoryBeanName" value="sqlSessionFactory" />
    </bean>

    <!-- 配置事务 -->
    <bean id="txManager" class="org.springframework.jdbc.datasource.DataSourceTransactionManager">
        <property name="dataSource" ref="dataSource" />
    </bean>

    <!-- 事务的通知方式 -->
    <tx:advice id="txAdvice" transaction-manager="txManager">
        <tx:attributes>
            <tx:method name="find*" propagation="REQUIRED" read-only="true" />
            <tx:method name="search*" propagation="REQUIRED" read-only="true" />
            <tx:method name="query*" propagation="REQUIRED" read-only="true" />

            <tx:method name="add*" propagation="REQUIRED" />
            <tx:method name="submit*" propagation="REQUIRED" />
            <tx:method name="save*" propagation="REQUIRED" />
            <tx:method name="insert*" propagation="REQUIRED" />

            <tx:method name="del*" propagation="REQUIRED" />
            <tx:method name="remove*" propagation="REQUIRED" />

            <tx:method name="update*" propagation="REQUIRED" />
            <tx:method name="modify*" propagation="REQUIRED" />

            <tx:method name="*" propagation="REQUIRED" read-only="true" />
        </tx:attributes>
    </tx:advice>

    <!-- AOP切面拦截事务 -->
    <aop:config>
        <aop:pointcut id="serviceMethod"
            expression="execution(* com.znsd.ssm.service.*.*.*(..))" />
        <aop:advisor advice-ref="txAdvice" pointcut-ref="serviceMethod" />
    </aop:config>


</beans>
4.在SSM中,可以省略mybatis.xml配置文件,也可以添加,只不过需要在sqlSessionFactory中配置configLocation属性即可。
<?xml version="1.0" encoding="UTF-8" ?>
<!DOCTYPE configuration
  PUBLIC "-//mybatis.org//DTD Config 3.0//EN"
  "http://mybatis.org/dtd/mybatis-3-config.dtd">
<configuration>
    <!-- 取别名,这个必须按照一定的顺序配置 -->
    <typeAliases>
    <!-- 将这个包下面的所有的类全部倒入进来,明明规则就是类名首字母小写 -->
    <package name="com.znsd.ssm.entities"/>
    </typeAliases>
</configuration>
三.最后是三层架构分别是Dao,Service,Controller层。还有entities实体类。
entities实体类代码如下:
package com.znsd.ssm.entities;

import java.io.Serializable;

public class Student implements Serializable{
    /**
     *
     */
    private static final long serialVersionUID = 1L;
    private Integer id;
    private String stuName;
    private Integer age;
    private Integer sex;
    //省略getter,setter,toString方法

}
Dao接口层代码如下:
package com.znsd.ssm.dao;

import java.util.List;

import com.znsd.ssm.entities.Student;

public interface StudentDao {
    public List<Student> selectList();
}
Dao层下创建mapper文件夹,再在该文件夹下添加映射文件代码如下:
<?xml version="1.0" encoding="UTF-8"?>
<!DOCTYPE mapper
  PUBLIC "-//mybatis.org//DTD Mapper 3.0//EN"
  "http://mybatis.org/dtd/mybatis-3-mapper.dtd">
<mapper namespace="com.znsd.ssm.dao.StudentDao">
    <resultMap type="com.znsd.ssm.entities.Student" id="studentMap">
        <id column="id" property="id" />
        <result column="stuName" property="stuName" />
        <result column="age" property="age" />
        <result column="sex" property="sex" />
    </resultMap>

    <!-- 查询学生列表 -->
    <select id="selectList" resultMap="studentMap">
        select * from student
    </select>

</mapper>
Service接口层和实现层代码如下:
package com.znsd.ssm.service;

import java.util.List;

import com.znsd.ssm.entities.Student;

public interface StudentService {
    public List<Student> find();
}
package com.znsd.ssm.service.impl;

import java.util.List;

import org.springframework.beans.factory.annotation.Autowired;
import org.springframework.stereotype.Service;

import com.znsd.ssm.dao.StudentDao;
import com.znsd.ssm.entities.Student;
import com.znsd.ssm.service.StudentService;
@Service
public class StudentServiceImpl implements StudentService{
    @Autowired
    private StudentDao studentDao;
    @Override
    public List<Student> find() {
        return studentDao.selectList();
    }
}
最后是Controller层代码如下:
package com.znsd.ssm.controller;

import java.util.List;

import org.springframework.beans.factory.annotation.Autowired;
import org.springframework.stereotype.Controller;
import org.springframework.web.bind.annotation.RequestMapping;

import com.znsd.ssm.entities.Student;
import com.znsd.ssm.service.StudentService;

@Controller
public class IndexController {
    @Autowired
    private StudentService studentService;

    @RequestMapping("/index")
    public String indnx() {
        List<Student> list = studentService.find();
        for (Student stu : list) {
            System.out.println(stu);
        }
        return "index";
    }
}
五.最后在项目下的WEB-INF文件夹下创建views文件夹,再创建index.html文件如下:
<!DOCTYPE html>
<html>
<head>
<meta charset="UTF-8">
<title>Insert title here</title>
</head>
<body>
    <h1>Hello word SSM!</h1>
</body>
</html>
再在WebContent文件夹下添加测试test.jsp
<%@ page language="java" contentType="text/html; charset=UTF-8"
    pageEncoding="UTF-8"%>
<!DOCTYPE html>
<html>
<head>
<meta charset="UTF-8">
<title>Insert title here</title>
</head>
<body>
    <%
        response.sendRedirect("index");
    %>
</body>
</html>
如果运行成功会跳转到index.html页面。那么一个简单的SSM框架搭好了!

 浙公网安备 33010602011771号