

tomcat8+memcached session共享
一、环境准备

时间同步(同步后确认各服务器时间是否一致,不一致需要修改一下时区)
关闭防火墙
软件包和jar包链接:https://pan.baidu.com/s/1sl9Nob7
二、安装配置nginx和memcached
Nginx和memcached使用yum安装即可,下面是nginx配置文件内容


user  nginx;
worker_processes  1;


events {
    worker_connections  1024;
}


http {
    include       mime.types;
    default_type  application/octet-stream;

    log_format  main  '$remote_addr - $remote_user [$time_local] "$request" '
                      '$status $body_bytes_sent "$http_referer" '
                      '"$http_user_agent" "$http_x_forwarded_for"';
    sendfile        on;
    tcp_nopush     on;
    keepalive_timeout  65;
    gzip  on;
    upstream tomcat-web {
      server 192.168.0.14:8080;
      server 192.168.0.15:8080;
       }
    server {
        listen       80;
        server_name  www.tomcat.com;


        location / {
            root   html;
            index  index.html index.htm index.jsp;
        }
        location ~* \.(jsp|do)$ {
                proxy_pass http://tomcat-web;
                proxy_redirect off;
                proxy_set_header Host $host;
                proxy_set_header X-Real-IP $remote_addr;
                proxy_set_header X-Forwarded-For $proxy_add_x_forwarded_for;
                proxy_next_upstream error timeout invalid_header http_500 http_502 http_503 http_504;
                   }
       location /nginx_status {
                stub_status on;
                access_log off;
                allow 192.168.0.0/24;
                deny all;
                }
        error_page   500 502 503 504  /50x.html;
        location = /50x.html {
            root   html;
        }
    }
}
分别启动nginx和memcached
三、安装配置tomcat
安装步骤忽略
下载jar包至各tomcat节点的tomcat安装目录下的lib目录中

分别在两个tomcat上的某host上定义一个用于测试的context容器,并在其中创建一个会话管理器,如下所示:
[root@tomcat-server-1 ~]# vim /usr/local/tomcat/conf/server.xml <Host name="localhost" appBase="webapps" unpackWARs="true" autoDeploy="true"> <Context path="/test" docBase="/usr/local/tomcat/webapps/test" reloadable="true"> <Manager className="de.javakaffee.web.msm.MemcachedBackupSessionManager" memcachedNodes="n1:192.168.0.12:11211,n2:192.168.0.13:11211" #n1代表memcached的名称,后面为具体的ip地址 failoverNodes="n1" requestUriIgnorePattern=".*\.(ico|png|gif|jpg|css|js)$" transcoderFactoryClass="de.javakaffee.web.msm.serializer.javolution.JavolutionTranscoderFactory" /> </Context> <Valve className="org.apache.catalina.valves.AccessLogValve" directory="logs" prefix="localhost_access_log" suffix=".txt" pattern="%h %l %u %t "%r" %s %b" /> </Host>
提供测试页面
tomcat-server-1
[root@tomcat-server-1 lib]# mkdir -pv /usr/local/tomcat/webapps/test/WEB-INF/{classes,lib}
[root@tomcat-server-1 lib]# vim /usr/local/tomcat/webapps/test/index.jsp
<%@ page language="java" %>
<html>
  <head><title>TomcatA</title></head>
  <body>
    <h1><font color="red">TomcatA</font></h1>
    <table align="centre" border="1">
      <tr>
        <td>Session ID</td>
    <% session.setAttribute("tomcat","tomcat"); %>
        <td><%= session.getId() %></td>
      </tr>
      <tr>
        <td>Created on</td>
        <td><%= session.getCreationTime() %></td>
     </tr>
    </table>
  </body>
</html>
tomcat-server-2
[root@tomcat-server-2 lib]# mkdir -pv /usr/local/tomcat/webapps/test/WEB-INF/{classes,lib}
[root@tomcat-server-2 lib]#  vim /usr/local/tomcat/webapps/test/index.jsp
<%@ page language="java" %>
<html>
  <head><title>TomcatB</title></head>
  <body>
    <h1><font color="blue">TomcatB</font></h1>
    <table align="centre" border="1">
      <tr>
        <td>Session ID</td>
    <% session.setAttribute("tomcat","tomcat"); %>
        <td><%= session.getId() %></td>
      </tr>
      <tr>
        <td>Created on</td>
        <td><%= session.getCreationTime() %></td>
     </tr>
    </table>
  </body>
</html>
重启两台tomcat,并用浏览器进行访问
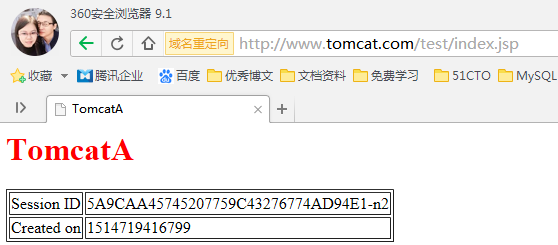
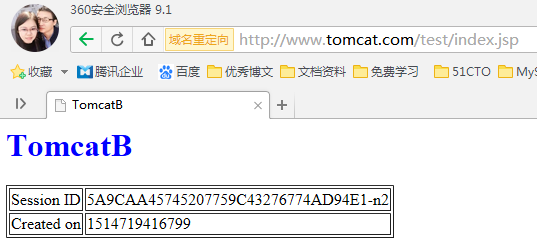
测试结果,在浏览器中访问http://www.tomcat.com/test/index.jsp,结果如上所示,其session ID在负载均衡环境中保持不变。
"一劳永逸" 的话,有是有的,而 "一劳永逸" 的事却极少

 浙公网安备 33010602011771号