

x-sky ISCSI使用
一、客户端安装iscsi依赖包(所有iscsi客户端上)
[root@localhost ~]#yum install -y binutils iscsi-initiator-utils  xfsprogs
[root@localhost ~]#systemctl restart iscsi
[root@localhost ~]# systemctl enable iscsi
[root@localhost ~]#cat /etc/iscsi/initiatorname.iscsi
InitiatorName=iqn.1994-05.com.redhat:3915324ae53  #查看本机IQN号
二、服务端创建ISCSI服务
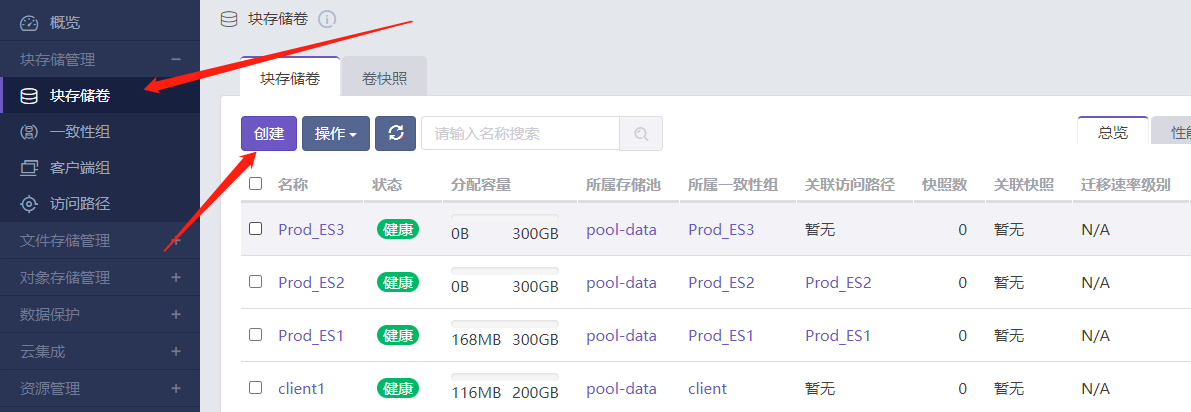
1.创建块存储
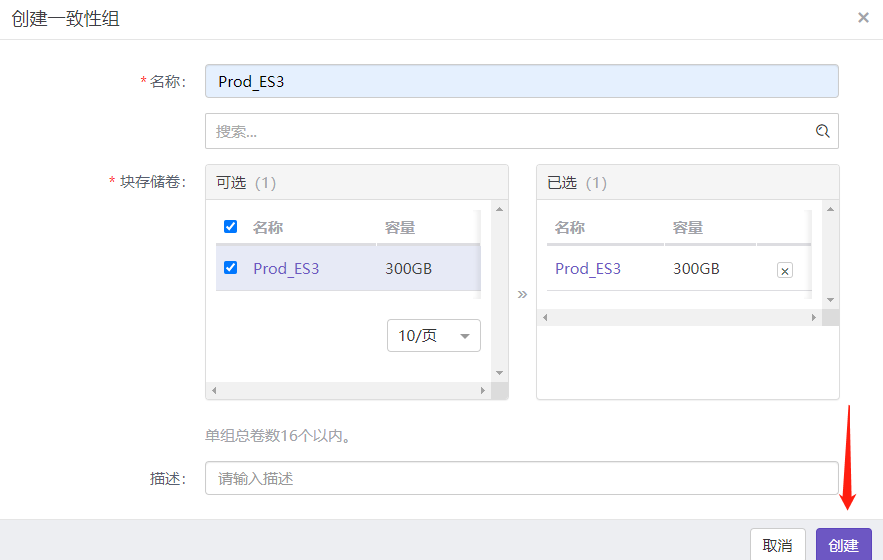
2.创建一次性组
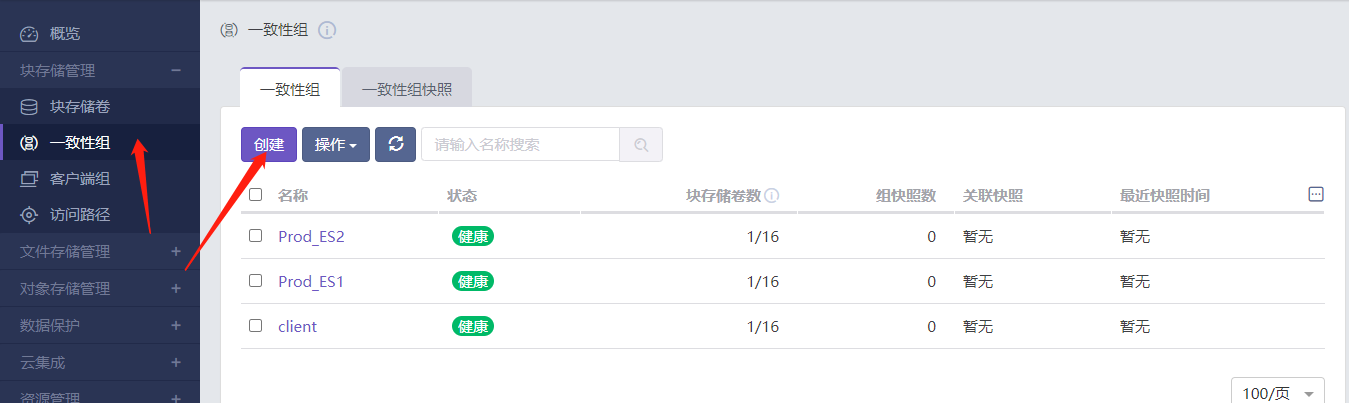
===
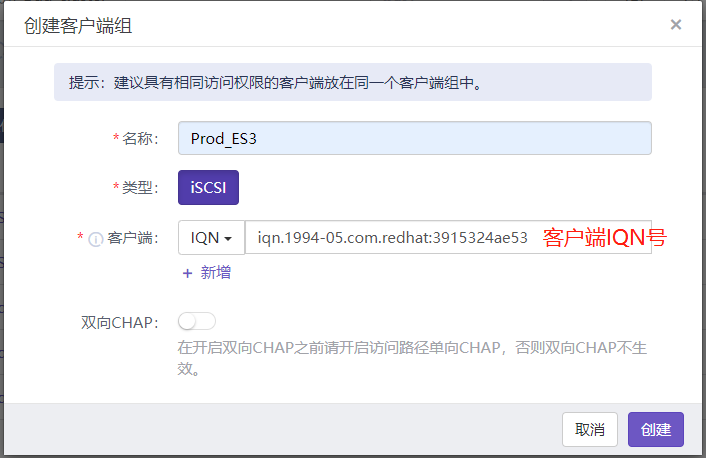
3.创建客户端组
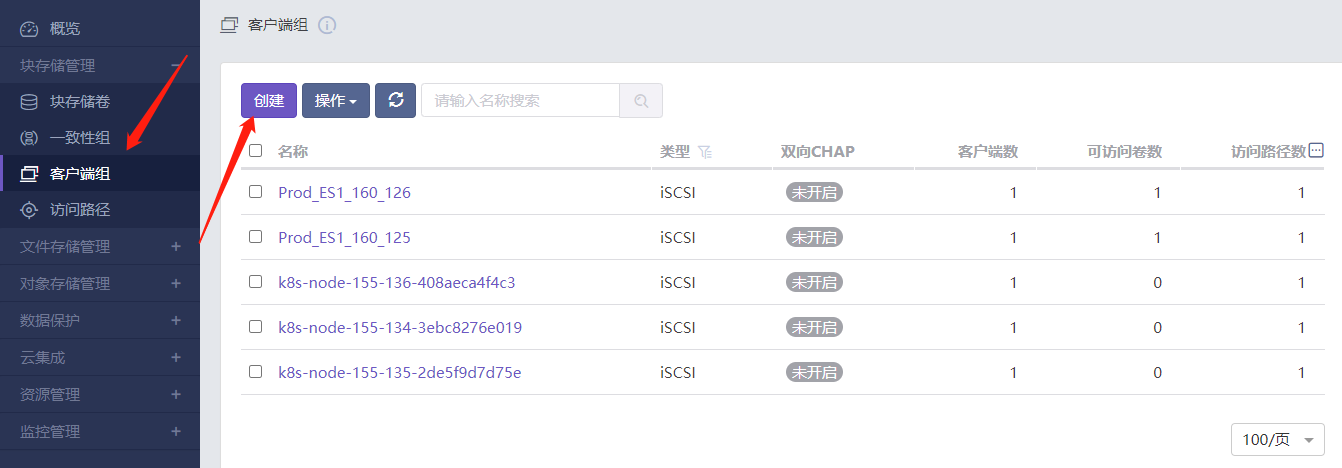
===
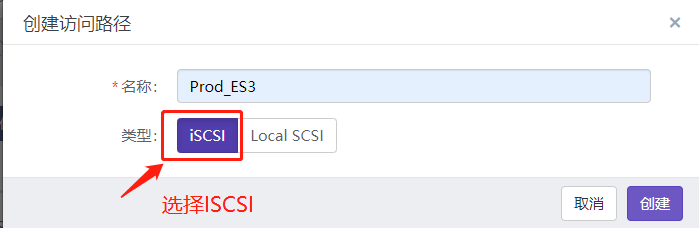
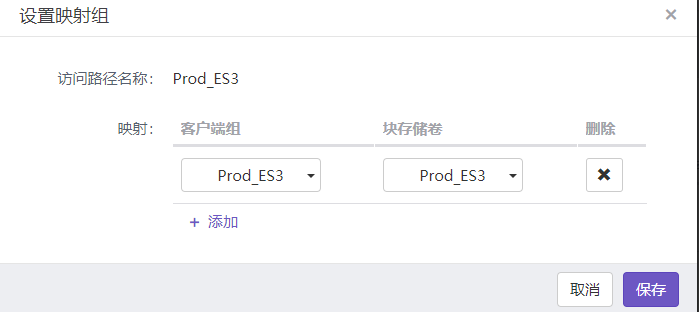
4.创建访问路径

===
===
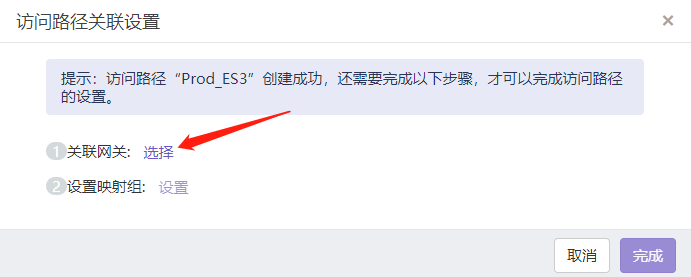
===
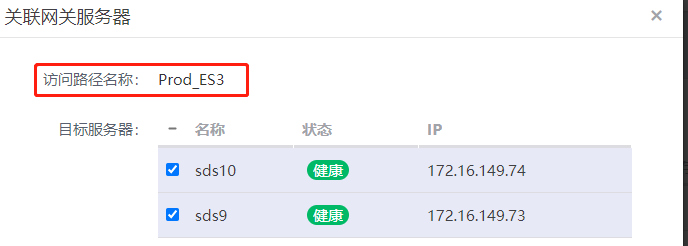
===
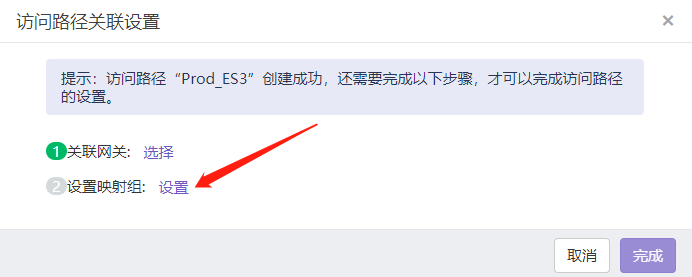
===
三、客户端挂载
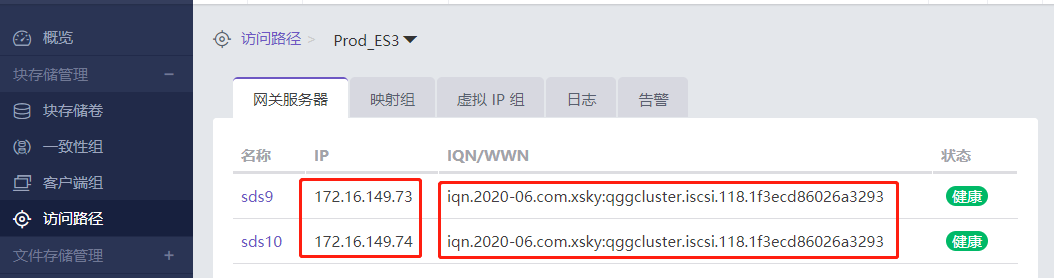
1.查看服务端IP及IQN号

===
2.查看存储服务器的iscsi是否在线
[root@localhost ~]# iscsiadm -m discovery --type sendtargets --portal 172.16.149.73
172.16.149.73:3260,1 iqn.2020-06.com.xsky:qggcluster.iscsi.118.1f3ecd86026a3293  #确认是否和服务端IQN号一致
3.登录ISCSI服务器并设置开机自动挂载
[root@localhost ~]# iscsiadm -m discovery --type sendtargets --portal 172.16.149.73 #发现ISCSI target
172.16.149.73:3260,1 iqn.2020-06.com.xsky:qggcluster.iscsi.118.1f3ecd86026a3293
[root@localhost ~]# iscsiadm -m discovery --type sendtargets --portal 172.16.149.74
172.16.149.74:3260,1 iqn.2020-06.com.xsky:qggcluster.iscsi.118.1f3ecd86026a3293
[root@localhost ~]# iscsiadm -m node -T iqn.2020-06.com.xsky:qggcluster.iscsi.118.1f3ecd86026a3293 -p 172.16.149.73:3260 -l #登录target,iscsiadm -m node -l all 命令可以一次登录所以发现的target
Logging in to [iface: default, target: iqn.2020-06.com.xsky:qggcluster.iscsi.118.1f3ecd86026a3293, portal: 172.16.149.73,3260] (multiple)
Login to [iface: default, target: iqn.2020-06.com.xsky:qggcluster.iscsi.118.1f3ecd86026a3293, portal: 172.16.149.73,3260] successful. #确保出现successful
[root@localhost ~]# iscsiadm -m node -T iqn.2020-06.com.xsky:qggcluster.iscsi.118.1f3ecd86026a3293 -p 172.16.149.74:3260 -l
Logging in to [iface: default, target: iqn.2020-06.com.xsky:qggcluster.iscsi.118.1f3ecd86026a3293, portal: 172.16.149.74,3260] (multiple)
Login to [iface: default, target: iqn.2020-06.com.xsky:qggcluster.iscsi.118.1f3ecd86026a3293, portal: 172.16.149.74,3260] successful.
[root@localhost ~]# iscsiadm -m node -T iqn.2020-06.com.xsky:qggcluster.iscsi.118.1f3ecd86026a3293 -p 172.16.149.73:3260 --op update -n node.startup -v automatic #设置开机自动挂载
[root@localhost ~]# iscsiadm -m node -T iqn.2020-06.com.xsky:qggcluster.iscsi.118.1f3ecd86026a3293 -p 172.16.149.74:3260 --op update -n node.startup -v automatic
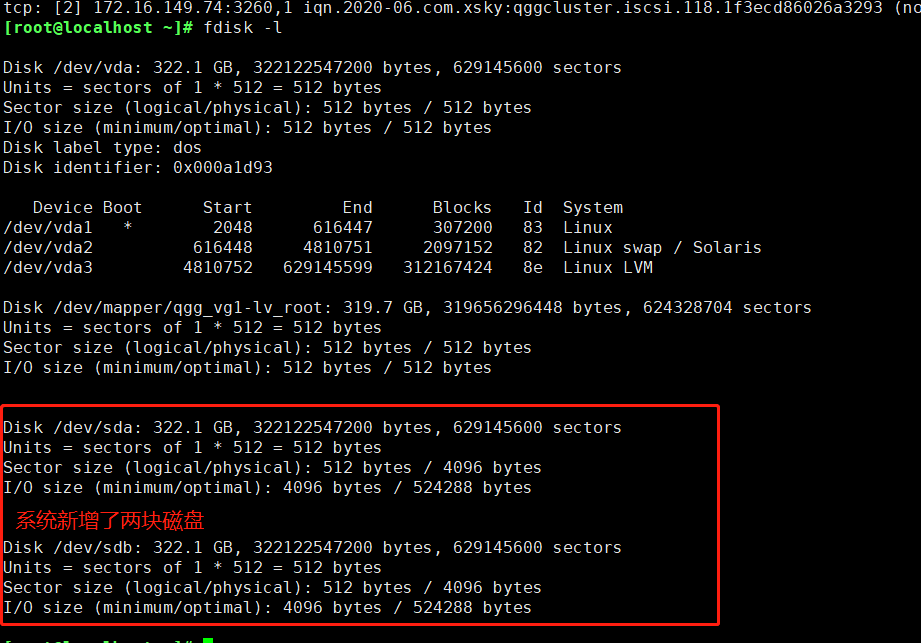
[root@localhost ~]# iscsiadm -m session #显示当前已经建立的连接
tcp: [1] 172.16.149.73:3260,1 iqn.2020-06.com.xsky:qggcluster.iscsi.118.1f3ecd86026a3293 (non-flash)
tcp: [2] 172.16.149.74:3260,1 iqn.2020-06.com.xsky:qggcluster.iscsi.118.1f3ecd86026a3293 (non-flash)
4.分区格式化及挂载
查看存储空间是否已经显示在磁盘列表中
对其中任意一块进行分区
[root@localhost ~]# fdisk /dev/sda  #对第一块磁盘分区
Welcome to fdisk (util-linux 2.23.2).

Changes will remain in memory only, until you decide to write them.
Be careful before using the write command.

Device does not contain a recognized partition table
Building a new DOS disklabel with disk identifier 0x47180079.

The device presents a logical sector size that is smaller than
the physical sector size. Aligning to a physical sector (or optimal
I/O) size boundary is recommended, or performance may be impacted.

Command (m for help): n  #创建分区
Partition type:
   p   primary (0 primary, 0 extended, 4 free)
   e   extended
Select (default p): p
Partition number (1-4, default 1):     #回车
First sector (2048-629145599, default 2048):
Using default value 2048
Last sector, +sectors or +size{K,M,G} (2048-629145599, default 629145599):
Using default value 629145599
Partition 1 of type Linux and of size 300 GiB is set

Command (m for help): w  #保存
The partition table has been altered!

Calling ioctl() to re-read partition table.
Syncing disks.
[root@localhost ~]# mkfs.xfs /dev/sda1  #对新分区格式化
meta-data=/dev/sda1              isize=512    agcount=4, agsize=19660736 blks
         =                       sectsz=4096  attr=2, projid32bit=1
         =                       crc=1        finobt=0, sparse=0
data     =                       bsize=4096   blocks=78642944, imaxpct=25
         =                       sunit=0      swidth=0 blks
naming   =version 2              bsize=4096   ascii-ci=0 ftype=1
log      =internal log           bsize=4096   blocks=38399, version=2
         =                       sectsz=4096  sunit=1 blks, lazy-count=1
realtime =none                   extsz=4096   blocks=0, rtextents=0
[root@localhost ~]# mkdir /Data  #创建挂载目录
[root@localhost ~]# mount /dev/sda1 /Data/ #挂载
[root@localhost ~]# df -h
Filesystem                   Size  Used Avail Use% Mounted on
/dev/mapper/qgg_vg1-lv_root  298G  2.4G  296G   1% /
devtmpfs                     7.8G     0  7.8G   0% /dev
tmpfs                        7.8G     0  7.8G   0% /dev/shm
tmpfs                        7.8G  8.7M  7.8G   1% /run
tmpfs                        7.8G     0  7.8G   0% /sys/fs/cgroup
/dev/vda1                    283M  115M  150M  44% /boot
tmpfs                        1.6G     0  1.6G   0% /run/user/0
/dev/sda1                    300G   33M  300G   1% /Data
5. 设置开机自动挂载
查看挂载磁盘UUID
[root@localhost ~]# blkid /dev/sda1
/dev/sda1: UUID="897ef05d-cd7e-469e-9886-028a96ba05e1" TYPE="xfs"
[root@localhost ~]# vim /etc/fstab
UUID=897ef05d-cd7e-469e-9886-028a96ba05e1 /Data     xfs     defaults,_netdev        0 0   #注意:挂载的时候一定要加_netdev参数,否则重启会卡住
[root@localhost ~]# umount /Data #测试是否可以自动挂载
[root@localhost ~]# df -h
[root@localhost ~]# mount -a
[root@localhost ~]# df -h
参考文档:https://blog.csdn.net/jiyiyun/article/details/103798730
"一劳永逸" 的话,有是有的,而 "一劳永逸" 的事却极少

 浙公网安备 33010602011771号