TensorFlow2 安装教程
 一文搞懂新版 TensorFlow2 GPU 版本安装教程
建议参考 TensorFlow 官网英文教程进行安装(不要使用中文教程,更新不及时)。
1. 创建 python 虚拟环境
建议使用 Anaconda 或 miniconda 来管理 Python 环境。
(1) 安装 miniconda
在 Windows 上安装
下载安装程序,然后进行安装
Download the .exe installer
在 Linux 上安装
下载和执行安装脚本 miniconda.sh
> mkdir -p ~/miniconda3
> wget https://repo.anaconda.com/miniconda/Miniconda3-latest-Linux-x86_64.sh -O ~/miniconda3/miniconda.sh
> bash ~/miniconda3/miniconda.sh -b -u -p ~/miniconda3
> rm -rf ~/miniconda3/miniconda.sh
初始化安装的 Miniconda
> ~/miniconda3/bin/conda init bash
> ~/miniconda3/bin/conda init zsh
(2) 创建虚拟环境
# 创建名为 tf 的虚拟环境,python 版本为 3.10
> conda create -n tf python=3.10
# 激活和使用名为 tf 的虚拟环境
> conda activate tf
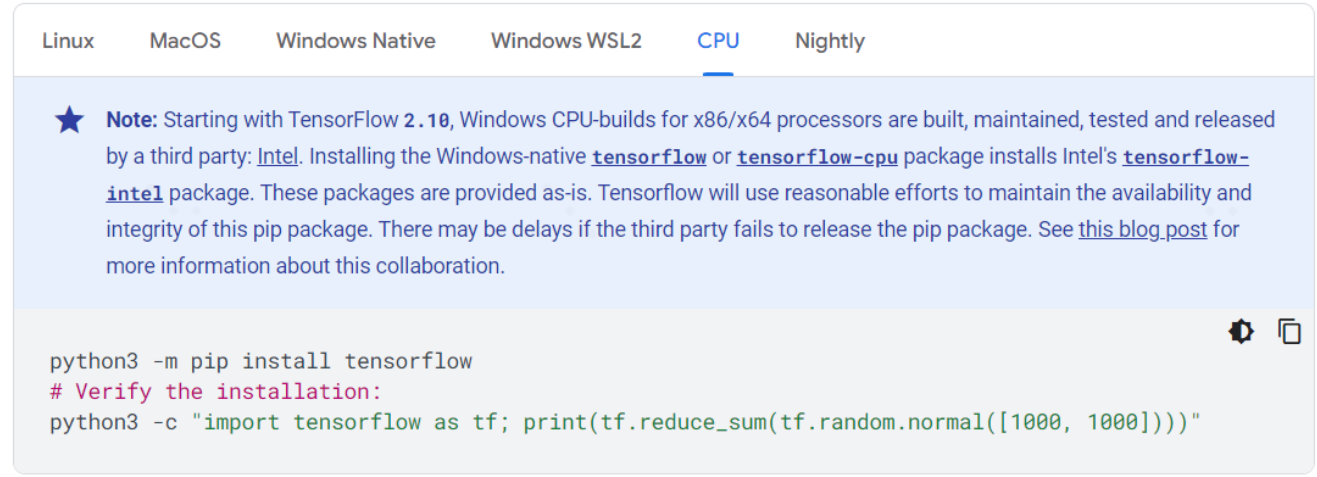
2. 安装仅支持 CPU 的 Tensorflow
3. 安装支持 GPU 的 Tensorflow
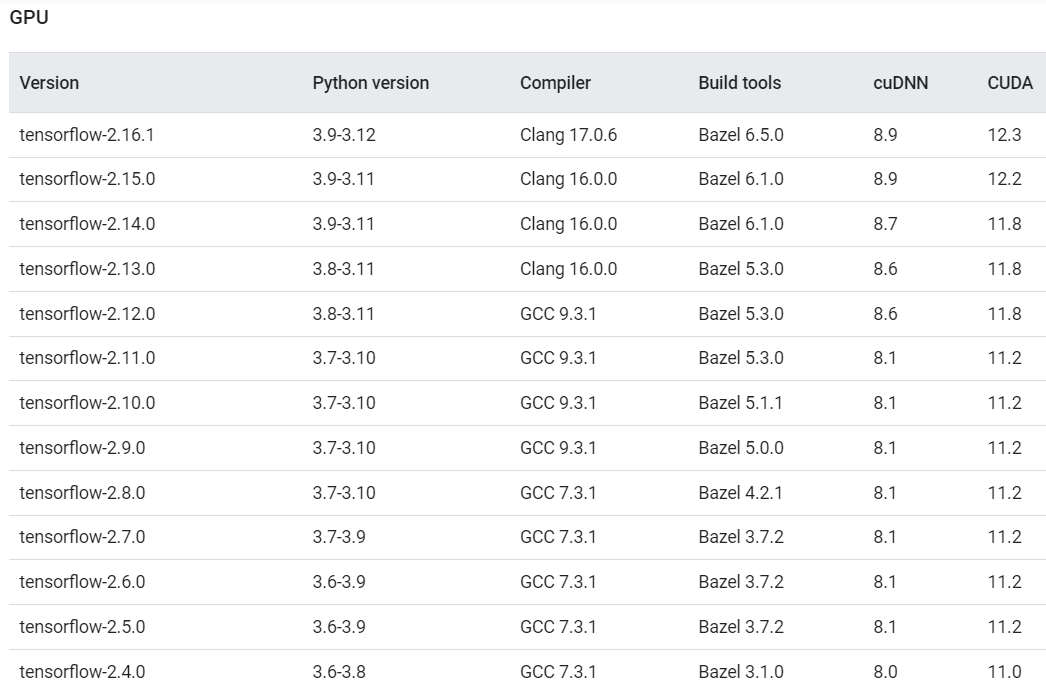
TensorFlow2 与cuDNN 和 CUDA 的版本对应关系
3.1 检查显卡驱动
检查在 windows 中是否安装了 Nvidia 显卡驱动,可以查看任务管理器。
注意:windows 中安装显卡驱动后,会以
libcuda.so库的形式自动映射到 WSL2 中,因此千万不要在 WSL2 中安装任何显卡驱动。
在 WSL2 中运行nvidia-smi命令,如果能正常运行,说明驱动是 OK 的。
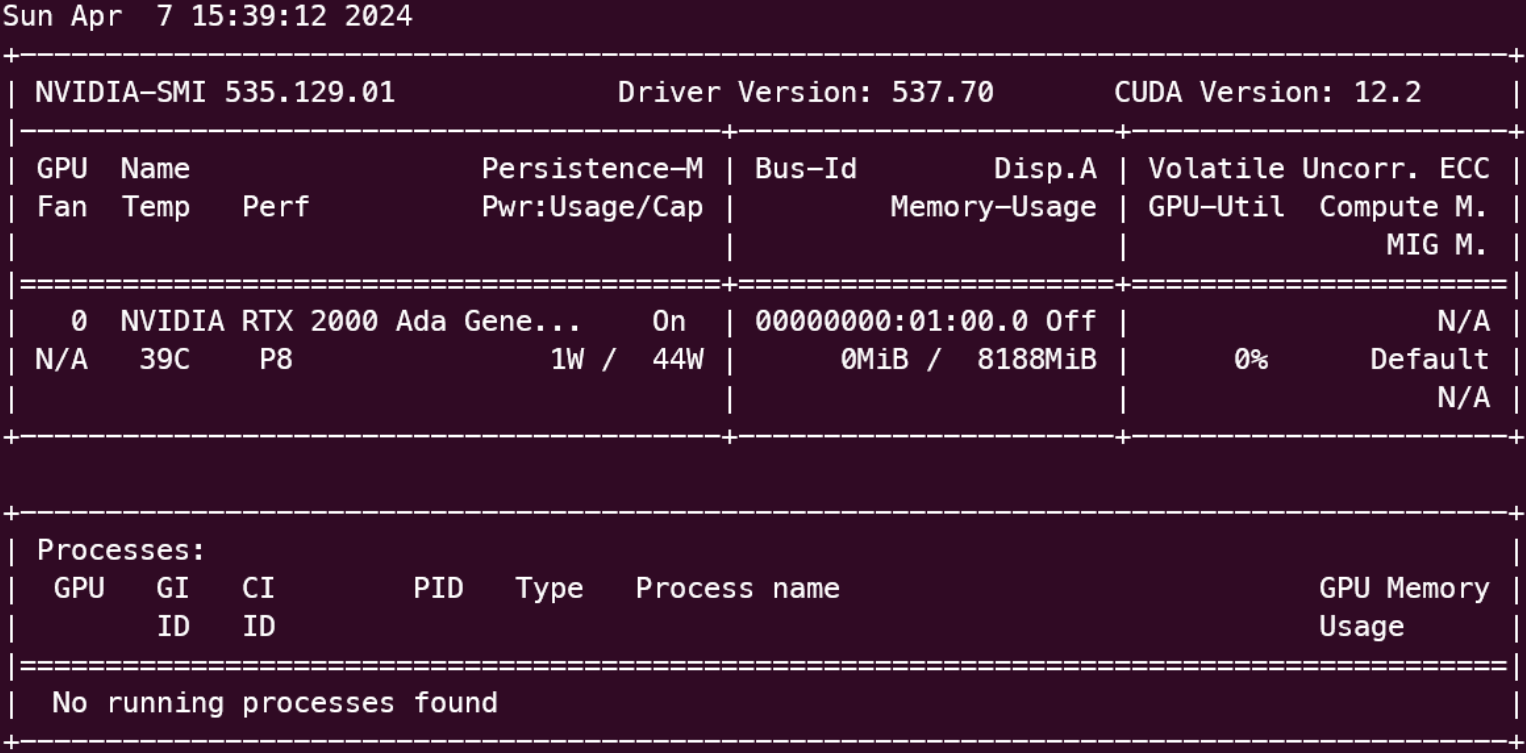
根据 nvidia-smi 命令的结果可知:需要安装 CUDA 12.2,cuDNN 8.9,tensorflow-2.15.0。
navidia-smi 显示的是 CUDA 驱动的版本,我们另外要安装的是 CUDA Runtime 的版本,只要不高于 CUDA 驱动版本就可以了。
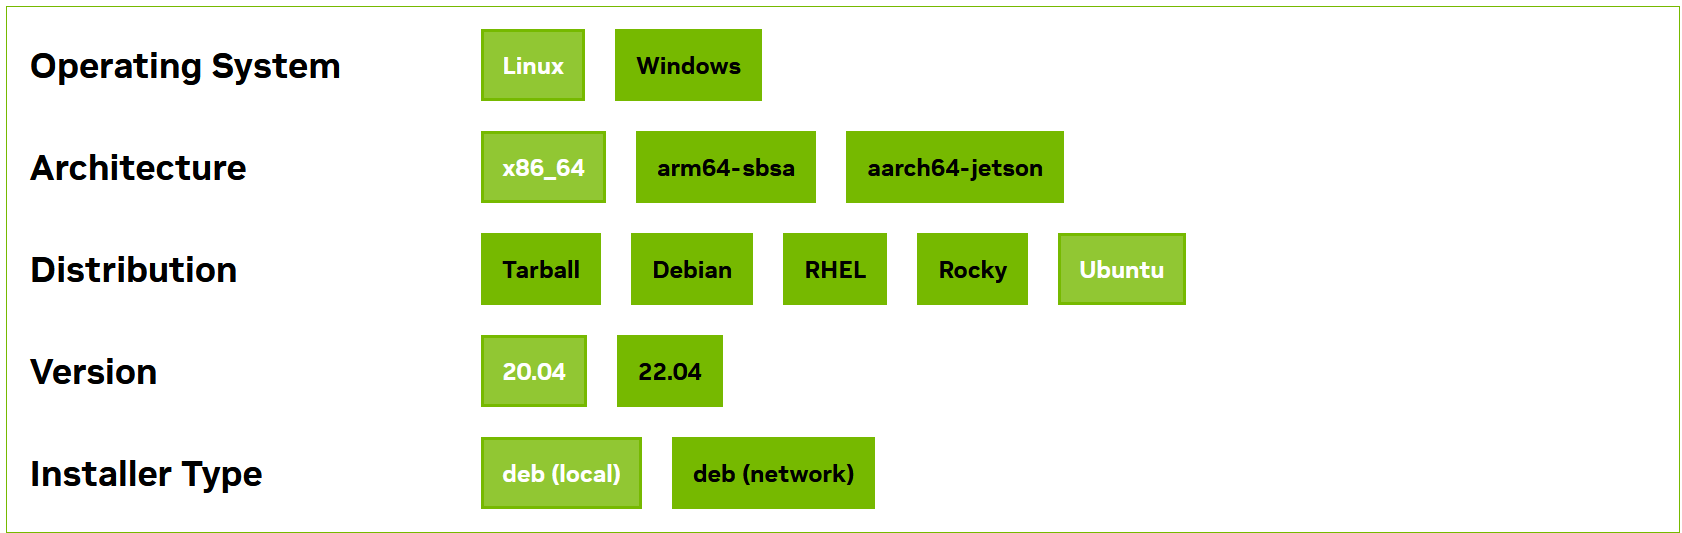
3.2 安装 cuda toolkit
在 NVIDIA 官网上找到对应的版本

本文以安装 cuda toolkit 12.2 版本为例:
https://developer.nvidia.com/cuda-12-2-0-download-archive
按照官网提供的命令进行下载和安装
wget https://developer.download.nvidia.com/compute/cuda/repos/wsl-ubuntu/x86_64/cuda-wsl-ubuntu.pin
sudo mv cuda-wsl-ubuntu.pin /etc/apt/preferences.d/cuda-repository-pin-600
wget https://developer.download.nvidia.com/compute/cuda/12.2.0/local_installers/cuda-repo-wsl-ubuntu-12-2-local_12.2.0-1_amd64.deb
sudo dpkg -i cuda-repo-wsl-ubuntu-12-2-local_12.2.0-1_amd64.deb
sudo cp /var/cuda-repo-wsl-ubuntu-12-2-local/cuda-*-keyring.gpg /usr/share/keyrings/
sudo apt-get update
sudo apt-get -y install cuda
3.3 安装 cuDNN SDK
同样的,在 NVIDIA 官网上找到对应的版本,按照官网提供的命令进行下载和安装
https://developer.nvidia.com/cudnn-downloads
wget https://developer.download.nvidia.com/compute/cuda/repos/wsl-ubuntu/x86_64/cuda-wsl-ubuntu.pin
sudo mv cuda-wsl-ubuntu.pin /etc/apt/preferences.d/cuda-repository-pin-600
wget https://developer.download.nvidia.com/compute/cuda/12.2.0/local_installers/cuda-repo-wsl-ubuntu-12-2-local_12.2.0-1_amd64.deb
sudo dpkg -i cuda-repo-wsl-ubuntu-12-2-local_12.2.0-1_amd64.deb
sudo cp /var/cuda-repo-wsl-ubuntu-12-2-local/cuda-*-keyring.gpg /usr/share/keyrings/
sudo apt-get updatesudo apt-get -y install cuda
3.4 安装 TensorRT(可选)
TensorRT 是可选的,根据需要进行安装,此处跳过该步骤。
3.5 安装 TensorFlow2
(1)在 Windows 上安装(版本 <= 2.10)
Tensorflow 2.10 是支持在 windows 上使用 GPU 的最后一个版本。从 Tensorflow 2.11 版本开始,如果需要使用 GPU,则只能在 WSL2 或 Linux 上进行安装。
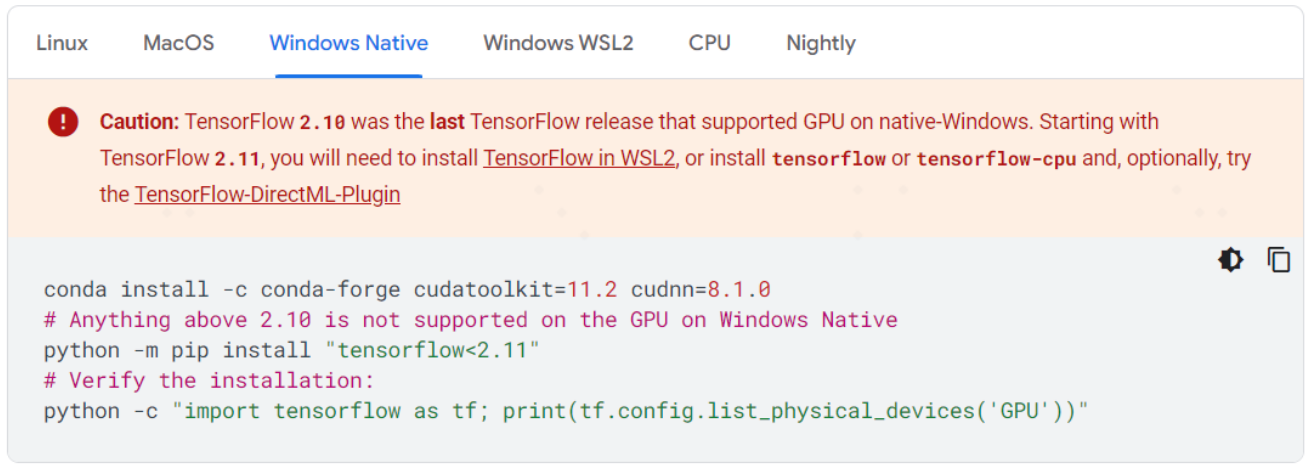
通过-i选项,可以指定使用某个国内镜像源来加快安装速度,例如
pip install tensorflow[and-cuda] -i https://pypi.tuna.tsinghua.edu.cn/simple
(2)在 WSL2 或 Linux 上安装
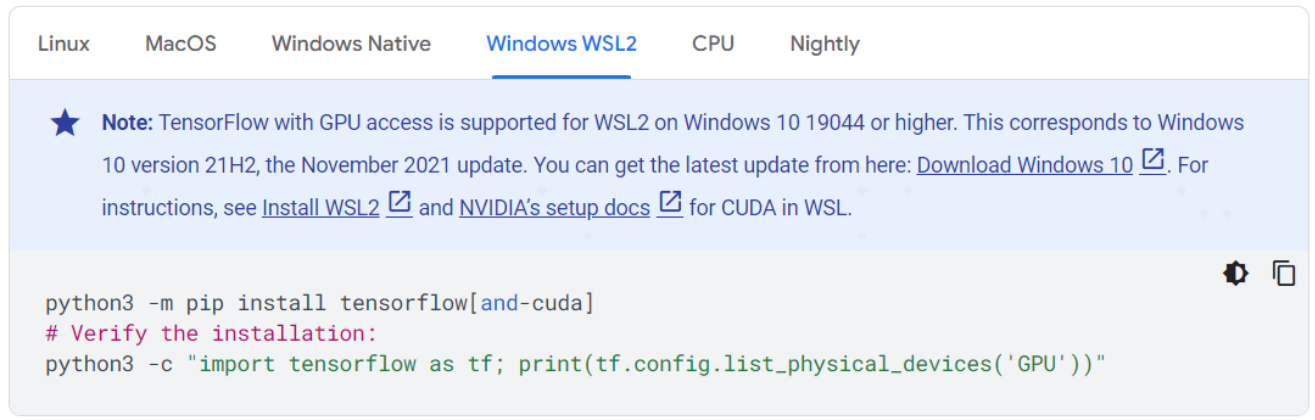
TensorFlow 2.11 及其以上的版本,安装过程非常简单,只需要一行命令,就会自动安装 tensorflow 及其对应版本的相关依赖库。
> pip install tensorflow[and-cuda]
# Verify the installation:
> python3 -c "import tensorflow as tf; print(tf.config.list_physical_devices('GPU'))"
注意:TensorFlow 2.15.0 版本有个bug,官方出了个修复版本
因此需要这样安装:
pip3 install tensorflow[and-cuda]==2.15.0.post1
运行时的警告信息
在 WSL2 上运行 Tensorflow 时,可能会输出下面这样的警告信息,这些信息并不是错误,不影响程序的运行。
>>> import tensorflow as tf
2024-06-02 15:23:57.566143: I tensorflow/core/util/port.cc:113] oneDNN custom operations are on. You may see slightly different numerical results due to floating-point round-off errors from different computation orders. To turn them off, set the environment variable `TF_ENABLE_ONEDNN_OPTS=0`.
2024-06-02 15:23:57.849075: E external/local_xla/xla/stream_executor/cuda/cuda_dnn.cc:9261] Unable to register cuDNN factory: Attempting to register factory for plugin cuDNN when one has already been registered
2024-06-02 15:23:57.849139: E external/local_xla/xla/stream_executor/cuda/cuda_fft.cc:607] Unable to register cuFFT factory: Attempting to register factory for plugin cuFFT when one has already been registered
2024-06-02 15:23:57.893921: E external/local_xla/xla/stream_executor/cuda/cuda_blas.cc:1515] Unable to register cuBLAS factory: Attempting to register factory for plugin cuBLAS when one has already been registered
2024-06-02 15:23:57.991138: I tensorflow/core/platform/cpu_feature_guard.cc:182] This TensorFlow binary is optimized to use available CPU instructions in performance-critical operations.
To enable the following instructions: AVX2 AVX512F AVX512_VNNI FMA, in other operations, rebuild TensorFlow with the appropriate compiler flags.
2024-06-02 15:23:58.875679: W tensorflow/compiler/tf2tensorrt/utils/py_utils.cc:38] TF-TRT Warning: Could not find TensorRT

>>> print(tf.config.list_physical_devices('GPU'))
2024-06-02 15:24:50.232401: I external/local_xla/xla/stream_executor/cuda/cuda_executor.cc:887] could not open file to read NUMA node: /sys/bus/pci/devices/0000:01:00.0/numa_node
Your kernel may have been built without NUMA support.
2024-06-02 15:24:50.391662: I external/local_xla/xla/stream_executor/cuda/cuda_executor.cc:887] could not open file to read NUMA node: /sys/bus/pci/devices/0000:01:00.0/numa_node
Your kernel may have been built without NUMA support.
2024-06-02 15:24:50.392124: I external/local_xla/xla/stream_executor/cuda/cuda_executor.cc:887] could not open file to read NUMA node: /sys/bus/pci/devices/0000:01:00.0/numa_node
Your kernel may have been built without NUMA support.
[PhysicalDevice(name='/physical_device:GPU:0', device_type='GPU')]
设置 TensorFlow 的 log 级别:
>>> import os
>>> os.environ['TF_CPP_MIN_LOG_LEVEL'] = '3'
# 此时再使用 TensorFlow,就不会输出前面的警告信息
>>> print(tf.config.list_physical_devices('GPU'))
[PhysicalDevice(name='/physical_device:GPU:0', device_type='GPU')]
4. 验证安装是否成功
>>> import tensorflow as tf
>>> tf.__versioin__
2.15.0
>>> tf.config.list_physical_devices('GPU')
[PhysicalDevice(name='/physical_device:GPU:0', device_type='GPU')]
只要能够输出结果 [PhysicalDevice(name='/physical_device:GPU:0', device_type='GPU')],就说明 GPU 版本的 TensorFlow 安装成功了。
5. 其它相关库的安装
(1)tensorflow_hub
注意千万不要这样安装:pip install tensorflow_hub
执行该命令会自动卸载已安装的 tensorflow,并安装最新的 tensorflow,可能导致版本对应不上,而无法正常使用 CUDA。
(2)tensorflow_text
和 tensorflow_hub 一样,千万不要这样安装:pip install tensorflow_text
IMPORTANT: When installing TF Text withpip install, please note the version of TensorFlow you are running, as you should specify the corresponding minor version of TF Text (eg. for tensorflow2.3.x use tensorflow_text2.3.x).
例如,tensorflow 版本是2.15.0,则应该这样安装
pip install tensorflow_text==2.15.*
安装该库时,会自动安装 tf-keras 和 tensorflow-hub
因此,不知道应该安装哪个版本的 tensorflow_hub 时,可以安装 tensorflow_text,从而顺带安装了 tensorflow-hub。
(3)tensorflow_datasets
pip install tensorflow_datasets
pip 安装 package
使用 pip 安装 package 时,会自动缓存已经下载过的 package,后面再次安装 package 时会自动从 cache 中进行安装,而不是重新下载。
- 查看 cache 信息
pip cache info
pip cache dir删除 cache
- 删除所有 cache
pip cache purge
# 删除某个 package 的 cache
pip cache remove <some-package>
如果在安装 package 时不想使用 cache,可以使用下面的命令
pip install --no-cache-dir <package>

 浙公网安备 33010602011771号