
单元测试 & 测试覆盖率——Code Coverage in VSTS with xUnit, Coverlet and ReportGenerator
Code Coverage in VSTS with xUnit, Coverlet and ReportGenerator
Today I was reading a post by Scott Hanselman about Code Coverage in .Net Core projects. Suddenly I started to go down a rabbit hole of posts about tools I never heard of, but that sounded quite interesting, such as Coverlet and ReportGenerator. Then I thought that they could possibly fit into our CI flows.
When I started .NET development I didn't do Unit Testing at all, I admit it. However, thanks to good folks such as Luis Fraile and Unai Zorrilla Castro I soon realized that they were so important that I could not live without them. So, I adopted Microsoft’s MsTest and started to write lots of [TestClass]es and [TestMethod]s. Then at some point I heard about xUnit and nothing was the same again. I forgot about [TestClass] attributes and started to write [Fact]s and [Theory]es.
I have been using them for a long time, but the problem I found when changing from MsTest to xUnit was that the information shown in Visual Studio Team Services’ build results was very poor, to be polite. And there was no code coverage data at all. That was bad indeed, but I am lazy and I have postponed the task of improving this until today.
Coverlet
The first thing I did was to partially implement the changes suggested by Scott Hanselman to include code coverage in my project. Coverlet is a package that can be included into your projects and generates code coverage info during build. The project states that it is literally a “cross-platform code coverage library for .NET Core, with support for line, branch and method coverage”.
To include Coverlet build targets in your project you must add the following line to your test project’s csproj file:
<PackageReference Include="coverlet.msbuild" Version="2.0.1" />
You can find out how the magic is done by reading its Github home page, but basically you can generate a code coverage file in several common formats by invoking dotnet test with the CollectCoverage parameter.
dotnet test /p:CollectCoverage=true
This, by default, generates a code coverage file in JSON format. If you want to experiment with Visual Studio Code extension Coverage Gutters, as suggested by Hanselman, you can use a task such as this in your .vscode/tasks.json file:
This, by default, generates a code coverage file in JSON format. If you want to experiment with Visual Studio Code extension Coverage Gutters, as suggested by Hanselman, you can use a task such as this in your .vscode/tasks.json file:
{
 "label": "test with coverage",
 "command": "dotnet",
 "type": "process",
 "args": [
  "test",
  "/p:CollectCoverage=true",
  "/p:CoverletOutputFormat=lcov",
  "/p:CoverletOutput=./lcov",
  "${workspaceFolder}/test/WebUserManager.Test/WebUserManagerTests.csproj"
 ],
 "problemMatcher": "$msCompile",
 "group": {
  "kind": "test",
  "isDefault": true
 }
}
The lcov.info file can be parsed by Coverage Gutters extension and show which lines are covered by your tests. This can be very convenient in local development, but for CI in VSTS we’ll need to use a different file format that can be understood by our report generation tool. The format is the one used by Cobertura, a code coverage utility for Java, and it can be generated by invoking dotnet test with these parameters:
dotnet test
  /p:CollectCoverage=true
  /p:CoverletOutputFormat=cobertura
This generates a file called coverage.cobertura.xml. This alone can be used to publish code coverage data to VSTS build results. However, we’ll go a step further and generate a full report that can be viewed and browsed with source code linking.
ReportGenerator
The tool we will need is called ReportGenerator, and its main usage is to generate beautiful reports in several formats from code coverage files in other formats. In our case we are going to generate an HTML file from our coverage.cobertura.xml file.
ReportGenerator is an executable that can be downloaded and run easily. But since we don’t want to depend on tools installed into our agents, we will make the build download and install the tool upon request. To do so, we will add it as a dotnet CLI tool into our project. Just add the following lines into your test project’s .csproj file:
<ItemGroup>
  <DotNetCliToolReference Include="dotnet-reportgenerator-cli" Version="4.0.0-alpha12" />
</ItemGroup>
NOTE: this is an alpha version of the tool, so be prepared to face potential issues and changes without notification. If you need something more stable, you can download and install the ReportGenerator.exe in a folder of your build agents and set your PATH accordingly.
Now your tester .csproj file should look something like this:
<Project Sdk="Microsoft.NET.Sdk.Web">  <PropertyGroup>
    <TargetFramework>netcoreapp2.1</TargetFramework>
    <IsPackable>False</IsPackable>
  </PropertyGroup>  <ItemGroup>
    <ProjectReference Include="..\..\src\App\Acme.App.csproj" />
    <ProjectReference Include="..\..\src\Domain\Acme.Domain.csproj" />
    <ProjectReference Include="..\..\src\Infrastructure\Acme.Infrastructure.csproj" />
  </ItemGroup>  <ItemGroup>
    <PackageReference Include="Microsoft.NET.Test.Sdk" Version="15.7.2" />
    <PackageReference Include="xunit" Version="2.3.1" />
    <PackageReference Include="xunit.runner.visualstudio" Version="2.3.1" />
    <PackageReference Include="Moq" Version="4.8.2" />
    <PackageReference Include="coverlet.msbuild" Version="2.0.1" />
  </ItemGroup>  <ItemGroup>
    <DotNetCliToolReference Include="dotnet-reportgenerator-cli" Version="4.0.0-alpha12" />
  </ItemGroup>  <ItemGroup Condition=" '$(TargetFramework)' == 'netcoreapp2.1' ">
    <PackageReference Include="Microsoft.CodeCoverage" Version="1.0.3" />
  </ItemGroup></Project>
Set up build definition
Now that we have the project correctly configured, it’s time to set up our build definition. Keep in mind that the following steps won’t work if you haven’t modified your project with the NuGet packages defined before.
Below you can see an example build definition. We are interested in the three highlighted tasks.

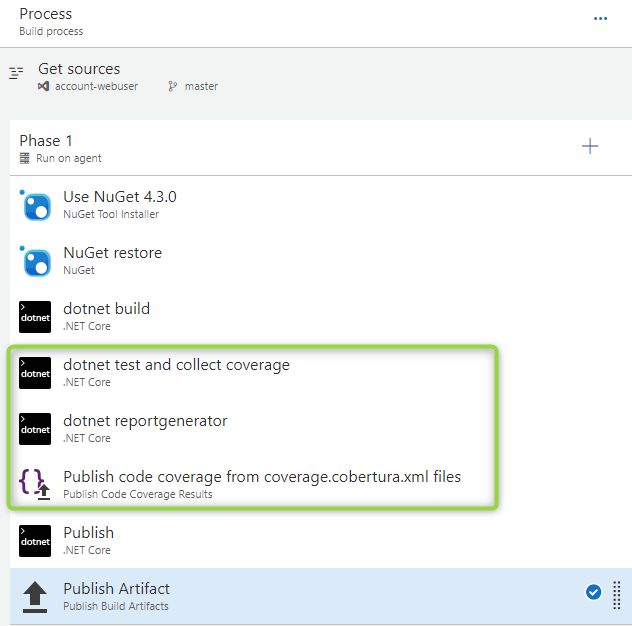
The first task runs the tests using the xUnit test runner and generates the code coverage file. The second task takes the generated file and builds a detailed report linked to source code. The third task publishes the two previous results so that they can be shown in the build results panel. Let’s see each one in detail.
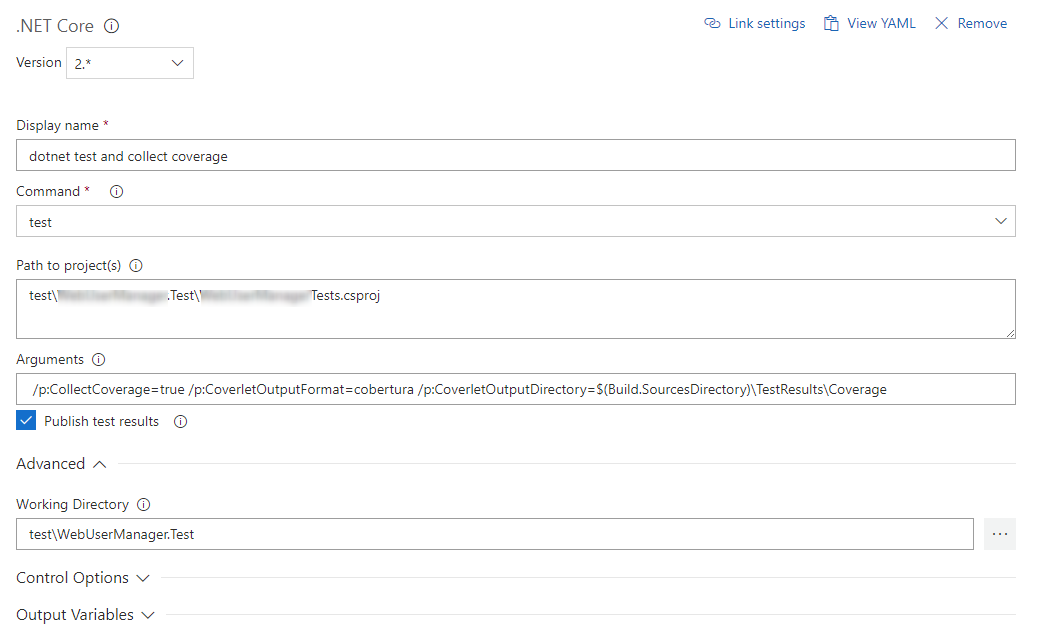
Test and collect coverage
This is a .NET Core task with these options:
- Command: test
- Path to project(s): select just one test project. It should be possible to choose more than one with globs but I haven’t tried.
- Arguments:
/p:CollectCoverage=true
/p:CoverletOutputFormat=cobertura
/p:CoverletOutput=$(Build.SourcesDirectory)\TestResults\Coverage\
Notice how we are setting the output format to cobertura and the folder where the output will be left to a subfolder named TestResults\Coverage.

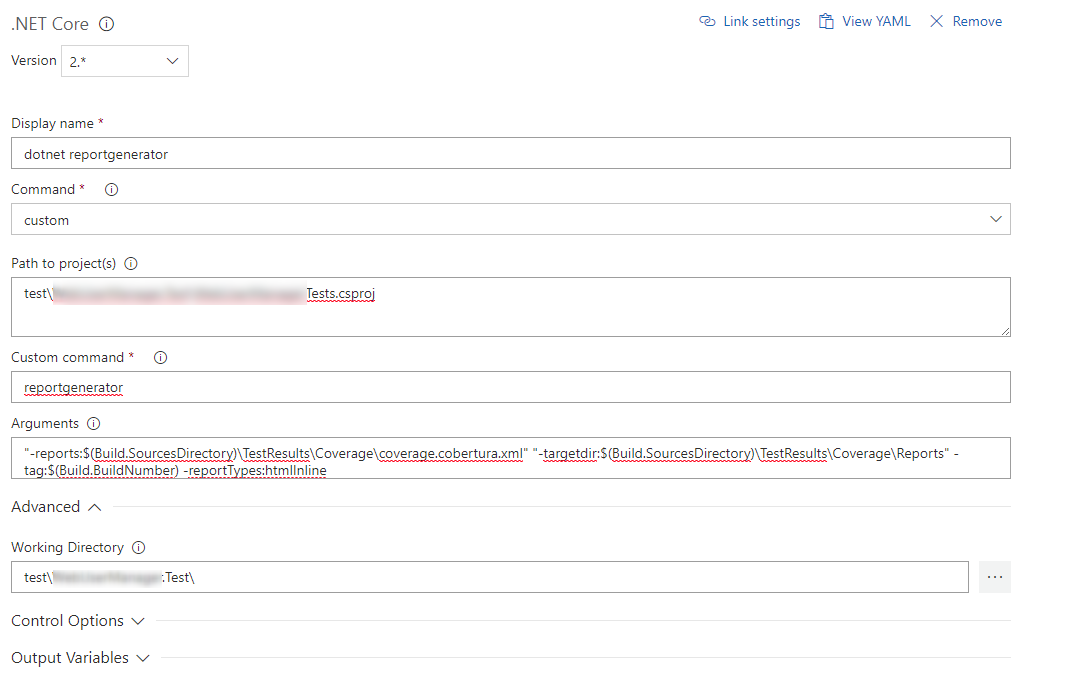
Report generator
The second task is also a .NET Core task with these options:
- Command: custom
- Path to project(s): same as the first task
- Custom command: reportgenerator
- Working Directory: set to the folder of the test project
- Arguments:
"-reports:$(Build.SourcesDirectory)\TestResults\Coverage\coverage.cobertura.xml" "-targetdir:$(Build.SourcesDirectory)\TestResults\Coverage\Reports" -tag:$(Build.BuildNumber) -reportTypes:htmlInline
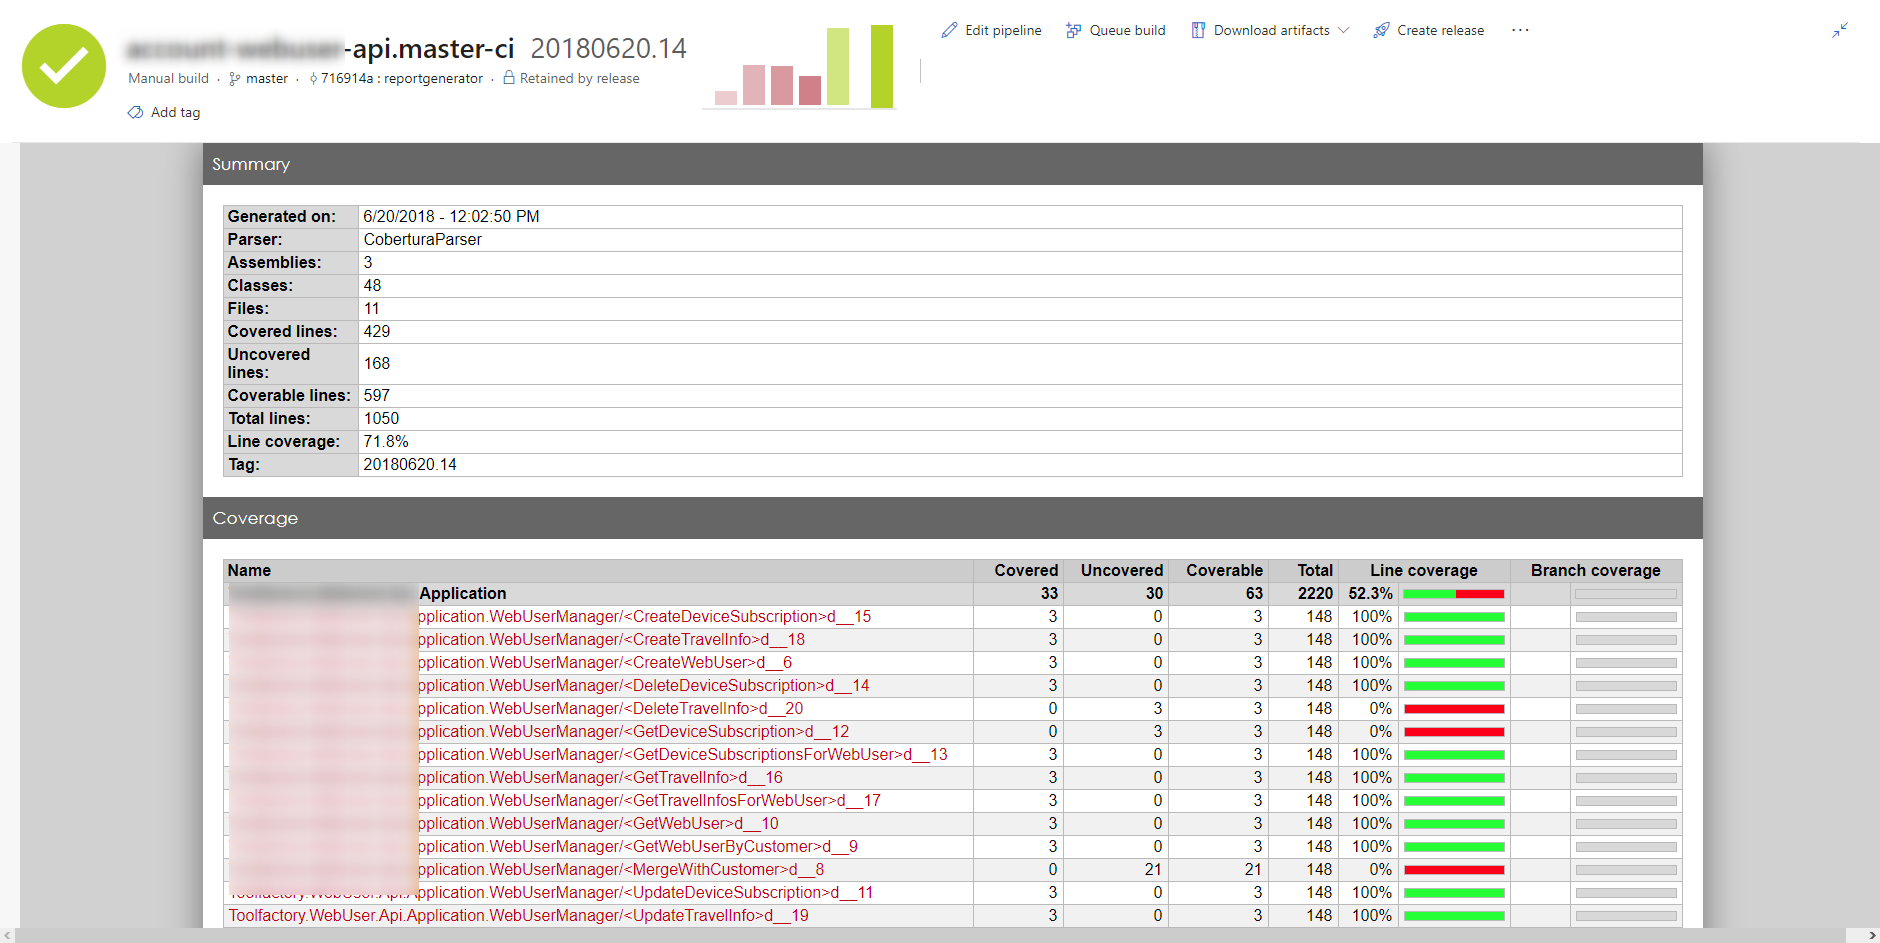
Here we are invoking the .Net Core CLI tool ReportGenerator.exe, as explained before, setting the input file to coverage.cobertura.xml, the output format to HTML inline (no external js nor image files) and the output folder to TestResults\Coverage\Reports.
NOTE: mind the quotes around some of the parameters, especially the ones containing paths.

At this point we have generated the coverage file and the report at these locations:
- $(Build.SourcesDirectory)\TestResults\Coverage\coverage.cobertura.xml
- $(Build.SourcesDirectory)\TestResults\Coverage\Report\*.htm
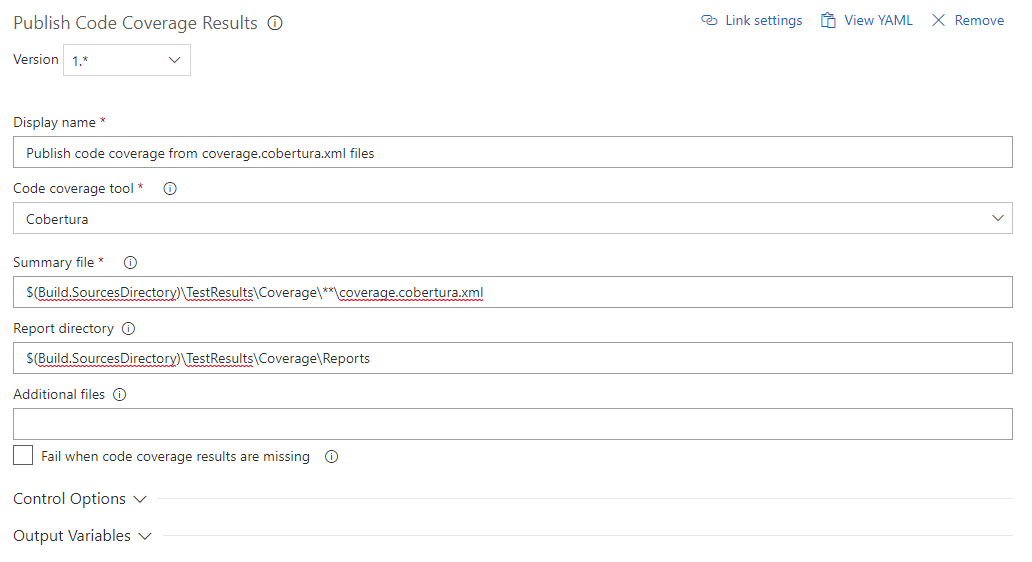
Publish coverage data
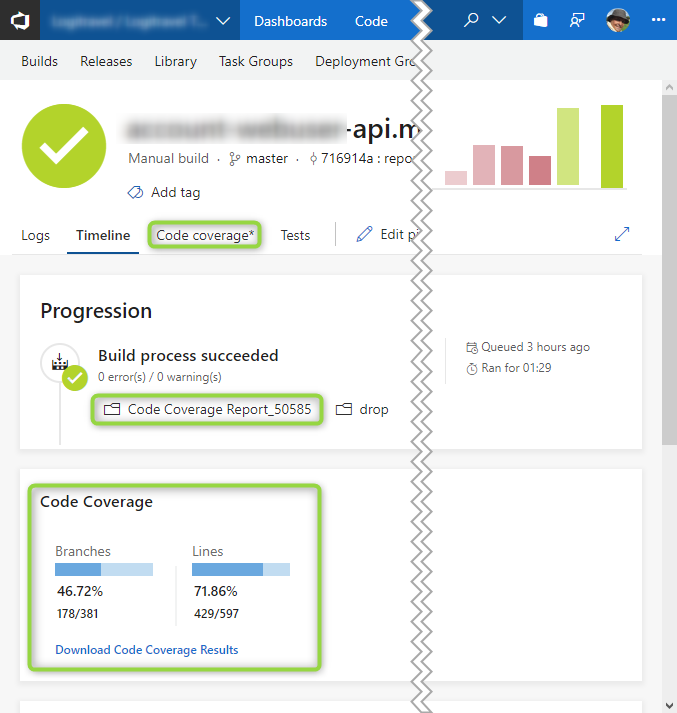
The last task just publishes the generated data. Add a “Publish Code Coverage Results” task with these values:
- Code coverage tool: Cobertura
- Summary file: $(Build.SourcesDirectory)\TestResults\Coverage\**\coverage.cobertura.xml
- Report directory: $(Build.SourcesDirectory)\TestResults\Coverage\Reports

And that’s it. The final results will be like the following:


More information:
- https://www.hanselman.com/blog/AutomaticUnitTestingInNETCorePlusCodeCoverageInVisualStudioCode.aspx
- https://github.com/tonerdo/coverlet
- https://danielpalme.github.io/ReportGenerator/
- https://github.com/danielpalme/ReportGenerator/wiki/Integration
- https://www.nuget.org/packages/dotnet-reportgenerator-cli/
- https://dotnetthoughts.net/code-coverage-in-netcore-with-coverlet/
- https://docs.microsoft.com/en-us/dotnet/core/tools/extensibility#per-project-based-extensibility
- https://marketplace.visualstudio.com/items?itemName=ryanluker.vscode-coverage-gutters

 浙公网安备 33010602011771号