
Newifi OpenWrt 下 EAP-PEAP,EAP-TLS 企业级无线认证及 FreeRadius3
Newifi OpenWrt 下 EAP-PEAP,EAP-TLS 企业级无线认证及 FreeRadius3
转载注明来源: 本文链接 来自osnosn的博客,写于 2019-07-15.
副标题:家用路由器,配置EAP-PEAP,EAP-TLS企业认证的无线接入服务。
前言
家里的WiFi一般是用WPA2认证,密码只有一个,泄漏了,家里所有设备都要换密码。
再加上现在密码共享软件的流行,如“wifi万能钥匙”,WPA2的密码也不安全了。
本文介绍如何搭建一个EAP的企业认证WiFi。支持N个账号(N>=1),可以做到一人一个账号。
一个账号泄漏,改掉这个账号的密码,或者删除这个账号就行。
如果你不嫌麻烦,还可以发放一人一个证书认证上网。证书本身有过期时间的,还能吊销。
过期证书或被吊销证书,是不能登陆WiFi的。
其他搭建方法
- 如果你有一台Linux机器,可以看我的另一篇:
CentOS7用hostapd做radius服务器为WiFi提供802.1X企业认证 - 如果你会使用openwrt的SDK编译ipk,可以重新编译hostapd-full软件包。
重编译指引, 配置,也看这篇:
CentOS7用hostapd做radius服务器为WiFi提供802.1X企业认证- 编译好的 wpad-openssl_mipsel_24kc.ipk , wpad-openssl_x86_64.ipk 可以在这里找到现成的【github.备份的文件】。
- 如果你的用openwrt, op23.05, op24.10, op25.12, 或更晚的版本。
用openwrt自带的hostapd-radius, 无需自己编译。只需要配置, 激活服务 即可。
设备条件
本文用的是Newifi-mini (Y1)
我使用的版本为: OpenWrt-18.06.4
我的刷机固件为 http://downloads.openwrt.org/releases/18.06.4/targets/ramips/mt7620/openwrt-18.06.4-ramips-mt7620-y1-squashfs-sysupgrade.bin
我的另一台Newifi D2, 也成功装上freeradius3,配好了wifi的企业认证。
固件用 http://downloads.openwrt.org/releases/18.06.4/targets/ramips/mt7621/openwrt-18.06.4-ramips-mt7621-d-team_newifi-d2-squashfs-sysupgrade.bin只要是基于OpenWRT,能用opkg安装额外包,剩余空间>3MB,应该都可以把freeradius3装好,并配置好。
安装配置
安装 freeradius3 软件包
以下的操作都是ssh到路由器上,在终端中安装freeradius3,和修改freeradius3的配置文件。
## ssh到路由器上,执行指令
opkg update (获取最新的软件包列表)
opkg remove wpad-mini (openwrt-19.07: remove wpad-basic)
opkg install wpad  (让openwrt的wifi支持 WPA2-EAP,WPA2 802.1x认证)
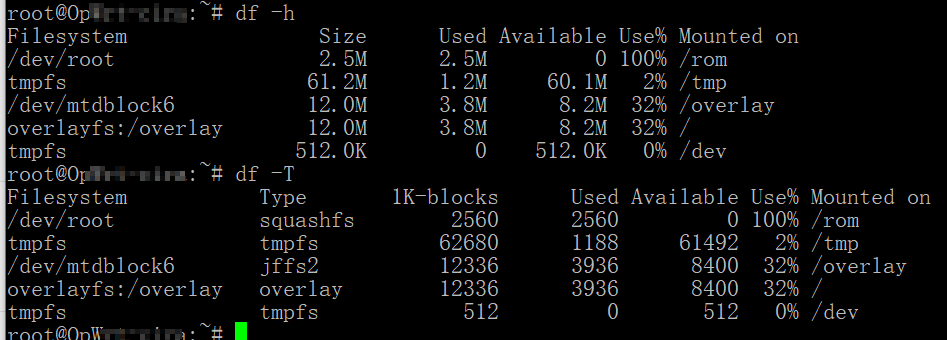
路由器空间使用情况: overlay used:10%,free 10.9M
## ssh到路由器上,执行指令,安装freeradius3的支持包
opkg install freeradius3 freeradius3-mod-eap-peap freeradius3-mod-always freeradius3-mod-realm freeradius3-mod-expr freeradius3-mod-files freeradius3-mod-eap-mschapv2
路由器空间使用情况: overlay used:27%,free:8.8M
包的说明:
freeradius3-mod-eap-peap (peap认证)
freeradius3-mod-always (reject)
freeradius3-mod-realm (suffix)
freeradius3-mod-expr (表达式计算)
freeradius3-mod-files (文件认证,账号存放)
freeradius3-mod-eap-mschapv2 (peap需要使用)
修改 /etc/freeradius3/mods-config/files/authorize
添加一行或多行(用户和密码),格式如下:
bob Cleartext-Password := "hello"
密码最好8个以上字符,因为密码太短,旧的安卓拒绝连接。比如安卓5。
修改 /etc/freeradius3/mods-enabled/eap
- default_eap_type = md5
+ default_eap_type = peap
注释掉有关 md5 {..}  leap {..} gtc {...} tls {..} ttls{...} 的行 。
- dh_file = ${certdir}/dh
+ #dh_file = ${certdir}/dh

- check_crl = yes
+ #check_crl = yes
创建测试证书
正式使用可以参考这篇文章:"用openssl为EAP-TLS生成证书(CA证书,服务器证书,用户证书)",创建漂亮的证书。
也可以用 certtool 工具创建证书,装opkg install certtool, 参考【用certtool生成证书】【重新生成ocserv 的证书】
## ssh 终端中, 执行, 安装openssl命令行工具
opkg install openssl-util
路由器空间使用情况: overlay used:29%,free:8.6M
## ssh 终端中, 执行,如果没有对应目录,则自己创建目录。
cd /etc/freeradius3/certs/

## 创建CA证书
openssl ecparam -name prime256v1 -out ec_param
openssl req -nodes -newkey ec:ec_param -days 3650 -x509 -sha256 -keyout ecca.key -out ecca.crt

## 创建server证书
## server证书一定要用RSA,否则连接radius是总是握手失败,导致认证失败。
## 猜测: server证书如用ECC,可能要启用dh_file配置。没测试,不知道是否成功。
openssl req -nodes -newkey rsa:1024 -days 3650 -sha256 -keyout serverec.key -out serverec.csr
## commonName: 不能留空
## 查看 csr 内容: openssl req -text -noout -in serverec.csr

mkdir ./demoCA/
mkdir ./demoCA/newcerts
touch ./demoCA/index.txt
echo 01 > ./demoCA/serial
cat > dns.conf <<EOF
[ v3_dns ]
subjectAltName = DNS.1:wifi,DNS.2:home
EOF
openssl ca -extensions v3_ca -days 3650 -out serverec.crt -in serverec.csr -cert ecca.crt -keyfile ecca.key -policy policy_anything -extensions v3_dns -extfile dns.conf
## 查看证书:openssl x509 -in serverec.crt -noout -text

## create crl.pem
echo 01 > ./demoCA/crlnumber
openssl ca -gencrl -keyfile ecca.key -cert ecca.crt -out crl.pem -config /etc/ssl/openssl.cnf

cat serverec.key serverec.crt > server.pem
cat ecca.crt crl.pem > ca.pem
## 如果仅配置EAP-PEAP,则不需要 "crl.pem",也不需要 "check_crl = yes" 。仅需 "cat ecca.crt > ca.pem" 即可。

# 格式转换
openssl pkcs12 -export -out ca_wifi_cert.p12 -in ecca.crt -nokeys -caname "ca_my_wifi"   #为p12设置一个密码
openssl x509 -outform der -in ecca.crt -out ca_wifi_cert.cer
# 如果客户端需要导入CA证书,可以导入 ca_wifi_cert.cer, ca_wifi_cert.p12, ecca.crt 任意一个。
# Domain 域名: wifi 或 home
调试修改
执行radiusd -X 根据出错的最后三行(红字)显示的文件名和行号,注释掉。

根据radiusd -X 的出错信息,最终在以下两个文件中,注释掉许多行,以下给出我最终注释掉的东西。
修改 /etc/freeradius3/sites-enabled/default
注释掉以下行
(在 authenticate{..} )
Auth-Type PAP {
    pap
}
Auth-Type CHAP {
    chap
}
 digest

(在 authorize{..} )
preprocess
chap
digest
expiration
logintime
pap

(在 preacct {...} )
preprocess

(在 accounting {...} )
detail
unix
exec
attr_filter.accounting_response

(在 post-auth {...} )
exec

(在 post-auth {Post-Auth-Type REJECT{...}..} )
attr_filter.access_reject
修改 /etc/freeradius3/sites-enabled/inner-tunnel
注释掉以下行
(在 authenticate{..} )
Auth-Type PAP {
    pap
}
Auth-Type CHAP {
    chap
}

(在 authorize{..} )
chap
expiration
logintime
pap

(在 session{..} )
radutmp

(在 post-auth {Post-Auth-Type REJECT{...}..} )
attr_filter.access_reject
路由器空间使用情况: overlay used:29%,free:8.5M
修改 /etc/freeradius3/clients.conf
修改 client localhost {...} 中,secret = testing123, 或者添加一个网段。
client localnet {
    ipaddr = 192.168.0.0/16
    secret = testing123  (radius认证密钥)
}
测试peap-mschapv2认证
参考:freeradius测试
## ssh终端中,执行,安装命令行测试工具
opkg install eapol-test
路由器空间使用情况: overlay used:32%,free:8.2M
写文件 test-peap
network={
        ssid="example"
        key_mgmt=WPA-EAP
        eap=PEAP
        identity="bob"
        anonymous_identity="anonymous"
        password="hello"
        phase2="autheap=MSCHAPV2"
   # 打开下面这行,在openwrt中测试不能通过。但在centos中测试就OK。
   # 怀疑openwrt中的eapol_test是个简版。也许安装eapol-test-openssl可以,我没试。
   #   ca_cert="/etc/freeradius3/certs/ca.pem"
}
## ssh终端(openwrt)中,执行
eapol_test -c test-peap -s testing123
## 或
eapol_test -c test-peap -a127.0.0.1 -s testing123
其中 testing123 为 /etc/freeradius3/clients.conf 中的radius认证密钥。
看到最后一行为 SUCCESS 就测试成功。
退出ssh终端。freeradius3安装,配置完成。
配置WIFI,启动radiusd服务
在 openwrt 的 luci web 管理页面,激活并启动 radiusd 服务。

见到绿色的 "Enabled" 就是已经启动了。
或者在 "/etc/rc.d" 目录中见到 "S50radiusd" 的连接文件,就是已经启动了。

配置2.4G和5G的WiFi,在 "无线安全" 设置中,
"加密" = "WPA2-EAP","算法" = "AES"。
设置 "Radius认证服务器" = "127.0.0.1","Radius认证端口" = "1812",
"Radius认证密钥" = "testing123"。

提供给"手机","电脑",等支持企业认证的设备连接使用。
/etc/freeradius3/mods-config/files/authorize文件中的账号多设置几个。
家里人用一个,或者用证书登陆。其他人,用另外的账号,万一泄露,修改密码不影响家人设备联网。
另外在2.4G WiFi中增加一个SSID,"加密" = "WPA2-PSK","算法" = "AES",并设置 "密钥"。
家里总有几个非智能设备不支持企业认证。这些设备一般只支持2.4G,不支持5G。
比如"远程遥控插座","扫地机器人",……
有大神说碰到如下情况,我没碰到。但也写在这留作参考。
我没修改这行,测试就通过了。
如果失败原因是 “The users session was previously rejected” ,
而且往上翻日志翻来覆去就是找不出原因,请尝试:
在 /etc/freeradius3/sites-available/inner-tunnel 中,MS-CHAP改为MSCHAP,第 220 行附近,有一段配置项:- Auth-Type MS-CHAP { mschap } + Auth-Type MSCHAP { mschap }
安装配置完成,支持PEAP
配置 EAP-TLS 支持
因为在openwrt中用eapol_test使用证书测试,无法通过。也许安装eapol-test-openssl可以,我没试。
我换用CentOS中的eapol_test 来测试。
安装软件包
## ssh终端中,执行
opkg update
opkg install freeradius3-mod-eap-tls
修改 /etc/freeradius3/mods-enabled/eap
# 对之前注释掉的 tls {...} 打开注释。
- #tls {
- #   tls = tls-common
- #}
+ tls {
+     tls = tls-common
+ }

- #check_crl = yes
+ check_crl = yes
停止服务
/etc/init.d/radiusd stop
测试
radiusd -X
没有错误就按 CTRL-C 终止
启动服务 /etc/init.d/radiusd start
退出ssh终端,配置完成。
制作用户测试证书
正式使用可以参考这篇文章:"用openssl为EAP-TLS生成证书(CA证书,服务器证书,用户证书)",创建漂亮的证书。
也可以用 certtool 工具创建证书,装opkg install certtool,参考【用certtool生成证书】【重新生成ocserv 的证书】
## ssh登陆路由器, 执行
cd /etc/freeradius3/certs/

#创建用户证书
openssl req -nodes -newkey ec:ec_param -days 3650 -sha256 -keyout userec.key -out userec.csr
## commonName: 不能留空
openssl ca -extensions v3_ca -days 3650 -out userec.crt -in userec.csr -cert ecca.crt -keyfile ecca.key

# 把 CA,用户证书,打包为 p12文件,用于证书导入
openssl pkcs12 -export -out user01_cert.p12 -inkey userec.key -in userec.crt -certfile ecca.crt -caname "ca_my_wifi" -name "user01"
## 为 p12 文件设置一个密码。
## user01_cert.p12 拷贝出来,在wifi客户端中导入证书。
# Domain 域名: wifi 或 home
路由器空间使用情况: overlay used:32%,free:8.2M
正式使用还要生成crl.pem,
cat ecca.crt crl.pem > ca.pem
并打开 /etc/freeradius3/mods-enabled/eap 文件中 check_crl = yes 的注释
- #check_crl = yes
+ check_crl = yes
最终使用时,发现win10使用 EAP-TLS 证书认证会失败。
发现 radiusd 的错误信息显示,用户名中包含空格而拒绝认证。
发现 win10 强制使用用户证书的 "CN=" 的内容作为用户名。
两个办法解决:
- 制作用户证书时,
CN值中不要包含空格。- 或安装
freeradius3-mod-attr-filter包,在验证前过滤掉用户名中的空格。
eapol_test 测试
参考:freeradius测试
在CentOS中,
写文件 test-tls
network={
    eap=TLS
    eapol_flags=0
    key_mgmt=IEEE8021X
    identity="test"
    password="test123"

    ca_cert="/etc/freeradius3/certs/ca.pem"
    client_cert="/etc/freeradius3/certs/userec.crt"
    private_key="/etc/freeradius3/certs/userec.key"
    #private_key_passwd="whatever"
}
在centos中执行 eapol_test -c test-tls -a<radius/路由的IP> -s 'testing123'
去CentOS,Debian 或者 Ubuntu 之类的Linux 中 用 eapol_test 命令测试。一般是OK的。
OpenWRT 中的 eapol_test 是怎么测试都通不过。大概是因为简化的太多了。也许安装eapol-test-openssl可以,我没试。
安装配置完成,支持PEAP,TLS
其他
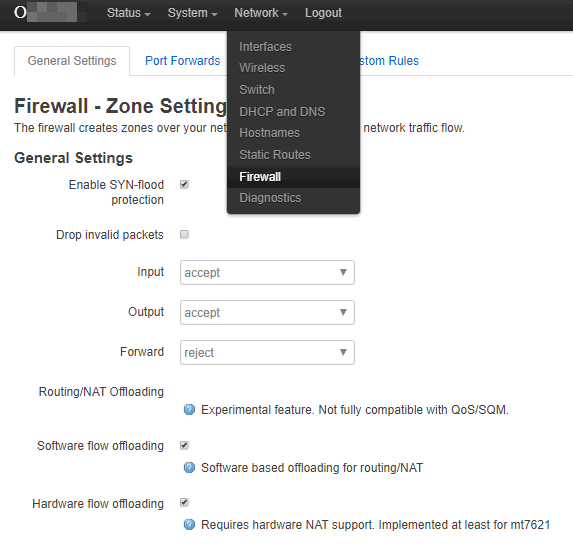
可以启用 mt7621的硬件nat (Newifi D1 或 D2)
newifi mini 用的是mt7620,也有硬件NAT,但不知道openwrt是否支持。 我的D2没开启硬件nat。
登陆路由器的网页。
Network -> Firewall -> General Settings -> Software flow offloading(勾上) -> Hardware flow offloading(勾上) -> Save&Apply(提交)

可以启用 TCP-BBR
您自己选择是否开启BBR,也可以不开启。 我没开启bbr。
opkg install kmod-tcp-bbr
重启后生效。
参考
- freeradius3的web luci配置页面,没搞。"可以参考这里"。
- 另有一篇讲openwrt上freeradius2的EAP-TLS配置,参考价值不高。他把所有radius包都装上了。
- 参考:FreeRadius EAP-TLS configuration
我的最终的配置文件,参考一下。
cat /etc/freeradius3/sites-enabled/default |sed '/^$/d'|sed '/[\t]*#/d'
server default {
listen {
        type = auth
        ipaddr = *
        port = 0
        limit {
              max_connections = 16
              lifetime = 0
              idle_timeout = 30
        }
}
listen {
        ipaddr = *
        port = 0
        type = acct
        limit {
        }
}
listen {
        type = auth
        port = 0
        limit {
              max_connections = 16
              lifetime = 0
              idle_timeout = 30
        }
}
listen {
        ipv6addr = ::
        port = 0
        type = acct
        limit {
        }
}
authorize {
        filter_username
        mschap
        suffix
        eap {
                ok = return
        }
        files
        -sql
        -ldap
}
authenticate {
        Auth-Type MS-CHAP {
                mschap
        }
        eap
}
preacct {
        acct_unique
        suffix
        files
}
accounting {
        -sql
}
session {
}
post-auth {
        update {
                &reply: += &session-state:
        }
        -sql
        remove_reply_message_if_eap
        Post-Auth-Type REJECT {
                -sql
                eap
                remove_reply_message_if_eap
        }
}
pre-proxy {
}
post-proxy {
        eap
}
}
cat /etc/freeradius3/sites-enabled/inner-tunnel |sed '/^$/d'|sed '/[\t]*#/d'
server inner-tunnel {
listen {
       ipaddr = 127.0.0.1
       port = 18120
       type = auth
}
authorize {
        filter_username
        mschap
        suffix
        update control {
                &Proxy-To-Realm := LOCAL
        }
        eap {
                ok = return
        }
        files
        -sql
        -ldap
}
authenticate {
        Auth-Type MS-CHAP {
                mschap
        }
        eap
}
session {
}
post-auth {
        -sql
        Post-Auth-Type REJECT {
                -sql
                update outer.session-state {
                        &Module-Failure-Message := &request:Module-Failure-Message
                }
        }
}
pre-proxy {
}
post-proxy {
        eap
}
cat /etc/freeradius3/mods-enabled/eap |sed '/^$/d'|sed '/[\t]*#/d'
eap {
        default_eap_type = peap
        timer_expire     = 60
        ignore_unknown_eap_types = no
        cisco_accounting_username_bug = no
        max_sessions = ${max_requests}
        tls-config tls-common {
                private_key_password = whatever
                private_key_file = ${certdir}/server.pem
                certificate_file = ${certdir}/server.pem
                ca_file = ${cadir}/ca.pem
                ca_path = ${cadir}
                cipher_list = "DEFAULT"
                ecdh_curve = "prime256v1"
                cache {
                        enable = yes
                        max_entries = 255
                }
                verify {
                }
                ocsp {
                        enable = no
                        override_cert_url = yes
                        url = "http://127.0.0.1/ocsp/"
                }
        }
        tls {
                tls = tls-common
        }
        peap {
                tls = tls-common
                default_eap_type = mschapv2
                copy_request_to_tunnel = no
                use_tunneled_reply = no
                virtual_server = "inner-tunnel"
        }
        mschapv2 {
        }
}
cat /etc/freeradius3/mods-config/files/authorize |sed '/^$/d'|sed '/[\t]*#/d'
bob     Cleartext-Password := "hello"
test    Cleartext-Password := "test123"
DEFAULT Framed-Protocol == PPP
        Framed-Protocol = PPP,
        Framed-Compression = Van-Jacobson-TCP-IP
DEFAULT Hint == "CSLIP"
        Framed-Protocol = SLIP,
        Framed-Compression = Van-Jacobson-TCP-IP
DEFAULT Hint == "SLIP"
        Framed-Protocol = SLIP
cat /etc/freeradius3/clients.conf |sed '/^$/d'|sed '/[\t]*#/d'
client localhost {
        ipaddr = 127.0.0.1
        proto = *
        secret = testing123
        require_message_authenticator = no
        limit {
                max_connections = 16
                lifetime = 0
                idle_timeout = 30
        }
}
client localhost_ipv6 {
        ipv6addr        = ::1
        secret          = testing123
}
client 192.168.1.0/24 {
        ipaddr = 192.168.1.0/24
        secret = testing123
}
相关链接,
转载注明来源: 本文链接 https://www.cnblogs.com/osnosn/p/11186646.html 来自osnosn的博客.

 浙公网安备 33010602011771号