

Improving SharePoint User Experience With JQuery-Client Side Form Validate
The SharePoint forms for the lists (NewForm.aspx and EditForm.aspx) will validate many things. For example, you can make a field be a required field and the forms will make sure the user input something, you also can specify a SharePoint column to be of type "something other than text" (types such "Numbers" and "Dates") SharePoint will enforce validations on those fields as well.
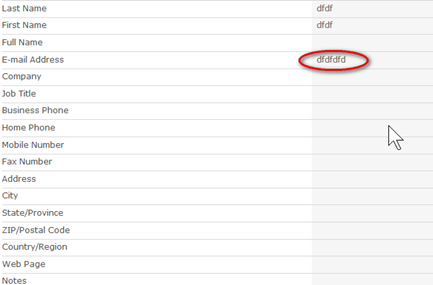
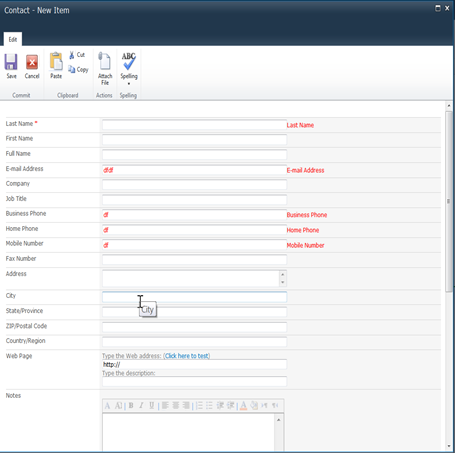
But you can not specify a SharePoint column to be of type " email addresses" or " phone number" .They are treated as text and the values' correctness are not enforced. Here's an example:
You also can not validation field's value in the client-side, which means that when click "Ok", you need to refresh the entire page, before you know whether there are input errors.
This solution enable you validate form on client side and real time.
We need jQuery JavaScript library and jQuery Validation Plugin. Upload the validation plug-in into a "jquery" library in your SharePoint site.
JQuery Validation Plugin is written and maintained by Jörn Zaefferer, a member of the jQuery team, lead developer on the jQuery UI team and maintainer of QUnit. It was started back in the early days of jQuery in 2006, and updated and improved since then.
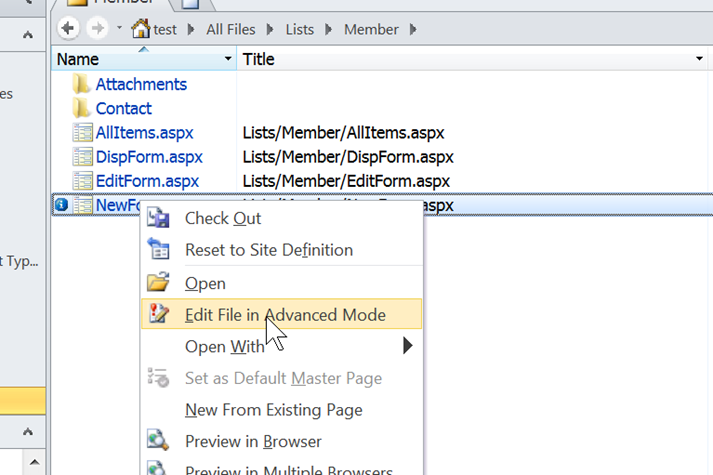
Next,open-up the SharePoint Site and edit the list's NewForm.aspx or EditForm.aspx in SharePoint Designer.In this example, we are editing the Contacts List EditForm.aspx.
- Click "All Files- Lists", and find the contact list.
- Right-click the NewForm.aspx, and choose "Edit File In Advanced Mode".
Add links to the jQuery script and the plugin with following code:

So once you have all the scripts you need on the page we just need to attach the behavior to the form field. To do this we can add some JavaScript to the page in a Content Editor web part.
Now we return to SharePoint. SharePoint launch the list forms in a dialog by default, it is not convenient to edit page. We can close Dialog Mode by modify List Setting-Advanced Setting- Dialogs

Now, open our list, and click "Add new item" ,Open NewForm.aspx
Select the Site Actions -> Edit Page, enter edit mode. Insert an HTML Form Web Part. Open WebPart Properties -> Source Editor. Delete the default HTML content. Write the following JavaScript code:
<script type="text/javascript">
$(document).ready(function () {
var validator = $("form").validate({ errorClass: "ms-formvalidation" });
$("input[title='E-mail Address']").rules("add", { email: true });
$("input[title='Last Name']").rules("add", { required: true });
$("input[title='Business Phone']").rules("add", { phoneUS: true });
$("input[title='Home Phone']").rules("add", { phoneUS: true });
$("input[title='Mobile Phone']").rules("add", { phoneUS: true });
$("input[value='Save']").each(function () {
var js = $(this).attr("onclick");
$(this).attr("onclick", "");//remove sharepoint click handler...
$(this).click(function (event) {
if (!validator.form()) {
return false;
} else {
//call sharepoint click handler..
eval(" ( function () {" + js + " })();");
}
})
})
});
</script>
Other Useful links:
Improving #SharePoint Forms-Hints
Improving #SharePoint Forms-Watermarks
Improving #SharePoint Forms-Character Count

 浙公网安备 33010602011771号