
实验 4:Open vSwitch 实验——Mininet 中使用 OVS 命令
一、实验目的
Mininet 安装之后,会连带安装 Open vSwitch,可以直接通过 Python 脚本调用 Open vSwitch 命令,从而直接控制 Open vSwitch,通过实验了解调用控制的方法。
二、实验任务
在本实验中,使用 Mininet 基于 Python 的脚本,调用“ovs-vsctl”命令直接控制 Open vSwitch。使用默认的交换机泛洪规则,设置更高的优先级规则进行预先定义 IP 报文的转发。在多个交换机中通过设置不同 TOS 值的数据包将通过不同的方式到达目的地址,验证主机间的连通性及到达目的地址的时间。
三、实验步骤
1.实验环境
安装了 Ubuntu-16.04.7-desktop-amd64 的虚拟机。
2.实验过程
SDNLAB 实验参考资料:https://www.sdnlab.com/15083.html
学习 ovsSingleBr.py 和 ovsMultiBr.py,在下图拓扑中实现一个 VLAN。
代码实现如下:
#!/usr/bin/python
from mininet.net import Mininet
from mininet.node import Node
from mininet.link import TCLink
from mininet.log import setLogLevel, info
def myNet():
"Create network from scratch using Open vSwitch."
info( "*** Creating nodes\n" )
switch0 = Node( 's0', inNamespace=False )
switch1 = Node( 's1', inNamespace=False )
h0 = Node( 'h0' )
h1 = Node( 'h1' )
h2 = Node( 'h2' )
h3 = Node( 'h3' )
info( "*** Creating links\n" )
linkopts0=dict(bw=100, delay='5ms', loss=0)
linkopts1=dict(bw=200, delay='10ms', loss=0)
TCLink( h0, switch0, **linkopts0)
TCLink( h1, switch0, **linkopts0)
TCLink( h2, switch1, **linkopts0)
TCLink( h3, switch1, **linkopts0)
TCLink( switch0, switch1, **linkopts1)
info( "*** Configuring hosts\n" )
h0.setIP( '192.168.123.1/24' )
h1.setIP( '192.168.123.2/24' )
h2.setIP( '192.168.123.3/24' )
h3.setIP( '192.168.123.4/24' )
info( str( h0 ) + '\n' )
info( str( h1 ) + '\n' )
info( str( h2 ) + '\n' )
info( str( h3 ) + '\n' )
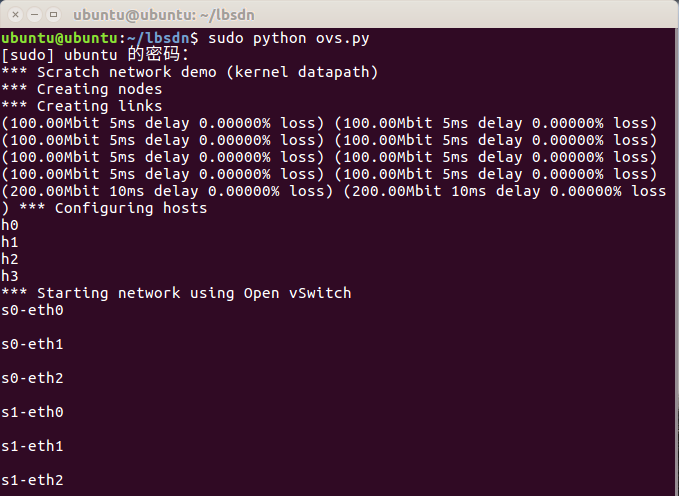
info( "*** Starting network using Open vSwitch\n" )
switch0.cmd( 'ovs-vsctl del-br dp0' )
switch0.cmd( 'ovs-vsctl add-br dp0' )
switch1.cmd( 'ovs-vsctl del-br dp1' )
switch1.cmd( 'ovs-vsctl add-br dp1' )
for intf in switch0.intfs.values():
print intf
print switch0.cmd( 'ovs-vsctl add-port dp0 %s' % intf )
for intf in switch1.intfs.values():
print intf
print switch1.cmd( 'ovs-vsctl add-port dp1 %s' % intf )
print switch0.cmd(r'ovs-ofctl -O OpenFlow13 add-flow s1 priority=1,in_port=1,actions=push_vlan:0x8100,set_field:4096-\>vlan_vid,output:4' )
print switch0.cmd(r'ovs-ofctl -O OpenFlow13 add-flow s1 priority=1,in_port=2,actions=push_vlan:0x8100,set_field:4097-\>vlan_vid,output:4' )
print switch0.cmd(r'ovs-ofctl -O OpenFlow13 add-flow s1 priority=1,dl_vlan=0,actions=pop_vlan,output:1' )
print switch0.cmd(r'ovs-ofctl -O OpenFlow13 add-flow s1 priority=1,dl_vlan=1,actions=pop_vlan,output:2' )
print switch1.cmd(r'ovs-ofctl -O OpenFlow13 add-flow s2 priority=1,in_port=1,actions=push_vlan:0x8100,set_field:4096-\>vlan_vid,output:4' )
print switch1.cmd(r'ovs-ofctl -O OpenFlow13 add-flow s2 priority=1,in_port=2,actions=push_vlan:0x8100,set_field:4097-\>vlan_vid,output:4' )
print switch1.cmd(r'ovs-ofctl -O OpenFlow13 add-flow s2 priority=1,dl_vlan=0,actions=pop_vlan,output:1' )
print switch1.cmd(r'ovs-ofctl -O OpenFlow13 add-flow s2 priority=1,dl_vlan=1,actions=pop_vlan,output:2' )
info( "*** Running test\n" )
h0.cmdPrint( 'ping -Q 0x10 -c 3 ' + h1.IP() )
h0.cmdPrint( 'ping -Q 0x20 -c 3 ' + h2.IP() )
h0.cmdPrint( 'ping -Q 0x30 -c 3 ' + h3.IP() )
h1.cmdPrint( 'ping -Q 0x40 -c 3 ' + h2.IP() )
h1.cmdPrint( 'ping -Q 0x50 -c 3 ' + h3.IP() )
h2.cmdPrint( 'ping -Q 0x60 -c 3 ' + h3.IP() )
info( "*** Stopping network\n" )
switch0.cmd( 'ovs-vsctl del-br dp0' )
switch0.deleteIntfs()
switch1.cmd( 'ovs-vsctl del-br dp1' )
switch1.deleteIntfs()
info( '\n' )
if __name__ == '__main__':
setLogLevel( 'info' )
info( '*** Scratch network demo (kernel datapath)\n' )
Mininet.init()
myNet()
上述代码将 h0 和 h2 划分在 VLAN 0 中,h1 和 h3 划分在 VLAN 1 中,由于拓扑没有控制器,并且初始化时删除了交换机中的所有流表,因此除非下发流表,否则主机之间网络无法连通。同时利用 ovs 命令直接下发 VLAN 设置的流表项,最终测试 h0 和 h2 互通,h1 和 h3 互通,其余主机均不通,结果如下图:
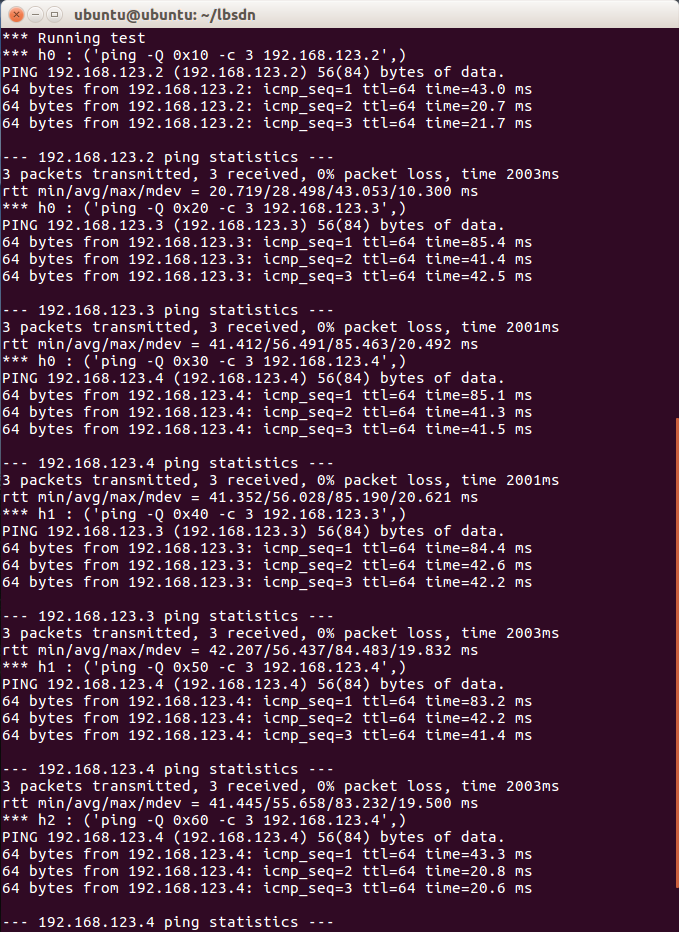

通过-Q 参数设置不通的 tos 值查看主机间的连通性,通过验证发现,tos 值设置越大,时间使用越少。

