Android - 动画
参考文章: http://hujiaweibujidao.github.io/blog/2016/05/26/when-math-meets-android-animation/
http://www.cnblogs.com/wondertwo/p/5295976.html
http://blog.csdn.net/eclipsexys/article/details/38401641
一、视图动画
主要相关类:Animation、AlphaAnimation\ScaleAnimation\RotateAnimation\TranslateAnimation、AnimationSet
1)xml 方式定义动画,shareInterpolator="true" 表示动画集合中的所有动画共享插值器,反之shareInterpolator="false" 表示不共享插值器;
Animation ani = AnimationUtils.loadAnimation(this, R.anim.ani_view); 加载xml动画
<?xml version="1.0" encoding="utf-8"?>
<set xmlns:android="http://schemas.android.com/apk/res/android"
    android:shareInterpolator="true" >

    <!--透明度-->
    <alpha
        android:fromAlpha="0"
        android:toAlpha="1" />

    <!--缩放-->
    <scale
        android:fromXScale="0.5f"
        android:fromYScale="1.5f"
        android:toXScale="0.5f"
        android:toYScale="1.5f"
        android:pivotX="100"
        android:pivotY="100" />

    <!--位移-->
    <translate
        android:fromXDelta="0"
        android:toXDelta="0"
        android:fromYDelta="200"
        android:toYDelta="200" />

    <!--旋转-->
    <rotate
        android:fromDegrees="0"
        android:toDegrees="360"
        android:pivotX="200"
        android:pivotY="200" />

</set>
2)代码方式
     // 创建动画集合
        AnimationSet aniSet = new AnimationSet(false); //false:集合种动画不共享插值器

        // 透明度动画
        AlphaAnimation alpha = new AlphaAnimation(0, 1);
        alpha.setDuration(4000);
        aniSet.addAnimation(alpha);

        // 旋转动画
        RotateAnimation rotate = new RotateAnimation(0, 360,
                RotateAnimation.RELATIVE_TO_SELF, 0.5f,
                RotateAnimation.RELATIVE_TO_SELF, 0.5f);
        rotate.setDuration(4000);
        aniSet.addAnimation(rotate);

        // 缩放动画
        ScaleAnimation scale = new ScaleAnimation(1.5f, 0.5f, 1.5f, 0.5f);
        scale.setDuration(4000);
        aniSet.addAnimation(scale);

        // 位移动画
        TranslateAnimation translate = new TranslateAnimation(0, 160, 0, 240);
        translate.setDuration(4000);
        aniSet.addAnimation(translate);

        // 动画监听
        aniSet.setAnimationListener(new Animation.AnimationListener() {
            // 动画开始
            @Override
            public void onAnimationStart(Animation animation) {

            }

            // 动画结束,一般在这里实现页面跳转逻辑
            @Override
            public void onAnimationEnd(Animation animation) {
                // 动画结束后,跳转到主页面
                startActivity(new Intent(GroupAni.this, MainActivity.class));
            }

            // 动画重复
            @Override
            public void onAnimationRepeat(Animation animation) {

            }
        });

        // 把动画设置给llGroup
        llGroup.startAnimation(aniSet);
3)自定义视图动画需要继承 android.view.animation.Animation ,重写initialize() 和 applyTransformation()
initialize() : 方法对一些变量进行初始化
applyTransformation(float interpolateTime,Transformation t): 通过矩阵修改动画数值,控制动画实现过程;该方法在动画执行过程中不断被调用;
interpolateTime:当前动画进行时间与总时间的比值[0,1];
t: 当前动画对象,t.getMatrix()获得Matrix矩阵对象;
import android.view.animation.Animation;
import android.view.animation.Transformation;

/**
 * QQ抖一抖特效的自定义View动画实现
 */
public class QQTrembleAni extends Animation {
    @Override
    protected void applyTransformation(float interpolatedTime, Transformation t) {
        t.getMatrix().setTranslate(
                (float) Math.sin(interpolatedTime * 50) * 8,
                (float) Math.sin(interpolatedTime * 50) * 8
                );// 50越大频率越高,8越小振幅越小
        super.applyTransformation(interpolatedTime, t);
    }
}

// 在线图形计算器: https://www.desmos.com/calculator
二、属性动画
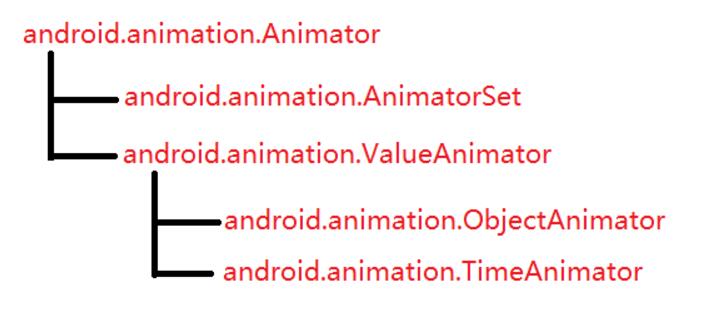
1) ObjectAnimator 是属性动画中重要的一个实现类;通过其静态工厂方法创建ObjectAnimator对象;
ObjectAnimator.ofFloat()、ObjectAnimator.ofInt()、ObjectAnimator.ofObject()
这些静态工厂方法接收的参数分别为:1、要设置动画的目标对象;2、动画的属性类型(目标对象需要提供getter/setter方法);3、一个或多个属性值,当指定一个属性值,默认为结束值;当指定两个属性值,默认为起始和结束值;当指定三个或以上,默认为线性插值;
2) ValueAnimator 属性动画核心类,主要方法有 addUpdateListener(),该监听器封装了动画逻辑
// 颜色渐变动画

ValueAnimator anim=ValueAnimator.ofFloat(0, 1);
anim.addUpdateListener(new ValueAnimator.AnimatorUpdateListener() {
	@Override
	public void onAnimationUpdate(ValueAnimator animation) {

    // 获取当前动画的进度值
    float currentValue = (float) animation.getAnimatedValue();

    // 获取动画当前时间流逝的百分比,范围在0~1之间
		float fraction=animation.getAnimatedFraction();

		int resultColor=blendColors(Color.RED,Color.BLUE,1-fraction);

		btnStart.setBackgroundColor(resultColor);
	}
});
anim.setDuration(3000);
anim.start();

private static int blendColors(int color1, int color2, float ratio) {
	final float inverseRation = 1f - ratio;
	float r = (Color.red(color1) * ratio) + (Color.red(color2) * inverseRation);
	float g = (Color.green(color1) * ratio) + (Color.green(color2) * inverseRation);
	float b = (Color.blue(color1) * ratio) + (Color.blue(color2) * inverseRation);
	return Color.rgb((int) r, (int) g, (int) b);
}
3) 插值器 Interpolator ,主要函数 float getInterpolation(float input);
输入参数:input,该值由系统经过计算后传入,随着动画的运行匀速增长,变化范围[0,1]
输出结果: ValueAnimator.getAnimatedFraction(); 实例函数获取的就是该值
AccelerateDecelerateInterpolator (先加速后减速) 源码:
package android.view.animation;

import android.content.Context;
import android.util.AttributeSet;

/**
 * An interpolator where the rate of change starts and ends slowly but
 * accelerates through the middle.
 */
public class AccelerateDecelerateInterpolator extends BaseInterpolator
        implements NativeInterpolatorFactory {
    public AccelerateDecelerateInterpolator() {
    }

    @SuppressWarnings({"UnusedDeclaration"})
    public AccelerateDecelerateInterpolator(Context context, AttributeSet attrs) {
    }

    public float getInterpolation(float input) {
        return (float)(Math.cos((input + 1) * Math.PI) / 2.0f) + 0.5f;
    }

    /** @hide */
    @Override
    public long createNativeInterpolator() {
        return NativeInterpolatorFactoryHelper.createAccelerateDecelerateInterpolator();
    }
}
【(float)(Math.cos((input + 1) * Math.PI) / 2.0f) + 0.5f】 翻译为数学公式:【0.5*cos[(input + 1)π] + 0.5 】-> 【0.5*cos(x)+0.5 , x∈[π,2π]】
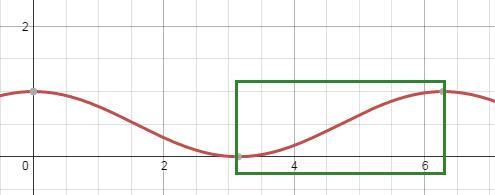 https://www.desmos.com/calculator
4) 估值器 TypeEvalutors , 主要方法 evaluate() 根据TimeInterpolation计算得到的因子、属性的开始值与结束值一起计算出当前时间的属性值;
android 提供了几个evalutor:IntEvaluator(值类型为int)、FloatEvaluator、ArgbEvaluator(值类型为十六进制颜色值)
public class FloatEvaluator implements TypeEvaluator {
        public Object evaluate(float fraction, Object startValue,
                Object endValue) {
            float startFloat = ((Number) startValue).floatValue();
            return startFloat + fraction
                    * (((Number) endValue).floatValue() - startFloat);
        }
    }
5) 整理总结:
ValueAnimator就是一个数值产生器, 计算动画变化过程中的值, 包含开始值、结束值、持续时间等, 但并没有把计算出的值应用到具体的对象上;
要将计算的值应用到对象上, 需要注册AnimatorUpdateListener, 由该监听器负责动画逻辑;
ValueAnimator封装了一个TimeInterpolator 和一个TypeEvaluator, TimeInterpolator定义了属性值在开始值与结束值之间的插值方法, TypeEvaluator根据TimeInterpolator计算得到的值、开始值和结束值计算出当前时间属性值;
ValueAnimator 根据动画运行时间与总时间计算出一个时间因子(0~1), 然后TimeInterpolator根据时间因子计算出一个插值因子, 最后TypeEvaluator根据插值因子计算出属性值;
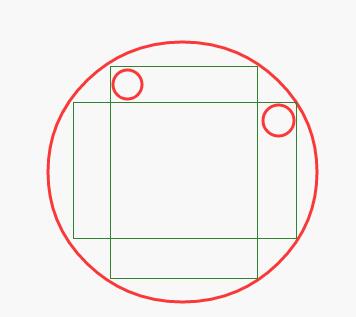
圆点旋转动画:

<?xml version="1.0" encoding="utf-8"?>
<shape xmlns:android="http://schemas.android.com/apk/res/android"
    android:shape="oval">
    <solid android:color="@android:color/holo_red_dark" />
</shape>
<?xml version="1.0" encoding="utf-8"?>
<LinearLayout xmlns:android="http://schemas.android.com/apk/res/android"
    android:layout_width="match_parent"
    android:layout_height="match_parent"
    android:gravity="center_horizontal"
    android:orientation="vertical">

    <Button
        android:id="@+id/anim_btn_start"
        android:layout_width="wrap_content"
        android:layout_height="wrap_content"
        android:layout_marginBottom="50dp"
        android:text="Start Animation" />

    <RelativeLayout
        android:layout_width="match_parent"
        android:layout_height="0dp"
        android:layout_weight="1"
        android:gravity="center">

        <LinearLayout
            android:id="@+id/ll1"
            android:layout_width="wrap_content"
            android:layout_height="240dp"
            android:layout_centerInParent="true"
            android:orientation="vertical">

            <ImageView
                android:layout_width="40dp"
                android:layout_height="40dp"
                android:background="@drawable/shape_circle" />
        </LinearLayout>

        <LinearLayout
            android:id="@+id/ll2"
            android:layout_width="wrap_content"
            android:layout_height="240dp"
            android:layout_centerInParent="true"
            android:orientation="vertical">

            <ImageView
                android:layout_width="40dp"
                android:layout_height="40dp"
                android:background="@drawable/shape_circle" />
        </LinearLayout>

        <LinearLayout
            android:id="@+id/ll3"
            android:layout_width="wrap_content"
            android:layout_height="240dp"
            android:layout_centerInParent="true"
            android:orientation="vertical">

            <ImageView
                android:layout_width="40dp"
                android:layout_height="40dp"
                android:background="@drawable/shape_circle" />
        </LinearLayout>

        <LinearLayout
            android:id="@+id/ll4"
            android:layout_width="wrap_content"
            android:layout_height="240dp"
            android:layout_centerInParent="true"
            android:orientation="vertical">

            <ImageView
                android:layout_width="40dp"
                android:layout_height="40dp"

                android:background="@drawable/shape_circle" />
        </LinearLayout>

    </RelativeLayout>
</LinearLayout>
public class AnimActivity extends AppCompatActivity {

    @InjectView(R.id.anim_btn_start)
     Button btnStart;

    @InjectView(R.id.ll1)
    LinearLayout ll1;

    @InjectView(R.id.ll2)
    LinearLayout ll2;

    @InjectView(R.id.ll3)
    LinearLayout ll3;

    @InjectView(R.id.ll4)
    LinearLayout ll4;


    @Override
    public void onCreate(Bundle savedInstanceState) {
        super.onCreate(savedInstanceState);

        setContentView(R.layout.activity_anim);

        ButterKnife.inject(this);

        btnStart.setOnClickListener(new View.OnClickListener() {
            @Override
            public void onClick(View v) {

                int duration=2000;
                int delay=150;

                ValueAnimator anim1= ObjectAnimator.ofFloat(ll1, "rotation", 0, 360);
                anim1.setDuration(duration);

                ValueAnimator anim2= ObjectAnimator.ofFloat(ll2,"rotation",0,360);
                anim2.setStartDelay(delay);
                anim2.setDuration(duration + delay);

                ValueAnimator anim3= ObjectAnimator.ofFloat(ll3,"rotation",0,360);
                anim3.setStartDelay(delay*2);
                anim3.setDuration(duration + delay * 2);

                ValueAnimator anim4= ObjectAnimator.ofFloat(ll4,"rotation",0,360);
                anim4.setStartDelay(delay*3);
                anim4.setDuration(duration + delay * 3);

                AnimatorSet animSet=new AnimatorSet();
                animSet.setInterpolator(new AccelerateDecelerateInterpolator());
                animSet.play(anim1).with(anim2).with(anim3).with(anim4);
                animSet.start();
            }
        });
    }
}
1)android:shape="oval" , 需要设置宽高一致才显示为圆形;
2)ImageView需要嵌套在LinearLayout中,旋转原理如图所示;

 浙公网安备 33010602011771号