spark性能优化(一)
本文内容说明
- 初始化配置给rdd和dataframe带来的影响
- repartition的相关说明
- cache&persist的相关说明
- 性能优化的说明建议以及实例
配置说明
spark:2.4.0
服务器:5台(8核32G)
初始化配置项
%%init_spark
launcher.master = "yarn"
launcher.conf.spark.app.name = "BDP-xw"
launcher.conf.spark.driver.cores = 1
launcher.conf.spark.driver.memory = '1g'
launcher.conf.spark.executor.instances = 3
launcher.conf.spark.executor.memory = '1g'
launcher.conf.spark.executor.cores = 2
launcher.conf.spark.default.parallelism = 5
launcher.conf.spark.dynamicAllocation.enabled = False
import org.apache.spark.sql.SparkSession
var NumExecutors = spark.conf.getOption("spark.num_executors").repr
var ExecutorMemory = spark.conf.getOption("spark.executor.memory").repr
var AppName = spark.conf.getOption("spark.app.name").repr
var max_buffer = spark.conf.getOption("spark.kryoserializer.buffer.max").repr
import org.apache.spark.rdd.RDD
import org.apache.spark.sql.{DataFrame, Row}
import org.apache.spark.sql.SparkSession
import org.apache.spark.sql.functions.monotonically_increasing_id
import org.apache.log4j.{Level, Logger}
import org.apache.spark.sql.types.{StructType, StructField, StringType, IntegerType}
import org.apache.spark.sql.functions.{udf, _}
import org.apache.spark.{SparkConf, SparkContext}


object LoadingData_from_files{
    def main(args: Tuple2[String, Array[String]]=Tuple2(hdfs_file, etl_date:Array[String])): Unit = {
        for( a <- etl_date){
            val hdfs_file_ = s"$hdfs_file" + a
            val rdd_20210113 = spark.sparkContext.textFile(hdfs_file_).cache()
            val num1 = rdd_20210113.count
            println(s"加载数据啦:$a RDD的数据量是$num1")
        }
        val rdd_20210113_test = spark.sparkContext.textFile(hdfs_file + "20210328").cache()
        var num1 = rdd_20210113_test.count()
        println(s"加载数据啦:20210113 RDD的数据量是$num1")
        rdd_20210113_test.unpersist() // 解除持久化
        val df_20210420 = spark.sparkContext.textFile(hdfs_file + "20210113").toDF.cache()
        num1 = df_20210420.count() // 指定memory之后,cache的数量太多之前cache的结果会被干掉
        println(s"加载数据啦:20210420 DataFrame的数据量是$num1")
    }
}

// 配置参数multiple_duplicated
val hdfs_file = "hdfs://path/etl_date="
val etl_date = Array("20210113","20210112","20210112","20210112","20210112","20210112", "20210113")
LoadingData_from_files.main(hdfs_file, etl_date)
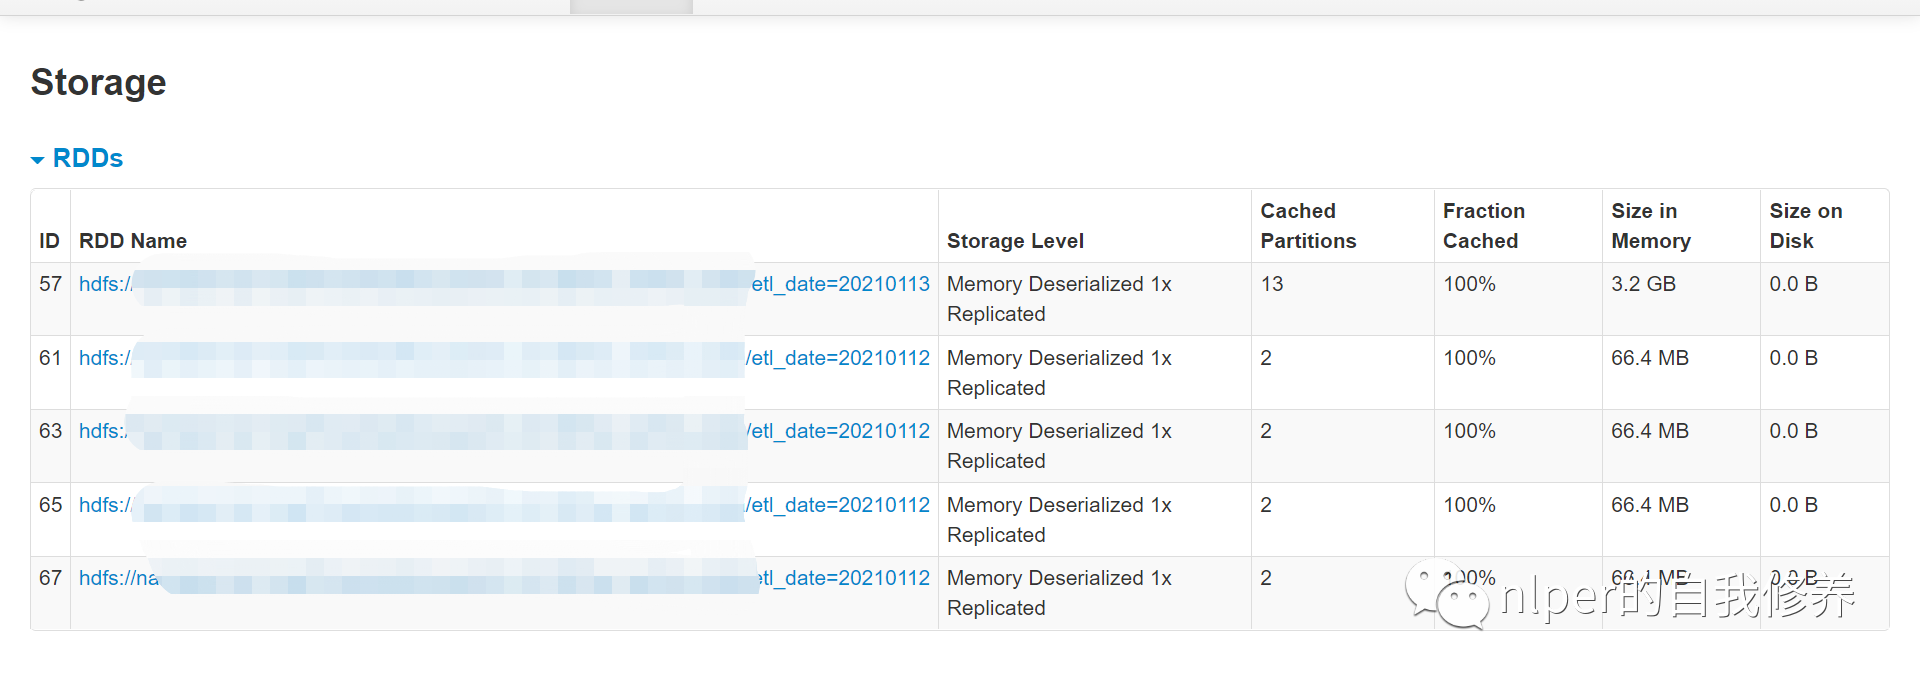
- 得到结果如下:
- 结果分析
- 可以看到默认情况下,RDD的缓存方式都是到
Memory的,而DataFrame的缓存方式都是Memory and Disk的 - 指定memory之后,cache的数量太多之前cache的结果会被干掉
- 可以看到默认情况下,RDD的缓存方式都是到
无特定配置项
import org.apache.spark.sql.SparkSession
var NumExecutors = spark.conf.getOption("spark.num_executors").repr
var ExecutorMemory = spark.conf.getOption("spark.executor.memory").repr
var AppName = spark.conf.getOption("spark.app.name").repr
object LoadingData_from_files{
def main(args: Tuple2[String, Array[String]]=Tuple2(hdfs_file, etl_date:Array[String])): Unit = {
for( a <- etl_date){
val hdfs_file_ = s"$hdfs_file" + a
val rdd_20210113 = spark.sparkContext.textFile(hdfs_file_).cache()
val num1 = rdd_20210113.count
println(s"加载数据啦:$a RDD的数据量是$num1")
}
val rdd_20210113_test = spark.sparkContext.textFile(hdfs_file + "20210328").cache()
var num1 = rdd_20210113_test.count()
println(s"加载数据啦:20210328 RDD的数据量是$num1")
rdd_20210113_test.unpersist() // 解除持久化
val df_20210420 = spark.sparkContext.textFile(hdfs_file + "20210113").toDF.cache()
num1 = df_20210420.count() // 指定memory之后,cache的数量太多之前cache的结果会被干掉
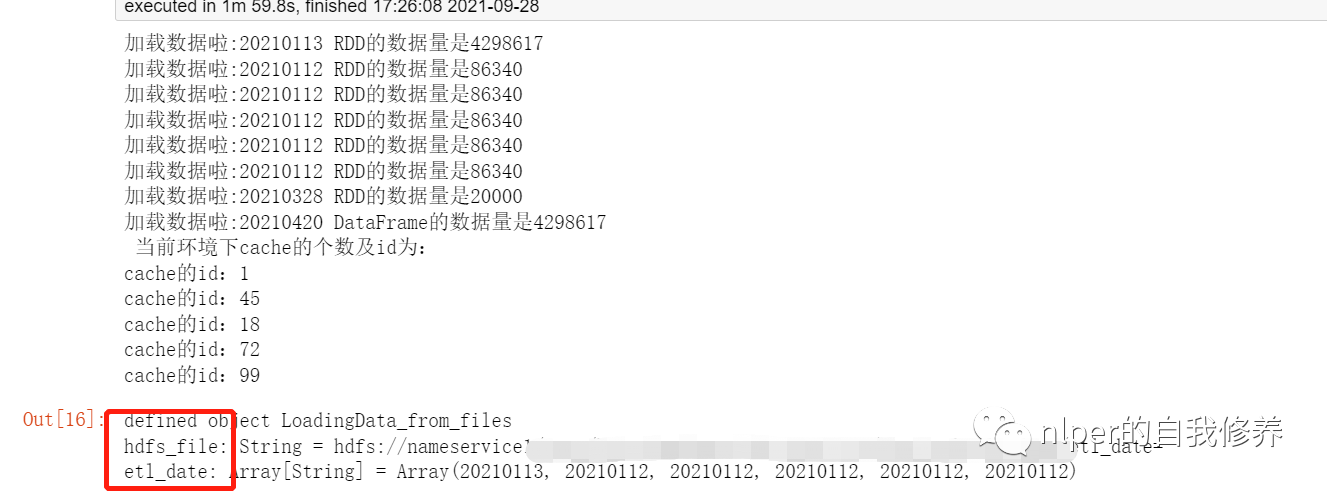
println(s"加载数据啦:20210420 DataFrame的数据量是$num1 \n当前环境下cache的个数及id为:")
spark.sparkContext.getPersistentRDDs.foreach(i=>println("cache的id:" + i._1))
}
}
// 无配置参数multiple_duplicated
val hdfs_file = "hdfs://path/etl_date="
val etl_date = Array("20210113","20210112","20210112","20210112","20210112","20210112", "20210113" )
LoadingData_from_files.main(hdfs_file, etl_date)
-
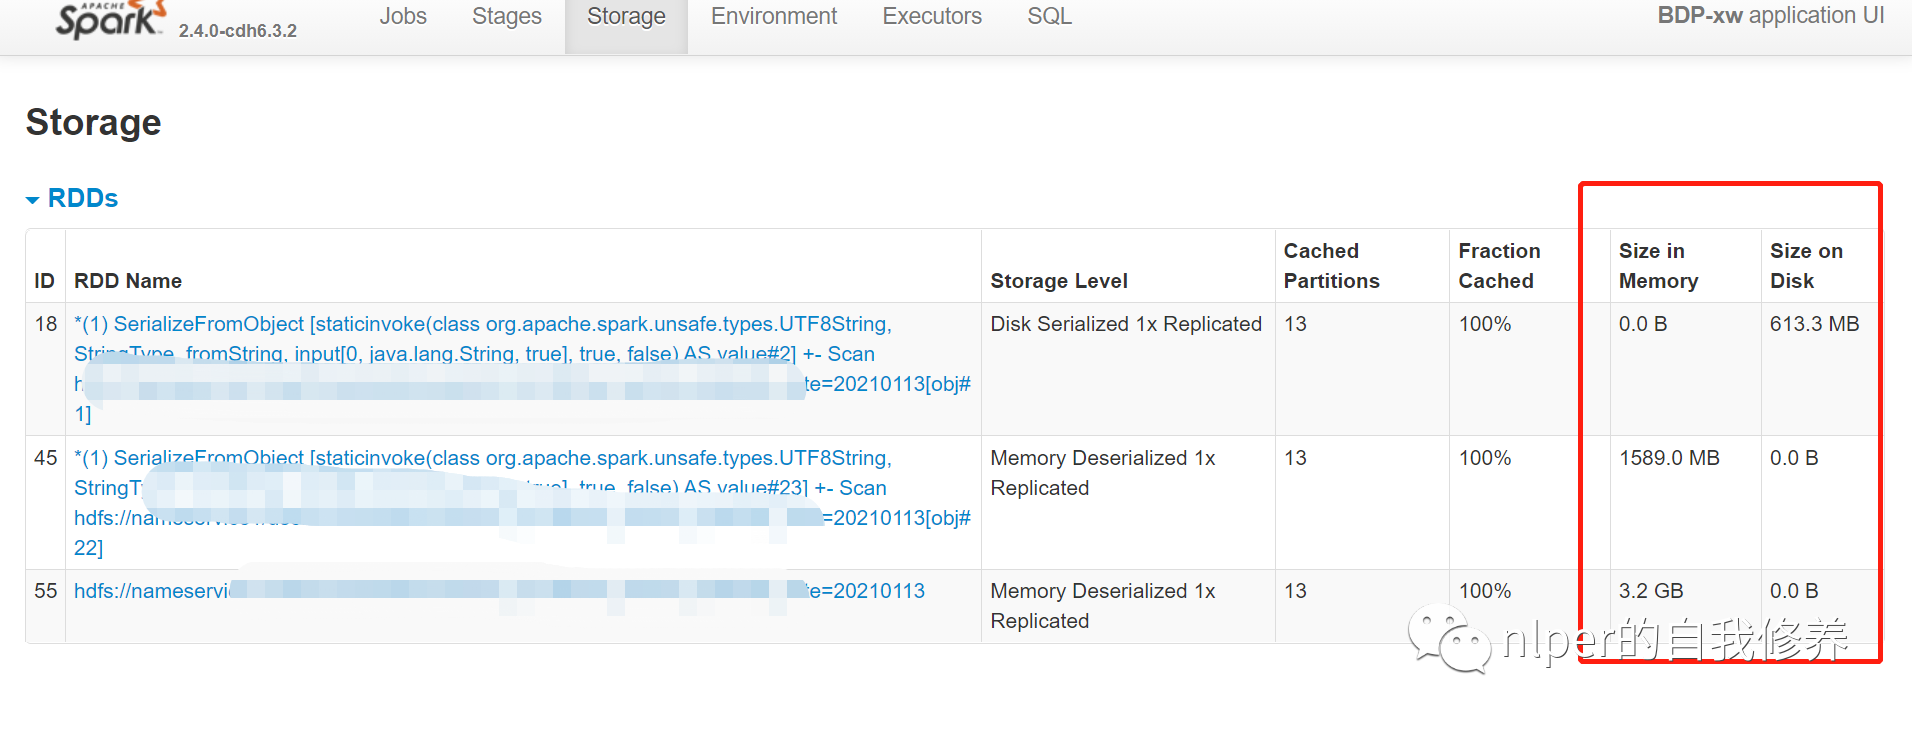
得到结果如下:
-
![spark_不做配置cache结果]()
-
结果分析
- spark的配置文件中,设置的也是动态分配内存;
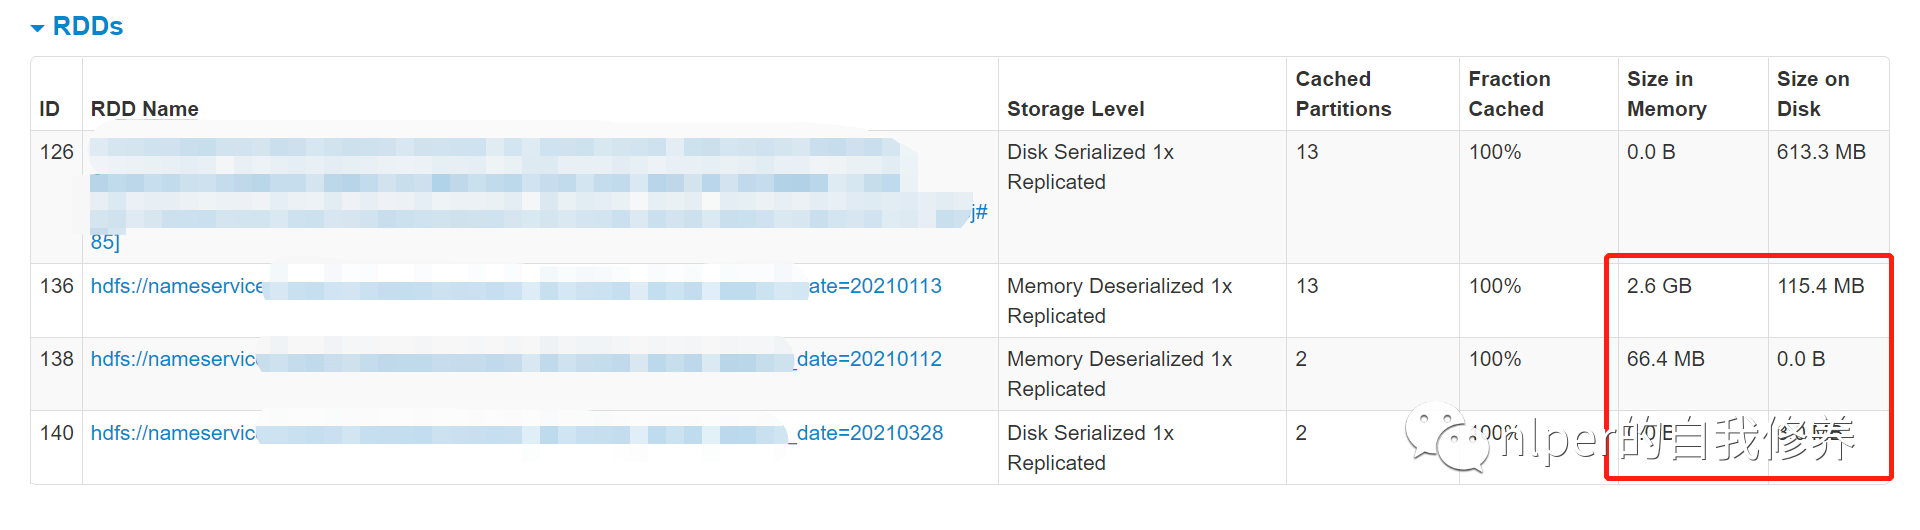
- cache的结果也是到达memory限制的时候,已经cache的结果会自动消失;
- 上述例子中,我们增加了8个文件,但最终只保留了5个cache的结果;
- 通过for重复从一个文件取数,并val声明给相同变量并cache,结果是会被多次保存在memory或者Disk中的;
查看当前服务下的所有缓存并删除
spark.sparkContext.getPersistentRDDs.foreach(i=>println(i._1))
spark.sparkContext.getPersistentRDDs.foreach(i=>{i._2.unpersist()})
repartition
- repartition只是coalesce接口中shuffle为true的实现
- repartition 可以增加和减少分区,而使用 coalesce 则只能减少分区
- 每个block的大小为默认的128M
//RDD
rdd.getNumPartitions
rdd.partitions.length
rdd.partitions.size

// For DataFrame, convert to RDD first
df.rdd.getNumPartitions
df.rdd.partitions.length
df.rdd.partitions.size
RDD
- 默认cache的级别是
Memory
val hdfs_file = "hdfs://path1/etl_date="
val rdd_20210113_test = spark.sparkContext.textFile(hdfs_file + "20210113").cache()
// 文件大小为1.5G
rdd_20210113_test.getNumPartitions
// res2: Int = 13
val rdd_20210113_test_par1 = rdd_20210113_test.repartition(5)
rdd_20210113_test_par1.partitions.size
// res9: Int = 5
val rdd_20210113_test_par2 = rdd_20210113_test_par1.coalesce(13)
rdd_20210113_test_par2.partitions.length
// res14: Int = 5 增加分区没生效
val rdd_20210113_test_par3 = rdd_20210113_test_par1.coalesce(3)
rdd_20210113_test_par3.partitions.length
// res16: Int = 3 增加分区生效
DataFrame
默认cache的级别是Memory and Disk
val hdfs_file = "hdfs://path1/etl_date="
val df_20210420 = spark.sparkContext.textFile(hdfs_file + "20210113").toDF().cache()
df_20210420.rdd.getNumPartitions
// res18: Int = 13
val df_20210420_par1 = df_20210420.repartition(20)
df_20210420_par1.rdd.getNumPartitions
// res19: Int = 20 增加分区生效
val df_20210420_par2 = df_20210420_par1.coalesce(5)
df_20210420_par2.rdd.getNumPartitions
// res20: Int = 5
cache&persist对比
- cache调用的是无参数版本的persist()
- persist的说明
import org.apache.spark.storage.StorageLevel._
// MEMORY_AND_DISK
val hdfs_file = "hdfs://path1/etl_date="
var etl_date = "20210113"
var hdfs_file_ = s"$hdfs_file" + etl_date
val rdd_20210113_DISK_MEMORY = spark.sparkContext.textFile(hdfs_file_).persist(MEMORY_AND_DISK)
println("DISK_ONLY数据量为" + rdd_20210113_DISK_MEMORY.count())
// MEMORY_ONLY
etl_date = "20210112"
hdfs_file_ = s"$hdfs_file" + etl_date
val rdd_20210113_MEMORY_ONLY = spark.sparkContext.textFile(hdfs_file_).persist(MEMORY_ONLY)
println("MEMORY_ONLY数据量为" + rdd_20210113_MEMORY_ONLY.count())
// DISK_ONLY
etl_date = "20210328"
hdfs_file_ = s"$hdfs_file" + etl_date
val rdd_20210113_DISK_ONLY = spark.sparkContext.textFile(hdfs_file_).persist(DISK_ONLY)
println("DISK_ONLY数据量为" + rdd_20210113_DISK_ONLY.count())
// DISK_ONLY数据量为4298617
// MEMORY_ONLY数据量为86340
// DISK_ONLY数据量为20000
性能优化
参数说明
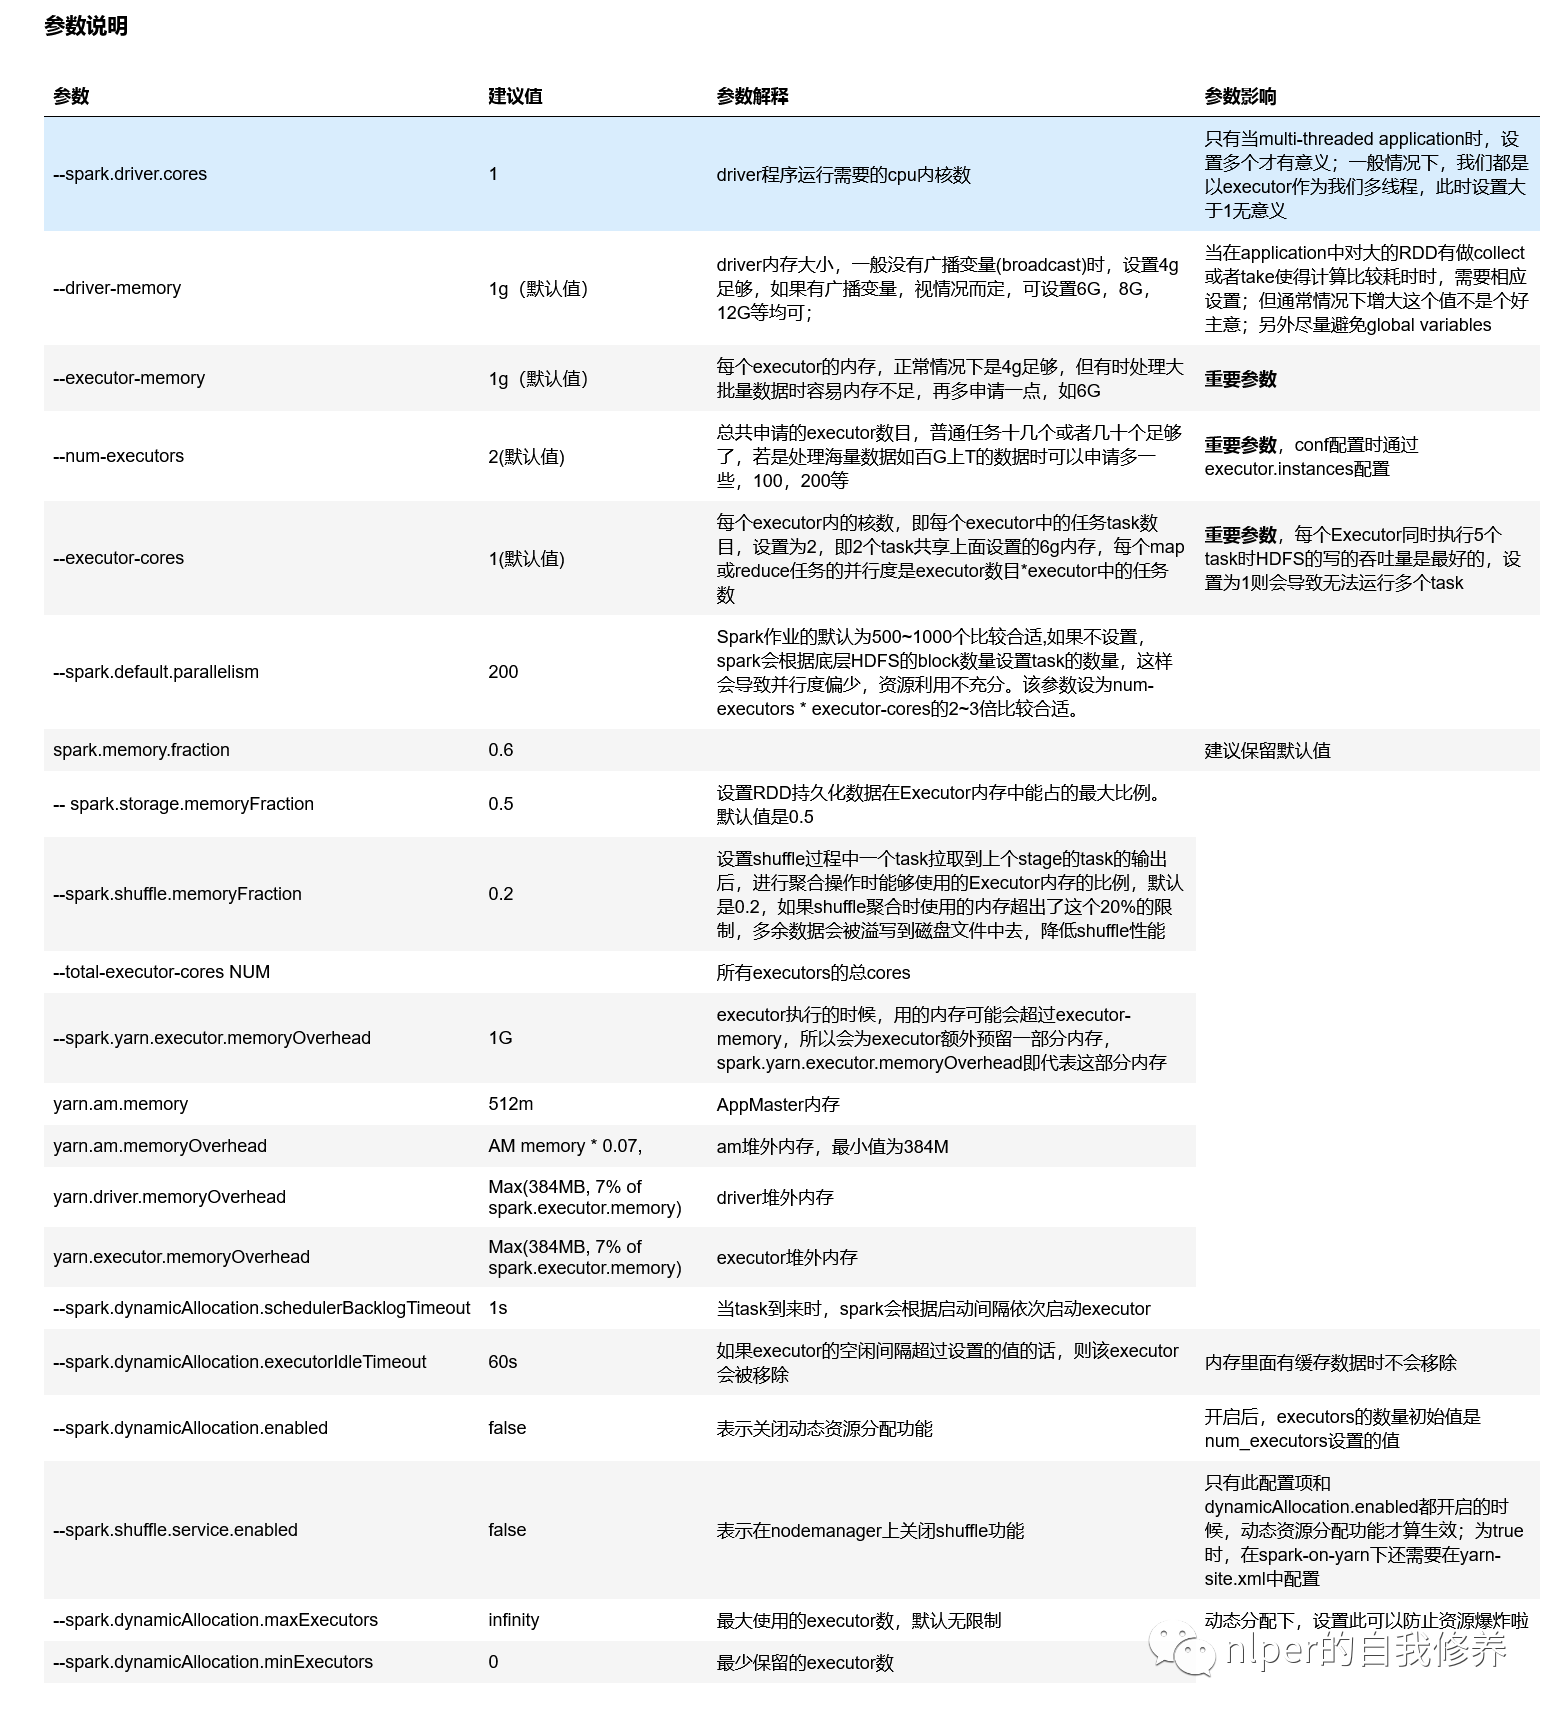
参数配置建议
-
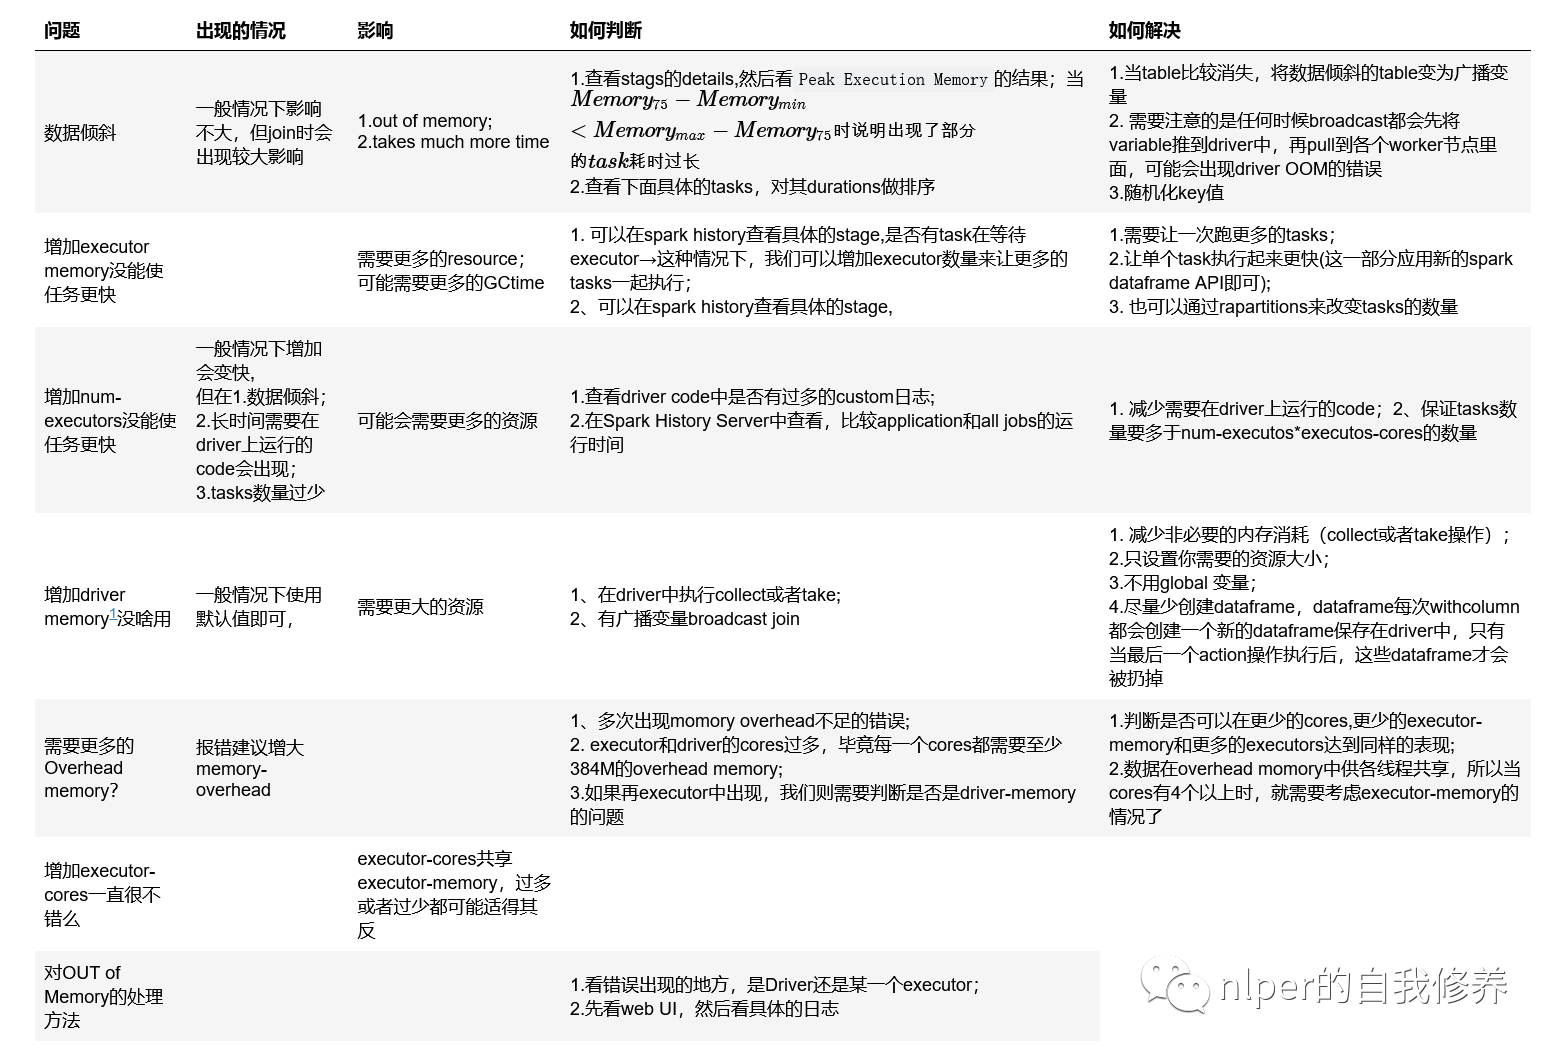
优化方面说明
![火狐截图_优化建议]()
-
tips
- yarn集群中一般有资源申请上限,如,executor-memory*num-executors < 400G 等,所以调试参数时要注意这一点
- 如果GC时间较长,可以适当增加--executor-memory的值或者减少--executor-cores的值
- yarn下每个executor需要的memory = spark-executor-memory + spark.yarn.executor.memoryOverhead.
- 一般需要为,后台进程留下足够的cores(一般每个节点留一个core)。
- Yarn ApplicationMaster (AM):ApplicationMaster负责从ResourceManager申请资源并且和NodeManagers一起执行和监控containers和它们的资源消耗。如果我们是spark on yarn模式,那么我们需要为ApplicationMaster预留一些资源(1G和1个Executor)
- num-executors大(30),executor-cores小(1)→ 每个executor只分配了一个核,将无法运行多个任务的优点
- num-executors小(5),executor-cores大(7)→ 每个executor分配了7个核,HDFS吞吐量会受到影响。同时过大的内存分配也会导致过多的GC延迟
- Spark shell required memory = (Driver Memory + 384 MB) + (Number of executors * (Executor memory + 384 MB))
设置资源的示例
- 资源分配情况【非动态分配资源模式下】
- contain、CPUVcores、AllocaMemory为hdfs下对具体的application的资源占用情况
- executors、storage-memory为spark web-ui下的executor情况
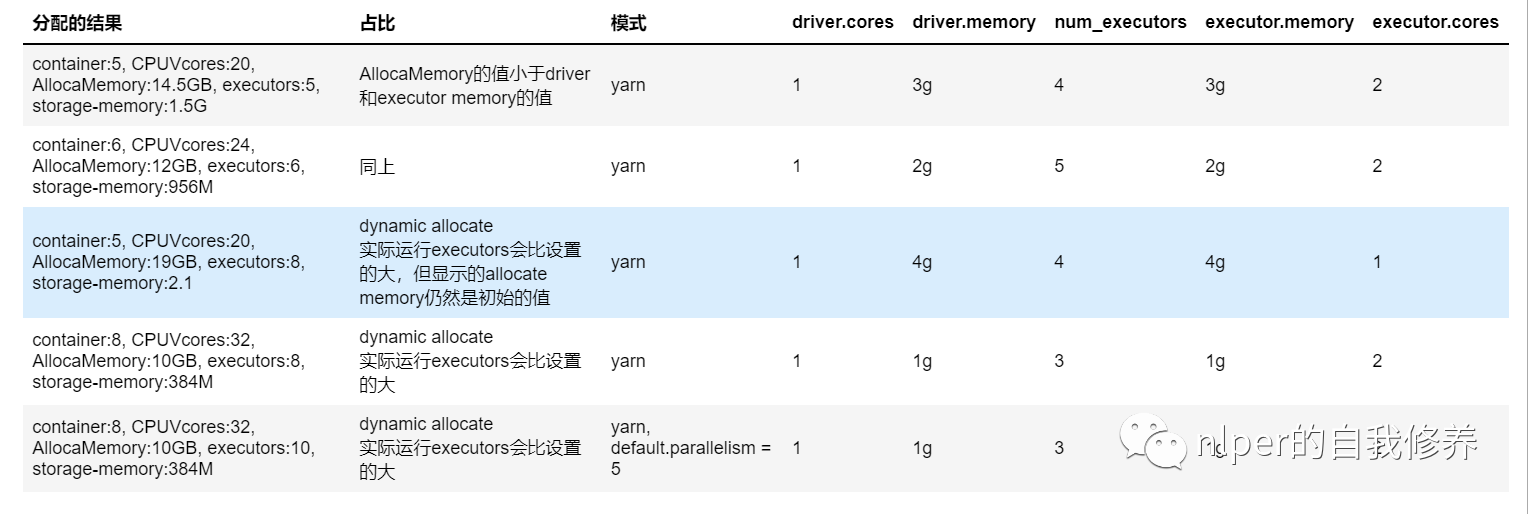
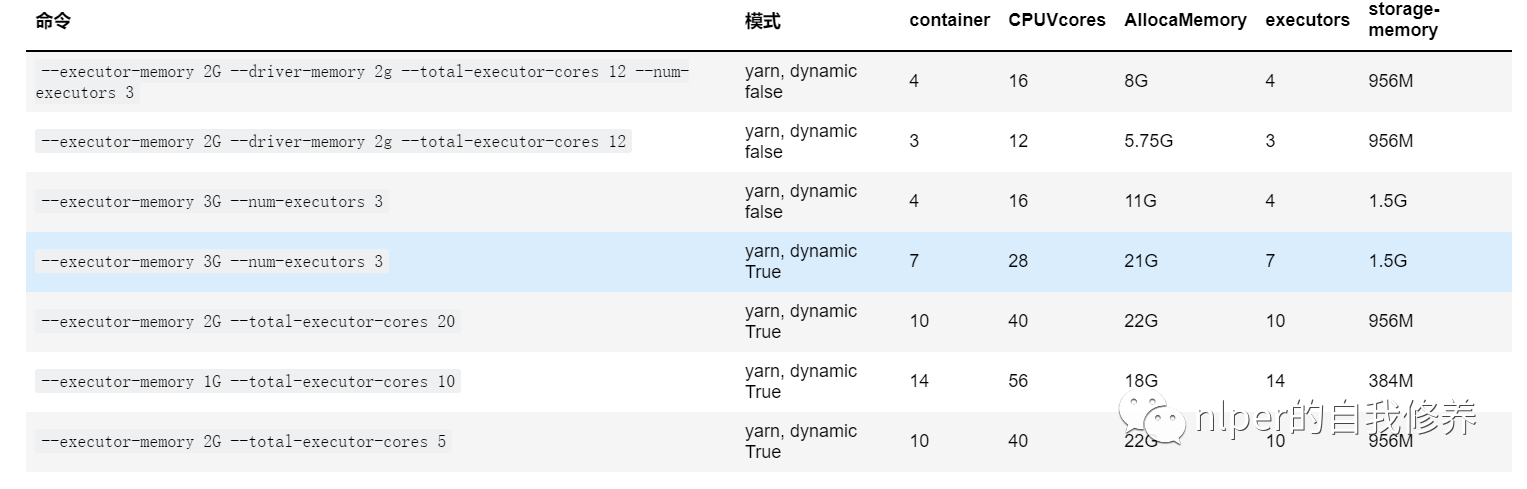
- spark-shell下资源占用情况
- 主要查看指定num-executor以及total-executor-cores情况下,资源占用是否仍然会动态变化
- 还是会动态变化

- spark-submit下资源占用情况
- 主要查看指定num-executor以及total-executor-cores情况下,资源占用是否仍然会动态变化
- 还是会动态变化
- CPUVcores是因为其默认是*4
- 设置资源的方式(以我们的集群为例,5台8核32G的服务器)
- 第一,给每个Executor分配3个core即executor-cores=3,一般设置5对HDFS的吞吐量会比较友好。
- 第二,为后台进程留一个core,则每个节点可用的core数是8 - 1 = 7。所以集群总的可用core数是7 x 5 = 35。
- 第三,每个节点上的Executor数就是 7 / 3 = 2,集群总的可用的Executor数就是 2 * 5 = 10。为ApplicationManager留一个Executor,则num-executors=9。
- 第四,每个节点上每个Executor可分配的内存是 (32GB-1GB) / 2 = 15GB(减去的1GB是留给后台程序用),除去MemoryOverHead=max(384MB, 7% * 15GB)=2GB,所以executor-memory=15GB - 2GB = 12GB。
- 所以最后的参数配置是:num-executors=9、executor-cores=3、executor-memory=12G
- 设置资源的方式(调整下,比如要降低GC,executor-memory不需要给那么多)
- 按照上述方式,得到每个Executor分配到的内存是12GB,但假设8GB内存就够用了
- 那么此时我们可以将executor-cores降低为2,那么每个节点就可以有7 / 2 = 3个Executor,那么总共可以获得的Executor数就是 (5 * 3) - 1 =14,每个节点上每个Executor可分配的内存是(32GB-1GB) / 3 = 10GB,除去MemoryOverHead=max(384MB, 7% * 10GB)=1GB,所以executor-memory=10GB - 1GB = 9GB
- 所以最后的参数配置是:num-executors=14、executor-cores=2、executor-memory=9G
查看Memory实际分配情况
// 计算driver Memory的
// spark 分配的实际资源情况
def getSparkMemory():Float={
    val driver_memory_set1 = sc.getConf.getSizeAsBytes("spark.driver.memory")/1024/1024/1024
    val systemMemory = Runtime.getRuntime.maxMemory.toFloat///1024/1024/1024
    // fixed amount of memory for non-storage, non-execution purposes
    val reservedMemory = 300 * 1024 * 1024
    // minimum system memory required
    val minSystemMemory = (reservedMemory * 1.5).ceil.toLong
    val usableMemory = systemMemory - reservedMemory
    val memoryFraction = sc.getConf.getDouble("spark.memory.fraction", 0.6)
    val maxMemory = (usableMemory * memoryFraction).toLong
    import org.apache.spark.network.util.JavaUtils
    val allocateMemory = JavaUtils.byteStringAsMb(maxMemory + "b")
    println(f"driver_memory: $driver_memory_set1%1.1f, allocateMemory: $allocateMemory%1.1f,")
    maxMemory
}

val maxMemory = getSparkMemory()
// driver_memory: 2.0, allocateMemory: 912.0,

// // 查看 spark web ui资源情况
def formatBytes(bytes: Double) = {
  val k = 1000
  val i = math.floor(math.log(bytes) / math.log(k))
  val maxMemoryWebUI = bytes / math.pow(k, i)
  f"$maxMemoryWebUI%1.1f"
}
println(formatBytes(maxMemory))
// 956.6
def allocateMemory(executorMemory:Float=1, executors:Float=1, driverMemory:Float=1):Double={
    val driver_overmemory = Array(384, driverMemory * 0.07).max
    val executor_Memory = Array(384, executorMemory * 0.07).max
    val allocateMemory = (driver_overmemory + driverMemory) + executors * (executor_Memory + executorMemory)
    allocateMemory/1024
}
allocateMemory(1 * 1024, 16, 1 * 1024)
// res3: Double = 23.375
查看服务环境
- 通过8088端口proxy查看任务信息
http://ip:8088/proxy/application_jobid/executors/ - 通过8088端口cluster查看任务信息
http://ip:8088/cluster/apps

 浙公网安备 33010602011771号