

IT0009.Vue.js核心技术解析与uni-app跨平台实战开发
IT0009.Vue.js核心技术解析与uni-app跨平台实战开发


自己一面看一面跟着打的代码,蛮大,其实很多都是npm的modules
链接:https://caiyun.139.com/m/i?0V5Cg5LbWDJWD 提取码:P7nf
第1章 Vue.js基础入门
v-bind指令可以简写成:
<img v-bind:src="logo" />
<img :src="logo" />
<!--注:logo是vue代码中的data中的变量-->
v-on指令可以简写成@
<button type="button" v-on:click='add'>click</button>
<button type="button" @click='add'>click</button>
<!--注:add是vue代码中的methods中定义的方法名-->
hello world
<div id="app">
    {{msg}}
    <br />
    {{obj.name}}
    <br />
    {{fl()}}
    <br />
    {{num>10?'数字num大于10':'数字num小于10'}}
</div>
<script src="https://cdn.jsdelivr.net/npm/vue/dist/vue.js"></script>
<script>
    var vm = new Vue({
        el:'#app',
        data:{
            msg:'hello niunan.',
            obj:{
                name:"牛腩"
            },
            fl(){
                return 3+5;
            },
            num:3
        }
    })
    </script>
计算器代码
<!DOCTYPE html>
        <html lang="en">
        <head>
            <meta charset="UTF-8">
            <meta http-equiv="X-UA-Compatible" content="IE=edge">
            <meta name="viewport" content="width=device-width, initial-scale=1.0">
            <title>计算器</title>
            <style>
                [v-cloak]{
                    display:none;
                }
            </style>
        </head>
        <body>
            <div id="app" v-cloak>
                <input type="text" v-model="num1" placeholder="请输入第1个数"/>
                <select v-model="sel">
                    <option value="+">+</option>
                    <option value="-">-</option>
                    <option value="*">*</option>
                    <option value="/">/</option>
                </select>
                <input type="text" v-model="num2" placeholder="请输入第2个数"/>
                <input type="button" value="=" @click="btn" />
                <input type="text" v-model="res" />
            </div>
            <script src="https://cdn.jsdelivr.net/npm/vue/dist/vue.js"></script>
            <script>
                var vm=new Vue({
                    el:'#app',
                    data:{
                        num1:null,
                        num2:null,
                        sel:'+',
                        res:null
                    },
                    methods:{
                        btn(){
                            if(this.sel=="+"){
                                this.res = parseInt(this.num1)+parseInt(this.num2);
                            }else if(this.sel=='-'){
                                this.res = parseInt(this.num1)-parseInt(this.num2);
                            }else if(this.sel=='*'){
                                this.res = parseInt(this.num1)*parseInt(this.num2);
                            }else if(this.sel=='/'){
                                this.res = parseInt(this.num1)/parseInt(this.num2);
                            }
                        }
                    }
                })
            </script>
        </body>
        </html>
简易学生管理系统代码
 <div id="main" v-cloak>
        <table>
            <tr>
                <td>学号</td>
                <td>姓名</td>
                <td>新增时间</td>
                <td>操作</td>
            </tr>
            <tr v-for="(item,i) in search(keywords)">
                <td>{{item.id}}</td>
                <td>{{item.name}}</td>
                <td>{{item.time}}</td>
                <td><a @click.prevent="del(i)">删除</a></td>
            </tr>
            <tr>
                <td><input type="text" placeholder="请输入学号" v-model="id" /></td>
                <td><input type="text" placeholder="请输入姓名" v-model="name" /></td>
                <td><input type="text" placeholder="搜索学生姓名" v-model="keywords" /></td>
                <td><input type="button" value="新增" @click="add" /></td>
            </tr>
        </table>
    </div>
<script src="https://cdn.jsdelivr.net/npm/vue/dist/vue.js"></script>
<script>
    var vm = new Vue({
        el:'#main',
        data:{
            id:'',//用户输入的学号
            name:'',//用户输入的姓名
            keywords:'',//搜索关键字
            list:[
                {id:1,name:'小明',time:new Date()},
                {id:2,name:'小红',time:new Date()},
                {id:3,name:'小涛',time:new Date()},
            ]
        },
        methods:{
            add(){
                var stu={
                    id:this.id,name:this.name,time:new Date()
                };
                this.list.push(stu);
                this.id=this.name='';
            },
            del(i){
                console.log('del:'+i);
                this.list.splice(i,1);
            },
            search(keywords){
                var newList=[];
                this.list.forEach(item => {
                    if(item.name.indexOf(keywords)!=-1){
                        newList.push(item);
                    }
                });
                return newList;
            }
        }
    })
</script>
第2章 Vue.js绑定样式及案例
tab的简单实现
<style>
        .redColor{
            color:red;
            background-color: antiquewhite;
            padding:5px 10px;
        }
    </style>

<div id="app">
    <div>
        <span :class="{redColor:active==0}" @click="btn(0)">vue.js</span>
        <span :class="{redColor:active==1}" @click="btn(1)">node.js</span>

    </div>
    <div v-if="active==0">vue.js的内容</div>
        <div v-if="active==1">node.js的内容</div>
</div>

<script src="https://cdn.jsdelivr.net/npm/vue/dist/vue.js"></script>
<script>
    var vm = new Vue({
        el:'#app',
        data:{
            active:0
        },
        methods:{
            btn(i){
                this.active = i;
            }
        }
    });
</script>
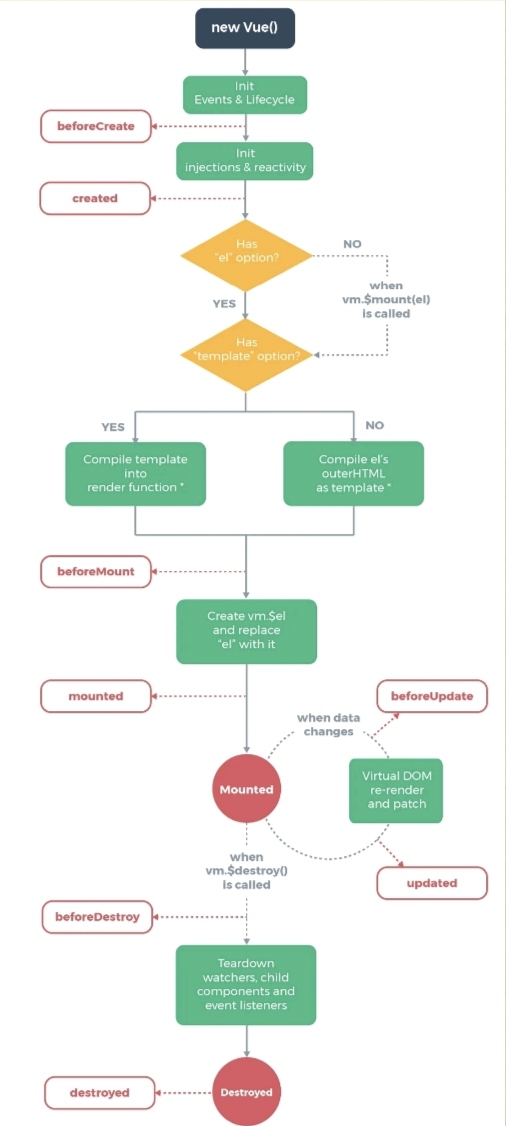
第3章 Vue.js生命周期函数

第4章 Vue.js动画

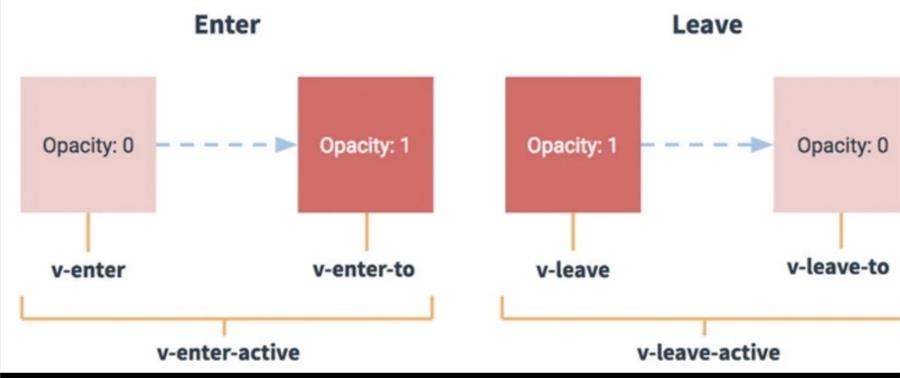
点击按钮显示隐藏区域
<!DOCTYPE html>
<html lang="en">
<head>
    <meta charset="UTF-8">
    <meta http-equiv="X-UA-Compatible" content="IE=edge">
    <meta name="viewport" content="width=device-width, initial-scale=1.0">
    <title>没用动画与用了动画</title>
    <style>
        .v-enter, .v-leave-to{
            opacity:0;
            transform: translateX(100px);
        }
        .v-enter-active, .v-leave-active{
            transition: all 0.5s ease;
        }
    </style>
</head>
  <body>

    <div id="app">
        <h3>没用动画</h3>
        <input type="button" value="toggle" @click="toggleFn" />
        <div v-if="flag"><strong>{{msg}}</strong></div>
        <hr />
        <h3>用了动画</h3>
        <input type="button" value="toggle" @click="toggleFn2" />
        <transition>
            <div v-if="flag2"><strong>{{msg}}</strong></div>
        </transition>
    </div>
    <script src="https://cdn.jsdelivr.net/npm/vue/dist/vue.js"></script>
    <script>
        var vm = new Vue({
            el:'#app',
            data:{
                flag:true,
                flag2:true,
                msg:"Hello Niunan.",
            },
            methods:{
                toggleFn(){
                    this.flag = !this.flag;
                },
                toggleFn2(){
                    this.flag2 = !this.flag2;
                },
            }
        });
    </script>
</body>
</html>
CSS3动画演示:http://www.mm2018.com/index.php/special/view_uprecord/uprecord_id/110.html
<!DOCTYPE html>
<html lang="en">
<head>
    <meta charset="UTF-8">
    <meta http-equiv="X-UA-Compatible" content="IE=edge">
    <meta name="viewport" content="width=device-width, initial-scale=1.0">
    <title>CSS3动画库</title>
    <link rel="stylesheet" href="css/animate.min.css" />
</head>
<body>

    <div id="app">
        <h3>CSS3动画库</h3>
        <input type="button" value="toggle" @click="toggleFn" />
        <transition enter-active-class="animated flipInY" leave-active-class=" animated flipOutY">
        <div v-if="flag"><strong>{{msg}}</strong></div>
        </transition>
        <hr />
    </div>
    <script src="https://cdn.jsdelivr.net/npm/vue/dist/vue.js"></script>
    <script>
        var vm = new Vue({
            el:'#app',
            data:{
                flag:true,
                msg:"Hello Niunan.",
            },
            methods:{
                toggleFn(){
                    this.flag = !this.flag;
                }
            }
        });
    </script>
</body>
</html>
列表动画
<!DOCTYPE html>
<html lang="en">
<head>
    <meta charset="UTF-8">
    <meta http-equiv="X-UA-Compatible" content="IE=edge">
    <meta name="viewport" content="width=device-width, initial-scale=1.0">
    <title>列表动画</title>
    <style>
        .v-enter, .v-leave-to{
            opacity:0;
            transform: translateY(100px);
        }
        .v-enter-active, .v-leave-active{
            transition: all 1s ease;
        }
    </style>
</head>
<body>
    <div id="app">
        <transition-group appear tag="ul">
            <li v-for="item in list" :key="item.id">
                {{item.id}} → {{item.name}}
            </li>
        </transition-group>
        <input type="text" v-model="id" placeholder="输入ID" />
        <input type="text" v-model="name" placeholder="输入name" />
        <input type="button" value="add" @click="add" />
    </div>
    <script src="https://cdn.jsdelivr.net/npm/vue/dist/vue.js"></script>
    <script>
        var vm = new Vue({
            el:'#app',
            data:{
                id:'',
                name:'',
                list:[
                    {id:1,name:"明明"},
                    {id:2,name:"空空"},
                ]
            },
            methods:{
                add(){
                    var m = {id:this.id, name:this.name};
                    this.list.push(m);
                    this.id='';
                    this.name ='';
                }
            }

        })
    </script>
</body>
</html>
第5章 Vue.js组件
<!DOCTYPE html>
<html lang="en">
<head>
    <meta charset="UTF-8">
    <meta http-equiv="X-UA-Compatible" content="IE=edge">
    <meta name="viewport" content="width=device-width, initial-scale=1.0">
    <title>组件</title>
</head>
<body>
    <div id="main">
        <mycom1></mycom1>
        <mycom3></mycom3>
        {{msg}}
    </div>
    <template id="temp">
        <div><h3>我是组件</h3></div>
    </template>
    <script src="https://cdn.jsdelivr.net/npm/vue/dist/vue.js"></script>
    <script>
        var com1 = Vue.extend({
            template:'<h1>tttt</h1>'
        })
        Vue.component('mycom1',com1);
        Vue.component('mycom3',{
            template:'#temp'
        })
        var vm = new Vue({
            el:'#main',
            data:{
                msg:"hello niunan."
            }
        })
        </script>
</body>
</html>
第6章 Vue.js路由
<!DOCTYPE html>
<html lang="en">
<head>
    <meta charset="UTF-8">
    <meta http-equiv="X-UA-Compatible" content="IE=edge">
    <meta name="viewport" content="width=device-width, initial-scale=1.0">
    <title>路由</title>
    <style>
        .router-link-active{
            color:white;
            background-color: blue;
            padding:5px 10px;
        }
    </style>
</head>
<body>
    <div id="main">
        <router-link to="/login?id=1">登录</router-link>
        <router-link to="/register">注册</router-link>
        <router-view></router-view>
    </div>
    <script src="https://cdn.jsdelivr.net/npm/vue/dist/vue.js"></script>
    <script src="https://unpkg.com/vue-router@2.0.0/dist/vue-router.js"></script>
    <script>
        var login={
            template:"<h1>登录,id:{{id}}</h1>",
            data(){
                return{
                    id:null
                }
            },
            created(){
                console.log(this.$route);
                this.id=this.$route.query.id
            }
        };
        var register = {
            template:"<h1>注册</h1>"
        };
        var router = new VueRouter({
            routes:[{
                path:'/login',
                component:login
            },{
                path:'/register',
                component:register
            }]
        });
        var vm = new Vue({
            el:'#main',
            router:router
        })
        </script>
</body>
</html>
第7章 Vue.js高级进阶
本章主要讲vue-cli的简单使用,先装node.js,再装vue-cli
npm install vue-cli -g//上面是书中的命令,在2023年03月04日用出错了,得用下面的命令,都得在CMD窗口下执行,如果在powershell里执行的话多少会出错的
npm install -g @vue/cli
//新建项目,除了vue-router那里输入y外,其他都默认按回车就好了,在我电脑上创建有点慢哦!!!电信20M
vue init webpack vuetestdemo
//运行, 记得是切换到vuetestdemo目录
npm run dev
vue-cli选项卡案例
- components下新新tab.vue文件,注:template下只能有一个根元素,所以得用一个div包起来
<template>
    <div>

<a :class="{active:isactive==0}" @click="mytab(0)">娱乐新闻</a>
<a :class="{active:isactive==1}" @click="mytab(1)">体育新闻</a>
<a :class="{active:isactive==2}" @click="mytab(2)">热搜新闻</a>

<hr />
<ul>
    <li v-for="item in newlist[isactive]">{{ item }}</li>
</ul>
</div>
</template>
<script>
export default {
    data(){
        return {
            isactive:0,
            newlist:[
                ["娱乐新闻1","娱乐新闻2","娱乐新闻3"],
                ["体育新闻1","体育新闻2","体育新闻3"],
                ["热搜新闻1","热搜新闻2","热搜新闻3"]
            ]
        }
    },
    methods:{
        mytab(i){
            this.isactive = i;
        }
    }
}
</script>
<style scoped>
.active{color:red;}
</style>
2. router下的index.js文件加入tab路由规则,记得要先import
import Vue from 'vue'
import Router from 'vue-router'
import HelloWorld from '@/components/HelloWorld'
//需要先引入Tab组件
import tab from '@/components/tab'

Vue.use(Router)

export default new Router({
  routes: [
    {
      path: '/',
      name: 'HelloWorld',
      component: HelloWorld
    },
    {
      path: '/tab',
      name: 'tab',
      component: tab
    }
  ]
})
3.运行测试,/tab 即可出来
第8章 element-ui/mint-ui组件库
书上写得太简单,看不懂,好像是以vue cli为基础安装的,我自己按官网的弄了,改了一下前面的计算器的界面,其他样式的可看官网文档
https://element.eleme.cn/#/zh-CN/component/installation
<!DOCTYPE html>
<html lang="en">
<head>
    <meta charset="UTF-8">
    <meta http-equiv="X-UA-Compatible" content="IE=edge">
    <meta name="viewport" content="width=device-width, initial-scale=1.0">
    <title>计算器</title>
    <!-- 引入样式 -->
<link rel="stylesheet" href="https://unpkg.com/element-ui/lib/theme-chalk/index.css">

    <style>
        [v-cloak]{
            display:none;
        }
    </style>
</head>
<body>
    <div id="app" v-cloak>
        <el-row :gutter="10">
            <el-col :span="3"><el-input v-model="num1" placeholder="请输入第1个数"></el-input></el-col>

            <el-col :span="2">
                <el-select v-model="sel" placeholder="请选择">
                    <el-option
                      v-for="item in options"
                      :key="item.value"
                      :label="item.label"
                      :value="item.value">
                    </el-option>
                  </el-select>
            </el-col>

            <el-col :span="3">
                <el-input v-model="num2" placeholder="请输入第2个数"> </el-input>
            </el-col>

            <el-col :span="1">
                <el-button type="primary" @click="btn">=</el-button>
            </el-col>

            <el-col :span="2"><el-input   v-model="res" /></el-col>
        </el-row>


    </div>
    <script src="https://cdn.jsdelivr.net/npm/vue/dist/vue.js"></script>
    <!-- 引入组件库 -->
<script src="https://unpkg.com/element-ui/lib/index.js"></script>
    <script>
        var vm=new Vue({
            el:'#app',
            data:{
                num1:null,
                num2:null,
                sel:'+',
                res:null,
                options: [{
                    value: '+',
                    label: '加'
                    }, {
                    value: '-',
                    label: '减'
                    }, {
                    value: '*',
                    label: '乘'
                    }, {
                    value: '/',
                    label: '除'
                    }]
            },
            methods:{
                btn(){
                    if(this.sel=="+"){
                        this.res = parseInt(this.num1)+parseInt(this.num2);
                    }else if(this.sel=='-'){
                        this.res = parseInt(this.num1)-parseInt(this.num2);
                    }else if(this.sel=='*'){
                        this.res = parseInt(this.num1)*parseInt(this.num2);
                    }else if(this.sel=='/'){
                        this.res = parseInt(this.num1)/parseInt(this.num2);
                    }
                }
            }
        })
    </script>
</body>
</html>


mint-ui的官网文档:https://mint-ui.github.io/docs/#/zh-cn2
第9章 axios发送HTTP请求
//用vue-cli命令创建项目
vue init webpack axiosdemo
//进入到项目目录安装axios
npm install axios -S
//项目中的main.js加入
import axios from 'axios'
Vue.prototype.$axios=axios
//项目中的Helloworld.vue就可以使用了
<script>
export default {
  name: 'HelloWorld',
  data () {
    return {
      msg: 'Welcome to Your Vue.js App'
    }
  },
  created(){ //页面加载完成后
    var url = "http://api.mm2018.com:8090/api/goods/home";
    this.$axios.get(url)
      .then(res=>{
        console.log(res);
      })
  }
}
</script>
第10章 Vuex状态管理
看了下感觉好像没啥用,要用的时候再看官网吧
https://vuex.vuejs.org/zh/index.html
第11章 企业项目实战
主要也是一个列表页和详情页,具体可看代码,和第14章的差不多的,只是把uni的ajax方式 改为axios方式来取远程数据了
第12章 Vue 3.X新特性解析
官网文档:https://cn.vuejs.org/guide/introduction.html
第13章 uni-app核心基础
装HBuilderX,https://www.dcloud.io/hbuilderx.html
相关文档:https://uniapp.dcloud.net.cn/
第14章 uni-app企业项目实战
就主要是一个列表页及一个详情页,具体代码如下 :
<template>
	<view class="content">
		<image class="logo" src="/static/logo.png"></image>
		<view class="text-area">
			<text class="title">{{title}}</text>

		</view>
	<view v-for="item in productList" @click="detail(item.productId)">
		<text>{{item.productName}} ¥{{item.salePrice}}</text>
	</view>
	</view>
</template>

<script>
	export default {
		data() {
			return {
				productList:[],
				title:'新闻列表',
				arr:[{productName:'aaa',salePrice:30},{productName:'bb',salePrice:20}]
			}
		},
		onLoad() {
			this.getData();
		},
		methods: {
			getData(){
				uni.request({
					url:`http://api.mm2018.com:8095/api/goods/allgoods?page=1&size=8&sort=&pricegt=&pricelte=`,
					method:'GET',
					//success(res) {  //这样是不行的,虽然console.log能出来东西,但赋值不上
					success:res=>{
						console.log(res.data.data);
						this.productList = res.data.data;
					}
				})
			},
			detail(productId){
				var url = "/pages/detail/detail?productId="+productId;
				uni.navigateTo({
					url:url
				})
			}
		}
	}
</script>
<template>
	<view>
		商品详情
		<view>ID:{{productData.productId}}</view>
		<view>商品名称:{{productData.productName}}</view>

		<view>
			价格:¥{{productData.salePrice}}
		</view>
	</view>
</template>

<script>
	export default {
		data() {
			return {
				productData:{
					productId:0,
					productName:'',
					salePrice:0,
				}
			}
		},
		methods: {

		},
		onLoad(option){
			var productId = option.productId;
			this.productData.productId = productId;
			 var url = "http://api.mm2018.com:8095/api/goods/productdet?productid="+productId;
			uni.request({
				url:url,
				method:'GET',
				success: (res) => {
					console.log(res);
					if(res.data!=''){
						console.log('赋值');
						this.product = res.data;
					}
				}
			})

		}
	}
</script>

 浙公网安备 33010602011771号