Identity Server 3独立实现第1部分
不再支持IdentityServer3。我强烈建议您考虑使用IdentityServer4。
![]()
欢迎使用《 Identity Server 3实施指南》的第一部分。首先,我们将使用隐式流程逐步完成Identity Server 3的独立实现,以使基本MVC应用程序可以对其进行身份验证。最初的帖子将与入门文档相似,不同之处在于,它使用了独立的实现,并花了一些时间详细讨论一些概念。我们将从隐式流程开始,因为这是最简单的演示,也是IdentityServer的默认流程,它使用以后的文章来解释混合流程并授权对API的访问。
安装
首先,我们需要一个空的ASP.NET应用程序,不需要模板。确保通过项目属性启用SSL,并将此HTTPS URL设置为项目默认值。
以下两个NuGet软件包对于安装Identity Server 3是必需的:
install-package IdentityServer3
install-package Microsoft.Owin.Host.Systemweb在哪里获取Microsoft.Owin.Host.Systemweb用于在IIS中托管OWIN管道的必要软件包(Identity Server作为Owin / Katana组件运行)。
组态
对于此演示,我们将使用Identity Server提供的内存中配置存储。这些商店需要一个集合来初始化,我们现在可以创建它。
客户群
客户端类是OAuth和OpenID Connect客户端的集合。在这里,我们可以控制每个客户端应用程序如何与Identity Server交互以及可以使用的URI。我们在此处配置的客户端将在本指南的第2部分中使用。
public static class Clients {
    public static IEnumerable<Client> Get() {
        return new List<Client> {
            new Client {
                ClientId = "implicitclient",
                ClientName = "Example Implicit Client",
                Enabled = true,
                Flow = Flows.Implicit,
                RequireConsent = true,
                AllowRememberConsent = true,
                RedirectUris =
                  new List<string> {"https://localhost:44304/account/signInCallback"},
                PostLogoutRedirectUris =
                  new List<string> {"https://localhost:44304/"},
                AllowedScopes = new List<string> {
                    Constants.StandardScopes.OpenId,
                    Constants.StandardScopes.Profile,
                    Constants.StandardScopes.Email
                },
                AccessTokenType = AccessTokenType.Jwt
            }
        };
    }
}该客户端Id是客户的唯一ID。将来的任何客户端应用程序都将引用此文件,以便与Identity Server进行交互。
ClientName将是在任何同意屏幕上显示的标识符。
启用允许您启用和禁用单个客户端。
Flow是为客户端设置OpenID Connect流的枚举。可用的流是:隐式,AuthorizationCode,混合,ClientCredentials,ResourceOwner和自定义(默认为隐式)。
RequireConsent和AllowRememberConsent激活并控制登录的同意屏幕。这些都默认为true。
RedirectUris是URI的集合,可以为此客户端返回令牌和授权代码。如果URI不在此列表中,则它无法使用此客户端与Identity Server进行交互。
PostLogoutRedirectUris是Identity Server在注销后可以重定向到的URI的集合。否则,用户将停留在Identity Server的默认注销成功屏幕上。
ScopeRestrictions是允许请求并返回给此客户端的OpenID Connect范围的列表。我们可以在此处利用Identity Server提供的预定义枚举。不设置此选项将允许检索所有范围(默认为空列表)。
AccessTokenType默认为JWT。另一个选择是Reference,它在本地存储JWT,然后向客户端发送对其的引用,使您可以轻松地撤销令牌。
所有令牌的生存期均保留为默认值,您可以在官方文档中找到这些默认值。
范围
现在,我们需要配置Identity Server可以提供的范围。这些作用域还将显示在OpenID Connect发现文档中。
public static class Scopes {
    public static IEnumerable<Scope> Get() {
        return new List<Scope> {
            StandardScopes.OpenId,
            StandardScopes.Profile,
            StandardScopes.Email,
            StandardScopes.Roles,
            StandardScopes.OfflineAccess
        };
    }
}
证书
就本示例而言,我们将使用IdentityServer3示例存储库中的示例签名证书。如果要使用此方法,请不要忘记将证书添加到项目中并将其作为嵌入式资源包括在内。
internal static class Cert {
    public static X509Certificate2 Load() {
        var assembly = typeof(Cert).Assembly;
        using (var stream = assembly.GetManifestResourceStream(
            "ScottBrady91.IdentityServer3.Example.Configuration.idsrv3test.pfx")) {
            return new X509Certificate2(ReadStream(stream), "idsrv3test");
        }
    }
    private static byte[] ReadStream(Stream input) {
        var buffer = new byte[16 * 1024];
        using (var ms = new MemoryStream()) {
            int read;
            while ((read = input.Read(buffer, 0, buffer.Length)) > 0) {
                ms.Write(buffer, 0, read);
            }
            return ms.ToArray();
        }
    }
}请注意,不建议您像这样嵌入证书。在生产环境中,应将其添加到证书存储中。请参阅此处有关使用Azure网站证书存储的说明。
用户数
在实施适当的用户服务之前,为了进行演示,我们将使用需要收集的内存中服务InMemoryUser。这些仅适用于开发。
public static class Users {
    public static List<InMemoryUser> Get() {
        return new List<InMemoryUser> {
            new InMemoryUser {
                Subject = "1",
                Username = "Scott Brady",
                Password = "Password123!",
                Claims = new List<Claim> {
                    new Claim(Constants.ClaimTypes.GivenName, "Scott"),
                    new Claim(Constants.ClaimTypes.FamilyName, "Brady"),
                    new Claim(Constants.ClaimTypes.Email, "info@scottbrady91.com"),
                    new Claim(Constants.ClaimTypes.Role, "Badmin")
                }
            }
        };
    }
}
启动
现在剩下的就是将IdentityServer添加到Owin启动类中。
public sealed class Startup {
    public void Configuration(IAppBuilder app) {
        app.Map(
            "/core",
            coreApp => {
                coreApp.UseIdentityServer(new IdentityServerOptions {
                    SiteName = "Standalone Identity Server",
                    SigningCertificate = Cert.Load(),
                    Factory = new IdentityServerServiceFactory()
                            .UseInMemoryClients(Clients.Get())
                            .UseInMemoryScopes(Scopes.Get())
                            .UseInMemoryUsers(Users.Get()),
                    RequireSsl = true
                });
            });
    }
}在这里,我们使用InMemory客户端存储,范围存储和用户服务。这些仅供开发使用。在生产中,您会看到使用用户存储(例如ASP.NET Identity)以及使用实体框架的客户端和作用域存储实现的用户服务。如您所料,内存中的存储器是易失的。
您不必将Identity Server映射到这样的路由,但是我发现它可以使OWIN管道在使用其他OWIN中间件时保持简单和整洁,尤其是当您将Identity Server嵌入到另一个项目中时。
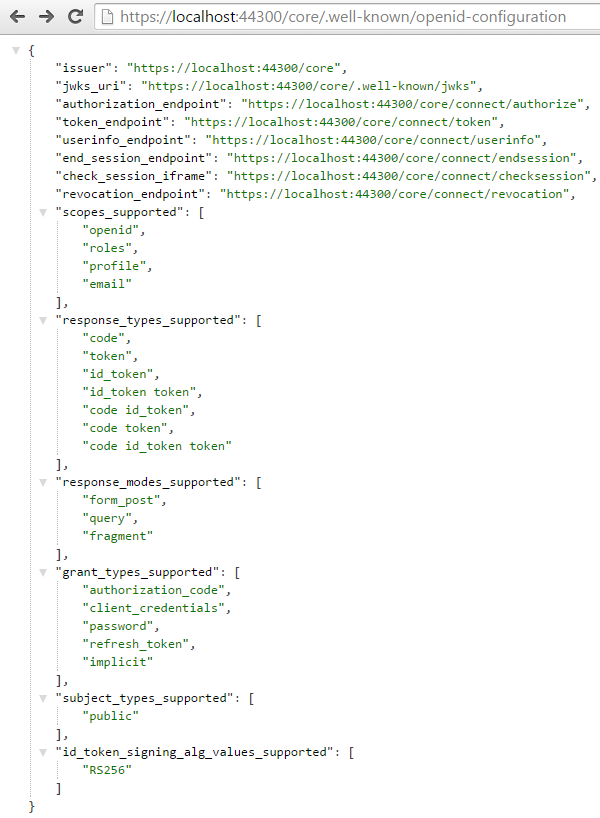
现在,我们可以启动项目并在以下位置签出OpenID Connect发现端点 /.well-known/openid-configuration
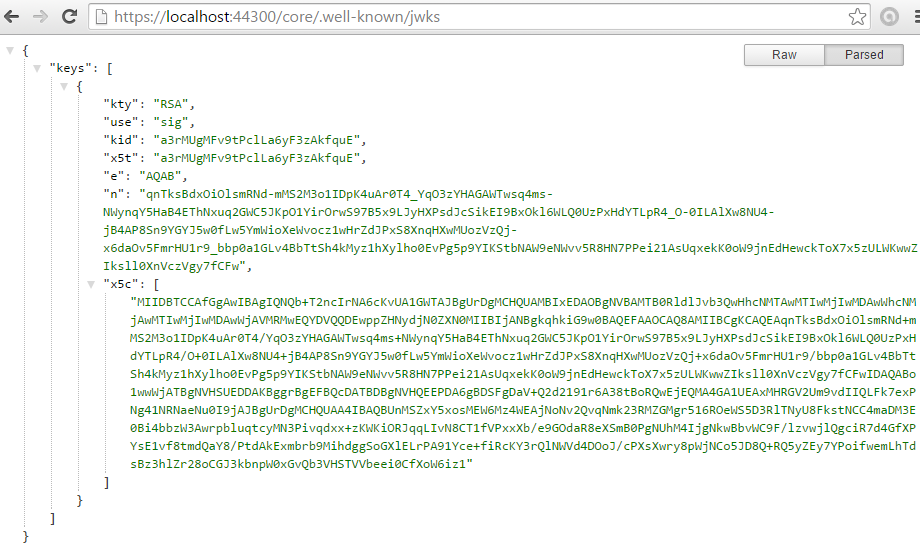
我们还可以使用jwks端点来确认证书已被使用并可供发现 /.well-known/jwks
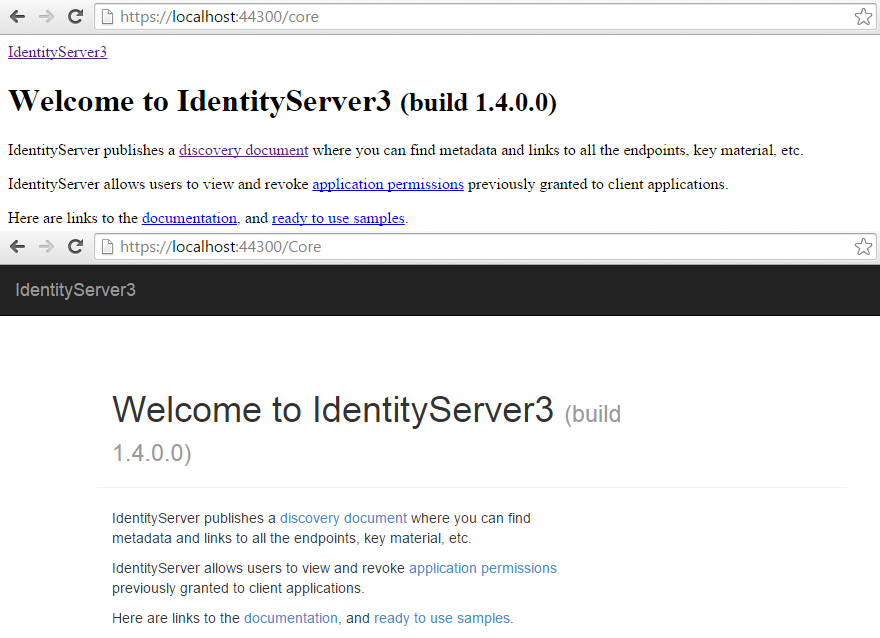
我们还需要在web.config中启用RAMMFAR,否则IdentityServer的嵌入式资源将无法正确加载。
<system.webServer>
  <modules runAllManagedModulesForAllRequests="true" />
</system.webServer>
参见下文,了解造成的差异:
源代码
我已经为这些帖子中涵盖的工作源代码创建了一个存储库,随着我在每个主题上的扩展,这些存储库将不断发展。你可以找到这个仓库在这里 GitHub上。随时指出任何错误或假设。
在本指南的下一部分中,我将介绍使用显式发现和自动发现与上述实现进行交互的各种方式。
身份服务器3 v2
2015年8月,Identity Server团队实现了Identity Server 3的2.0.0版本。此新程序包在常规配置选项中进行了一些小的重大更改,但最值得注意的是名称空间从Thinktecture.IdentityServer更改为IdentityServer3。身份团队已从IdentityServer,IdentityManager和IdentityModel的整个Identity系列中删除了Thinktecture的术语。
您可以在初始公告和发行更改日志中阅读有关Identity Server 3 v2.0.0的更多信息。
v2变更
对示例代码的更改非常少,在我们的Users和Scopes类中无需进行任何更改。
在我们的“客户”类别中,ScopeRestrictions已变得更加清晰,并更改为AllowedScopes。默认情况下,客户端不再有权访问任何范围,从而迫使开发人员明确声明其范围。我已经注意到,这在过去引起了人们的困惑,因此希望这可以解决问题。
同样在此类中,ClientSecret已重命名为just Secret。
我们的OWIN Startup类也做了一些更改,其中删除了InMemoryFactory。现在,我们必须重新IdentityServerServiceFactory使用“ UseInMemory”扩展方法来分配任何InMemory类。
v3计划在2016年进行进一步的重大更改。
资料来源

 浙公网安备 33010602011771号