如何在解决方案中使用ASP.NET Identity和IdentityServer4
身份管理是任何解决方案的重要组成部分。 在本文中,我将通过结合使用IdentityServer4和ASP.NET Identity来构建身份服务。
任何现代应用程序都包含许多组件:前端,后端和第三方API。 您应该如何实施身份验证和授权?
ASP.NET Core Identity是什么?
ASP.NET Core Identity是成员身份nuget程序包,可在任何ASP.NET项目类型中使用:MVC,WebForms,WebAPI。 它具有以下主要功能:
- 轻松自定义用户配置文件数据。
- 使用Entity Framework Code First将用户的信息存储在持久性数据存储中。
- 单元可测试性
- 按角色限制访问
- 基于声明的提供者
ASP.NET Identity是身份验证和授权提供程序。 为什么我们需要IdentityServer4?
ASP.NET Identity可以从第三方登录提供商(如Facebook,Google,Microsoft和Twitter)接收安全令牌。 但是,如果要为本地ASP.NET Identity用户颁发安全令牌,则需要使用第三方库(例如IdentityServer4,OpenIddict)。
如果进行一些研究,您会发现IdentityServer4是最常见的。
IdentityServer4是什么?
IdentityServer4是用于ASP.NET Core的OpenID Connect和OAuth 2.0框架。 它是一个nuget程序包,在asp.net核心中间件中使用它来启用使用登录/注销,令牌/授权和其他标准协议终结点的功能。
为了对体系结构有一个很好的了解,我认为您最好回顾一下本文中将使用的主要术语:
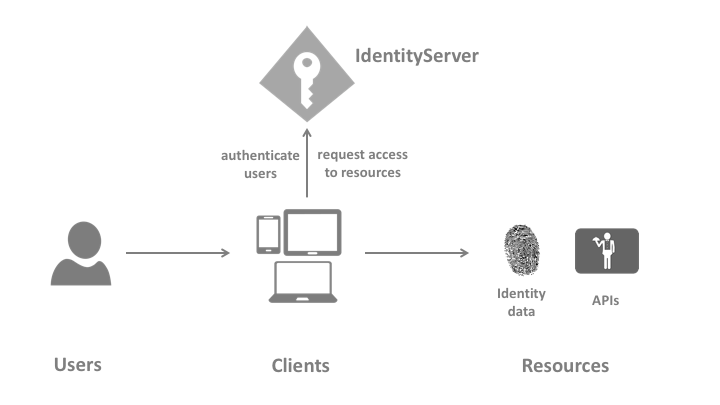
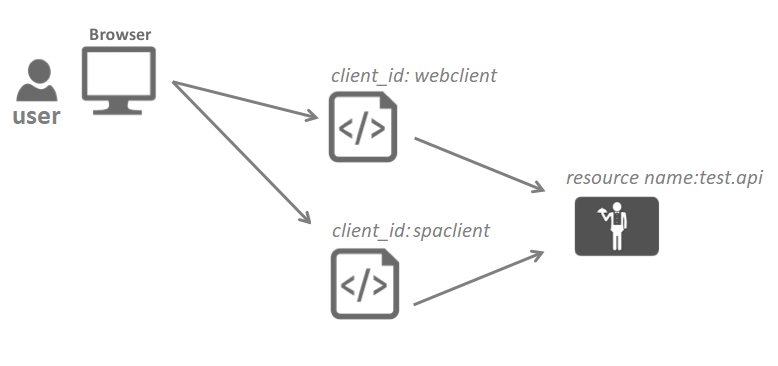
- User: 正在使用客户端的人(我和您)
- Client: 网络浏览器,移动应用之类的软件,以及要求资源的任何代码。
- Resources: 您要使用Identityserver4保护的内容
- Access Token: 客户端用于访问API资源的令牌。
- Refresh Token: 每个访问令牌都有一个有效期。 刷新令牌用于在无需用户交互的情况下获取新的访问令牌。 应该允许客户端通过在IdentityServer4的客户端配置中将AllowOfflineAccess设置为true来执行此操作。
- Grant Type:这是客户端和IdentityServer之间交互的类型。 根据您的客户,您应该选择合适的授予类型。
构建 Identity Service
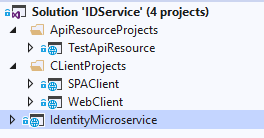
您可以在IdentityServer4文档( IdentityServer4 docs )中查看以下步骤,以获取更多详细信息。 最后的输出将是Visual Studio 2019解决方案,其中包含:
- IdentityMicroservice (IdentityServer4 and ASP.NET Identity)
- ClientsProjects\SPAClient (Single Page Application Client)
- ClientsProjects\WebClient (ASP.NET MVC Client)
- ApiResrouceProjects\TestApiResource (Represents a secured resource)
1- Identity MicroService Project Startup
这是负责保护API,配置客户端和存储用户数据的项目。 您可以在Github上查看源代码 source code on Github.。
步骤如下:
创建一个新的ASP.NET CORE Web应用程序(空)项目。

通过执行以下命令来安装IdentityServer4模板:
dotnet new -i IdentityServer4.Templates
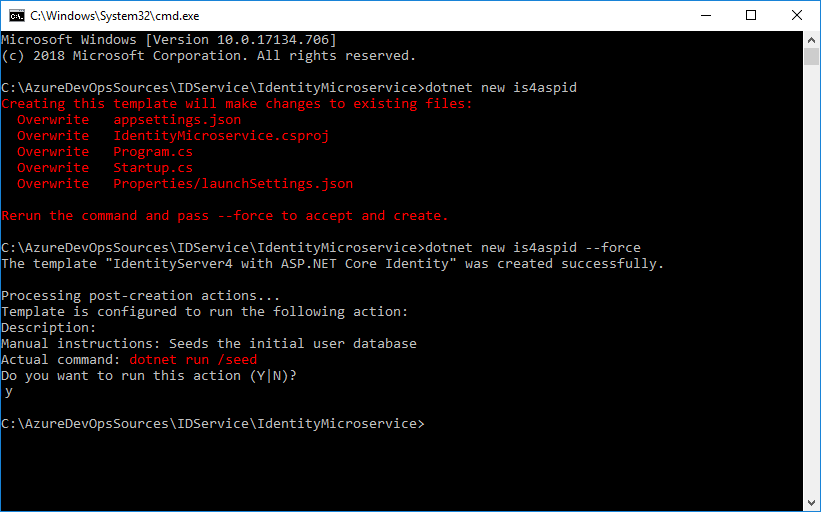
通过运行以下命令将IdentityServer4及其QuickStart UI文件 QuickStart 以及ASP.NET Identity Nuget包添加到项目中:
dotnet new is4aspid --force
在 .NET Core 2.2中:
运行上述命令后,请确保将项目更改为.NET 2.2并更新Nuget软件包,因为执行该命令会影响.csproj文件,并可能基于IdentityServer4.Templates版本降级.net核心版本。
您可能需要通过直接修改csproj文件来更新以下Nuget软件包:
"Microsoft.VisualStudio.Web.CodeGeneration.Design" Version="2.2.3"
"Microsoft.EntityFrameworkCore.Tools" Version="2.2.4"
在 .NET Core 3.1中
运行上述命令后,请确保将项目从.NET Core 3.0更改为.Net Core 3.1,并将IdentityServer4 Nuget软件包从3.0更新为3.1,因为执行该命令会影响.csproj文件并可能降级.net 基于IdentityServer4.Templates版本的核心版本。
您将更新以下Nuget软件包:
"Microsoft.EntityFrameworkCore.Tools" Version="3.1.0"
您需要删除“ Microsoft.AspNetCore.App” nuget程序包,因为.NET Core 3.1不需要此程序包。 由于缺少Nuget软件包,会在ApplicationDbContext和Startup.cs中导致错误,请安装:
- Microsoft.AspNetCore.Identity.EntityFrameworkCore 3.1.0
- Microsoft.AspNetCore.Diagnostics.EntityFrameworkCore 3.1.0
您还将收到有关IHostingEnvironment的警告消息,因为此接口在.NET Core 3.1中已替换,因此您应该使用IWebHostEnvironment。
在startup.cs文件的ConfigureServices()中添加此内容:
//services.AddMvc().SetCompatibilityVersion(Microsoft.AspNetCore.Mvc.CompatibilityVersion.Version_2_1);
services.AddControllersWithViews();
在startup.cs文件的Configure()中,您需要对此进行修改:
app.UseRouting();
	    // Block 4:
            //  UseIdentityServer include a call to UseAuthentication
            app.UseIdentityServer();
            app.UseAuthorization();

            //app.UseMvcWithDefaultRoute();
            app.UseEndpoints(endpoints =>
            {
                endpoints.MapControllerRoute(
                    name: "default",
                    pattern: "{controller=Home}/{action=Index}/{id?}");
            });
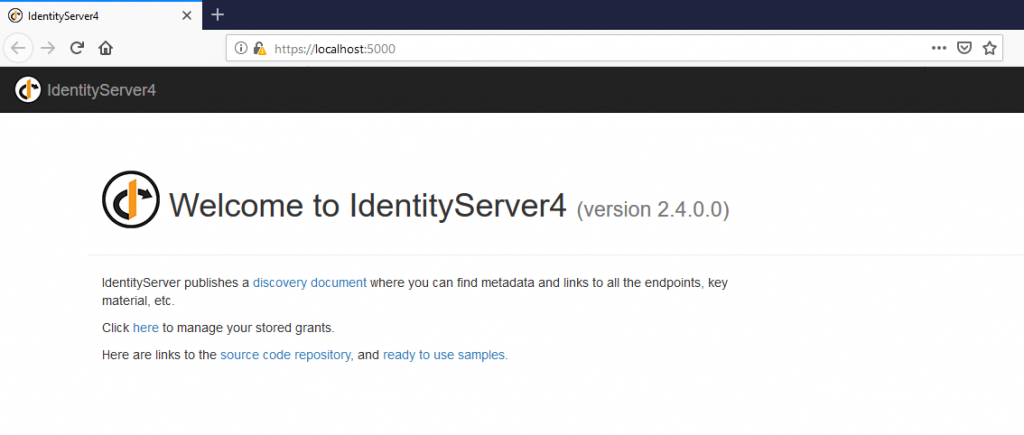
之后,您就可以构建项目以确保其正在运行了.
2- 配置 Identity MicroService 项目
您应查看和修改的主要文件:
- Config.cs
- Startup.cs
定义您的资源与客户端
IdentityServer4提供了两个配置选项。 您可以使用InMemory配置或使用数据库存储。 在本示例中,为简洁起见,我们将使用InMemory。
在config.cs文件中,您将定义要保护的API资源以及用户将用来访问其资源的客户端。 下一步将使用此文件,在Startup.cs中添加中间件。
在实际方案项目中,您需要使用数据库配置。 IdentityServer4已使用EntityFramework Core为SQL Server(SQL Server using EntityFramework Core)提供了现成的实现。 在此的示例Config.cs文件将类似于以下内容:
// Block 1: All APIs, I want to protect in my system
        public static IEnumerable GetApis()
        {
            return new ApiResource[]
            {
                new ApiResource("identity.api", "Identity API"),
                new ApiResource("test.api","Test API")
            };
        }

        public static IEnumerable GetClients()
        {
            return new[]
            {
                //Block 2:  MVC client using hybrid flow
                new Client
                {
                    ClientId = "webclient",
                    ClientName = "Web Client",
                    RequireConsent = false,
                    AllowedGrantTypes = GrantTypes.HybridAndClientCredentials,
                    ClientSecrets = { new Secret("49C1A7E1-0C79-4A89-A3D6-A37998FB86B0".Sha256()) },

                    RedirectUris = { "https://localhost:5002/signin-oidc" },
                    FrontChannelLogoutUri = "https://localhost:5002/signout-oidc",
                    PostLogoutRedirectUris = { "https://localhost:5002/signout-callback-oidc" },

                    AllowOfflineAccess = true,
                    AllowedScopes = { "openid", "profile", "identity.api","test.api" }
                },

                //Block 3: SPA client using Code flow
                new Client
                {
                    ClientId = "spaclient",
                    ClientName = "SPA Client",
                    ClientUri = "https://localhost:5003",
                    RequireConsent = false,
                    AllowedGrantTypes = GrantTypes.Code,
                    RequirePkce = true,
                    RequireClientSecret = false,
                    AllowAccessTokensViaBrowser = true,

                    RedirectUris =
                    {