深入理解Linux系统调用
环境准备
1. 安装环境
1 sudo apt install build-essential
2 sudo apt install qemu # install QEMU
3 sudo apt install libncurses5-dev bison flex libssl-dev libelf-dev
4 sudo apt install axel
2. 下载linux5.4.34源码
1 axel -n 20 https://mirrors.edge.kernel.org/pub/linux/kernel/v5.x/linux-5.4.34.tar.xz
2 xz -d linux-5.4.34.tar.xz
3 tar -xvf linux-5.4.34.tar cd linux-5.4.34
3. 配置内核编译选项
make defconfig #Default configuration is based on 'x86_64_defconfig'
make menuconfig
#打开debug相关选项
Kernel hacking --->
    Compile-time checks and compiler options --->
        [*] Compile the kernel with debug info
        [*] Provide GDB scripts for kernel debugging [*] Kernel debugging
#关闭KASLR,否则会导致打断点失败
Processor type and features ---->
    [] Randomize the address of the kernel image (KASLR)
4. 编译内核
1 make -j$(nproc)
2 # 测试一下内核能不能正常加载运行,因为没有文件系统最终会kernel panic
3 qemu-system-x86_64 -kernel arch/x86/boot/bzImage
5. 制作根文件系统
下载
1 axel -n 20 https://busybox.net/downloads/busybox-1.31.1.tar.bz2
2 tar -jxvf busybox-1.31.1.tar.bz2
3 cd busybox-1.31.1
制作根文件系统
make menuconfig
记得要编译成静态链接,不用动态链接库。
Settings --->
    [*] Build static binary (no shared libs)
然后编译安装,默认会安装到源码目录下的 _install 目录中。
make -j$(nproc) && make install
6. 制作内存根文件系统镜像
1 mkdir rootfs
2 cd rootfs
3 cp ../busybox-1.31.1/_install/* ./ -rf
4 mkdir dev proc sys home
5 sudo cp -a /dev/{null,console,tty,tty1,tty2,tty3,tty4} dev/
7. 准备init脚本文件放在根文件系统跟目录下(rootfs/init),添加如下内容到init文件。
1 #!/bin/sh
2 mount -t proc none /proc mount -t sysfs none /sys
3 echo "Wellcome MengningOS!" echo "--------------------"
4 cd home
5 /bin/sh
给init脚本添加可执行权限
1 chmod +x init
打包成内存根文件系统镜像
1 find . -print0 | cpio --null -ov --format=newc | gzip -9 > ../rootfs.cpio.gz
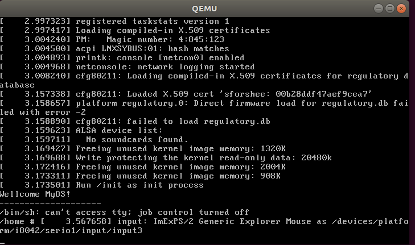
测试挂载根文件系统,看内核启动完成后是否执行init脚本
1 qemu-system-x86_64 -kernel linux-5.4.34/arch/x86/boot/bzImage -initrd rootfs.cpio.gz
查看系统调用并编写调用汇编代码
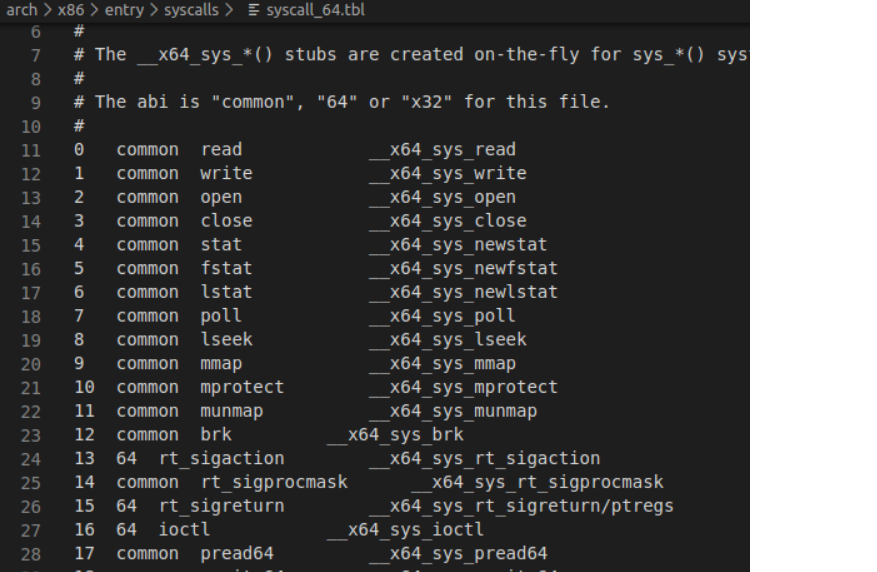
我的系统调用号是10, mprotect()函数

gcc编译(这里采用静态编译)后运行,输出结果:
gcc -o write-file wrrite-file.c -stat
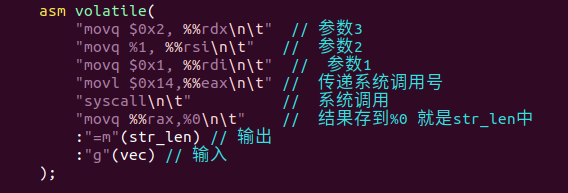
汇编改写手动触发系统调用
新建在 rootfs/home 目录下新建文件 test.c,在后面添加以下内容:
gcc编译后查看执行结果
gdb调试与分析
重新打包根文件目录,纯命令⾏下启动虚拟机。
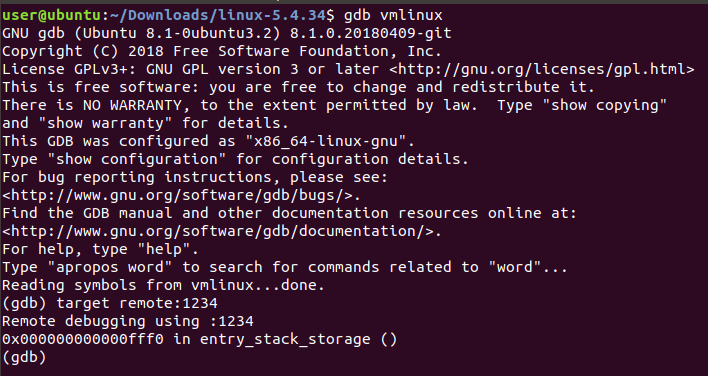
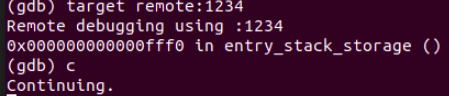
qemu-system-x86_64 -kernel shiyan/linux-5.4.34/arch/x86/boot/bzImage -initrd rootfs.cpio.gz -S -s -nographic -append "console=ttyS0",此时虚拟机会暂停在启动界面。在另一个terminal中开启gdb调试 gdb vmlinux,连接进行调试,target remote:1234。结果如下图所示:

然后给对应的系统调用打上断点
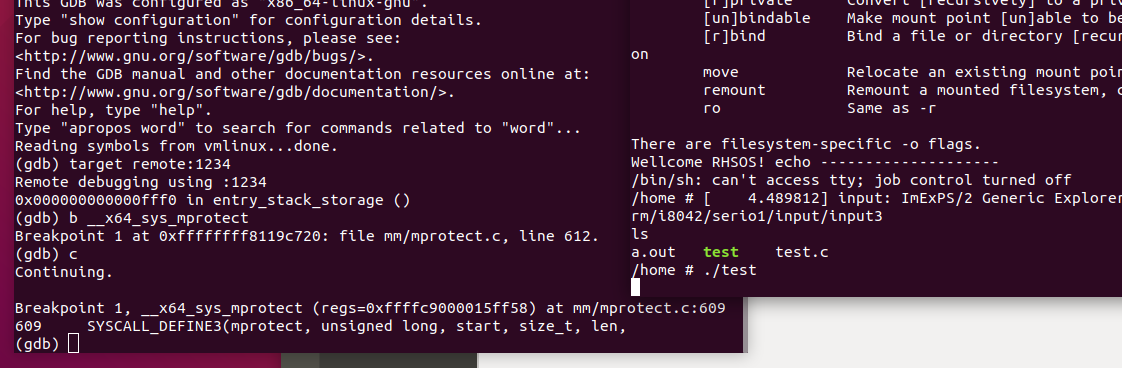
gdb单步调试


结果分析‘
系统调用的保存现场和恢复现场;entry_SYSCALL_64是系统调用的入口点,它完成了保存现场,调用对应的内核处理函数、恢复现场、系统调用返回等工作。

汇编指令syscall 触发系统调用,通过MSR寄存器找到了中断函数入口;
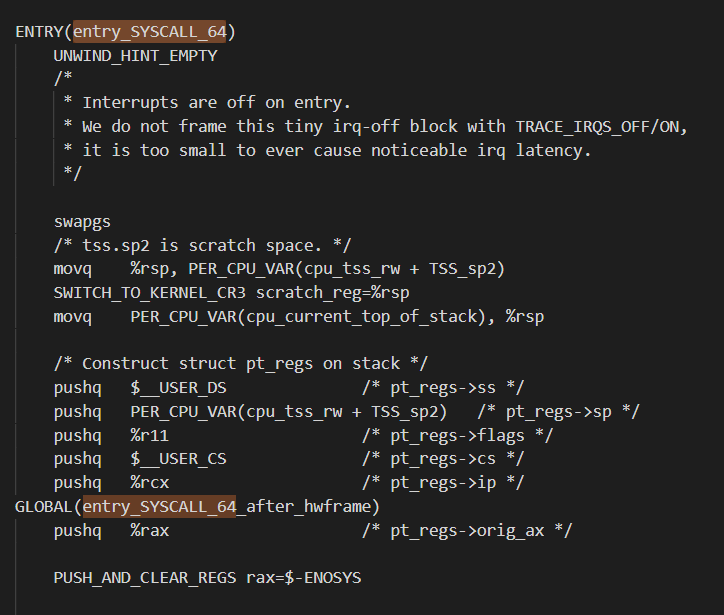
接着跳转获得系统调用号,执行系统调用的内容

 浙公网安备 33010602011771号