06-Flutter移动电商实战-dio基础_Get_Post请求和动态组件协作
上篇文章中,我们只看到了 dio 的使用方式,但并未跟应用关联起来,所以这一篇将 dio 网络请求与应用界面结合起来,当然这也是为以后的实战作基础准备,基础打牢,我们才能飞速前进。
1、案例说明
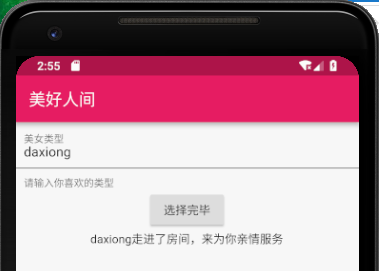
我们还是作去“大保健”选择服务对象这个例子,不过这次我们使用按钮和动态组件来实现。具体业务逻辑是这样的:
- 我们制作一个文本框,用于输入需要什么样的美女为我们服务
- 然后点击按钮,相当于去后端请求数据
- 后端返回数据后,根据你的需要美女就会走进房间
一图顶千言
2、生成动态组件
可以使用stful的快捷方式,在AndroidStudio里快速生成StatefulWidget的基本结构,我们只需要改一下类的名字就可以了,就会得到如下代码.
class HomePage extends StatefulWidget {
  _HomePageState createState() => _HomePageState();
}

class _HomePageState extends State<HomePage> {
  @override
  Widget build(BuildContext context) {
    return Container(
       child: child,
    );
  }
}
3、加入文本框Widget
有了动态组件,咱们先把界面布局作一下。
Widget build(BuildContext context) {
    return Container(

        child: Scaffold(
          appBar: AppBar(title: Text('美好人间'),),
          body:Container(
            height: 1000,
            child: Column(
              children: <Widget>[
                TextField(
                  controller:typeController,
                  decoration:InputDecoration (
                    contentPadding: EdgeInsets.all(10.0),
                    labelText: '美女类型',
                    helperText: '请输入你喜欢的类型'
                  ),
                  autofocus: false,
                ),
                RaisedButton(
                  onPressed:_choiceAction,
                  child: Text('选择完毕'),
                ),

                Text(
                  showText,
                    overflow:TextOverflow.ellipsis,
                    maxLines: 2,
                ),
                ],
            ),
          )
        ),
    );
  }
4、Dio的get_post方法
布局完成后,可以先编写一下远程接口的调用方法,跟上节课的内容类似,不过这里返回值为一个Future,这个对象支持一个等待回掉方法then。具体代码如下:
Future getHttp(String TypeText)async{
    try{
      Response response;
      var data={'name':TypeText};
      response = await Dio().get(
        "https://www.easy-mock.com/mock/5c60131a4bed3a6342711498/baixing/dabaojian",
          queryParameters:data
      );
      return response.data;
    }catch(e){
      return print(e);
    }
  }
post方法如上方几乎一致,只是改变了请求方式:
 Future getHttp(String TypeText) async{
    try{
      Response response;
      var data={'name':TypeText};
      response = await Dio().post(
          "https://www.easy-mock.com/mock/5c60131a4bed3a6342711498/baixing/post_dabaojian",
          queryParameters:data
      );
      return response.data;
    }catch(e){
      return print(e);
    }
  }
为何要返回 Feature,只有返回 Feature 才能使用 then 回调。
5、得到数据后的处理
当我们写完内容后,要点击按钮,按钮会调用方法,并进行一定的判断。比如判断文本框是不是为空。然后当后端返回数据时,我们用setState方法更新了数据。
具体代码如下:
void _choiceAction(){
    print('开始选择你喜欢的类型............');
    if(typeController.text.toString()==''){
      showDialog(
        context: context,
        builder: (context)=>AlertDialog(title:Text('美女类型不能为空'))
      );
    }else{
        getHttp(typeController.text.toString()).then((val){
         setState(() {
           showText=val['data']['name'].toString();
         });
        });
    }

  }
6、案例全部代码
import 'package:flutter/material.dart';
import 'package:dio/dio.dart';


class HomePage extends StatefulWidget {
  _HomePageState createState() => _HomePageState();
}

class _HomePageState extends State<HomePage> {

  TextEditingController typeController = TextEditingController();
  String showText = '欢迎你来到美好人间';
  @override
  Widget build(BuildContext context) {
    return Container(

        child: Scaffold(
          appBar: AppBar(title: Text('美好人间'),),
          body:Container(
            height: 1000,
            child: Column(
              children: <Widget>[
                TextField(
                  controller:typeController,
                  decoration:InputDecoration (
                    contentPadding: EdgeInsets.all(10.0),
                    labelText: '美女类型',
                    helperText: '请输入你喜欢的类型'
                  ),
                  autofocus: false,
                ),
                RaisedButton(
                  onPressed:_choiceAction,
                  child: Text('选择完毕'),
                ),

                Text(
                  showText,
                    overflow:TextOverflow.ellipsis,
                    maxLines: 2,
                ),

                ],
            ),
          )
        ),
    );
  }

  void _choiceAction(){
    print('开始选择你喜欢的类型............');
    if(typeController.text.toString()==''){
      showDialog(
        context: context,
        builder: (context)=>AlertDialog(title:Text('美女类型不能为空'))
      );
    }else{
        getHttp(typeController.text.toString()).then((val){
         setState(() {
           showText=val['data']['name'].toString();
         });
        });
    }

  }

  Future getHttp(String TypeText)async{
    try{
      Response response;
      var data={'name':TypeText};
      response = await Dio().get(
        "https://www.easy-mock.com/mock/5c60131a4bed3a6342711498/baixing/dabaojian",
          queryParameters:data
      );
      return response.data;
    }catch(e){
      return print(e);
    }
  }
}
7、总结
通过这节课的学习,我们应该掌握如下知识点
- 对Flutter动态组件的深入了解
- Future对象的使用
- 改变状态和界面的setState的方法应用
- TextField Widget的基本使用

 浙公网安备 33010602011771号