移除链表元素&反转链表&设计链表
 移除链表元素&反转链表&设计链表方法思想总结
一、移除链表元素
1.方法概述
带傀儡节点的方法:
- 创建一个傀儡节点puppet来充当该链表的假头节点,当真正的头结点head不为null时,且在真正的头节点head的val值在等于删除值val时进行删除操作的方式则与后面与删除值val相等的节点的删除方法一致。删除完后返回傀儡节点puppet的next域指向的节点即可。
不带傀儡节点的方法:
- 不带傀儡节点,当真正的头结点head不为null时,就需要考虑头节点的val值是否等于删除值val,如果等于则需要将head指向head的next域所指的节点,也就是向后挪一个节点达到删除的目的。再进行删除操作。最后返回头节点即可。
2.具体实现
Java版本实现带傀儡节点的方法:
点击查看代码
/**
 * Definition for singly-linked list.
 * public class ListNode {
 *     int val;
 *     ListNode next;
 *     ListNode() {}
 *     ListNode(int val) { this.val = val; }
 *     ListNode(int val, ListNode next) { this.val = val; this.next = next; }
 * }
 */
class Solution {
    public ListNode removeElements(ListNode head, int val) {
        if (head == null) {
            return head;
        }
        ListNode puppet = new ListNode(-1, head);
        ListNode pre = puppet;
        ListNode cur = head;
        while (cur != null) {
                if (cur.val == val) {
                pre.next = cur.next;
            } else {
                pre = cur;
            }
            cur = cur.next;
        }
        return puppet.next;
    }
}
Java版本实现不带傀儡节点的方法:
点击查看代码
/**
 * Definition for singly-linked list.
 * public class ListNode {
 *     int val;
 *     ListNode next;
 *     ListNode() {}
 *     ListNode(int val) { this.val = val; }
 *     ListNode(int val, ListNode next) { this.val = val; this.next = next; }
 * }
 */
class Solution {
    public ListNode removeElements(ListNode head, int val) {
        while(head != null && head.val == val){
            head = head.next;
        }

        if (head == null) {
            return head;
        }

        ListNode prev = head;
        ListNode cur = head.next;
        while (cur != null) {
           if(cur.val == val){
                prev.next = cur.next;
            }else{
                prev = cur;
            }
            cur = cur.next;
        }
        return head;
    }
}
3.要点总结
- 是否带傀儡节点。
- 删除的位置是否为头节点head,如果节点的val值为删除值val,该是如何移动,否则该如何移动。
- 该如何删除。
二、反转链表
1.方法概述
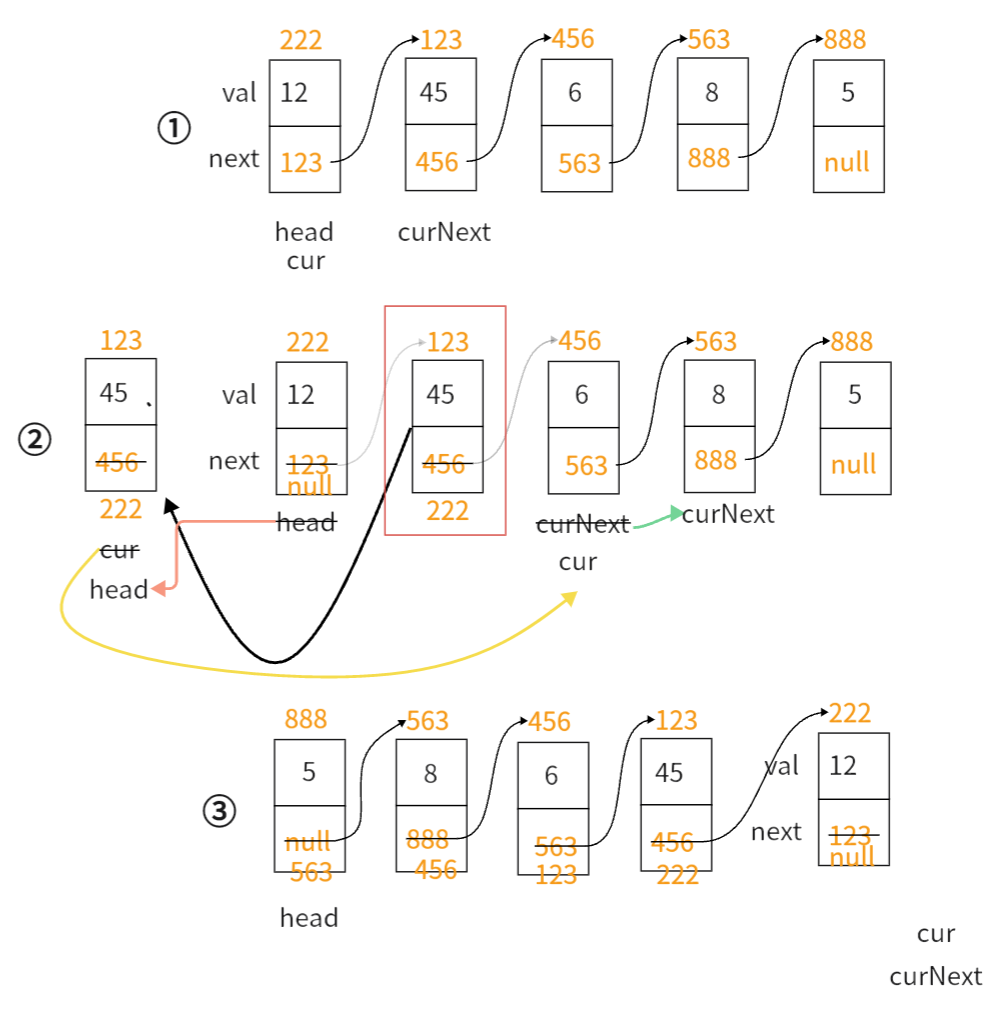
- 将头节点之后的节点用头插法的方式进行反转。
三个引用方法:
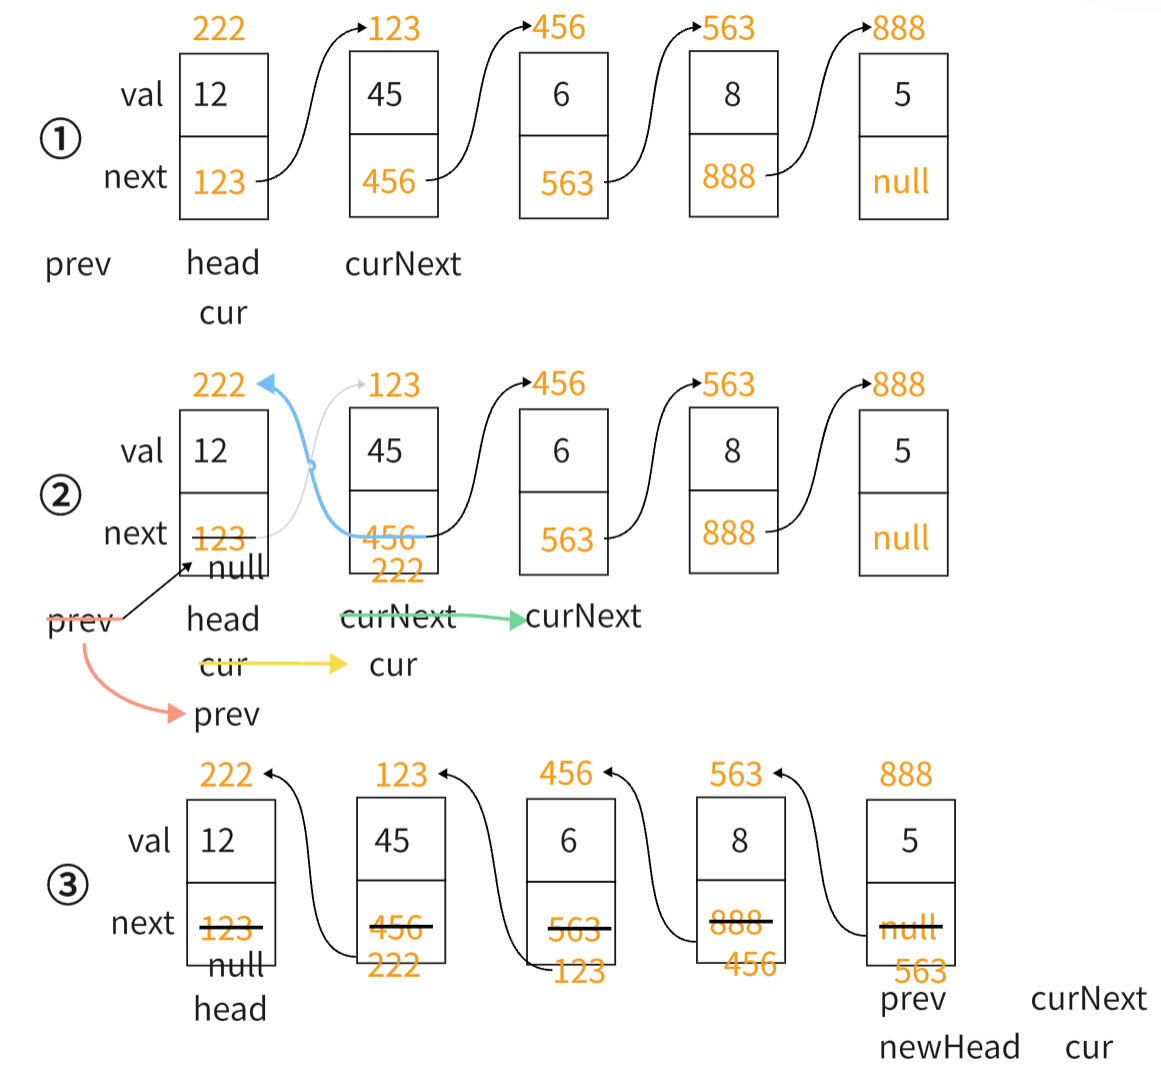
- 定义三个引用,分别记录当前节点cur和当前节点的前驱prev,当前节点的后继curNext。然后进行反转。
递归方法:
- 设计一个反转函数,使用递归的方式来调用反转函数进行反转。
2.具体实现
头插方法
点击查看代码
/**
 * Definition for singly-linked list.
 * public class ListNode {
 *     int val;
 *     ListNode next;
 *     ListNode() {}
 *     ListNode(int val) { this.val = val; }
 *     ListNode(int val, ListNode next) { this.val = val; this.next = next; }
 * }
 */
class Solution {
    public ListNode reverseList(ListNode head) {
        if(head == null){
            return null;
        }

        if(head.next == null){
            return head;
        }

        ListNode cur = head;
        ListNode curNext = cur.next;

        cur.next = null;
        cur = curNext;
        while(cur != null){
            curNext = cur.next;
            cur.next = head;
            head = cur;
            cur = curNext;
        }
        return head;
    }
}
三个引用
点击查看代码
/**
 * Definition for singly-linked list.
 * public class ListNode {
 *     int val;
 *     ListNode next;
 *     ListNode() {}
 *     ListNode(int val) { this.val = val; }
 *     ListNode(int val, ListNode next) { this.val = val; this.next = next; }
 * }
 */
class Solution {
    public ListNode reverseList(ListNode head) {
        ListNode prev = null;
        ListNode cur = head;
        ListNode newHead = null;
        while(cur != null){
            ListNode curNext = cur.next;
            if(curNext == null){
                newHead = cur;
            }
            cur.next = prev;
            prev = cur;
            cur = curNext;
        }
        return newHead;
    }
}
递归
从前往后递归
点击查看代码
/**
 * Definition for singly-linked list.
 * public class ListNode {
 *     int val;
 *     ListNode next;
 *     ListNode() {}
 *     ListNode(int val) { this.val = val; }
 *     ListNode(int val, ListNode next) { this.val = val; this.next = next; }
 * }
 */
class Solution {
    public  ListNode reverse(ListNode prev,ListNode cur){
            if(cur == null){
                return prev;
            }

            ListNode curNext = null;
            curNext = cur.next;
            cur.next = prev;
            return reverse(cur,curNext);
        }
    public ListNode reverseList(ListNode head) {
        return reverse(null,head);
    }
}
从后往前递归
点击查看代码
class Solution {
    ListNode reverseList(ListNode head) {
        // 边缘条件判断
        if(head == null) return null;
        if (head.next == null) return head;

        // 递归调用,翻转第二个节点开始往后的链表
        ListNode last = reverseList(head.next);
        // 翻转头节点与第二个节点的指向
        head.next.next = head;
        // 此时的 head 节点为尾节点,next 需要指向 NULL
        head.next = null;
        return last;
    }
}
3.要点总结
头插法:
- 需要注意的是原本链表就为null的情况,直接返回null。
- 当链表只有一个节点的情况下直接返回头节点head。
- 在反转时需要有curNext引用来记录cur的下一个节点位置。以防cur的next域被修改后找不到下一节点。
三个引用:
- 当cur为null时循环反转操作停止,prev所指向的就是新的头节点newHead。
递归:
- 一个方法在执行过程中调用自身就称为递归,递归的关键在于一定要有一个趋近于终止的条件,否则会出现栈溢出异常的错误!本题的递归趋近条件就是当cur == null,也就是所有节点反转完成后,引用到达的边界条件。
三、设计链表
2.具体实现
点击查看代码
class ListNode{
    int val;
    ListNode next,prev;
    ListNode() {};
    ListNode(int val){
        this.val = val;
    }
}


class MyLinkedList {

    int size;
    ListNode head,tail;

    public MyLinkedList() {
        this.size = 0;
        this.head = new ListNode(0);
        this.tail = new ListNode(0);

        head.next=tail;
        tail.prev=head;
    }

    public int get(int index) {
        if(index<0 || index>=size){
            return -1;
        }
        ListNode cur = this.head;
        if(index >= size / 2){
            cur = tail;
            for(int i=0; i< size-index; i++){
                cur = cur.prev;
            }
        }else{
            for(int i=0; i<= index; i++){
                cur = cur.next;
            }
        }
        return cur.val;
    }

    public void addAtHead(int val) {
        addAtIndex(0,val);
    }

    public void addAtTail(int val) {
        addAtIndex(size,val);
    }

    public void addAtIndex(int index, int val) {
        if(index>size){
            return;
        }
        if(index<0){
            index = 0;
        }
        size++;
        ListNode pre = this.head;
        for(int i=0; i<index; i++){
            pre = pre.next;
        }
        ListNode newNode = new ListNode(val);
        newNode.next = pre.next;
        pre.next.prev = newNode;
        newNode.prev = pre;
        pre.next = newNode;

    }

    public void deleteAtIndex(int index) {
        if(index<0 || index>=size){
            return;
        }
        size--;
        ListNode pre = this.head;
        for(int i=0; i<index; i++){
            pre = pre.next;
        }
        pre.next.next.prev = pre;
        pre.next = pre.next.next;
    }
}

/**
 * Your MyLinkedList object will be instantiated and called as such:
 * MyLinkedList obj = new MyLinkedList();
 * int param_1 = obj.get(index);
 * obj.addAtHead(val);
 * obj.addAtTail(val);
 * obj.addAtIndex(index,val);
 * obj.deleteAtIndex(index);
 */
未完待续...

 浙公网安备 33010602011771号