

NHIbernate学习之旅【二】——入门2
曾经说过NHIbernate学习主要以李永京老师的博客为主,之前仿照李永京老师的第一个NHibernate程序以失败告终,但有了上篇文章的铺垫,对NHIbernate也有了一定的了解,所以现在回归正轨,按照李永京老师的教程继续学习,因此这篇文章还是入门,但和上次不一样,这次我们进行简单的分层,也就是3层。
首先,我们创建表,数据库还是用上次入门的NHIbernateSample:
[CustomerId] int IDENTITY ( 1,1 ) NOT NULL,
[Firstname] varchar(50) NULL,
[Lastname] varchar(50) NULL
)
也许你会奇怪,李永京老师博客里有4张表,有的还有Version,为什么这里没有,因为这篇文章只需要一张表,也不需要表关联。关于Version是NHibernate处理并发时用的,以后学到了再加,这里用不到。
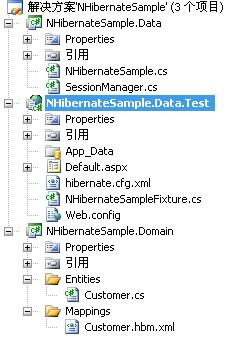
然后我们创建个空白解决方案NHibernateSample,在解决方案中添加两个类项目,一个WebApplication项目,结构如下图
以下引用李永京老师的:
在这里因为我Nunit用的比较少,所以把Test除掉了,直接用WEB,这样也比较直观。
接下来,创建持久化类和对应的映射。
在Entities中添加Customer.cs类,Mappings中添加Customer.hbm.xml,注意Customer.cs中的属性必须为virtual,代码如下:
public class Customer
{
public virtual int Id { get; set; }
public virtual string FirstName { get; set; }
public virtual string LastName { get; set; }
}
注意Customer.hbm.xml要设置为“嵌入的资源”,并且assembly="NHibernateSample.Domain"为当前持久化类所在项目的程序集名称,namespace="NHibernateSample.Domain.Entities" 为当前持久化类所在的命名空间,<class name ="Customer">为要映射的表(持久化类要与表面一致),而id,property中的name为持久化类的属性名,Column为数据库表中的列名
 代码
代码
<hibernate-mapping xmlns="urn:nhibernate-mapping-2.2"
assembly="NHibernateSample.Domain"
namespace="NHibernateSample.Domain.Entities">
<class name ="Customer">
<id name="Id" column ="CustomerId">
<generator class ="native"/>
</id>
<property name ="FirstName"/>
<property name ="LastName"/>
</class>
</hibernate-mapping>
以上是Domain层,接下来我们编写数据访问层Data:
在编写代码之前,我们需要了解一点,要用NHibernate,必须从ISessionFactory中获取一个ISession(NHibernate的工作单元)。其中ISessionFactory可以创建并打开新的Session,ISession代表与数据库之间的一次操作。这句话对初学NHibernate的我们也许不是很懂,但是没关系,=看到源代码就会有大致的概念了。
接下来按照李永京老师的步骤,我们创建一个辅助类,为什么要辅助类呢?为了更方便的获取创建ISessionFactory。
代码
{
private ISessionFactory _sessionFactory;
public SessionManager()
{
_sessionFactory = GetSessionFactory();
}
private ISessionFactory GetSessionFactory()
{
return (new Configuration()).Configure().BuildSessionFactory();
}
//获取一个Session
public ISession GetSession()
{
return _sessionFactory.OpenSession();
}
}
接下来就是操作类了,简单的添加和根据ID返回对应的Customer信息
代码
{
protected ISession Session { get; set; }
public NHibernateSample(ISession session)
{
Session = session;
}
/// 添加customer
/// </summary>
/// <param name="customer"></param>
public void CreateCustomer(Customer customer)
{
Session.Save(customer);
Session.Flush();
}
/// <summary>
/// 根据ID返回对应的信息
/// </summary>
/// <param name="customerId"></param>
/// <returns></returns>
public Customer GetCustomerById(int customerId)
{
return Session.Get<Customer>(customerId);
}
}
接下来就是配置NHibernate了(hibernate.cfg.xml),直接放到WEB根目录下就行了:
除了数据库链接串,最要注意的是<mapping assembly="NHibernateSample.Domain"/>,assembly中为你放映射文件的程序集名称。
hibernate.cfg.xml“复制到输出目录”为“不复制”,这里需要修改为“始终复制”,配置方法与hbm.xml相同。
 代码
代码
<hibernate-configuration xmlns="urn:nhibernate-configuration-2.2" >
<session-factory name="NHibernate.Test">
<property name="connection.driver_class">NHibernate.Driver.SqlClientDriver</property>
<property name="connection.connection_string">
Data Source=.;Initial Catalog=NHibernateSample;Persist Security Info=True;User ID=sa;Password=sa
</property>
<property name="adonet.batch_size">10</property>
<property name="show_sql">false</property>
<property name="dialect">NHibernate.Dialect.MsSql2000Dialect</property>
<property name="use_outer_join">true</property>
<property name="command_timeout">60</property>
<property name="query.substitutions">true 1, false 0, yes 'Y', no 'N'</property>
<property name="proxyfactory.factory_class">NHibernate.ByteCode.Castle.ProxyFactoryFactory, NHibernate.ByteCode.Castle</property>
<mapping assembly="NHibernateSample.Domain"/>
</session-factory>
</hibernate-configuration>
最后一步了,李永京老师编写的是测试类,但我们去掉了,但是里面的方法还是可以用到的,当然你也可以不写它,直接在ASPX页面调用,代码如下:
代码
public class NHibernateSampleFixture
{
private ISession _session;
private SessionManager _helper;
private NHibernateSample _sample;
public NHibernateSampleFixture()
{
_helper = new SessionManager();
_session = _helper.GetSession();
_sample = new NHibernateSample(_session);
}
[TestFixtureSetUp]
public void TestFixtureSetup()
{
_helper = new SessionManager();
}
[SetUp]
public void Setup()
{
_session = _helper.GetSession();
_sample = new NHibernateSample(_session);
}
[Test]
public void GetCustomerById1Test()
{
NHibernateSample _sample = new NHibernateSample(_session);
Assert.AreEqual(1, _sample.GetCustomerById(1).Id);
}
[Test]
public void GetCustomerByIdTest()
{
Customer customer = _sample.GetCustomerById(1);
int customerId = customer.Id;
Assert.AreEqual(1, customerId);
}
public void CreateCustomer(Customer customer)
{
_sample.CreateCustomer(customer);
}
}
以上的TEST,Assert.AreEqual都是测试,可以去掉,如我写的最后一个添加方法,你也可以把_sample.CreateCustomer(customer);
直接复制到ASPX用。
好了,都写完了,再在首页的page_load中进行测试吧:
代码
Customer c = new Customer();
c.FirstName = "王";
c.LastName = "小小";
nh.CreateCustomer(c);
nh.GetCustomerByIdTest();


 浙公网安备 33010602011771号