

NHibernate学习之旅【一】——入门
本片文章仅仅是让你入门,体验下NHibernate,用HQL进行增删改查,不包含任何分层架构之类的技术,后期会尽量完善的。
第一步:下载最新NHibernate文件,我下的是NHibernate-2.1.2.GA-bin,2M多 地址是http://sourceforge.net/projects/nhibernate/
第二步:创建数据库
 代码
代码

[StudentId] [int] IDENTITY (1, 1) NOT NULL ,
[StudentName] [nvarchar] (40) COLLATE Chinese_PRC_CI_AS NULL ,
[StudentPassword] [nvarchar] (20) COLLATE Chinese_PRC_CI_AS NULL ,
[EmailAddress] [nvarchar] (40) COLLATE Chinese_PRC_CI_AS NULL ,
[DateCreated] [datetime] NULL
)
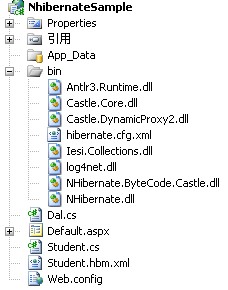
第三步:创建一个WEB应用程序,名称任意,并从NHibernate文件中复制图中BIN文件夹中的DLL到你项目中的BIN,并引用,其中的xml是后来创建的,这里不用管 如图
第四步:新建一个持久化类Student.cs文件
代码
{
public Student() { }
private int studentId;
private string studentName;
private string studentPassword;
private string emailAddress;
private DateTime dateCreated;
public virtual int StudentId
{
get { return studentId; }
set { studentId = value; }
}
public virtual string StudentName
{
get { return studentName; }
set { studentName = value; }
}
public virtual string StudentPassword
{
get { return studentPassword; }
set { studentPassword = value; }
}
public virtual string EmailAddress
{
get { return emailAddress; }
set { emailAddress = value; }
}
public virtual DateTime DateCreated
{
get { return dateCreated; }
set { dateCreated = value; }
}
}
注意:virtual方法是必须的
第五步:编写映射文件
为什么要编写映射文件,这里转载李永京老师的话:
NHibernate要知道怎样去加载和存储持久化类的对象。这正是NHibernate映射文件发挥作用的地方。映射文件包含了对象/关系映射所需的元数据。元数据包含持久化类的声明和属性到数据库的映射。映射文件告诉NHibernate它应该访问数据库里面的哪个表及使用表里面的哪些字段
这里的映射文件是Student.hbm.xml,创建后还要把该XML文件改成“嵌入的资源”,设置方法:右击文件-属性-生成操作选项里面改成‘嵌入的资源’,代码如下:
代码
<hibernate-mapping xmlns="urn:nhibernate-mapping-2.2">
<class name="NhibernateSample.Student, NhibernateSample" table="Student">
<id name="StudentId" column="StudentId" type="Int32">
<generator class="native" />
</id>
<property name="StudentName" column= "StudentName" type="string" length="40"/>
<property name="StudentPassword" type="string" length="20"/>
<property name="EmailAddress" type="String" length="40"/>
<property name="DateCreated" type="DateTime" length="8"/>
</class>
</hibernate-mapping>
再次注意:class中的属性NAME的值一定要对应你的程序集名称,由第一张图可以知道,我的程序集是NHibernateSample,所以这里也是NHibernateSample,要映射的是Student表(持久化类应该和表名一致),所以NhibernateSample.Student,逗号后面是程序集名。
第六步:创建一个配置文件,网上看到共有3种写法
1:在web.config,App.config里面配置
则需要这样实例化Configuration对象。
NHibernate.Cfg.Configuration cfg = new NHibernate.Cfg.Configuration();
这种配置方法将会到应用程序配置文件(App.Config,Web.Config)中查找NHibernate的配置信息
2:hibernate.cfg.xml
建立名为hibernate.cfg.xml的文件。实例化Configuration config = new Configuration().Configure();这样NHibernate将会在目录下自动寻找hibernate.cfg.xml的配置文件。
文件创建在bin文件夹下面 ,注意更改数据库名称和密码
3:直接用程序指明配置信息,比较繁琐,不提倡
因为第二种最简单,所以这里采用第二种,代码如下:
代码
<hibernate-configuration xmlns="urn:nhibernate-configuration-2.2" >
<session-factory>
<property name="connection.driver_class">NHibernate.Driver.SqlClientDriver</property>
<property name="connection.connection_string">
Data Source=.;Initial Catalog=NHibernateSample;Persist Security Info=True;User ID=sa;Password=sa
</property>
<property name="adonet.batch_size">10</property>
<property name="show_sql">true</property>
<property name="dialect">NHibernate.Dialect.MsSql2000Dialect</property>
<property name="use_outer_join">true</property>
<property name="command_timeout">10</property>
<property name="query.substitutions">true 1, false 0, yes 'Y', no 'N'</property>
<property name='proxyfactory.factory_class'>NHibernate.ByteCode.Castle.ProxyFactoryFactory, NHibernate.ByteCode.Castle</property>
<mapping assembly="NhibernateSample"/>
</session-factory>
</hibernate-configuration>
这里没什么特别要注意的,只要注意改数据库链接串就行,还有
<property name='proxyfactory.factory_class'>NHibernate.ByteCode.Castle.ProxyFactoryFactory, NHibernate.ByteCode.Castle</property>
你应该注意到NHibernate的Required_For_LazyLoading文件夹下含有3个框架文件夹,这3个框架具体有什么区别我还没研究,以后补上,这里我们采用Castle,所以上面这句话要用 Castle关键字,其他的框架就改成其他名字
第七步:编写数据访问类
这里没分层,所以叫类没叫层,这里要引用
using NHibernate;
using System.Collections.Generic;
代码如下:
代码
{
public void testData()
{
NHibernate.Cfg.Configuration mCfg = new NHibernate.Cfg.Configuration().Configure();
NHibernate.ISessionFactory SessionFactory = null;
SessionFactory = mCfg.BuildSessionFactory();
ISession vSession = SessionFactory.OpenSession();
#region 查询
string hsql = "from Student";
IQuery query = vSession.CreateQuery(hsql);
//this.dataGridView1.DataSource = query.List<Person>();
IList<Student> list = query.List<Student>();
if (list.Count > 0)
{
Student obj = (Student)list[0];
//.....
}
#endregion
#region 插入
//Student stu = new Student();
//stu.StudentName = "test22";
//stu.StudentPassword = "test22";
//stu.EmailAddress = "test22@54job.com";
//stu.DateCreated = DateTime.Now;
//ITransaction vTransaction = vSession.BeginTransaction();
//try
//{
// vSession.Save(stu);
// vTransaction.Commit();
//}
//catch (Exception)
//{
// vTransaction.Rollback();
//}
//vSession.Close();
#endregion
#region 更新
/*
IQuery query = vSession.CreateQuery("from Student where StudentName='kexd'");
IList<Student> list = query.List<Student>();
ITransaction vTransaction = vSession.BeginTransaction();
try
{
foreach (Student stu in list)
{
stu.EmailAddress = "kesfzu@21cn.com";
vSession.Save(stu);
}
vTransaction.Commit();
}
catch (Exception)
{
vTransaction.Rollback();
}
finally
{
vSession.Close();
}
*/
#endregion
#region 删除
/*
IQuery query = vSession.CreateQuery("from Student where StudentName='ffer'");
IList<Student> list = query.List<Student>();
ITransaction vTransaction = vSession.BeginTransaction();
try
{
foreach (Student stu in list)
{
vSession.Delete(stu);
}
vTransaction.Commit();
}
catch (Exception)
{
vTransaction.Rollback();
}
finally
{
vSession.Close();
}
*/
#endregion
}
}
第八步:测试
以上代码包含增删改查,需要的话去掉注释,使用方法在ASPX页里面调用testData()方法测试了。以上代码亲自测试通过。
下期是什么时候我也不知道,毕竟还在工作,只能业余时间学下,会尽快学的。
源代码:/Files/neekey/NhibernateSample.rar


 浙公网安备 33010602011771号