RabbitMQ的安装与基本使用(windows版)
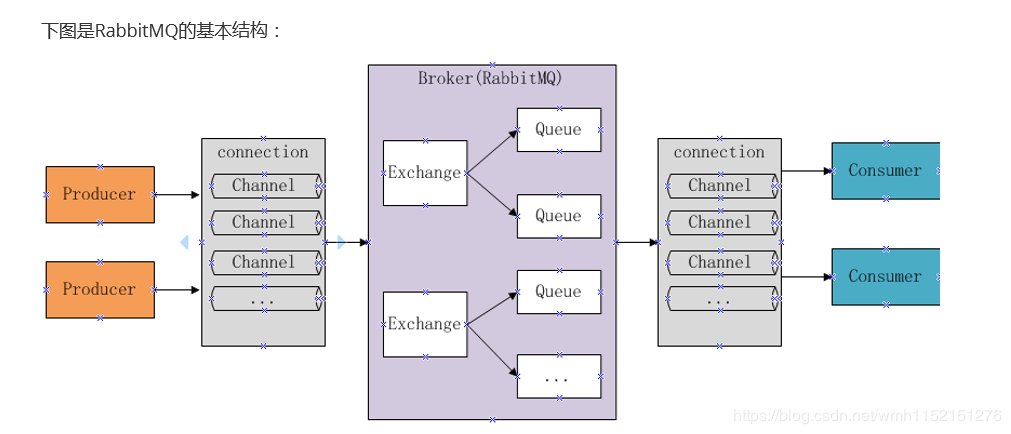
基本结构
windows安装
1、 先安装erlang开发语言,然后安装rabbitmq-server服务器(需要比对rabbitmq版本和erlang版本对应下载安装,我项目中选用的版本为otp_win64_21.0.1.exe和rabbitmq-server-3.7.8.exe)
下载地址:链接:https://pan.baidu.com/s/1IyFYuSq_xNQivE33AA8YeQ 提取码:pl9g
2、 通过命令安装rabbitmq的web管理插件,rabbitmq-plugins enable rabbitmq_management(使用命令行在rabbitmq的安装目录下执行)
3、 使用http://localhost:15672打开web管理控制台,默认用户名和密码都是guest
4、 在web管理页面使用自定义用户进行开发,给予管理员权限,另外还需要为其配置数据库
工作模式
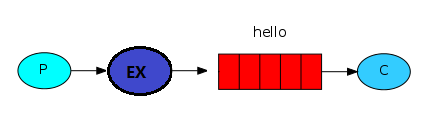
简单模式(一个生产者对应一个消费者)
1、模型
2、需要的依赖
<dependencies>
    <!-- 引入队列依赖 -->
    <dependency>
        <groupId>com.rabbitmq</groupId>
        <artifactId>amqp-client</artifactId>
        <version>4.0.2</version>
    </dependency>

    <dependency>
        <groupId>org.slf4j</groupId>
        <artifactId>slf4j-api</artifactId>
        <version>1.7.10</version>
    </dependency>

    <dependency>
        <groupId>org.slf4j</groupId>
        <artifactId>slf4j-log4j12</artifactId>
        <version>1.7.5</version>
    </dependency>

    <dependency>
        <groupId>log4j</groupId>
        <artifactId>log4j</artifactId>
        <version>1.2.17</version>
    </dependency>

    <dependency>
        <groupId>junit</groupId>
        <artifactId>junit</artifactId>
        <version>4.11</version>
    </dependency>
</dependencies>
3、创建连接,分为消息发送方和消息消费方,不论哪一方都需要获取连接,创建通道,设置队列
4、连接工具类
public class ConnectionUtils {

   /**
    *功能描述 获取一个连接
    * @date 2020/2/19
    * @param []
    * @return com.rabbitmq.client.Connection
    */
    public static Connection getConnection() throws IOException, TimeoutException {

        //定义一个连接工厂
        ConnectionFactory factory = new ConnectionFactory();

        //设置服务地址
        factory.setHost("127.0.0.1");

        //设置amqp端口
        factory.setPort(5672);

        //vHost
        factory.setVirtualHost("/vHost_test");

        //用户名
        factory.setUsername("test");

        //密码
        factory.setPassword("123");

        return factory.newConnection();
    }
}
5、消息发送方
public class Send {

    private static final String QUEUE_NAME = "test_simple_queue";

    public static void main(String[] args) throws IOException, TimeoutException {

        //获取一个连接
        Connection connection = ConnectionUtils.getConnection();

        //创建一个通道
        Channel channel = connection.createChannel();

        //创建一个队列声明
        channel.queueDeclare(QUEUE_NAME,false,false,false,null);

        String msg = "hello simple";

        channel.basicPublish("", QUEUE_NAME,null,msg.getBytes());

        channel.close();
        connection.close();


    }
}
6、 消费者
public class Recei {

    private static final String QUEUE_NAME = "test_simple_queue";

    public static void main(String[] args) throws IOException, TimeoutException {

        //获取一个连接
        Connection connection = ConnectionUtils.getConnection();

        //创建一个通道
        Channel channel = connection.createChannel();

        //创建一个队列声明
        channel.queueDeclare(QUEUE_NAME,false,false,false,null);

        //定义消费者
        DefaultConsumer consumer = new DefaultConsumer(channel) {
            @Override
            public void handleDelivery(String consumerTag, Envelope envelope, AMQP.BasicProperties properties, byte[] body) throws IOException {
               String msg= new String(body,"UTF-8");
               System.out.println("receiver msg :" + msg);
            }
        };
        //添加消费者监听
        channel.basicConsume(QUEUE_NAME,consumer);

    }
}
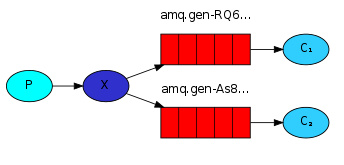
工作模式(一个生产者对应多个消费者,资源争抢)
模型

1、简单队列的不足:耦合性高,生产者和消费者一一对应,当队列名称变更,则需要同步变更
2、出现的原因:生产者发送消息是不怎么耗时的,而消费者消费消息是要进行处理业务的,因此耗时较高,这样当消息多了的情况下会导致消息积压,不利于消息处理
1、轮询分发
默认情况下,消息分发是通过轮询的方式分发的,不论消费者是否空闲,都是你一个我一个分发的
2、公平分发
需要手动确认分发,使用basicQos(prefetch = 1),需要关闭自动应答,改为手动
1、 生产者需设置消息发送间隔
2、 消费者除了设置消息发送间隔外,还需关闭消息自动应答
生产者
public class Send {

    private static final String QUEUE_NAME = "test_work_queue";
    public static void main(String[] args) throws IOException, TimeoutException, InterruptedException {

        //获取连接
        Connection connection = ConnectionUtils.getConnection();
        //创建通道
        Channel channel = connection.createChannel();
        //限制消息队列每次只能发送一条消息给消费者
        //在消费者发送应答消息之前,消息队列不再发送消息给消费者
        int prefetch = 1;
        channel.basicQos(prefetch);

        channel.queueDeclare(QUEUE_NAME,false,false,false,null);

        for (int i = 0; i < 50; i++) {
            String msg = "test" + i;
            System.out.println("work_queue send:" + msg);
            channel.basicPublish("",QUEUE_NAME,null,msg.getBytes());
            Thread.sleep( i * 20);
        }

        channel.close();
        connection.close();

    }
}
消费者1
public class Recei1 {

    private static final String QUEUE_NAME = "test_work_queue";

    public static void main(String[] args) throws IOException, TimeoutException {

        //获取一个连接
        Connection connection = ConnectionUtils.getConnection();

        //创建一个通道
        final Channel channel = connection.createChannel();

        channel.basicQos(1);

        //创建一个队列声明
        channel.queueDeclare(QUEUE_NAME,false,false,false,null);

        //定义消费者
        DefaultConsumer consumer = new DefaultConsumer(channel) {
            @Override
            public void handleDelivery(String consumerTag, Envelope envelope, AMQP.BasicProperties properties, byte[] body) throws IOException {
               String msg= new String(body,"UTF-8");
               System.out.println("R1 receiver msg :" + msg);

                try {
                    Thread.sleep(2000);
                } catch (InterruptedException e) {
                    e.printStackTrace();
                } finally {
                    System.out.println("R1 down");
                    channel.basicAck(envelope.getDeliveryTag(),false);
                }
            }
        };

        boolean autoAck = false;//自动应答改为false
        //添加消费者监听
        channel.basicConsume(QUEUE_NAME,autoAck,consumer);

    }
}
消费者2
public class Recei2 {

    private static final String QUEUE_NAME = "test_work_queue";

    public static void main(String[] args) throws IOException, TimeoutException {

        //获取一个连接
        Connection connection = ConnectionUtils.getConnection();

        //创建一个通道
       final Channel channel = connection.createChannel();

        channel.basicQos(1);

        //创建一个队列声明
        channel.queueDeclare(QUEUE_NAME,false,false,false,null);

        //定义消费者
        DefaultConsumer consumer = new DefaultConsumer(channel) {
            @Override
            public void handleDelivery(String consumerTag, Envelope envelope, AMQP.BasicProperties properties, byte[] body) throws IOException {
               String msg= new String(body,"UTF-8");
               System.out.println("R2 receiver msg :" + msg);

                try {
                    Thread.sleep(1000);
                } catch (InterruptedException e) {
                    e.printStackTrace();
                } finally {
                    System.out.println("R2 down");
                    channel.basicAck(envelope.getDeliveryTag(),false);
                }
            }
        };
        boolean autoAak = false;
        //添加消费者监听
        channel.basicConsume(QUEUE_NAME,autoAak,consumer);

    }
}
效果:消费消息能力强的消费者将消费更多的消息,也称之为“能者多劳”使用线程休眠时间模拟处理消息的能力,时间越短表明处理消息的能力越强
消息应答和消息持久化
消息应答
boolean autoAck = false;
//添加消费者监听
channel.basicConsume(QUEUE_NAME,autoAck,consumer);
消息持久化消息应答(autoAck),表示当消息队列发送消息给消费者之后,消费者发送消息应答给消息队列,收到应答后则会把消息从内存中删除,默认autoAck=true是打开自动应答的
//创建一个队列声明

Boolean durable = false;
channel.queueDeclare(QUEUE_NAME,durable,false,false,null);
订阅模式(publish/fanout)
说明:当已经声明了一个队列时,如果此时修改持久化状态,虽然代码不会提示出错,但是会运行失败,因为rabbitmq不允许重新定义一个已经存在的队列,此时可以从管理页面删除或重新定义一个新名称的队列
模型
1、 一个生产者,多个消费者
2、 每一个消费者都有自己的队列
3、 生成者没有直接把消息发送到队列上,而是发到了交换机,转换器 exchange
4、 每个队列都要绑定到交换机上
5、 生产者发送的消息经过交换机到达队列,这样就能实现一条消息由多个消费者消费
生产者:
public class send {

    private static final String EXCHANGE_NAME = "test_exchange_fanout";
    public static void main(String[] args) throws IOException, TimeoutException {
        Connection connection = ConnectionUtils.getConnection();
        Channel channel = connection.createChannel();
        //声明交换机
        channel.exchangeDeclare(EXCHANGE_NAME,"fanout");//分发

        String msg = "hello exchange";
        channel.basicPublish(EXCHANGE_NAME,"",null ,msg.getBytes());

        System.out.println(msg);
        channel.close();
        connection.close();
    }
}
消费者
public class Recei1 {

    private static final String QUEUE_NAME = "test_pub_queue1";
    private static final String EXCHANGE_NAME = "test_exchange_fanout";
    public static void main(String[] args) throws IOException, TimeoutException {
        //获取一个连接
        Connection connection = ConnectionUtils.getConnection();

        //创建一个通道
        Channel channel = connection.createChannel();

        //创建一个队列声明
        channel.queueDeclare(QUEUE_NAME,false,false,false,null);

        channel.queueBind(QUEUE_NAME,EXCHANGE_NAME,"");

        //定义消费者
        DefaultConsumer consumer = new DefaultConsumer(channel) {
            @Override
            public void handleDelivery(String consumerTag, Envelope envelope, AMQP.BasicProperties properties, byte[] body) throws IOException {
                String msg= new String(body,"UTF-8");
                System.out.println("receiver msg :" + msg);
            }
        };
        //添加消费者监听
        channel.basicConsume(QUEUE_NAME,consumer);
    }
}
Exchange(交换机 转换器)
一方面负责接收生产者发送的消息,另一方面是向队列推送消息
匿名转发 “”
Fanout(不处理路由),只要绑定了队列,就会把消息转给交换机上绑定的队列
Direct(路由模式),只有当交换机上设置的路由和消费者定义的路由一致时,交换机才会把消息转给绑定在交换机的消息队列
路由模式(routing/direct)
模型

1、 生产者声明交换机时定义模式为”direct”
2、 发布消息时带上routeKey
3、 消费者再声明队列后绑定交换机时带上设置的routeKey
只有队列上定义的key与交换机上设置的key相匹配时才会转发,只有当路由表明确时才有效果
生产者
public class Send {

    private static final String EXCHANGE_NAME = "test_exchange_route";

    public static void main(String[] args) throws IOException, TimeoutException {

        Connection connection = ConnectionUtils.getConnection();

        Channel channel = connection.createChannel();

        channel.exchangeDeclare(EXCHANGE_NAME,"direct");

        String routeKey = "sa";

        String msg = "hello route";
        channel.basicPublish(EXCHANGE_NAME,routeKey,null,msg.getBytes());
        System.out.println("route msg:" + msg);

        channel.close();
        connection.close();

    }
}
消费者
public class Recei1 {

    private static final String QUEUE_NAME = "test_exchange_route1";
    private static final String EXCHANGE_NAME = "test_exchange_route";
    public static void main(String[] args) throws IOException, TimeoutException {
        //获取一个连接
        Connection connection = ConnectionUtils.getConnection();

        //创建一个通道
        Channel channel = connection.createChannel();

        //创建一个队列声明
        channel.queueDeclare(QUEUE_NAME,false,false,false,null);

        channel.queueBind(QUEUE_NAME,EXCHANGE_NAME,"route");

        //定义消费者
        DefaultConsumer consumer = new DefaultConsumer(channel) {
            @Override
            public void handleDelivery(String consumerTag, Envelope envelope, AMQP.BasicProperties properties, byte[] body) throws IOException {
                String msg= new String(body,"UTF-8");
                System.out.println("receiver msg :" + msg);
            }
        };
        //添加消费者监听
        channel.basicConsume(QUEUE_NAME,consumer);
    }
}
Topic模式
模型
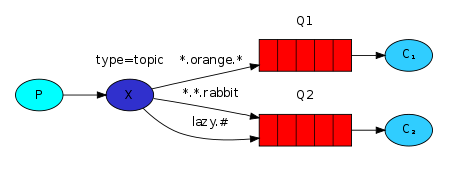
匹配符匹配*,表示某一类的消息发送可以发送给消费者接收到
生产者
public class Send {


    private static final String EXCHANGE_NAME = "test_exchange_topic";

    public static void main(String[] args) throws IOException, TimeoutException {

        Connection connection = ConnectionUtils.getConnection();

        Channel channel = connection.createChannel();

        channel.exchangeDeclare(EXCHANGE_NAME,"topic");

        String msg = "goods....";

        channel.basicPublish(EXCHANGE_NAME,"goods.delete",null,msg.getBytes());

        System.out.println("topic send:" + msg);

        channel.close();

        connection.close();
    }
}
消费者
public class Recei1 {

    private static final String QUEUE_NAME = "test_exchange_topic1";
    private static final String EXCHANGE_NAME = "test_exchange_topic";
    public static void main(String[] args) throws IOException, TimeoutException {
        //获取一个连接
        Connection connection = ConnectionUtils.getConnection();

        //创建一个通道
        Channel channel = connection.createChannel();

        //创建一个队列声明
        channel.queueDeclare(QUEUE_NAME,false,false,false,null);

        channel.queueBind(QUEUE_NAME,EXCHANGE_NAME,"goods.add");

        //定义消费者
        DefaultConsumer consumer = new DefaultConsumer(channel) {
            @Override
            public void handleDelivery(String consumerTag, Envelope envelope, AMQP.BasicProperties properties, byte[] body) throws IOException {
                String msg= new String(body,"UTF-8");
                System.out.println("receiver msg :" + msg);
            }
        };
        //添加消费者监听
        channel.basicConsume(QUEUE_NAME,consumer);
    }
}
效果:当消费者进行绑定时,设置routeKey为goods.*时,当生产者发送携带goods.*模式的routeKey时都可以被该消费者接收到
消息确认机制(事务+confirm)
在rabbitmq中,我们可以通过使用消息持久化机制解决当服务器异常导致消息丢失的问题
问题:当生产者把消息发出去之后,消息到底有没有到达rabbitmq服务器,这个默认情况是不知道的
解决方法:
1、 AMQP实现了事务机制
2、 Confirm模式
事务模式
txSelect,txCommit,txRollback,由AMQP中定义的三个api完成事务操作,三者分别为开启事务、事务提交、事务回滚
生产者:
public class Send {


    private static final String QUEUE_NAME = "test_tx_queue";

    public static void main(String[] args) throws IOException, TimeoutException {

        Connection connection = ConnectionUtils.getConnection();
        Channel channel = connection.createChannel();
        channel.queueDeclare(QUEUE_NAME,false,false,false,null);

        String msg = "hello tx";
        try {
            channel.txSelect();
            channel.basicPublish("",QUEUE_NAME,null,msg.getBytes());
            int i = 1/0;
            channel.txCommit();
            System.out.println("send:" + msg);
        } catch (Exception e) {
            channel.txRollback();
            System.out.println("tx rollback");
        }

        channel.close();
        connection.close();

    }
}
消费者
public class Revei {

    private static final String QUEUE_NAME = "test_tx_queue";
    public static void main(String[] args) throws IOException, TimeoutException {


        Connection connection = ConnectionUtils.getConnection();
        Channel channel = connection.createChannel();
        channel.queueDeclare(QUEUE_NAME,false,false,false,null);
        channel.basicConsume(QUEUE_NAME,new DefaultConsumer(channel){
            @Override
            public void handleDelivery(String consumerTag, Envelope envelope, AMQP.BasicProperties properties, byte[] body) throws IOException {
                String msg = new String(body,"UTF-8");
                System.out.println("recei msg:" + msg);
            }
        });
    }
}
效果:当生产者发送消息时产生异常时,就会发生事务回滚,消费者也收不到该消息
缺陷:这种方式是比较耗时的,这样会降低消息的吞吐量
Confirm模式
生产者将信道设置成confirm模式,一旦信道进入confirm模式,所有在该信道上面发布的消息都会被指派一个唯一的ID(从1开始),一旦消息被投递到所有匹配的队列之后,broker就会发送一个确认给生产者(包含消息的唯一ID),这就使得生产者知道消息已经正确到达目的队列了,如果消息和队列是可持久化的,那么确认消息会将消息写入磁盘之后发出,broker回传给生产者的确认消息中deliver-tag域包含了确认消息的序列号,此外broker也可以设置basicack的multiple域,表示到这个序列号之前的所有消息都已经得到了处理
此模式最大的好处就是可以异步
普通模式-单条发送
生产者
public class Send {

        private static final String QUEUE_NAME = "test_confirm_queue";

        public static void main(String[] args) throws IOException, TimeoutException, InterruptedException {

            Connection connection = ConnectionUtils.getConnection();
            Channel channel = connection.createChannel();
            channel.queueDeclare(QUEUE_NAME,false,false,false,null);

            String msg = "hello confirm study";

            channel.confirmSelect();
                           channel.basicPublish("",QUEUE_NAME,null,msg.getBytes());

            if(!channel.waitForConfirms()) {
                System.out.println("send confirm message fail:" + msg);
            }else {

                System.out.println("send confirm message ok:" + msg);
            }

            channel.close();
            connection.close();

        }
}
多条发送
生产者
public class Send {

        private static final String QUEUE_NAME = "test_confirm_queue";

        public static void main(String[] args) throws IOException, TimeoutException, InterruptedException {

            Connection connection = ConnectionUtils.getConnection();
            Channel channel = connection.createChannel();
            channel.queueDeclare(QUEUE_NAME,false,false,false,null);

            String msg = "hello confirm study";

            channel.confirmSelect();
            for (int i = 0; i < 10; i++) {
                channel.basicPublish("",QUEUE_NAME,null,msg.getBytes());
            }

            if(!channel.waitForConfirms()) {
                System.out.println("send confirm message fail:" + msg);
            }else {

                System.out.println("send confirm message ok:" + msg);
            }

            channel.close();
            connection.close();

        }
}
异步模式
Channel对象提供的ConfirmListener()回调方法只包含deliveryTag(当前Chanel发出的消息序号),我们需要自己为每个Channnel维护一个unconfirm的消息序号集合,每publish一条数据,集合中元素加1,每回调一次handleAck方法,unconfirm集合删掉相应的一条(multiple=false)或多条(multiple=true)记录,从程序运行效率上看,这个unconfirm集合最好采用有序集合SortedSet存储结构异步模式
生产者
public class Send1 {

        private static final String QUEUE_NAME = "test_confirm_queue1";

        public static void main(String[] args) throws IOException, TimeoutException, InterruptedException {

            Connection connection = ConnectionUtils.getConnection();
            Channel channel = connection.createChannel();
            channel.queueDeclare(QUEUE_NAME,false,false,false,null);

            //设置生产者的模式为confirm
            channel.confirmSelect();

            //存放未确认的消息标识
            final SortedSet<Long> confirmSet = Collections.synchronizedSortedSet(new TreeSet<Long>());

            //添加监听
            channel.addConfirmListener(new ConfirmListener() {
                //成功回调方法
                public void handleAck(long l, boolean b) throws IOException {
                    if(b) {
                        System.out.println("-----handleAck---multiple");
                        confirmSet.headSet(l + 1).clear();
                    } else {
                        System.out.println("-----handleAck---multiple false");
                        confirmSet.remove(l);
                    }
                }
                //失败回调方法
                public void handleNack(long l, boolean b) throws IOException {
                    if(b) {
                        System.out.println("-----handleNack---multiple");
                        confirmSet.headSet(l + 1).clear();
                    } else {
                        System.out.println("-----handleNack---multiple false");
                        confirmSet.remove(l);
                    }
                }
            });

            String msg = "hello confirm study";
            while(true) {
                long nextNo = channel.getNextPublishSeqNo();
                channel.basicPublish("",QUEUE_NAME,null,msg.getBytes());
                confirmSet.add(nextNo);
            }

        }
}
Spring整合rabbitmq
使用xml方式
依赖
<dependency>

      <groupId>org.springframework.amqp</groupId>

      <artifactId>spring-rabbit</artifactId>

      <version>2.0.3.RELEASE</version>

 </dependency>
Xml文件
<!--1、定义connection连接工厂-->

  <rabbit:connection-factory id="connectionFactory"

                           host="127.0.0.1" port="5672" username="test" password="123"

                           virtual-host="/vHost_test" />

  <!--2、定义rabbitmq模板,指定连接工厂以及exchange-->

  <rabbit:template id="amqpTemplate" connection-factory="connectionFactory" exchange="fanoutExchange"/>

  <!--MQ的管理,包括队列,交换器声明等-->

  <rabbit:admin connection-factory="connectionFactory"/

  <!--定义队列自动声明-->

  <rabbit:queue name="myQueue" auto-declare="true" durable="true" />

  <!--定义交换器自动声明-->

  <rabbit:fanout-exchange name="fanoutExchange" auto-declare="true">

    <rabbit:bindings>

        <rabbit:binding queue="myQueue"/>

    </rabbit:bindings>

</rabbit:fanout-exchange>

  <!--队列监听-->

  <rabbit:listener-container connection-factory="connectionFactory">

    <rabbit:listener ref="foo" method="listen" queue-names="myQueue"/>

</rabbit:listener-container>

  <!--消费者-->

  <bean id="foo" class="com.hsz.rabbitmq.MyConsumer"/>
消费者
public class MyConsumer {

    //业务代码
public void listen(String foo) {

        System.out.println("监听到:" + foo);

    }

}
测试
public class MyTest {

    public static void main(String[] args) throws InterruptedException {

        ClassPathXmlApplicationContext ctx = new ClassPathXmlApplicationContext("classpath:applicationContext.xml");

        RabbitTemplate bean = ctx.getBean(RabbitTemplate.class);

        bean.convertAndSend("hello spring");

        Thread.sleep(200);

        ctx.destroy();

    }

}
注解方式
依赖
<dependencies>

    <!-- RabbitMQ的Java Client库 -->

    <dependency>

        <groupId>com.rabbitmq</groupId>

        <artifactId>amqp-client</artifactId>

        <version>5.2.0</version>

    </dependency>

    <!-- https://mvnrepository.com/artifact/org.springframework.amqp/spring-amqp -->

    <dependency>

        <groupId>org.springframework.amqp</groupId>

        <artifactId>spring-amqp</artifactId>

        <version>2.0.3.RELEASE</version>

    </dependency>

    <!-- https://mvnrepository.com/artifact/org.springframework.amqp/spring-rabbit -->

    <dependency>

        <groupId>org.springframework.amqp</groupId>

        <artifactId>spring-rabbit</artifactId>

        <version>2.0.3.RELEASE</version>

    </dependency>

    <!-- https://mvnrepository.com/artifact/org.springframework.retry/spring-retry -->

    <dependency>

        <groupId>org.springframework.retry</groupId>

        <artifactId>spring-retry</artifactId>

        <version>1.2.2.RELEASE</version>

    </dependency>

  </dependencies>
rabbitmq.properties
#IP地址

rabbitmq.host=127.0.0.1

#端口号

rabbitmq.port=5672

#用户名

rabbitmq.username=test

#密码

rabbitmq.password=123

#消费者监听的队列queue

rabbitmq.queuenames=rabbitMQ_test2,rabbitMQ_pro_lswd_server,rabbitMQ_pro_lswd_wecaht

#生产者监听消息queue

rabbitmq.produce.queuename=rabbitMQ_pro_lswd_server

#消息监听类

rabbitmq.listener.class=com.lswd.rabbitmq.listener.ServiceMessageListener
RabbitmqConfig配置文件
@EnableCaching

@PropertySource("classpath:db.properties")

public class RabbitmqConfig {

    @Autowired

    Environment env;

    @Bean

    <!-- 连接服务配置  -->

    public ConnectionFactory connectionFactory(){

        CachingConnectionFactory factory = new CachingConnectionFactory(

                env.getProperty("rabbitmq.host"),

                env.getProperty("rabbitmq.port", Integer.class)

        );

        factory.setUsername(env.getProperty("rabbitmq.username"));

        factory.setPassword(env.getProperty("rabbitmq.password"));

        return factory;

    }

    @Bean

    public RabbitAdmin rabbitAdmin(ConnectionFactory connectionFactory){

        RabbitAdmin rabbitAdmin=new RabbitAdmin(connectionFactory);

        return rabbitAdmin;

    }

    @Bean

    //AmqpTemplate配置,AmqpTemplate接口定义了发送和接收消息的基本操作

    public AmqpTemplate  rabbitTemplate(ConnectionFactory connectionFactory){

        RabbitTemplate rabbitTemplate=new RabbitTemplate(connectionFactory);

        RetryTemplate retryTemplate = new RetryTemplate();

        ExponentialBackOffPolicy backOffPolicy = new ExponentialBackOffPolicy();

        backOffPolicy.setInitialInterval(500);

        backOffPolicy.setMultiplier(10.0);

        backOffPolicy.setMaxInterval(10000);

        retryTemplate.setBackOffPolicy(backOffPolicy);

        rabbitTemplate.setRetryTemplate(retryTemplate);

        rabbitTemplate.setRoutingKey(env.getProperty("rabbitmq.produce.queuename"));

       return  rabbitTemplate;

    }

    @Bean

    public ChannelAwareMessageListener channelAwareMessageListener() throws InstantiationException, IllegalAccessException, ClassNotFoundException {

    return  (ChannelAwareMessageListener) Class.forName(env.getProperty("rabbitmq.listener.class")).newInstance();

    }

    @Bean

    <!-- queue litener  观察 监听模式 当有消息到达时会通知监听在对应的队列上的监听对象-->

    public SimpleMessageListenerContainer messageListenerContainer(ConnectionFactory connectionFactory,ChannelAwareMessageListener channelAwareMessageListener){

        SimpleMessageListenerContainer container = new SimpleMessageListenerContainer();

        container.setConnectionFactory(connectionFactory);

        //container.setMessageListener(messageListener);

        container.setChannelAwareMessageListener(channelAwareMessageListener);

        Queue[] queues=new Queue[env.getProperty("rabbitmq.queuenames").split(",").length];

        for (int i = 0; i < queues.length; i++) {

            Queue queue=new Queue(env.getProperty("rabbitmq.queuenames").split(",")[i]);

            queues[i]=queue;

        }

        container.setQueues(queues);

        container.setConsumerArguments(Collections. <String, Object> singletonMap("x-priority",

                Integer.valueOf(10)));

        return container;

    }

}
消息监听实现MessageListener
@Component

public class ServiceMessageListener implements MessageListener{//消息监听类虚实现MessageListener接口

    @Override

    public void onMessage(Message message) {

        try {

            //消息内容

            String body = new String(message.getBody(), "UTF-8");

            System.out.println("消息内容:::::::::::"+body);

            //消息队列

            System.out.println(message.getMessageProperties().getConsumerQueue());

        } catch (UnsupportedEncodingException e) {

            e.printStackTrace();

        }

    }

}
消息监听实现ChannelAwareMessageListener
@Component

public class ServiceMessageListener implements ChannelAwareMessageListener{

    @Override

    public void onMessage(Message message, Channel channel) throws Exception {

        // TODO Auto-generated method stub

        String body = new String(message.getBody(), "UTF-8");

        System.out.println("消息内容:::::::::::"+body);

        System.out.println(message.getMessageProperties().getConsumerQueue());

        boolean mqFlag=false;//业务处理

         //还有一个点就是如何获取mq消息的报文部分message?

        if(mqFlag){

            basicACK(message,channel);//处理正常--ack

        }else{

            basicNACK(message,channel);//处理异常--nack

        }

    }

    //正常消费掉后通知mq服务器移除此条mq

    private void basicACK(Message message,Channel channel){

        try{

            channel.basicAck(message.getMessageProperties().getDeliveryTag(),false);

        }catch(IOException e){

            System.out.println("通知服务器移除mq时异常,异常信息:"+e);

        }

    }

    //处理异常,mq重回队列

    private void basicNACK(Message message,Channel channel){

        try{

            channel.basicNack(message.getMessageProperties().getDeliveryTag(),false,true);

        }catch(IOException e){

            System.out.println("mq重新进入服务器时出现异常,异常信息:"+e);

        }

    }

}
测试
@WebAppConfiguration

@RunWith(value = SpringJUnit4ClassRunner.class)

//指定spring配置类

@ContextConfiguration(classes = { WebConfig.class, AppConfig.class})

public class RabbitmqTest{

    @Autowired

    private AmqpTemplate rabbitTemplate;

    @Test

    public  void pushMeun(){

        MessageProperties properties= new MessageProperties();

        properties.setConsumerQueue("rabbitMQ_test2");

        rabbitTemplate.send(new Message("12.34".getBytes(), properties));

    }

}

 浙公网安备 33010602011771号