狂神说JUC学习笔记(二)
狂神说JUC的原版笔记:
链接:https://pan.baidu.com/s/12zrGI4JyZhmkQh0cqEO4BA
提取码:d65c我的笔记在狂神的笔记上增加了一些知识点或者做了些许补充/修改
如果狂神原版笔记的连接失效了请在评论区留言,我看到后会更新的
Callable
1、可以有返回值;
2、可以抛出异常;
3、方法不同,run()/call()
public class CallableTest {
    public static void main(String[] args) throws ExecutionException, InterruptedException {
        for (int i = 1; i < 10; i++) {
            MyThread1 myThread1 = new MyThread1();

            FutureTask<Integer> futureTask = new FutureTask<>(myThread1);
            // 放入Thread中使用,结果会被缓存
            new Thread(futureTask,String.valueOf(i)).start();
            // 这个get方法可能会被阻塞,如果在call方法中是一个耗时的方法,所以一般情况我们会把这个放在最后,或者使用异步通信
            int a = futureTask.get();
            System.out.println("返回值:" + s);
        }

    }

}
class MyThread1 implements Callable<Integer> {

    @Override
    public Integer call() throws Exception {
        System.out.println("call()");// 会打印几个call
        return 1024;
    }
}
细节:
1、有缓存
2、结果可能需要等待,会阻塞!
常用的辅助类(必会)
CountDownLatch
import java.util.concurrent.CountDownLatch;

public class CountDownLatchDemo {
    public static void main(String[] args) throws InterruptedException {
        // 总数是6,必须要执行任务的时候,再使用!
        CountDownLatch countDownLatch = new CountDownLatch(6);

        for (int i = 1; i <= 6; i++) {
            new Thread(()->{
                System.out.println(Thread.currentThread().getName() + "Go out");
                countDownLatch.countDown();// 数量-1
            }, String.valueOf(i)).start();
        }

        countDownLatch.await();

        System.out.println("Close Door");
    }
}
输出结果(顺序不一定是一样的):
1: Go out
6: Go out
4: Go out
3: Go out
2: Go out
5: Go out
Close Door
原理:
countDownLatch.countDown(); // 数量-1
countDownLatch.await(); // 等待计数器归零,然后再向下执行
每次有线程调用 countDown() 数量-1,假设计数器变为0,countDownLatch.await() 就会被唤醒,继续
执行!
CyclicBarrier

加法计数器
import java.util.concurrent.BrokenBarrierException;
import java.util.concurrent.CyclicBarrier;

public class CyclicBarrierDemo {
    public static void main(String[] args) {
        //集齐7颗龙珠召唤神龙

        CyclicBarrier cyclicBarrier = new CyclicBarrier(7, ()->{
            System.out.println("召唤神龙成功!");
        });

        for (int i = 1; i <= 7 ; i++) {
            // lambda能操作到 i 吗?不行,所以用一个final定义一个临时常量
            final int temp = i;
            new Thread(()->{
                System.out.println(Thread.currentThread().getName() + "收集第" + temp + "个龙珠!");
                try {
                    cyclicBarrier.await();
                } catch (InterruptedException e) {
                    e.printStackTrace();
                } catch (BrokenBarrierException e) {
                    e.printStackTrace();
                }
            }).start();
        }
    }
}
通过await等待,看线程是否达到7个!
输出结果(顺序不一定是一样的):
Thread-0收集第1个龙珠!
Thread-1收集第2个龙珠!
Thread-2收集第3个龙珠!
Thread-3收集第4个龙珠!
Thread-5收集第6个龙珠!
Thread-4收集第5个龙珠!
Thread-6收集第7个龙珠!
召唤神龙成功!
如果cyclicbarrier设置为8,那么达不到8个线程就无法“召唤神龙”成功。
Semaphore
Semaphore:信号量
.jpg)
例子:抢车位!
6车---3个停车位置
import java.util.concurrent.Semaphore;
import java.util.concurrent.TimeUnit;

public class SemaphoreDemo {
    public static void main(String[] args) {

        // 线程数量,停车位,限流
        Semaphore semaphore = new Semaphore(3);
        for (int i = 0; i <= 6; i++) {
            new Thread(() -> {
                // acquire() 得到
                try {
                    semaphore.acquire();
                    System.out.println(Thread.currentThread().getName() + "抢到车位");
                    TimeUnit.SECONDS.sleep(2);
                    System.out.println(Thread.currentThread().getName() + "离开车位");
                }catch (Exception e) {
                    e.printStackTrace();
                }finally {
                    semaphore.release(); // release() 释放
                }
            }).start();
        }
    }
}
输出结果(顺序不一定是一样的):
Thread-0抢到车位
Thread-1抢到车位
Thread-3抢到车位
Thread-0离开车位
Thread-1离开车位
Thread-3离开车位
Thread-2抢到车位
Thread-4抢到车位
Thread-5抢到车位
Thread-5离开车位
Thread-2离开车位
Thread-4离开车位
Thread-6抢到车位
Thread-6离开车位
原理:
semaphore.acquire()获得资源,如果资源已经使用完了,就等待资源释放后再进行使用!
semaphore.release()释放,会将当前的信号量释放+1,然后唤醒等待的线程!
作用: 多个共享资源互斥的使用! 并发限流,控制最大的线程数!
读写锁ReadWriteLock
.jpg)
补充
读写锁包含一对相关的锁,读锁用于只读操作,写锁用于写操作。读锁可能由多个读线程同时运行,写锁是唯一的。
1、读锁和写锁之间是互斥的,同一时间只能有一个在运行。但是可以有多个线程同时读取数据。
2、写入数据之前必须重新确认(ReCheck)状态,因为其他的线程可能会拿到写锁再一次修改我们已经修改过的值。这是因为前一个线程拿到写锁之后,后面的线程会被阻塞。当前一个线程释放写锁之后,被阻塞的线程会继续运行完成被阻塞的部分代码,所以才会出现这样的情况。
3、当某一个线程上了写锁之后,自己仍然可以上读锁,之后在释放写锁,这是一种降级(Downgrade)的处理方法。
读写锁(ReadWriteLock)包含如下两个方法:
1.读锁
Lock readLock()
2.写锁
Lock writeLock()
例子
先看看数据不可靠的例子
public class ReadWriteLockDemo {
    public static void main(String[] args) {
        MyCache myCache = new MyCache();
        int num = 6;
        for (int i = 1; i <= num; i++) {
            int finalI = i;
            new Thread(() -> {

                myCache.write(String.valueOf(finalI), String.valueOf(finalI));

            },String.valueOf(i)).start();
        }

        for (int i = 1; i <= num; i++) {
            int finalI = i;
            new Thread(() -> {

                myCache.read(String.valueOf(finalI));

            },String.valueOf(i)).start();
        }
    }
}

/**
 *  方法未加锁,导致写的时候被插队
 */
class MyCache {
    private volatile Map<String, String> map = new HashMap<>();

    public void write(String key, String value) {
        System.out.println(Thread.currentThread().getName() + "线程开始写入");
        map.put(key, value);
        System.out.println(Thread.currentThread().getName() + "线程写入ok");
    }

    public void read(String key) {
        System.out.println(Thread.currentThread().getName() + "线程开始读取");
        map.get(key);
        System.out.println(Thread.currentThread().getName() + "线程读取ok");
    }
}
输出结果(顺序不一定是一样的):
1线程开始写入
4线程开始写入
3线程开始写入
3线程写入ok
2线程开始写入
6线程开始写入
1线程写入ok
5线程开始写入
5线程写入ok
4线程写入ok
1线程开始读取
6线程写入ok
2线程写入ok
5线程开始读取
5线程读取ok
1线程读取ok
2线程开始读取
2线程读取ok
6线程开始读取
6线程读取ok
3线程开始读取
3线程读取ok
4线程开始读取
4线程读取ok
可以看到上面的结果不是先写完在读取,而是有可能被其他线程插队的。所以如果我们不加锁的情况,多线程的读写会造成数据不可靠的问题。
我们也可以采用synchronized这种重量锁和轻量锁 lock去保证数据的可靠。
但是这次我们采用更细粒度的锁:ReadWriteLock 读写锁来保证
public class ReadWriteLockDemo {
    public static void main(String[] args) {
        MyCache2 myCache = new MyCache2();
        int num = 6;
        for (int i = 1; i <= num; i++) {
            int finalI = i;
            new Thread(() -> {

                myCache.write(String.valueOf(finalI), String.valueOf(finalI));

            },String.valueOf(i)).start();
        }

        for (int i = 1; i <= num; i++) {
            int finalI = i;
            new Thread(() -> {

                myCache.read(String.valueOf(finalI));

            },String.valueOf(i)).start();
        }
    }

}
class MyCache2 {
    private volatile Map<String, String> map = new HashMap<>();
    private ReadWriteLock lock = new ReentrantReadWriteLock();

    public void write(String key, String value) {
        lock.writeLock().lock(); // 写锁
        try {
            System.out.println(Thread.currentThread().getName() + "线程开始写入");
            map.put(key, value);
            System.out.println(Thread.currentThread().getName() + "线程写入ok");

        }finally {
            lock.writeLock().unlock(); // 释放写锁
        }
    }

    public void read(String key) {
        lock.readLock().lock(); // 读锁
        try {
            System.out.println(Thread.currentThread().getName() + "线程开始读取");
            map.get(key);
            System.out.println(Thread.currentThread().getName() + "线程读取ok");
        }finally {
            lock.readLock().unlock(); // 释放读锁
        }
    }
}
输出结果(顺序不一定是一样的):
1线程开始写入
1线程写入ok
3线程开始写入
3线程写入ok
5线程开始写入
5线程写入ok
6线程开始写入
6线程写入ok
2线程开始写入
2线程写入ok
4线程开始写入
4线程写入ok
1线程开始读取
1线程读取ok
5线程开始读取
5线程读取ok
2线程开始读取
6线程开始读取
3线程开始读取
3线程读取ok
2线程读取ok
6线程读取ok
4线程开始读取
4线程读取ok
总结
- 独占锁(写锁) 一次只能被一个线程占有
- 共享锁(读锁) 多个线程可以同时占有
- ReadWriteLock
- 读-读 可以共存!
- 读-写 不能共存!
- 写-写 不能共存!
阻塞队列


BlockQueue
是Collection的一个子类
什么情况下我们会使用阻塞队列?多线程并发处理、线程池

BlockingQueue 有四组api
| 方式 | 抛出异常 | 不会抛出异常,有返回值 | 阻塞,等待 | 超时等待 |
|---|---|---|---|---|
| 添加 | add | offer | put | offer(timenum.timeUnit) |
| 移出 | remove | poll | take | poll(timenum,timeUnit) |
| 判断队首元素 | element | peek | - | - |
/**
 * 抛出异常
 */
public static void test1(){
    //需要初始化队列的大小
    ArrayBlockingQueue blockingQueue = new ArrayBlockingQueue<>(3);

    System.out.println(blockingQueue.add("a"));
    System.out.println(blockingQueue.add("b"));
    System.out.println(blockingQueue.add("c"));
    //抛出异常:java.lang.IllegalStateException: Queue full
    //System.out.println(blockingQueue.add("d"));
    System.out.println(blockingQueue.remove());
    System.out.println(blockingQueue.remove());
    System.out.println(blockingQueue.remove());
    //如果多移除一个
    //这也会造成 java.util.NoSuchElementException 抛出异常
    System.out.println(blockingQueue.remove());
}
=======================================================================================
/**
 * 不抛出异常,有返回值
 */
public static void test2(){
    ArrayBlockingQueue blockingQueue = new ArrayBlockingQueue<>(3);
    System.out.println(blockingQueue.offer("a"));
    System.out.println(blockingQueue.offer("b"));
    System.out.println(blockingQueue.offer("c"));
    //添加 一个不能添加的元素 使用offer只会返回false 不会抛出异常
    System.out.println(blockingQueue.offer("d"));

    System.out.println(blockingQueue.poll());
    System.out.println(blockingQueue.poll());
    System.out.println(blockingQueue.poll());
    //弹出 如果没有元素 只会返回null 不会抛出异常
    System.out.println(blockingQueue.poll());
}
=======================================================================================
/**
 * 等待 一直阻塞
 */
public static void test3() throws InterruptedException {
    ArrayBlockingQueue blockingQueue = new ArrayBlockingQueue<>(3);

    //一直阻塞 不会返回
    blockingQueue.put("a");
    blockingQueue.put("b");
    blockingQueue.put("c");

    //如果队列已经满了, 再进去一个元素  这种情况会一直等待这个队列 什么时候有了位置再进去,程序不会停止
	//blockingQueue.put("d");

    System.out.println(blockingQueue.take());
    System.out.println(blockingQueue.take());
    System.out.println(blockingQueue.take());
    //如果我们再来一个  这种情况也会等待,程序会一直运行 阻塞
    System.out.println(blockingQueue.take());
}
=======================================================================================
/**
 * 等待 超时阻塞
 *  这种情况也会等待队列有位置 或者有产品 但是会超时结束
 */
public static void test4() throws InterruptedException {
    ArrayBlockingQueue blockingQueue = new ArrayBlockingQueue<>(3);
    blockingQueue.offer("a");
    blockingQueue.offer("b");
    blockingQueue.offer("c");
    System.out.println("开始等待");
    blockingQueue.offer("d",2, TimeUnit.SECONDS);  //超时时间2s 等待如果超过2s就结束等待
    System.out.println("结束等待");
    System.out.println("===========取值==================");
    System.out.println(blockingQueue.poll());
    System.out.println(blockingQueue.poll());
    System.out.println(blockingQueue.poll());
    System.out.println("开始等待");
    blockingQueue.poll(2,TimeUnit.SECONDS); //超过两秒 我们就不要等待了
    System.out.println("结束等待");
}
同步队列
同步队列 没有容量,也可以视为容量为1的队列;
进去一个元素,必须等待取出来之后,才能再往里面放入一个元素;
put方法 和 take方法;
Synchronized 和 其他的BlockingQueue 不一样 它不存储元素;
put了一个元素,就必须从里面先take出来,否则不能再put进去值!
并且SynchronousQueue 的take是使用了lock锁保证线程安全的。
import java.util.concurrent.BlockingQueue;
import java.util.concurrent.SynchronousQueue;
import java.util.concurrent.TimeUnit;

public class SynchronousQueueDemo {
    public static void main(String[] args) {
        BlockingQueue<String> blockingQueue = new SynchronousQueue<>();

        new Thread(()->{
            try {
                System.out.println(Thread.currentThread().getName() + "put 1");
                blockingQueue.put("1");
                System.out.println(Thread.currentThread().getName() + "put 2");
                blockingQueue.put("2");
                System.out.println(Thread.currentThread().getName() + "put 3");
                blockingQueue.put("3");
            } catch (InterruptedException e) {
                e.printStackTrace();
            }
        }, "T1").start();

        new Thread(()->{
            try {
                TimeUnit.SECONDS.sleep(3);
                System.out.println(Thread.currentThread().getName() + "==>" + blockingQueue.take());
                TimeUnit.SECONDS.sleep(3);
                System.out.println(Thread.currentThread().getName() + "==>" + blockingQueue.take());
                TimeUnit.SECONDS.sleep(3);
                System.out.println(Thread.currentThread().getName() + "==>" + blockingQueue.take());
            } catch (InterruptedException e) {
                e.printStackTrace();
            }

        },"T2").start();
    }
}
输出结果(顺序不一定是一样的):
T1put 1
T2==>1
T1put 2
T2==>2
T1put 3
T2==>3
线程池
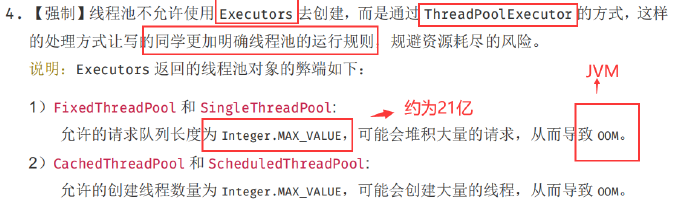
线程池:三大方式、七大参数、四种拒绝策略
池化技术
程序的运行,本质:占用系统的资源!我们需要去优化资源的使用 ===> 池化技术
线程池、JDBC的连接池、内存池、对象池 等等。。。。
资源的创建、销毁十分消耗资源
池化技术:事先准备好一些资源,如果有人要用,就来我这里拿,用完之后还给我,以此来提高效率。
线程池的好处:
1、降低资源的消耗;
2、提高响应的速度;
3、方便管理;
线程复用、可以控制最大并发数、管理线程;
线程池:三大方法
- ExecutorService threadPool = Executors.newSingleThreadExecutor();//单个线程
- ExecutorService threadPool2 = Executors.newFixedThreadPool(5); //创建一个固定的线程池的大小
- ExecutorService threadPool3 = Executors.newCachedThreadPool(); //可伸缩的
import java.util.concurrent.ExecutorService;
import java.util.concurrent.Executors;

//Executors 工具类、3大方法
public class Demo01 {
    public static void main(String[] args) {
        ExecutorService threadPool = Executors.newSingleThreadExecutor();//单个线程
        //ExecutorService threadPool2 = Executors.newFixedThreadPool(5);//创建一个固定的线程池的大小
        //ExecutorService threadPool3 = Executors.newCachedThreadPool()//可伸缩的,遇强则强,遇弱则弱

        try {
            for (int i = 0; i < 100; i++) {
                // 使用了线程池之后,使用线程池来创建线程
                threadPool.execute(()->{
                    System.out.println(Thread.currentThread().getName() + "ok");
                });
            }
        } catch (Exception e) {
            e.printStackTrace();
        } finally {
            // 线程池用完,程序结束,关闭线程池
            threadPool.shutdown();
        }
    }
}
七大参数
源码分析
public ThreadPoolExecutor(int corePoolSize,  //核心线程池大小
                          int maximumPoolSize, //最大的线程池大小
                          long keepAliveTime,  //超时了没有人调用就会释放
                          TimeUnit unit, //超时单位
                          BlockingQueue<Runnable> workQueue, //阻塞队列
                          ThreadFactory threadFactory, //线程工厂 创建线程的 一般不用动
                          RejectedExecutionHandler handler //拒绝策略
                         ) {
    if (corePoolSize < 0 ||
        maximumPoolSize <= 0 ||
        maximumPoolSize < corePoolSize ||
        keepAliveTime < 0)
        throw new IllegalArgumentException();
    if (workQueue == null || threadFactory == null || handler == null)
        throw new NullPointerException();
    this.corePoolSize = corePoolSize;
    this.maximumPoolSize = maximumPoolSize;
    this.workQueue = workQueue;
    this.keepAliveTime = unit.toNanos(keepAliveTime);
    this.threadFactory = threadFactory;
    this.handler = handler;
}
狂神的银行排队例子
.jpg)
4种拒绝策略
-
new ThreadPoolExecutor.AbortPolicy(): //该拒绝策略为:银行满了,还有人进来,不处理这个人的,并抛出异常。超出最大承载,就会抛出异常:队列容量大小+maxPoolSize
-
new ThreadPoolExecutor.CallerRunsPolicy(): //该拒绝策略为:哪来的去哪里 main线程进行处理
-
new ThreadPoolExecutor.DiscardPolicy(): //该拒绝策略为:队列满了,丢掉异常,不会抛出异常。
-
new ThreadPoolExecutor.DiscardOldestPolicy(): //该拒绝策略为:队列满了,尝试去和最早的进程竞争,不会抛出异常
如何设置线程池的大小
1、CPU密集型:电脑的核数是几核就选择几;选择maximunPoolSize的大小
// 获取cpu 的核数
        int max = Runtime.getRuntime().availableProcessors();
        ExecutorService service =new ThreadPoolExecutor(
                2,
                max,
                3,
                TimeUnit.SECONDS,
                new LinkedBlockingDeque<>(3),
                Executors.defaultThreadFactory(),
                new ThreadPoolExecutor.AbortPolicy()
        );
2、I/O密集型:
在程序中有15个大型任务,io十分占用资源;I/O密集型就是判断我们程序中十分耗I/O的线程数量,大约是最大I/O数的一倍到两倍之间。
回顾:手动创建一个线程池
import java.util.concurrent.*;

public class Demo02 {
    public static void main(String[] args) {
        // 自定义线程池!工作 ThreadPoolExecutor
        ExecutorService threadPool = new ThreadPoolExecutor(
                2,
                5,
                3,
                TimeUnit.SECONDS,
                new LinkedBlockingDeque<>(3),
                Executors.defaultThreadFactory(),
                new ThreadPoolExecutor.DiscardPolicy()
        );
        // 最大承载:Deque + max
        // 超过 RejectedExecutionException
        try {
            for (int i = 1; i <= 9; i++) {
                threadPool.execute(()->{
                    System.out.println(Thread.currentThread().getName() + "ok");
                });
            }
        } catch (Exception e) {
            e.printStackTrace();
        } finally {
            threadPool.shutdown();
        }
    }
}

 浙公网安备 33010602011771号