
笔记参照地址,如有学习,请跳转查看更加详细描述:华为二面:SpringBoot如何自定义Starter? - 码农Academy - 博客园 (cnblogs.com)
一、创建启动器
1.定义一个启动器项目WebStarterDemo,具体结构如下:

2.pom.xml所需依赖
<project xmlns="http://maven.apache.org/POM/4.0.0" xmlns:xsi="http://www.w3.org/2001/XMLSchema-instance"
         xsi:schemaLocation="http://maven.apache.org/POM/4.0.0 http://maven.apache.org/xsd/maven-4.0.0.xsd">
    <modelVersion>4.0.0</modelVersion>
    <parent>
        <groupId>com.lancoo</groupId>
        <artifactId>WebTool</artifactId>
        <version>1.0.0</version>
    </parent>

    <groupId>com.sbproject</groupId>
    <artifactId>WebStarterDemo</artifactId>
    <packaging>jar</packaging>

    <name>WebStarterDemo</name>
    <url>http://maven.apache.org</url>

    <properties>
        <project.build.sourceEncoding>UTF-8</project.build.sourceEncoding>
    </properties>

    <dependencies>
        <dependency>
            <groupId>org.springframework.boot</groupId>
            <artifactId>spring-boot-starter</artifactId>
        </dependency>
        <dependency>
            <groupId>org.springframework.boot</groupId>
            <artifactId>spring-boot-starter-test</artifactId>
            <scope>test</scope>
        </dependency>
        <dependency>
            <groupId>org.springframework.boot</groupId>
            <artifactId>spring-boot-starter-web</artifactId>
        </dependency>
      <!-- 自动化配置 -->
        <dependency>
            <groupId>org.springframework.boot</groupId>
            <artifactId>spring-boot-autoconfigure</artifactId>
        </dependency>
      <!-- 其中spring-boot-configuration-processor这个依赖主要用于IDEA支持和编译时生成元数据。 -->
        <dependency>
            <groupId>org.springframework.boot</groupId>
            <artifactId>spring-boot-configuration-processor</artifactId>
            <optional>true</optional>
        </dependency>
        <dependency>
            <groupId>junit</groupId>
            <artifactId>junit</artifactId>
            <scope>test</scope>
        </dependency>
    </dependencies>
</project>
这里有一个需要注意的地方:如果不存在父项目,那么必定需要在该项目指定指定打包,打包脚本如下(父级的pom.xml):
<project xmlns="http://maven.apache.org/POM/4.0.0" xmlns:xsi="http://www.w3.org/2001/XMLSchema-instance"
         xsi:schemaLocation="http://maven.apache.org/POM/4.0.0 http://maven.apache.org/xsd/maven-4.0.0.xsd">
    <modelVersion>4.0.0</modelVersion>
    <modules>
        <module>LogPlugIn</module>
        <module>WebStarterDemo</module>
        <module>WebStarterDemo</module>
    </modules>
    <parent>
        <groupId>org.springframework.boot</groupId>
        <artifactId>spring-boot-starter-parent</artifactId>
        <version>2.7.2</version>
        <relativePath/> <!-- lookup parent from repository -->
    </parent>

    <groupId>com.lancoo</groupId>
    <artifactId>WebTool</artifactId>
    <version>1.0.0</version>
    <packaging>pom</packaging>

    <name>WebTool</name>
    <url>http://maven.apache.org</url>

    <properties>
        <project.build.sourceEncoding>UTF-8</project.build.sourceEncoding>
        <java.version>1.8</java.version>
    </properties>

    <dependencyManagement>
        <dependencies>
            <dependency>
                <groupId>org.springframework.boot</groupId>
                <artifactId>spring-boot-starter</artifactId>
                <version>2.7.2</version>
            </dependency>
            <dependency>
                <groupId>org.springframework.boot</groupId>
                <artifactId>spring-boot-starter-test</artifactId>
                <version>2.7.2</version>
                <scope>test</scope>
            </dependency>
            <dependency>
                <groupId>org.springframework.boot</groupId>
                <artifactId>spring-boot-starter-web</artifactId>
                <version>2.7.2</version>
            </dependency>
            <dependency>
                <groupId>org.springframework.boot</groupId>
                <artifactId>spring-boot-autoconfigure</artifactId>
                <version>2.7.2</version>
            </dependency>
            <dependency>
                <groupId>org.springframework.boot</groupId>
                <artifactId>spring-boot-configuration-processor</artifactId>
                <version>2.7.2</version>
            </dependency>
            <dependency>
                <groupId>com.alibaba</groupId>
                <artifactId>fastjson</artifactId>
                <version>2.0.11</version>
            </dependency>
            <dependency>
                <groupId>org.projectlombok</groupId>
                <artifactId>lombok</artifactId>
                <version>1.18.24</version>
                <scope>provided</scope>
            </dependency>
            <dependency>
                <groupId>junit</groupId>
                <artifactId>junit</artifactId>
                <version>3.8.1</version>
                <scope>test</scope>
            </dependency>

            <dependency>
                <groupId>joda-time</groupId>
                <artifactId>joda-time</artifactId>
                <version>2.10.14</version>
            </dependency>
            <!-- 上传obs引入 -->
            <dependency>
                <groupId>com.huaweicloud</groupId>
                <artifactId>esdk-obs-java</artifactId>
                <version>[3.21.11,)</version>
            </dependency>
            <!-- 上传obs需要将String转换为inputStream流上传 -->
            <dependency>
                <groupId>commons-io</groupId>
                <artifactId>commons-io</artifactId>
                <version>2.11.0</version>
            </dependency>

        </dependencies>
    </dependencyManagement>
    <build>
        <resources>
            <resource>
                <directory>src/main/java</directory>
                <includes>
                    <include>**/*.properties</include>
                    <include>**/*.xml</include>
                </includes>
                <filtering>false</filtering>
            </resource>
            <resource>
                <directory>src/main/resources</directory>
                <includes>
                    <include>**/*.properties</include>
            <!-- 通过查看spring boot源码可以知道,在加载上下文配置、监听器的过程中,自动配置回去加载.factories配置的全限定引用符号进而加载相关的bean -->
            <!-- 所以,这里一定要指定资源文件,不然打包的时候,无法将自动配置的内容打包,出现的问题是:当您在新的项目进行@Autowired自动装配时,将会报错 -->
                    <include>**/*.factories</include>
                </includes>
                <filtering>false</filtering>
            </resource>
        </resources>
        <plugins>
            <plugin>
                <groupId>org.springframework.boot</groupId>
                <artifactId>spring-boot-maven-plugin</artifactId>
                <configuration>
                    <includeSystemScope>true</includeSystemScope>
                    <jvmArguments>-Dfile.encoding=UTF-8</jvmArguments>
                </configuration>
            </plugin>
        </plugins>
    </build>
</project>
3.编写启动器相关功能类WebStarter.java
package com.sbproject;

/**
 * Starter启动器功能
 * */
public class WebStarter
{
    public String WebStarterEntrance(){
        return "这是Starter启动器入口....";
    }
}
4.配置bean(WebStarterBean.java)
package com.sbproject;

import org.springframework.context.annotation.Bean;
import org.springframework.context.annotation.Configuration;

@Configuration
public class WebStarterBean {
    @Bean
    public WebStarter getWebStarter(){
        return new WebStarter();
    }
}
注:这里需要注意使用@Configuration和@AutoConfiguration的区别,笔记末尾有提到。
5.配置自动配置的.factories(src\main\resources\META-INF\spring.factories)
org.springframework.boot.autoconfigure.EnableAutoConfiguration=com.sbproject.WebStarterBean
二、在项目中引用启动器
1.pom.xml引入启动器内容
<?xml version="1.0" encoding="UTF-8"?>
<project xmlns="http://maven.apache.org/POM/4.0.0"
         xmlns:xsi="http://www.w3.org/2001/XMLSchema-instance"
         xsi:schemaLocation="http://maven.apache.org/POM/4.0.0 http://maven.apache.org/xsd/maven-4.0.0.xsd">
    <modelVersion>4.0.0</modelVersion>
    <parent>
        <groupId>org.springframework.boot</groupId>
        <artifactId>spring-boot-starter-parent</artifactId>
        <version>2.7.2</version>
        <relativePath/> <!-- lookup parent from repository -->
    </parent>


    <groupId>com.namejr</groupId>
    <artifactId>FirstSBDemo</artifactId>
    <version>1.0-SNAPSHOT</version>
    <packaging>war</packaging>

    <properties>
        <maven.compiler.source>8</maven.compiler.source>
        <maven.compiler.target>8</maven.compiler.target>
        <project.build.sourceEncoding>UTF-8</project.build.sourceEncoding>
        <java.version>1.8</java.version>
    </properties>

    <dependencies>
        <dependency>
            <groupId>org.springframework.boot</groupId>
            <artifactId>spring-boot-starter</artifactId>
        </dependency>
        <dependency>
            <groupId>org.springframework.boot</groupId>
            <artifactId>spring-boot-starter-test</artifactId>
            <scope>test</scope>
        </dependency>
        <dependency>
            <groupId>org.springframework.boot</groupId>
            <artifactId>spring-boot-starter-web</artifactId>
        </dependency>
        <dependency>
            <groupId>junit</groupId>
            <artifactId>junit</artifactId>
            <version>3.8.1</version>
            <scope>test</scope>
        </dependency>
        <dependency>
            <groupId>joda-time</groupId>
            <artifactId>joda-time</artifactId>
            <version>2.10.14</version>
        </dependency>
        <!-- 添加本地启动器jar包的依赖 -->
        <dependency>
            <groupId>com.sbproject</groupId>
            <artifactId>WebStarterDemo</artifactId>
            <version>1.0.0</version>
            <scope>system</scope>
            <systemPath>${project.basedir}/libs/WebStarterDemo.jar</systemPath>
        </dependency>
    </dependencies>
    <build>
        <resources>
            <resource>
                <directory>src/main/java</directory>
                <includes>
                    <include>**/*.properties</include>
                    <include>**/*.xml</include>
                </includes>
                <filtering>false</filtering>
            </resource>
            <resource>
                <directory>src/main/resources</directory>
                <includes>
                    <include>**/*.properties</include>
                    <include>**/*.yml</include>
                    <include>**/*.xml</include>
                    <include>**/*.json</include>
                    <include>**/*.txt</include>
                    <include>**/*.mp3</include>
                </includes>
                <filtering>false</filtering>
            </resource>
            <resource>
                <!-- 注册webapp目录为资源目录 -->
                <directory>src/main/webapp</directory>
                <targetPath>META-INF/resources</targetPath>
                <includes>
                    <include>**/**</include>
                </includes>
            </resource>
        </resources>
        <plugins>
            <plugin>
                <groupId>org.springframework.boot</groupId>
                <artifactId>spring-boot-maven-plugin</artifactId>
                <configuration>
                    <includeSystemScope>true</includeSystemScope>
                    <jvmArguments>-Dfile.encoding=UTF-8</jvmArguments>
                </configuration>
            </plugin>
            <plugin>
                <!-- 配置jar包打包工具 -->
                <groupId>org.apache.maven.plugins</groupId>
                <artifactId>maven-war-plugin</artifactId>
                <configuration>
                    <webResources>
                        <resource>
                            <directory>${project.basedir}/libs</directory>
                            <targetPath>WEB-INF/lib</targetPath>
                            <includes>
                                <include>**/*.jar</include>
                            </includes>
                        </resource>
                    </webResources>
                </configuration>
            </plugin>
        </plugins>
    </build>
</project>
2.直接引入启动器使用(PublicController.java)
package com.namejr.controller;

import com.namejr.serviceImpl.PublicServiceImpl;
import com.sbproject.WebStarter;
import org.joda.time.DateTime;
import org.springframework.beans.factory.annotation.Autowired;
import org.springframework.web.bind.annotation.RequestMapping;
import org.springframework.web.bind.annotation.RequestMethod;
import org.springframework.web.bind.annotation.RestController;

@RestController
@RequestMapping(value = "/api/public")
public class PublicController {
    @Autowired
    private PublicServiceImpl pServiceImpl;

    @Autowired
    private WebStarter getWebStarter;

    @RequestMapping(value = "/getServerTime", method = RequestMethod.GET,produces = "application/json;charset=UTF-8")
    public String getServerTime() {
        return DateTime.now().toString("yyyy-MM-dd HH:mm:ss");
    }

    @RequestMapping(value = "/runStarter", method = RequestMethod.GET,produces = "application/json;charset=UTF-8")
    public String runStarter() {
        return getWebStarter.WebStarterEntrance();
    }
}
调用输出:

三、获取配置信息
启动器内部配置:
1.WebStarterProperties.java
package com.sbproject;

import org.springframework.boot.context.properties.ConfigurationProperties;
import org.springframework.context.annotation.Configuration;

/**
 * 获取配置中心信息
 * */
@Configuration
@ConfigurationProperties(prefix = "web-starter")
public class WebStarterProperties {
    // 字段
    private String wsname;

    public String getWsname() {
        return wsname;
    }

    public void setWsname(String wsname) {
        this.wsname = wsname;
    }
}
2.注册bean
package com.sbproject;

import org.springframework.context.annotation.Bean;
import org.springframework.context.annotation.Configuration;

@Configuration
public class WebStarterBean {
    @Bean
    public WebStarter getWebStarter(){
        return new WebStarter();
    }
    @Bean
    public WebStarterProperties wsProperties(){
        return new WebStarterProperties();
    }
}
3.配置启动器接口
package com.sbproject;

/**
 * Starter启动器功能
 * */public class WebStarter
{public String webStarterEntrance(){
        return "这是Starter启动器入口....";
    }
}
外部项目引用:
1.application.properties配置需要的配置信息
server.port=8080

logging.config=classpath:logback-spring.xml

web-starter.wsname=namejr
2.直接使用
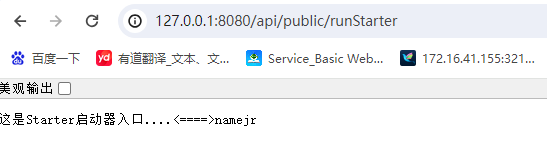
package com.namejr.controller;

import com.namejr.serviceImpl.PublicServiceImpl;
import com.sbproject.WebStarter;
import com.sbproject.WebStarterProperties;
import org.joda.time.DateTime;
import org.springframework.beans.factory.annotation.Autowired;
import org.springframework.web.bind.annotation.RequestMapping;
import org.springframework.web.bind.annotation.RequestMethod;
import org.springframework.web.bind.annotation.RestController;

@RestController
@RequestMapping(value = "/api/public")
public class PublicController {
    @Autowired
    private PublicServiceImpl pServiceImpl;
    @Autowired
    private WebStarter getWebStarter;
    @Autowired
    private WebStarterProperties wsProperties;

    @RequestMapping(value = "/getServerTime", method = RequestMethod.GET,produces = "application/json;charset=UTF-8")
    public String getServerTime() {
        return DateTime.now().toString("yyyy-MM-dd HH:mm:ss");
    }

    @RequestMapping(value = "/runStarter", method = RequestMethod.GET,produces = "application/json;charset=UTF-8")
    public String runStarter() {
        return getWebStarter.webStarterEntrance()+"<====>"+wsProperties.getWsname();
    }
}
输出:

四、额外补充启动器内部默认配置(也可以在文件中将private String wsname;改为默认值:private String wsname="";)
启动器内部配置:
1. WebStarterDemo\src\main\resources\META-INF中添加webstarter-dev.properties配置文件
web-starter.wsname=this is the default configuration file
2.配置bean中的WebStarterBean.java中引入配置文件
注:@PropertySource要在配置bean中引入。
package com.sbproject;

import org.springframework.context.annotation.Bean;
import org.springframework.context.annotation.Configuration;
import org.springframework.context.annotation.PropertySource;

@Configuration
@PropertySource(value = "classpath:/META-INF/webstarter-dev.properties")
public class WebStarterBean {
    @Bean
    public WebStarter getWebStarter(){
        return new WebStarter();
    }
    @Bean
    public WebStarterProperties wsProperties(){
        return new WebStarterProperties();
    }
}
外部项目配置:
1.在项目中不配置(注销)web-starter.wsname,直接输出
package com.namejr.controller;

import com.namejr.serviceImpl.PublicServiceImpl;
import com.sbproject.WebStarter;
import com.sbproject.WebStarterProperties;
import org.joda.time.DateTime;
import org.springframework.beans.factory.annotation.Autowired;
import org.springframework.web.bind.annotation.RequestMapping;
import org.springframework.web.bind.annotation.RequestMethod;
import org.springframework.web.bind.annotation.RestController;

@RestController
@RequestMapping(value = "/api/public")
public class PublicController {
    @Autowired
    private PublicServiceImpl pServiceImpl;
    @Autowired
    private WebStarter getWebStarter;
    @Autowired
    private WebStarterProperties wsProperties;

    @RequestMapping(value = "/getServerTime", method = RequestMethod.GET,produces = "application/json;charset=UTF-8")
    public String getServerTime() {
        return DateTime.now().toString("yyyy-MM-dd HH:mm:ss");
    }

    @RequestMapping(value = "/runStarter", method = RequestMethod.GET,produces = "application/json;charset=UTF-8")
    public String runStarter() {
        return getWebStarter.webStarterEntrance()+"<====>"+wsProperties.getWsname();
    }
}
输出内容:

当开放外部项目的application.properties配置文件时,访问输出如下:
外部的application.properties文件:
web-starter.wsname=namejr
@Configuration和@AutoConfiguration的区别:
详情可以查看Springboot Configuration 和 AutoConfiguraton - 简书 (jianshu.com)
相同点:都能够进行功能的配置(包括实现自动配置)。
不同点:
1、加载顺序不同:@Configuration会优先@AutoConfiguration加载,但是@Configuration的加载顺序是不可控的,而@AutoConfiguration可以通过@AutoConfigureAfter、@AutoConfigureBefore和@AutoConfigureOrder来控制类的加载顺序。
2、@Configuration是通过@ComponentScan进行指定扫描的,会先扫描所有被扫描到的配置文件,然后再去加载Bean;@AutoConfiguration是通过自动配置文件(classpath*:META-INF/spring.factories)的配置一个个去扫描并加载Bean。注:如果自动装配类使用@ComponentScan扫描,并且类名在自动配置文件中,那么将会被扫描两次并且@AutoConfigureAfter、@AutoConfigureBefore和@AutoConfigureOrder会失效。
、、、

 浙公网安备 33010602011771号