

【随笔】HLS VITIS开发深度学习踩坑笔记1--从HLSmodule到vitis中PS调用(附HLS VITIS代码)
本文只是做一个记录,想到什么写什么
版本
VITIS 2022.2
VIVADO 2022.2
HLS 2022.2
bug记录
vitis无法在debug连接上的时候,relaunch debug,否则会报错如下
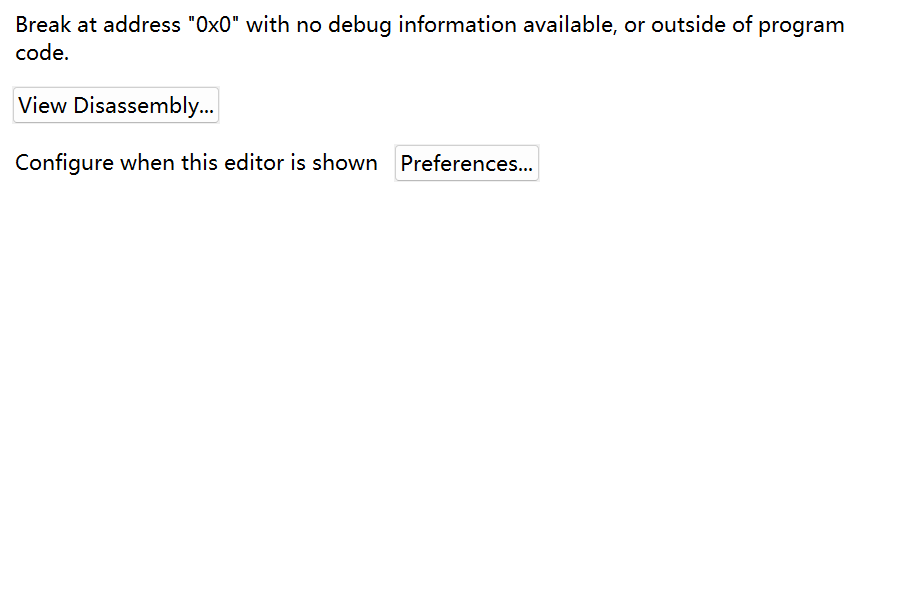
重新插拔jtag解决
例程
1.编写HLS代码:
#include <ap_cint.h>
#include "demo.h"
#include <cstring>
void foo_top (uint32 *m ) {
// 基于Directive视图的HLS编译指令
#pragma HLS INTERFACE mode=m_axi bundle=gmem0 depth=64 port=m offset=slave // 将变量m映射到AXI4M主接口,深度64,端口m,地址从AXI-Lite接口获取
#pragma HLS INTERFACE mode=s_axilite bundle=BUS_B port=return    // 将函数返回控制映射到AXI-Lite总线BUS_A
	for(int i=0;i<300;i++){
		m[i]=m[i]+1;
	}

}
将某个地址的值+1后写回去
综合结果
由于前面我设置了#pragma HLS INTERFACE mode=m_axi bundle=gmem0 depth=64 port=m offset=slave即地址由从机决定,所以我们需要将m的地址和bram接起来,才能让他读写bram
同时可以看出来,它默认生成的是64位地址
2.Vivado中搭建PS
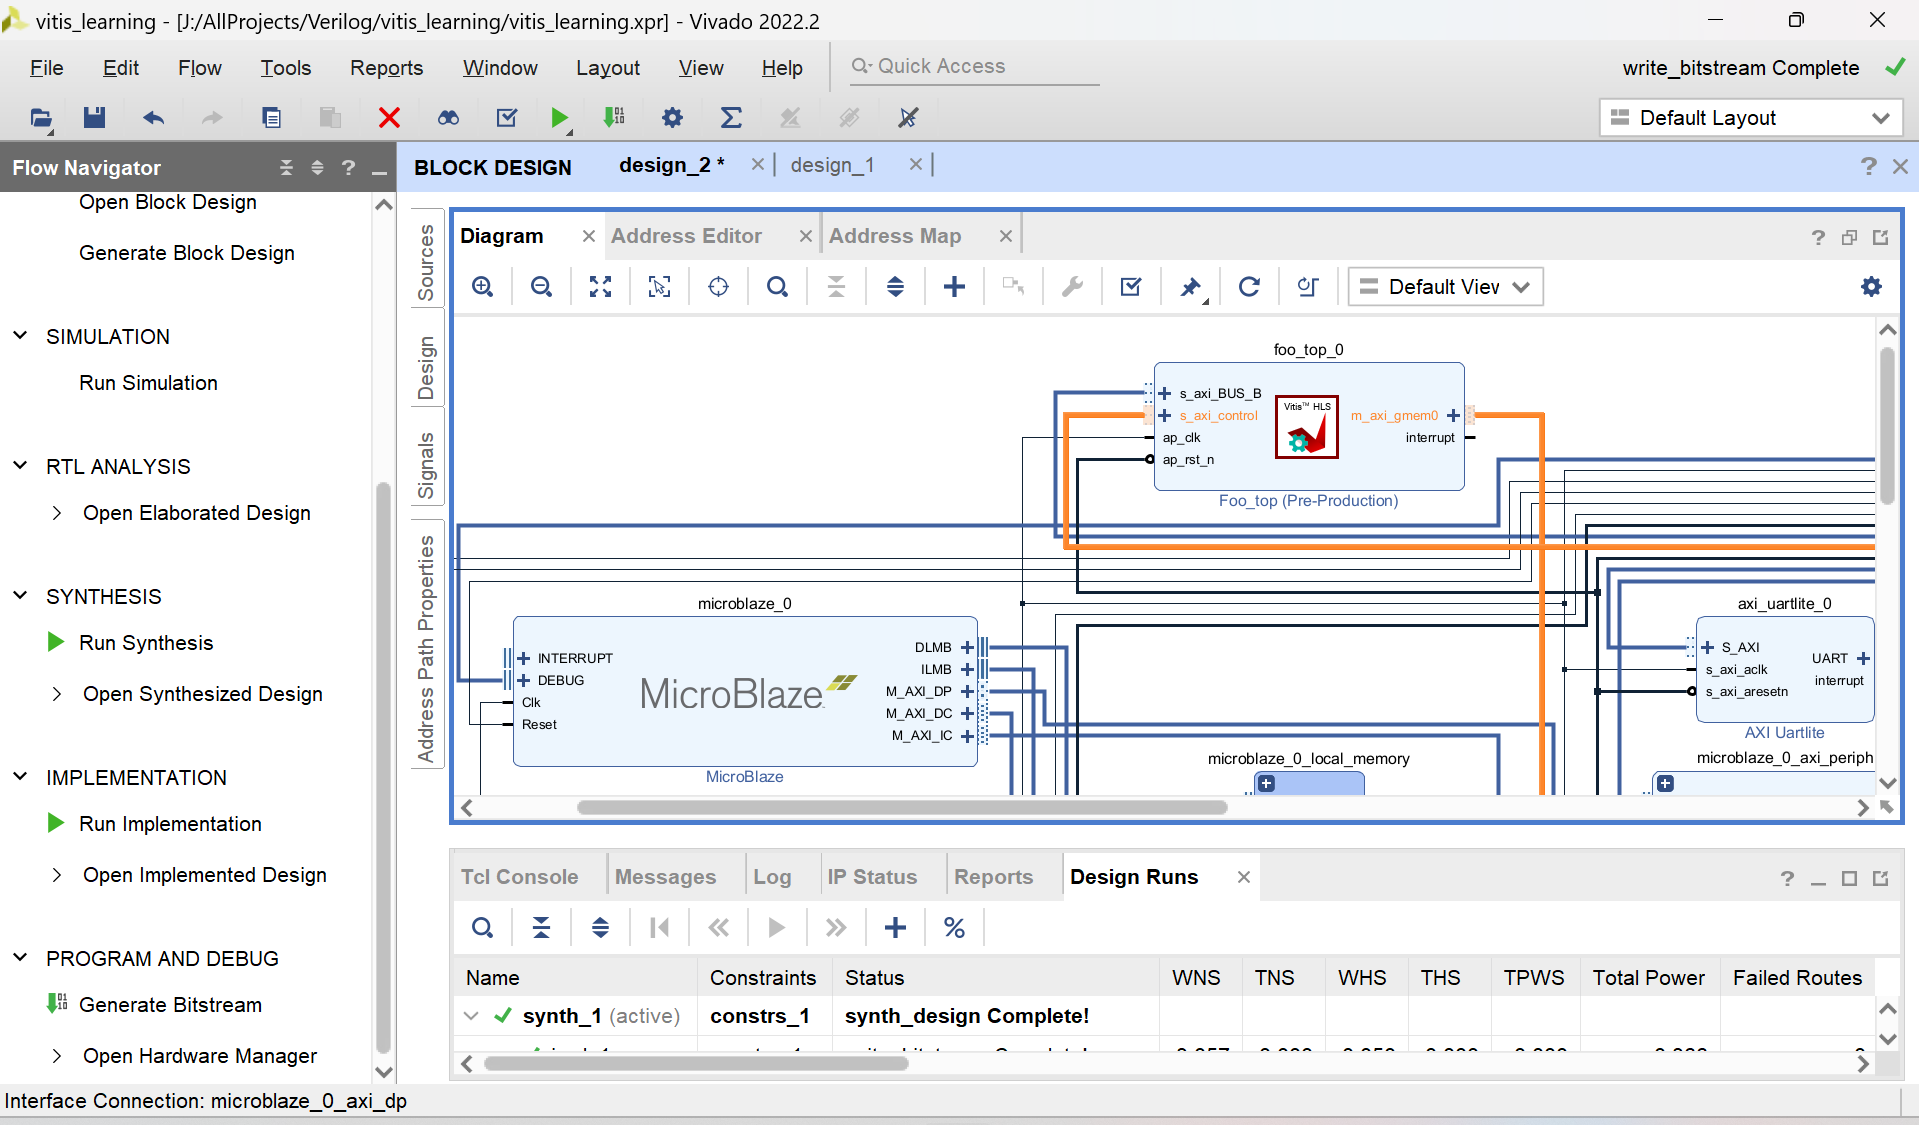
2.1 拉模块
没什么好说的,正常搭建就可以,关键就是:
- 拖出来一个bram
- 拖出来一个自己生成的HLS模块
- 拖出来microblaze,如果用zynq也可以拖出来zynq
- 把他们都连接到一起,可以run automation connection
2.2 写地址
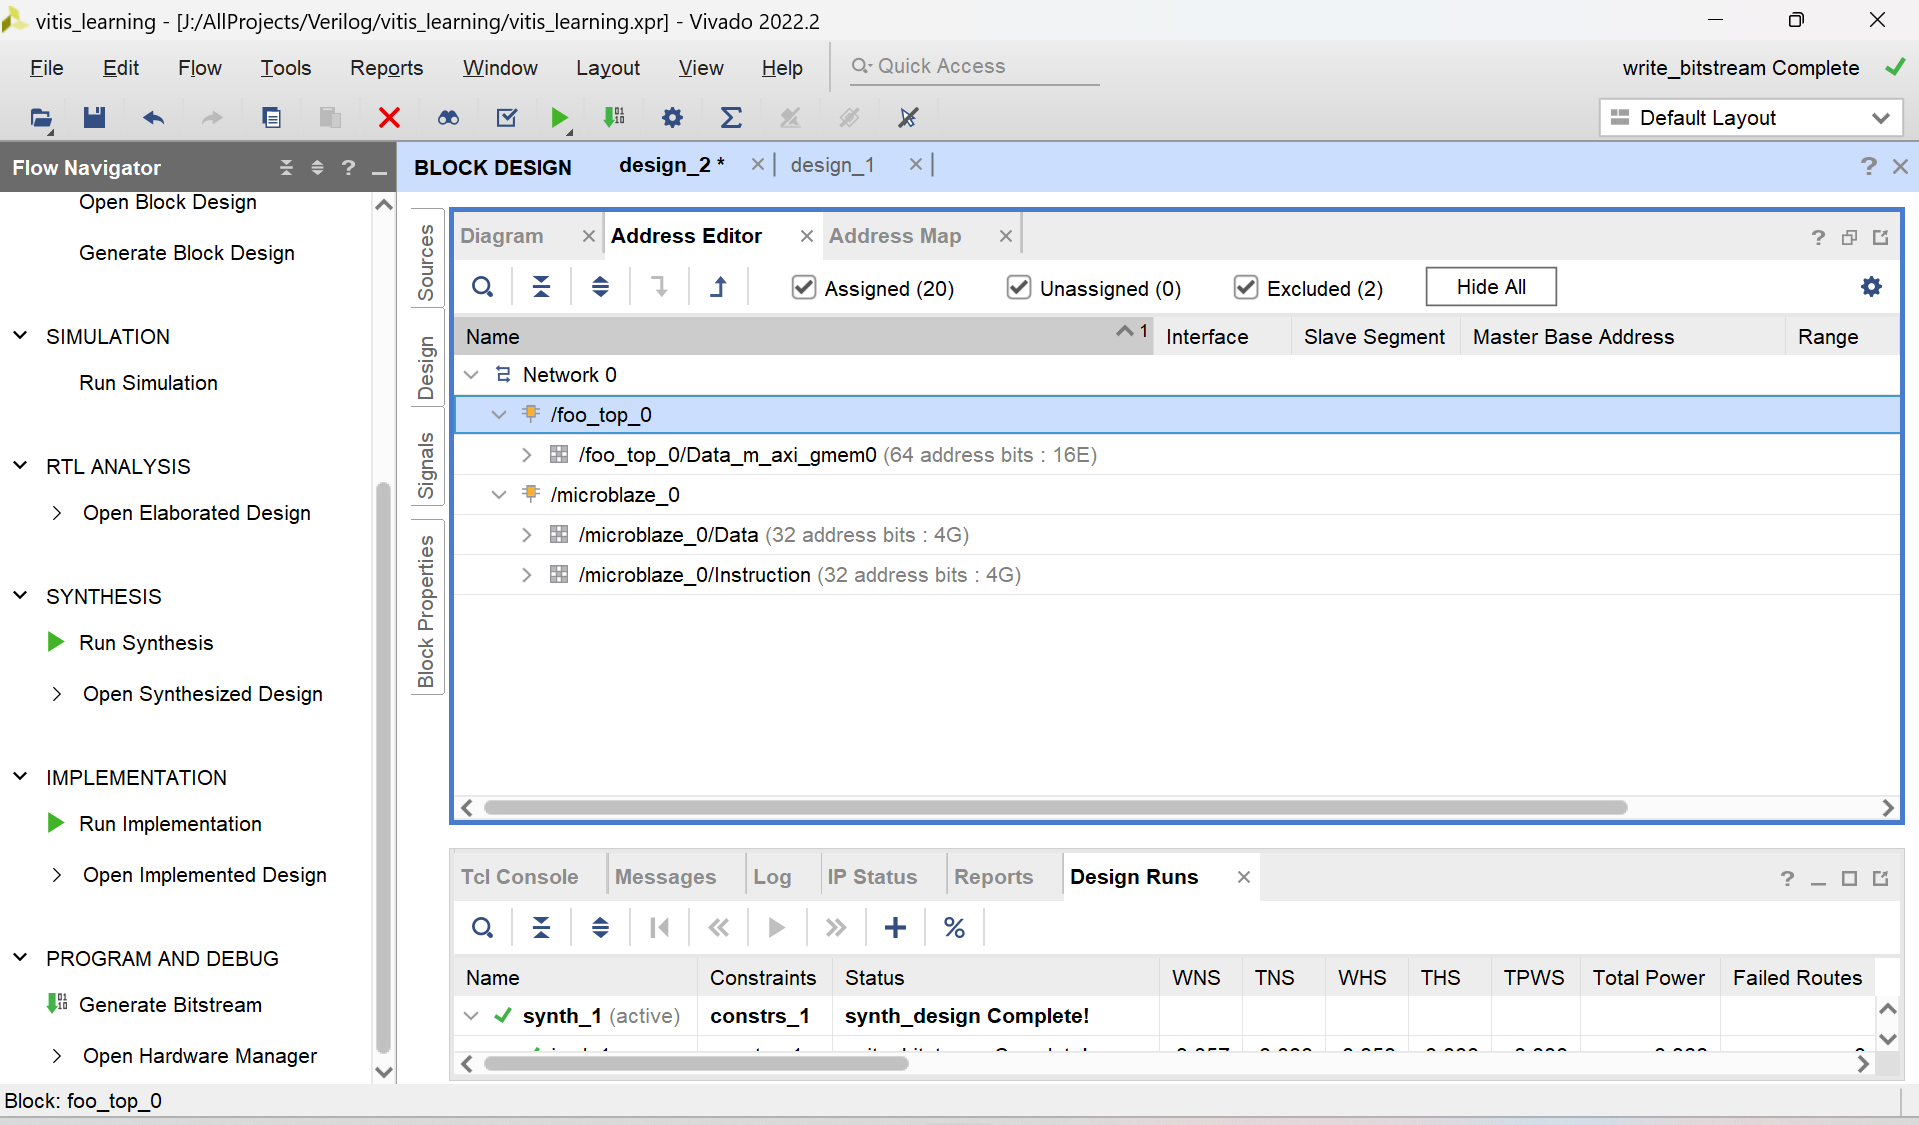
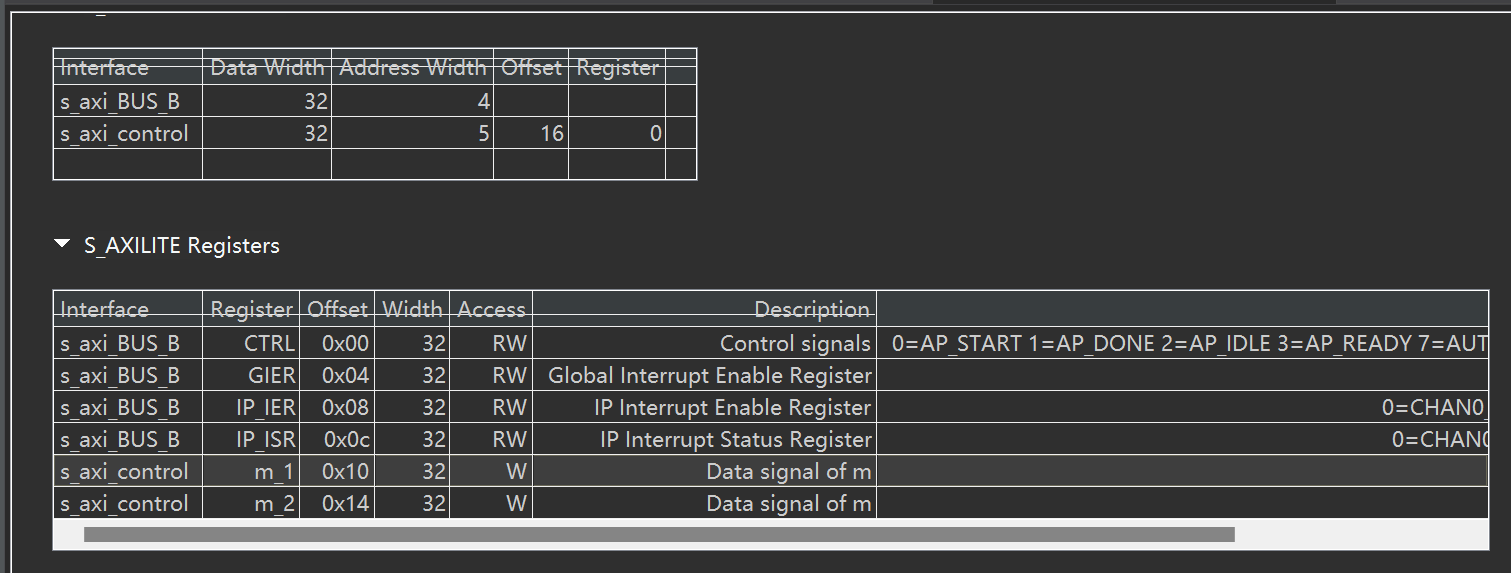
可以看到vivado生成了两部分,一部分是microblaze另一部分是自己的hls模块。代表microblaze眼中的地址映射或 hls模块中的地址映射 由于拖拽的microblaze是32位的,而hls是64位,所以写hls的地址的时候需要前面填充0
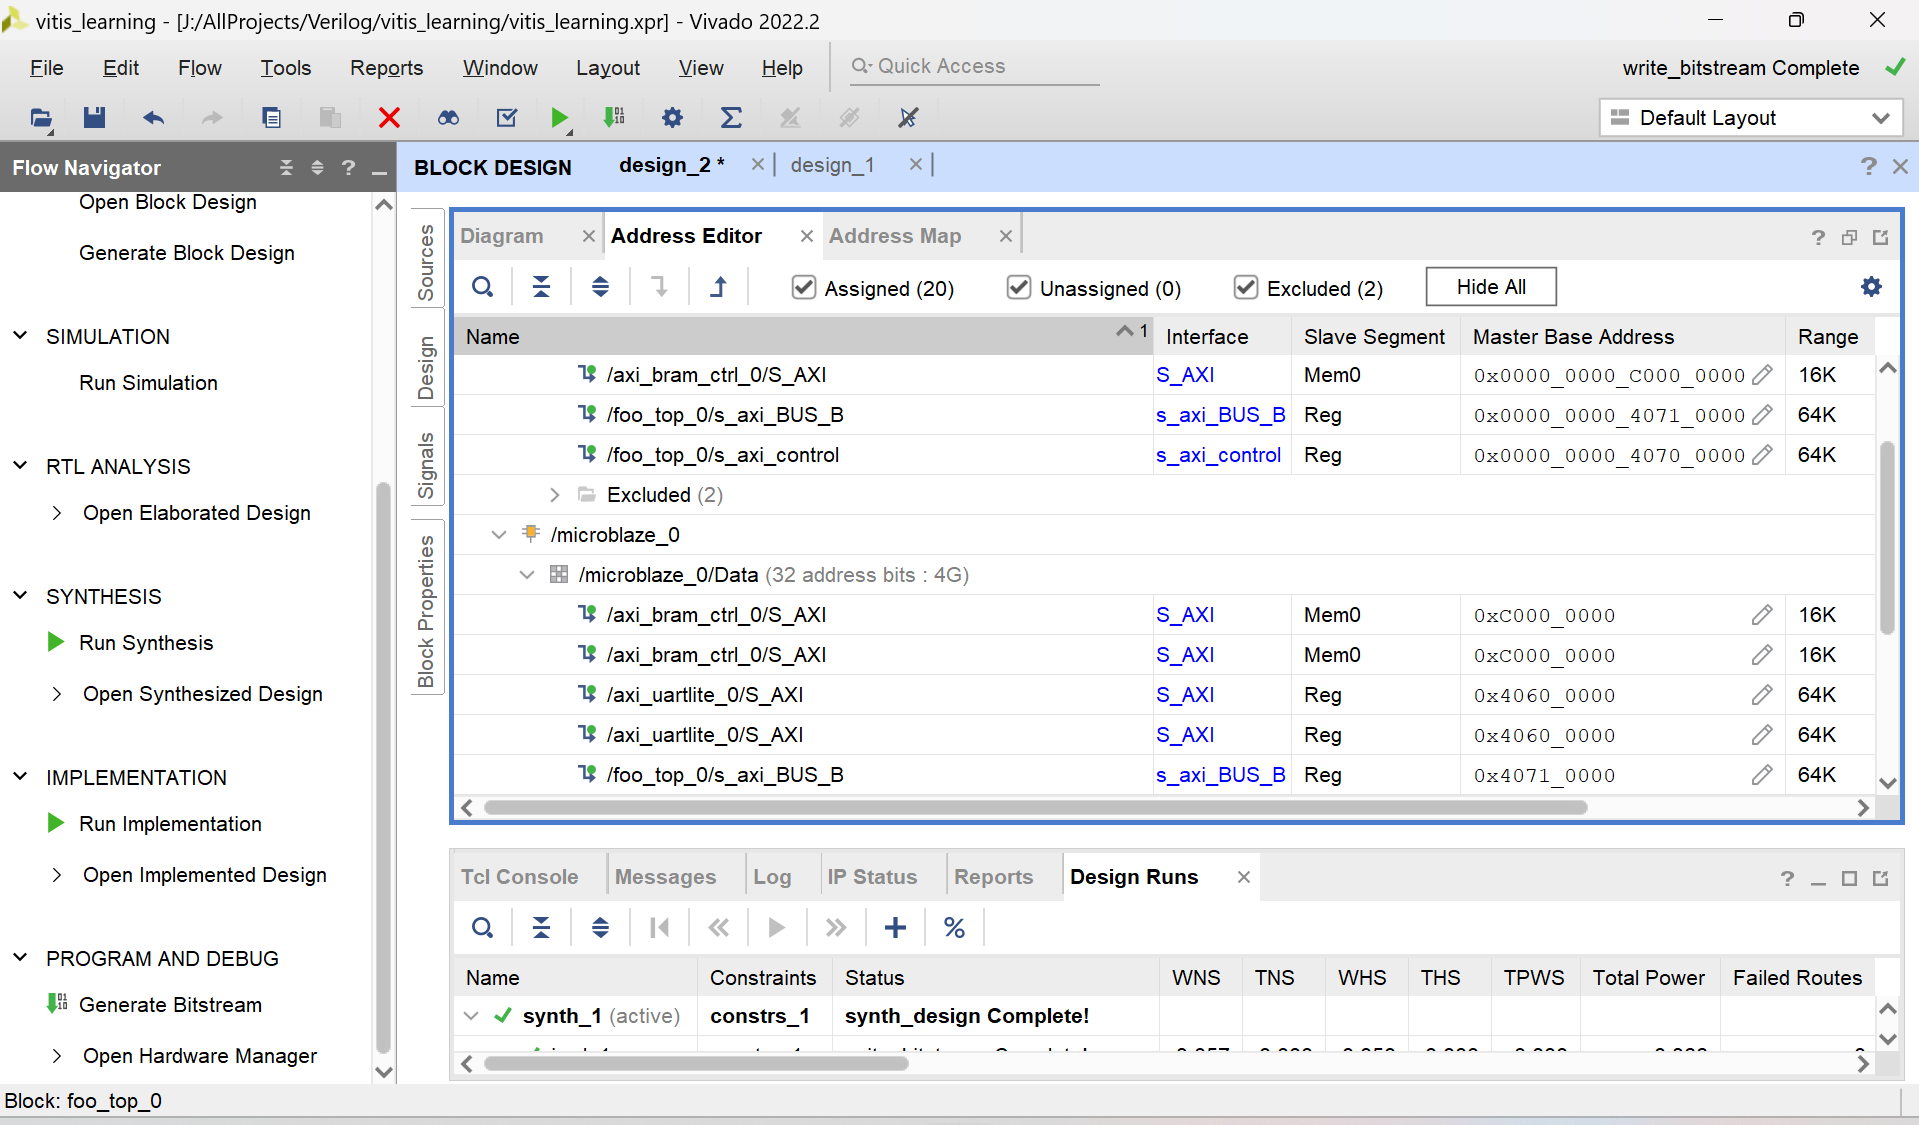
随便填写地址,不要自己跟自己冲突就行。这里的s_axi_control对应m的地址
这里我将BRAM的地址设置为了0xC000_0000、决定m的基地址的寄存器放在0x0000_0000_4070_0000
接下来就是:
填写完成-验证-综合block ip-综合-布局布线-生成bit流-导出硬件,都是常规操作,默认你都会了
VITIS编写驱动
VITIS代码如下:
/******************************************************************************
*
* Copyright (C) 2009 - 2014 Xilinx, Inc.  All rights reserved.
*
* Permission is hereby granted, free of charge, to any person obtaining a copy
* of this software and associated documentation files (the "Software"), to deal
* in the Software without restriction, including without limitation the rights
* to use, copy, modify, merge, publish, distribute, sublicense, and/or sell
* copies of the Software, and to permit persons to whom the Software is
* furnished to do so, subject to the following conditions:
*
* The above copyright notice and this permission notice shall be included in
* all copies or substantial portions of the Software.
*
* Use of the Software is limited solely to applications:
* (a) running on a Xilinx device, or
* (b) that interact with a Xilinx device through a bus or interconnect.
*
* THE SOFTWARE IS PROVIDED "AS IS", WITHOUT WARRANTY OF ANY KIND, EXPRESS OR
* IMPLIED, INCLUDING BUT NOT LIMITED TO THE WARRANTIES OF MERCHANTABILITY,
* FITNESS FOR A PARTICULAR PURPOSE AND NONINFRINGEMENT. IN NO EVENT SHALL
* XILINX  BE LIABLE FOR ANY CLAIM, DAMAGES OR OTHER LIABILITY,
* WHETHER IN AN ACTION OF CONTRACT, TORT OR OTHERWISE, ARISING FROM, OUT OF
* OR IN CONNECTION WITH THE SOFTWARE OR THE USE OR OTHER DEALINGS IN THE
* SOFTWARE.
*
* Except as contained in this notice, the name of the Xilinx shall not be used
* in advertising or otherwise to promote the sale, use or other dealings in
* this Software without prior written authorization from Xilinx.
*
******************************************************************************/

/*
 * helloworld.c: simple test application
 *
 * This application configures UART 16550 to baud rate 9600.
 * PS7 UART (Zynq) is not initialized by this application, since
 * bootrom/bsp configures it to baud rate 115200
 *
 * ------------------------------------------------
 * | UART TYPE   BAUD RATE                        |
 * ------------------------------------------------
 *   uartns550   9600
 *   uartlite    Configurable only in HW design
 *   ps7_uart    115200 (configured by bootrom/bsp)
 */
#include "xil_types.h"
#define __MICROBLAZE__
#include "xil_io.h"
#include "xparameters.h"
#include <stdio.h>
#include "platform.h"
#include "xil_printf.h"
#include "xil_cache.h" // 包含Cache操作的头文件
#include "xfoo_top_hw.h"
#include "xfoo_top.h"
#include <stdint.h>
int critical_sensor_reading __attribute__((section(".fast_data")));
int main()
{
    init_platform();

    print("Hello World\n\r");
    XFoo_top aaa;
    XFoo_top* InstancePtr = &aaa;
    u32 data=0;
    for(int i=0;i<40;i+=4){
        Xil_Out32(XPAR_BRAM_0_BASEADDR+i,data);
        xil_printf("write data: %x\t ",data);
    }
    XFoo_top_WriteReg(XPAR_FOO_TOP_0_S_AXI_CONTROL_BASEADDR, 0x10, (u64)XPAR_BRAM_0_BASEADDR);
    u32 top=XFoo_top_ReadReg(XPAR_FOO_TOP_0_S_AXI_CONTROL_BASEADDR, 0x10);
    u32 low=XFoo_top_ReadReg(XPAR_FOO_TOP_0_S_AXI_CONTROL_BASEADDR, 0x14);
    int status=XFoo_top_Initialize(InstancePtr,XPAR_FOO_TOP_0_DEVICE_ID);
    if (status != XST_SUCCESS) {
        xil_printf("init fail");
    }

    XFoo_top_Start(InstancePtr);
    int i=0;
    while (XFoo_top_IsDone(InstancePtr)==0) {
        i++;
    }
    Xil_DCacheInvalidateRange((INTPTR)XPAR_BRAM_0_BASEADDR, 40);
    for(int i=0;i<40;i+=4){
        data=Xil_In32(XPAR_BRAM_0_BASEADDR+i);
        xil_printf("data: %x\t ",data);
    }

    print("Successfully ran Hello World application");
    cleanup_platform();
    return 0;
}
这里访问的数据长度跟HLS的不一样,不重要
解析一下里面的关键操作
实例化HLS IP
    XFoo_top aaa;
    XFoo_top* InstancePtr = &aaa;
int status=XFoo_top_Initialize(InstancePtr,XPAR_FOO_TOP_0_DEVICE_ID);
    if (status != XST_SUCCESS) {
        xil_printf("init fail");
    }
映射m的地址到bram
XFoo_top_WriteReg(XPAR_FOO_TOP_0_S_AXI_CONTROL_BASEADDR, 0x10, (u64)XPAR_BRAM_0_BASEADDR);
    u32 top=XFoo_top_ReadReg(XPAR_FOO_TOP_0_S_AXI_CONTROL_BASEADDR, 0x10);
    u32 low=XFoo_top_ReadReg(XPAR_FOO_TOP_0_S_AXI_CONTROL_BASEADDR, 0x14);
0x0000_0000_4070_0000 ,偏移0x10,和hls保持一致

启动控制
XFoo_top_Start(InstancePtr);
    int i=0;
    while (XFoo_top_IsDone(InstancePtr)==0) {
        i++;
    }
清除cache,强制cpu重新读取bram,而不是从缓存读取
Xil_DCacheInvalidateRange((INTPTR)XPAR_BRAM_0_BASEADDR, 40);
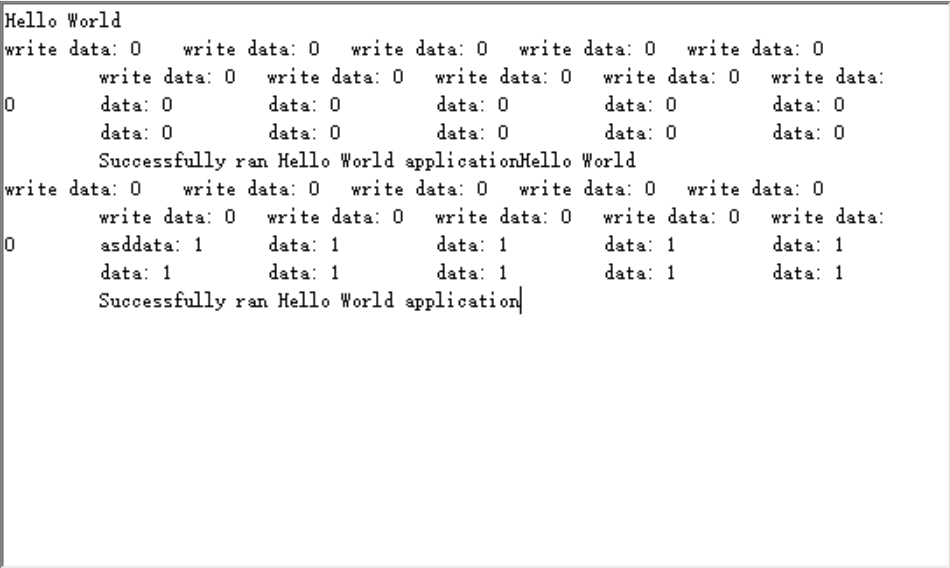
运行结果如下:

 浙公网安备 33010602011771号