

linux配置Java环境
CentOS在线安装Mysql5.7
一、通过Yum命令安装
1.下载rpm安装源
官方地址:https://dev.mysql.com/downloads/repo/yum/
rpm文件地址:https://dev.mysql.com/get/mysql57-community-release-el7-11.noarch.rpm
1)通过wget命令下载文件

[root@localhost ~]# wget https://dev.mysql.com/get/mysql57-community-release-el7-11.noarch.rpm
--2018-01-08 16:57:46--  https://dev.mysql.com/get/mysql57-community-release-el7-11.noarch.rpm
正在解析主机 dev.mysql.com (dev.mysql.com)... 137.254.60.11
正在连接 dev.mysql.com (dev.mysql.com)|137.254.60.11|:443... 已连接。
已发出 HTTP 请求,正在等待回应... 302 Found
位置:https://repo.mysql.com//mysql57-community-release-el7-11.noarch.rpm [跟随至新的 URL]
--2018-01-08 16:57:48--  https://repo.mysql.com//mysql57-community-release-el7-11.noarch.rpm
正在解析主机 repo.mysql.com (repo.mysql.com)... 23.1.165.122
正在连接 repo.mysql.com (repo.mysql.com)|23.1.165.122|:443... 已连接。
已发出 HTTP 请求,正在等待回应... 200 OK
长度:25680 (25K) [application/x-redhat-package-manager]
正在保存至: “mysql57-community-release-el7-11.noarch.rpm”

100%[==================================================================================================================================================================================================>] 25,680      --.-K/s 用时 0.1s

2018-01-08 16:57:48 (232 KB/s) - 已保存 “mysql57-community-release-el7-11.noarch.rpm” [25680/25680])

[root@localhost ~]#
2.安装Mysql
1)安装Mysql源文件
yum localinstall -y mysql57-community-release-el7-11.noarch.rpm
2)查看Mysql源是否安装成功
[root@localhost ~]# yum repolist enabled | grep "mysql.*-community.*"
mysql-connectors-community/x86_64        MySQL Connectors Community           42
mysql-tools-community/x86_64             MySQL Tools Community                55
mysql57-community/x86_64                 MySQL 5.7 Community Server          227
[root@localhost ~]#
3)安装Mysql服务
yum install -y mysql-community-server
4)查看Mysql服务是否安装成功
[root@localhost ~]# systemctl status mysqld
● mysqld.service - MySQL Server
   Loaded: loaded (/usr/lib/systemd/system/mysqld.service; enabled; vendor preset: disabled)
   Active: inactive (dead)
     Docs: man:mysqld(8)
           http://dev.mysql.com/doc/refman/en/using-systemd.html
[root@localhost ~]#
3.启动Mysql
systemctl start mysqld
4.修改root登录密码
1)获取root默认密码(由于Mysql安全策略升级,安装完成后系统自动设置了一个随机密码)
[root@localhost ~]# grep 'temporary password' /var/log/mysqld.log
2018-01-08T09:21:45.780623Z 1 [Note] A temporary password is generated for root@localhost: auw;Nj7J!j/J
[root@localhost ~]#
2)登录Mysql
[root@localhost ~]# mysql -uroot -p
Enter password:
Welcome to the MySQL monitor.  Commands end with ; or \g.
Your MySQL connection id is 3
Server version: 5.7.20

Copyright (c) 2000, 2017, Oracle and/or its affiliates. All rights reserved.

Oracle is a registered trademark of Oracle Corporation and/or its
affiliates. Other names may be trademarks of their respective
owners.

Type 'help;' or '\h' for help. Type '\c' to clear the current input statement.

mysql>
3)修改密码
3.1)由于Mysql默认要求设置密码复杂度高(必须包含 大小写字母、数字、符号)
mysql> alter user 'root'@'localhost' identified by '123456';
ERROR 1819 (HY000): Your password does not satisfy the current policy requirements
mysql>
这样设置是合法的:
mysql> alter user 'root'@'localhost' identified by 'Mysql666!';
Query OK, 0 rows affected (0.00 sec)

mysql>
3.2)关闭Mysql密码校验规则,允许设置简单密码
3.2.1)在Mysql配置文件最后加入:validate_password = off
[root@localhost ~]# vi /etc/my.cnf
# For advice on how to change settings please see
# http://dev.mysql.com/doc/refman/5.7/en/server-configuration-defaults.html

[mysqld]
#
# Remove leading # and set to the amount of RAM for the most important data
# cache in MySQL. Start at 70% of total RAM for dedicated server, else 10%.
# innodb_buffer_pool_size = 128M
#
# Remove leading # to turn on a very important data integrity option: logging
# changes to the binary log between backups.
# log_bin
#
# Remove leading # to set options mainly useful for reporting servers.
# The server defaults are faster for transactions and fast SELECTs.
# Adjust sizes as needed, experiment to find the optimal values.
# join_buffer_size = 128M
# sort_buffer_size = 2M
# read_rnd_buffer_size = 2M
datadir=/var/lib/mysql
socket=/var/lib/mysql/mysql.sock

# Disabling symbolic-links is recommended to prevent assorted security risks
symbolic-links=0

log-error=/var/log/mysqld.log
pid-file=/var/run/mysqld/mysqld.pid

validate_password = off
3.2.2)重启Mysql服务生效
systemctl restart mysqld
4)设置简单密码 :)
mysql> alter user 'root'@'localhost' identified by '123456';
Query OK, 0 rows affected (0.00 sec)

mysql>
5.配置远程用户登录
1)指定Ip
mysql> grant all privileges on *.* to 'root'@'192.168.1.1' identified by '123456' with grant option;
Query OK, 0 rows affected, 1 warning (0.00 sec)

mysql>
2)允许所有
mysql> grant all privileges on *.* to 'root'@'%' identified by '123456' with grant option;
Query OK, 0 rows affected, 1 warning (0.00 sec)

mysql>
6.设置开机启动
systemctl enable mysqld
systemctl daemon-reload
7.其他
1)已配置远程访问权限,依然不能登录?请检查系统是否开启了防火墙。
1.1)CentOS关闭防火墙
systemctl stop firewalld.service
1.2)禁止防火墙开机启动
systemctl disable firewalld.service
2)Mysql客户端软件(推荐)
2.1)SQLyog(官网:https://sqlyog.en.softonic.com/)
2.2)Navicat(官网:https://www.navicat.com/en/)
CentOS在线安装JDK
1、查看JDK版本
选择yum安装tomcat需要的jdk-1.8,就不用再手动配置环境变量。
[root@localhost ~]# yum -y install java-1.8*
2、查看JDK版本
[root@localhost ~]# java -version
openjdk version "1.8.0_191"
OpenJDK Runtime Environment (build 1.8.0_191-b12)
OpenJDK 64-Bit Server VM (build 25.191-b12, mixed mode)
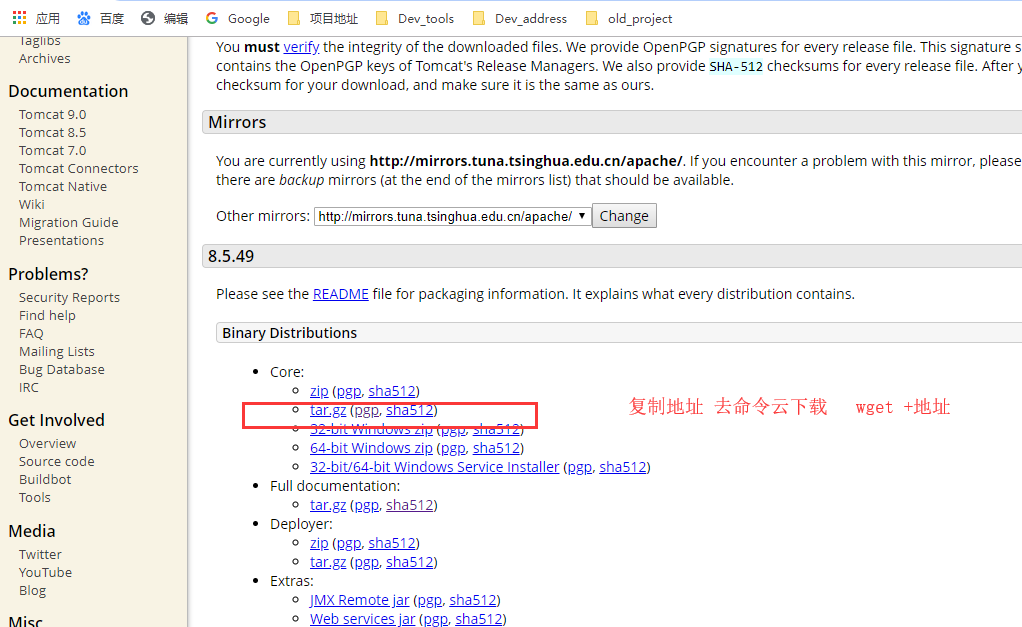
下载Tomcat
https://tomcat.apache.org/download-80.cgi
查看端口 ss -tunlp | grep 9100
查看Java服务有没有起 ps -ef | grep java
测试能不能访问curl localhost:8080
关闭防火墙 systemctl stop firewalld


 浙公网安备 33010602011771号