
http://alvinalexander.com/unix/edu/putty-ssh-tunnel-firefox-socks-proxy/1-putty-ssh-tunnel-introduction.shtml
How to create a Firefox SOCKS proxy with a Putty SSH tunnel (introduction)
It drives me crazy when I have to work at client sites and they have a web proxy like Websense set up that keeps me from doing my job. Don't get me wrong -- a tool like Websense is probably necessary for a lot of reasons, especially in larger organizations -- but on the flip side, a lot of technical blogs that I use as resources end up being blocked by Websense, and that "Blocked by Websense" message drives me nuts.
At my last job my own business webmail server was blocked by Websense, so I went to my employer and said "Listen, I really need to be able to read my other business email while I work here. Can you configure Websense to let me get to my site, or do you mind if I set up an SSH tunnel so I can get to my webmail?" As it turns out, that conversation led to this tutorial.
So, getting this point out of the way -- I don't recommend doing anything illegal to bypass or defeat Websense, and it's certainly not something you want to lose your job over -- let's get down to work. In this tutorial I'll demonstrate how I use Putty on Microsoft Windows computers to create an SSH tunnel that I can use as a SOCKS proxy with the Firefox web browser. Yes, this technique helps me bypass Websense when I need to (with the approval of my surpervisors), but it also secures my web browsing by encrypting the traffic between web browser and the remote web sites that I'm connecting to. That benefit of this technique is also great when you're on any public WiFi network.
Step 1: What you'll need before starting
As mentioned, you're going to need a couple of things in order to create an SSH tunnel that you can use as a Firefox SOCKS proxy. Here's a short list of things you'll need:
- A remote server you can connect to using SSH. This is typically a remote Unix or Linux server that supports SSH logins.
- Your organization will need to let you connect to that site using SSH. By default SSH runs on port 22, so your organization will need to let you out on port 22.
- (Actually, if using port 22 is a problem for you, I think it's possible to configure SSH on any port, like port 80 (normally used for HTTP) or port 443 (normally used for HTTPS), so the need to use port 22 may not be that hard and fast. But, I haven't tried this yet.)
- The Putty software, which you can download for free.
Once you have all those things in place we're ready to get started.
Step 2: Downloading and installing Putty
This step is easy. Just browse to the official Putty website, and download the putty.exe executable file. On Windows I normally put this file in a directory I've named C:\bin, but you can put it in any directory you like. As of this writing there is no installation process -- just download it, drop it in a folder, and it's ready to be used.
(This is Part 2 of a four-part tutorial. Here's a link to the introduction.)
Step 3: Configuring a tunnel to your SSH server
Next, we'll use Putty to create an SSH tunnel and connect to your remote server. For the purposes of this example let's assume we are connecting to a site named "myremotesshserver.com".
When you start Putty you should see a window that looks like the next figure:

Start Putty, and we'll create a new session configuration that will serve as your tunnel. In the field labeled "Host Name (or IP address)", enter the hostname or TCP/IP address of your remote server. For the purposes of this tutorial my fictitious hostname will be myremotesshserver.com, so I enter that name in the Host Name field.
In the textfield labeled "Saved Sessions", enter a name that you want to use to identify this configuration. This is typically the hostname or IP address of your remote server, but it can also be something like "SSH tunnel". In my case I'm just going to put my hostname here, i.e., myremotesshserver.com.
At this point your Putty window should look like the following figure:

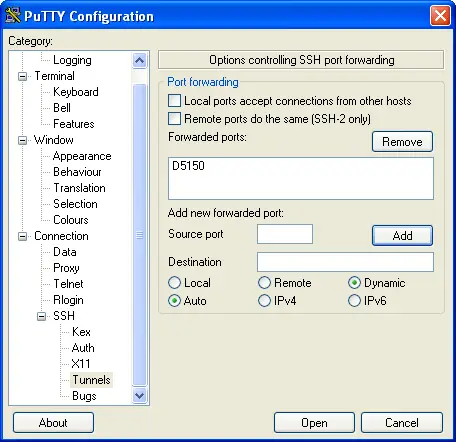
Next, on the left side of the putty window there is a navigation tree. In that tree you want to select the Tunnels item. If this item isn't already visible, you can find it by clicking the Connection node in the tree, then SSH, and then Tunnels. This is shown in the next figure:

Under the section labeled "Add a new forwarded port" type in a port like 5150 (my personal tribute to Van Halen) for the source port. Leave the Destination field blank, then select the Dynamic and Auto radio buttons. Then click the Add button, and you should see the text D5150 show up in the textarea just above the "Add a new forwarded port".
Your Putty window should now look like the next figure:
That's all you have to do on this screen. In the Putty navigation tree on the left click on the Session node (at the top of the tree), and then click the Save button on the right side of the screen to save this configuration.
Congratulations -- that's all you had to do to configure Putty. Now all you have to do is login to your remote server. To do this, just click the Open button at the bottom of this window. You should see a Putty login shell open up to your remote server. Just login to your remote server with your username and password, and you're done. That's all you need to do to open the tunnel. Now you're ready to configure Firefox.
(This is Part 3 of a four-part tutorial. Here's a link to the introduction.)
Step 4: Configure Firefox to use the Putty SSH tunnel as a SOCKS proxy
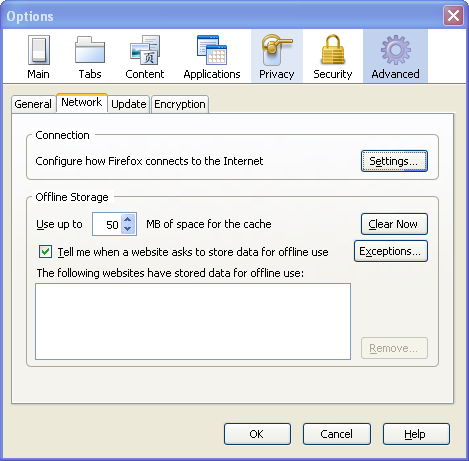
Configuring Firefox to use this new SSH tunnel is simple. Start Firefox, then select the Tools menu, and then select the Options... menu item. Now click the Advanced icon (on the upper-right of the dialog), and then select the Network tab. This is shown in the next figure:
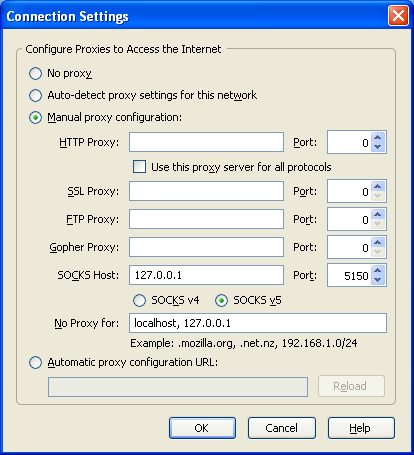
Now click the "Settings..." button. This brings up the Connection Settings dialog. On this dialog click the "Manual proxy configuration" radio button, then put the address 127.0.0.1 in the SOCKS Host field. In the Port field just to the right of the SOCKS Host field enter the port you used when configuring your SSH tunnel with Putty. In my case this port was 5150. The completed dialog is shown in the following figure:
That's all you need to do here. Just click OK on this dialog, click OK again on the Options dialog, and Firefox should be ready to go.
(This is the final part of a four-part tutorial. Here's a link to the introduction.)
Step 5: Test your Putty SSH tunnel and Firefox SOCKS proxy
As an initial test of the tunnel just try to go to a website like google.com in Firefox. If everything has been configured right, and your Putty tunnel is up and running, you should connect just fine.
Really test the configuration
Now, to really test your Putty SSH tunnel Firefox configuration, go to your Putty login window and logout from your remote server. That's right, close your Putty window.
After you've done this, go back to Firefox and press the refresh button. Did the google.com website show up? If so, you have a problem -- your browser worked even when your tunnel was down, which means something is wrong -- your browser isn't really using the tunnel. (If this happened to you go back and check your Firefox settings.)
What should have happened was Firefox should have failed to connect to the remote site, and should have shown you a "Proxy Server Refused Connection" error message like the one shown below:
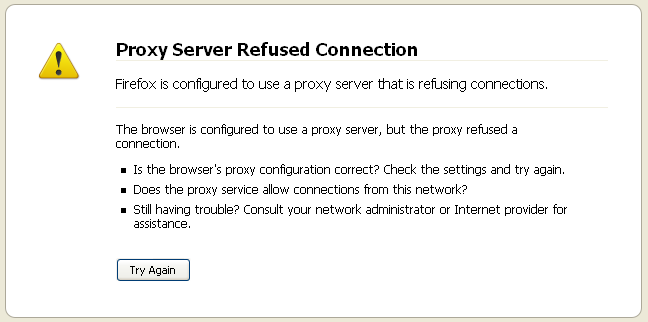
You get this error message for the reason shown -- we intentionally shut down your proxy server when you closed your Putty session, and now Firefox can't connect to the internet.
Re-opening the Putty SSH tunnel
If you have the hang of this you now know what to do -- restart your Putty connection to your remote SSH server. Just start Putty, select the connection you just created, press the Load button, press the Open button, and login to your remote site. Then go back to Firefox and press the Refresh button again. This time the google.com website should be displayed without an error message. If so, congratulations -- your SSH tunnel and your Firefox SOCKS proxy is working.
Again, the disclaimer
I conclude this article with the same disclaimer I started with: If you're doing this at work, school, or other places where you're doing it to bypass or defeat Websense, you're doing that at your own risk. I don't condone anything like that. As I've written before I recommend that you try any technique like this with the approval of the organization whose network you are using. Again, it's not worth losing your job, getting kicked out of school, or similar.
=============================
Secure shell tunneling[edit]
A secure shell (SSH) tunnel consists of an encrypted tunnel created through a SSH protocol connection. Users may set up SSH tunnels to transfer unencrypted traffic over a network through an encrypted channel. For example, Microsoft Windows machines can share files using the Server Message Block (SMB) protocol, a non-encrypted protocol. If one were to mount a Microsoft Windows file-system remotely through the Internet, someone snooping on the connection could see transferred files. To mount the Windows file-system securely, one can establish a SSH tunnel that routes all SMB traffic to the remote fileserver through an encrypted channel. Even though the SMB protocol itself contains no encryption, the encrypted SSH channel through which it travels offers security.
SSH tunnels provide a means to bypass firewalls that prohibit certain Internet services — so long as a site allows outgoing connections. For example, an organization may prohibit a user from accessing Internet web pages (port 80) directly without passing through the organization's proxy filter (which provides the organization with a means of monitoring and controlling what the user sees through the web). But users may not wish to have their web traffic monitored or blocked by the organization's proxy filter. If users can connect to an external SSH server, they can create a SSH tunnel to forward a given port on their local machine to port 80 on a remote web-server. To access the remote web-server, users would point their browser to the local port at http://localhost/.
Some SSH clients support dynamic port forwarding that allows the user to create a SOCKS 4/5 proxy. In this case users can configure their applications to use their local SOCKS proxy server. This gives more flexibility than creating a SSH tunnel to a single port as previously described. SOCKS can free the user from the limitations of connecting only to a predefined remote port and server. If an application doesn't support SOCKS, one can use a "socksifier" to redirect the application to the local SOCKS proxy server. Some "socksifiers", such as Proxycap, support SSH directly, thus avoiding the need for a SSH client.
Tunneling to circumvent firewall policy[edit]
Users can also use tunneling to "sneak through" a firewall, using a protocol that the firewall would normally block, but "wrapped" inside a protocol that the firewall does not block, such as HTTP. If the firewall policy does not specifically exclude this kind of "wrapping", this trick can function to get around the intended firewall policy.
Another HTTP-based tunneling method uses the HTTP CONNECT method/command. A client issues the HTTP CONNECT command to a HTTP proxy. The proxy then makes a TCP connection to a particular server:port, and relays data between that server:port and the client connection.[1] Because this creates a security hole, CONNECT-capable HTTP proxies commonly restrict access to the CONNECT method. The proxy allows connections only to specific ports, such as 443 for HTTPS.[2]
===================
Socket Secure (SOCKS) is an Internet protocol that routes network packets between a client and server through a proxy server. SOCKS5 additionally provides authentication so only authorized users may access a server. Practically, a SOCKS server proxies TCP connections to an arbitrary IP address, and provides a means for UDP packets to be forwarded.
Some SSH suites, such as OpenSSH, support dynamic port forwarding that allows the user to create a local SOCKS proxy.[8] This can free the user from the limitations of connecting only to a predefined remote port and server.
======================
http://www.howtogeek.com/168145/how-to-use-ssh-tunneling/
How to Use SSH Tunneling
This article will cover how to use the port-forwarding feature in SSH to accomplish tunneling from one machine to another.
Contents[hide] |
Overview
SSH, or Secure Shell, has the ability to proxy connections both forward and backwards, by opening a port on either the local machine running the SSH client, or the remote SSH server (if you have privileges to do so).
For example, if you want to connect to remote host on port 80, but you don’t have direct access to reach that machine because of firewall or network restrictions, the SSH client can listen on a local port and pretend that it is the remote machine. All connections to that port will be sent through the SSH server to the remote host.
Localhost:80 --> SSH SERVER --> REMOTE HOST:80
Todo: Insert better illustration here.
You can also tunnel requests the opposite direction, by opening a port on the remote server and tunneling all connections backwards up through the SSH client to your local machine. This is often used to open a remote X session on a client machine, or to allow reverse tunneling into a machine behind an extremely restrictive firewall that doesn’t allow incoming connections.
Usage
To forward from one machine to another, you need to use the -L switch when creating an ssh connection.
Syntax:
ssh -L <localport>hostname<remoteport> <username>@<servername>.
Example:
ssh -L 3306:localhost:3306 geek@webserver.com
Tunnel All Connections Using SOCKS Proxy
Tunnel to a MySQL Server on the SSH Server
Use this syntax, you can simply use the -L option with localhost as the server to be forwarded to. In this case, localhost is actually the ssh server, because this option is referenced from the point of view of the server you are connecting to (in this case sshserver).
ssh -L 3306:localhost:3306 geek@sshserver
Note that if you are running a local mysql server, you’ll have to change the first parameter to another port, for instance 13306:localhost:3306. Then you’ll have to specify the option in the mysql client to use another port when connecting.
Tunnel to a MySQL Server on Another Server
Use this syntax, replacing mysqlserverIP with the actual IP of the MySQL server.
ssh -L 3306:mysqlserverIP:3306 geek@sshserver
Note that if you are running a local mysql server, you’ll have to change the first parameter to another port, for instance 13306:mysqlserverIP:3306. Then you’ll have to specify the option in the mysql client to use another port when connecting.

 浙公网安备 33010602011771号