

Handsontable的使用实例
首先简单地介绍一下handsontable,Handsontable Community Edition (CE) 是一个开源的JavaScript电子表格组件,非常流行的web应用程序的UI组件,可用于 各种技术,如react、Angular和vue,它很容易与任何数据源集成并提供了各种有用的功能,如数据绑定、验证、排序和强大的上下文菜单,它可以处理大量数据而无需担心性能问题,兼容所有现代浏览器和IE9+。简而言之就是在页面也能像excel一样操作数据。
官方文档地址:https://handsontable.com/docs/7.4.2/tutorial-introduction.html
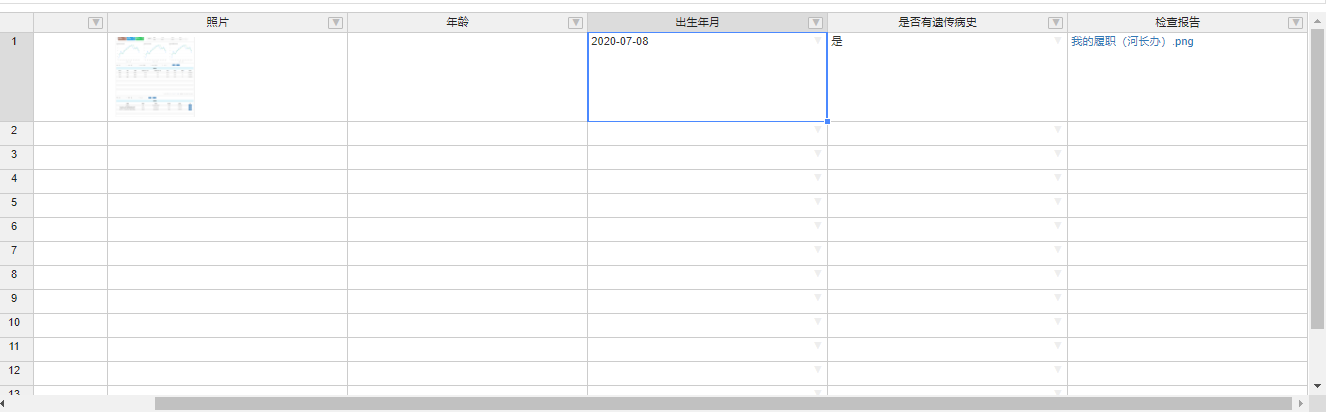
我的实现效果(包含输入框,文件,图片,日期选择,下拉框)
我的Handsontable对象配置
new Handsontable(this.$refs.example, {
        data: this.handsontableData,//表数据
        width: "100%",
        height: "100%",
        rowHeaders: true,
        colHeaders: headers,//表头数据
        fixedRowsTop: 0,
        columns: columns,//列的类型
        columnSorting: true,
        rowHeights: 30,
        colWidths: 300,
        manualColumnResize: true,
        manualRowResize: true,
        selectionMode: "range",
        manualRowMove: true,
        manualColumnFreeze: true,
        contextMenu: [
          "row_above",
          "row_below",
          "remove_row",
          "alignment",
          "freeze_column",
          "unfreeze_column"
        ],//右键菜单
        dropdownMenu: ["alignment"],//表头筛选菜单
        language: "zh-CN",
        afterSelectionEnd: function(fromRow, fromCol, toRow, toCol) {
          window.hotSelection = this.hot.getSelected();//获取选中的节点,存入全局变量
          if (!this.readOnly) {
            $.each(this.fileCol, function(index, val) {
              if (
                fromRow == toRow &&
                fromCol == toCol &&
                fromCol == val.index
              ) {
                document.querySelector(".fileBtn").disabled = false;//这里是一个文件上传按钮,进行控制
                return false;
              } else {
                document.querySelector(".fileBtn").disabled = true;
              }
            });
          }
        }.bind(this),//选中后触发的事件
        licenseKey: "non-commercial-and-evaluation"//提示非商业用途
})
这里的列类型有文本类型、数字类型、日期类型、下拉类型、还有就是自定义渲染
var columns=[]
//文本
columns.push({
        data: rs.data.options[i].optionNum,//设值
        type: "text",
        readOnly: this.readOnly
});
//数字
columns.push({
        data: rs.data.options[i].optionNum,
        type: "numeric",
        readOnly: this.readOnly
});
//日期
columns.push({
        data: rs.data.options[i].optionNum,
        type: "date",
        dateFormat: "YYYY-MM-DD",
        readOnly: this.readOnly
});
//下拉
columns.push({
        data: rs.data.options[i].optionNum,
        type: "dropdown",
        source: options,//下拉数组
        readOnly: this.readOnly
});
//自定义渲染
columns.push({
        data: rs.data.options[i].optionNum,
        renderer: this.fileRenderer,//渲染的方法
        readOnly: true
});

//文件渲染方法
    fileRenderer: function(
      instance,
      td,
      row,
      col,
      prop,
      value,
      cellProperties
    ) {
      var txt = "";
      if (value) {
        for (var i = 0; i < value.length; i++) {
          if (value[i].name) {
            txt +=
              "<a href='" +
              value[i].path +
              "' target='_blank'>" +
              value[i].name +
              "</a><br>";
          } else {
            continue;
          }
        }
      }
      td.innerHTML = txt;
    },

    //图片渲染
    imgRenderer(instance, td, row, col, prop, value, cellProperties) {
      var txt = "";
      if (value) {
        for (var i = 0; i < value.length; i++) {
          if (value[i].name) {
            txt +=
              "<a onclick='previewPicFunc(" +
              i +
              ")'><img style='margin:5px;height: 100px;width:100px;object-fit: cover;' src='" +
              value[i].path +
              "' style='width:100px;height:100px;'></img></a>";
          } else {
            continue;
          }
        }
      }
      td.innerHTML = txt;
    }
自定义渲染就是将html代码插入单元格里,从而实现想要的效果(视频、图片、a标签等等)。

 浙公网安备 33010602011771号