

Spring和MyBatis整合
我们已经学完,Spring和MyBatis两个框架了,这篇博客中写了一下怎么把两个框架整合在一起
整合这两个框架,在Spring中写一个例子:添加图书
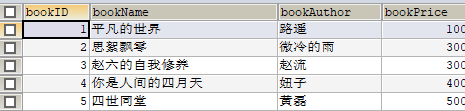
准备数据表
第一步:引入依赖
 <!-- Spring整合JavaWeb的包 -->
        <dependency>
            <groupId>org.springframework</groupId>
            <artifactId>spring-web</artifactId>
            <version>4.2.0.RELEASE</version>
        </dependency>

        <!--Mybatis+Spring整合-->
        <dependency>
            <groupId>org.mybatis</groupId>
            <artifactId>mybatis-spring</artifactId>
            <version>1.2.1</version>
        </dependency>

        <!--mybatis jar包-->
        <dependency>
            <groupId>org.mybatis</groupId>
            <artifactId>mybatis</artifactId>
            <version>3.2.2</version>
        </dependency>
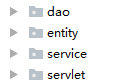
第二步:对案例分层
首先是实体类
Book
package demo23ssm.entity;


/**
 * Created by mycom on 2018/3/13.
 */
public class Book {
    private Integer bookId;
    private String bookName;
    private String bookAuthor;
    private Integer bookPrice;

    @Override
    public String toString() {
        return "Book{" +
                "bookId=" + bookId +
                ", bookName='" + bookName + '\'' +
                ", bookAuthor='" + bookAuthor + '\'' +
                ", bookPrice=" + bookPrice +
                '}';
    }

    public Integer getBookId() {
        return bookId;
    }

    public void setBookId(Integer bookId) {
        this.bookId = bookId;
    }

    public String getBookName() {
        return bookName;
    }

    public void setBookName(String bookName) {
        this.bookName = bookName;
    }

    public String getBookAuthor() {
        return bookAuthor;
    }

    public void setBookAuthor(String bookAuthor) {
        this.bookAuthor = bookAuthor;
    }

    public Integer getBookPrice() {
        return bookPrice;
    }

    public void setBookPrice(Integer bookPrice) {
        this.bookPrice = bookPrice;
    }
}
DAO层:接口和映射文件
package demo23ssm.dao;

import demo23ssm.entity.Book;

/**
 * Created by mycom on 2018/3/17.
 */
public interface IBookDao {
    //添加图书
    public int addBook(Book book);
}
<?xml version="1.0" encoding="UTF-8" ?>
<!DOCTYPE mapper
        PUBLIC "-//mybatis.org//DTD Mapper 3.0//EN"
        "http://mybatis.org/dtd/mybatis-3-mapper.dtd">
<mapper namespace="demo23ssm.dao.IBookDao">

    <!--添加-->
    <insert id="addBook">
        insert into book(bookName,bookAuthor,bookPrice) values(#{bookName},#{bookAuthor},#{bookPrice})
    </insert>
</mapper>
Service层:接口和实现类
package demo23ssm.service;

import demo23ssm.entity.Book;

/**
 * Created by mycom on 2018/3/17.
 */
public interface IBookService {
    public int addBook(Book book);
}
package demo23ssm.service;

import demo23ssm.dao.IBookDao;
import demo23ssm.entity.Book;
import org.springframework.transaction.annotation.Transactional;

/**
 * Created by mycom on 2018/3/17.
 */
public class BookServiceImpl implements IBookService {
    private IBookDao bookDao;

    public IBookDao getBookDao() {
        return bookDao;
    }

    public void setBookDao(IBookDao bookDao) {
        this.bookDao = bookDao;
    }
    @Transactional
    public int addBook(Book book) {
        return bookDao.addBook(book);
    }
}
Servlet层:
package demo23ssm.servlet;

import com.sun.javafx.webkit.WebConsoleListener;
import demo23ssm.entity.Book;
import demo23ssm.service.IBookService;
import org.springframework.context.ApplicationContext;
import org.springframework.context.support.ClassPathXmlApplicationContext;
import org.springframework.web.context.support.WebApplicationContextUtils;

import javax.servlet.ServletException;
import javax.servlet.http.HttpServlet;
import javax.servlet.http.HttpServletRequest;
import javax.servlet.http.HttpServletResponse;
import java.io.IOException;

/**
 * Created by mycom on 2018/3/17.
 */
public class BookServlet extends HttpServlet {
    protected void doPost(HttpServletRequest request, HttpServletResponse response) throws ServletException, IOException {
        request.setCharacterEncoding("utf-8");
        String bookName=request.getParameter("bookname");
        Integer bookPrice=Integer.parseInt(request.getParameter("bookprice"));
        String bookAuthor=request.getParameter("bookauthor");
        //创建book对象
        Book book=new Book();
        book.setBookName(bookName);
        book.setBookPrice(bookPrice);
        book.setBookAuthor(bookAuthor);
        //ApplicationContext context=new ClassPathXmlApplicationContext("applicationContextdemo23ssm.xml");
        ApplicationContext context= WebApplicationContextUtils.getRequiredWebApplicationContext(this.getServletContext());
        IBookService bookService =(IBookService) context.getBean("bookService");
        int count = bookService.addBook(book);
        if(count>0){
            //转发
            request.getSession().setAttribute("book",book);
            request.getRequestDispatcher("/index.jsp").forward(request,response);
        }else{
            response.sendRedirect("/addBook.jsp");
        }
    }

    protected void doGet(HttpServletRequest request, HttpServletResponse response) throws ServletException, IOException {
        doPost(request,response);
    }
}
第三步:配置文件
<?xml version="1.0" encoding="UTF-8"?>
<beans xmlns="http://www.springframework.org/schema/beans"
       xmlns:xsi="http://www.w3.org/2001/XMLSchema-instance" xmlns:aop="http://www.springframework.org/schema/aop"
       xmlns:context="http://www.springframework.org/schema/context" xmlns:tx="http://www.springframework.org/schema/tx"
       xsi:schemaLocation="http://www.springframework.org/schema/beans http://www.springframework.org/schema/beans/spring-beans.xsd http://www.springframework.org/schema/aop http://www.springframework.org/schema/aop/spring-aop.xsd http://www.springframework.org/schema/context http://www.springframework.org/schema/context/spring-context.xsd http://www.springframework.org/schema/tx http://www.springframework.org/schema/tx/spring-tx.xsd">

    <!--配置数据源-->
    <bean id="dateSource" class="org.springframework.jdbc.datasource.DriverManagerDataSource">
        <property name="driverClassName" value="${jdbc.driver}"></property>
        <property name="url" value="${jdbc.url}"></property>
        <property name="username" value="${jdbc.username}"></property>
        <property name="password" value="${jdbc.password}"></property>
    </bean>

    <!--识别到jdbc.properties-->
    <!--配置1-->
    <!--<context:property-placeholder location="classpath:jdbc.properties"></context:property-placeholder>-->
    <!--配置2-->
    <bean class="org.springframework.beans.factory.config.PropertyPlaceholderConfigurer">
        <property name="location" value="classpath:jdbc.properties"></property>
    </bean>
    <!--关键点 SqlSessionFactory生成权交给spring-->
    <bean class="org.mybatis.spring.SqlSessionFactoryBean">
        <property name="dataSource" ref="dateSource"></property>
        <property name="configLocation" value="classpath:Mybatis-config.xml"></property>
    </bean>
    <!--配置bookDao-->
    <bean id="bookDao" class="org.mybatis.spring.mapper.MapperScannerConfigurer">
        <property name="basePackage" value="demo23ssm.dao"></property>
    </bean>

    <!--service id-->
    <bean id="bookService" class="demo23ssm.service.BookServiceImpl">
        <property name="bookDao" ref="IBookDao"></property>
    </bean>
    <!--事务-->
    <!--事务管理器-->
    <bean id="transactionManager" class="org.springframework.jdbc.datasource.DataSourceTransactionManager">
        <property name="dataSource" ref="dateSource"></property>
    </bean>
    <!--事务代理工厂bean  方式二-->
    <tx:annotation-driven transaction-manager="transactionManager"></tx:annotation-driven>
</beans>
第四步:编写添加图书和添加成功后的页面
<%--
  Created by IntelliJ IDEA.
  User: mycom
  Date: 2018/3/17
  Time: 14:32
  To change this template use File | Settings | File Templates.
--%>
<%@ page contentType="text/html;charset=UTF-8" language="java" isELIgnored="false" %>
<html>
<head>
    <title>添加图书</title>
</head>
<body>
<h1>添加图书</h1>
<form action="${pageContext.request.contextPath}/BookServlet" method="post">
    图书名称:<input name="bookname"/>
    图书作者:<input name="bookauthor"/>
    图书价格:<input name="bookprice"/>
    <input type="submit" value="添加"/>
</form>
</body>

</html>
<%@ page contentType="text/html;charset=UTF-8" language="java" isELIgnored="false" %>
<html>
<head>
    <title>成功页面</title>
</head>
<body>
<p>${book.bookName}添加成功</p>
</body>

</html>

 浙公网安备 33010602011771号