在Eclipse中使用JUnit4进行单元测试
第一步:
打开eclipse.exe,创建一个名为“Ives”的工项目,创建一个名为”UnitTest”的类。写几个方法:两数+ - * /的方法和返回结果的方法。
代码如下:

import java.util.*;
public class Expression {
int a;
int b;
static int c;//用户答案
int answer;//答案
static Scanner in=new Scanner(System.in);
public int Expression(){
a = new Random().nextInt()%10;
b = new Random().nextInt()%10;
System.out.print(""+a+"+"+b+"=");
return answer = a + b;
}
public static void main(String[] args){
int answer;
Expression expression = new Expression();
answer = expression.Expression();
try{
Expression.c = in.nextInt();
}
catch(InputMismatchException e)
{ System.err.println("\nError ,please Enter a Int number");
}
if(answer==c)
{
System.out.print("答对了");
}
else System.out.print("答错了");
//System.out.print("answer="+answer);
}
}

 1 import java.util.*;
 2 public class Expression {
 3     int a;
 4     int b;
 5     static int c;//用户答案
 6     int answer;//答案
 7     static Scanner in=new Scanner(System.in);
 8
 9
10 public int Expression(){
11     a = new Random().nextInt()%10;
12     b = new Random().nextInt()%10;
13     System.out.print(""+a+"+"+b+"=");
14     return answer = a + b;
15
16 }
17 public static void main(String[] args){
18     int answer;
19     Expression expression = new Expression();
20     answer = expression.Expression();
21     try{
22         Expression.c = in.nextInt();
23     }
24     catch(InputMismatchException e)
25     {   System.err.println("\nError  ,please Enter a Int number");
26     }
27     if(answer==c)
28     {
29         System.out.print("答对了");
30     }
31     else System.out.print("答错了");
32     //System.out.print("answer="+answer);
33 }
34 }
第二步:
Duang!酷炫的效果来了,跟紧脚步了。
将JUnit4单元测试包引入这个项目:在该项目“Ives”上点右键,点“属性”(Properties),如图: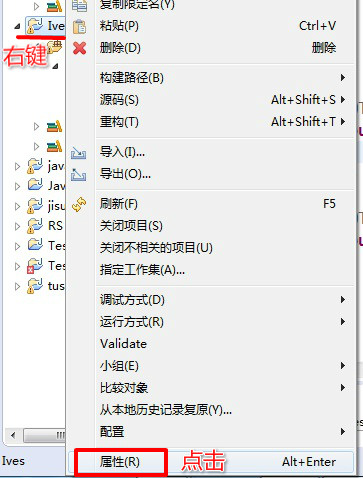
在弹出的属性窗口中,首先在左边选择“Java 构建路径”(Java Build Path),然后到右上选择"库(L)"(Libraries)标签,之后在最右边点击“添加库(A)”(Add Libraries)按钮,如下图所示: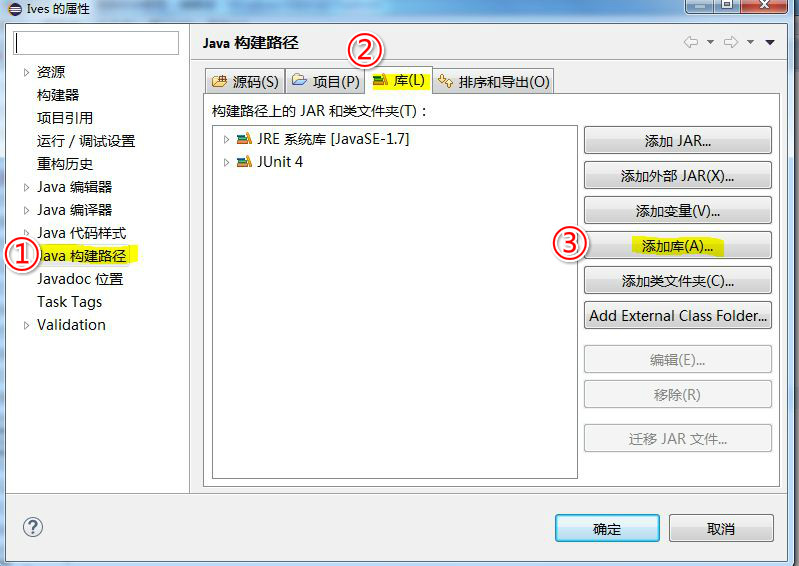
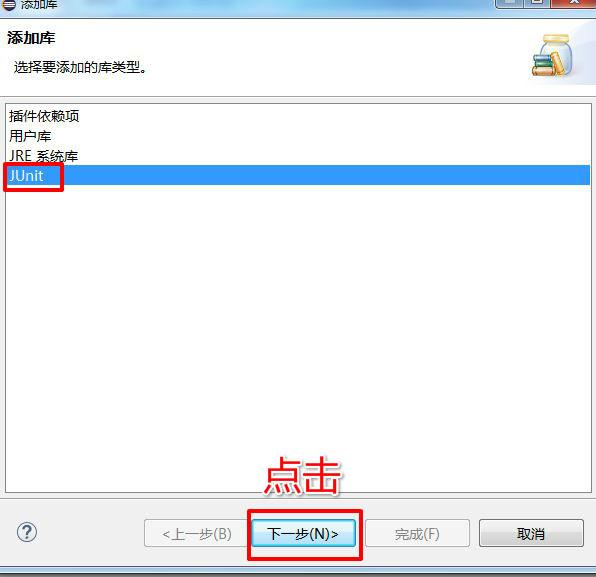
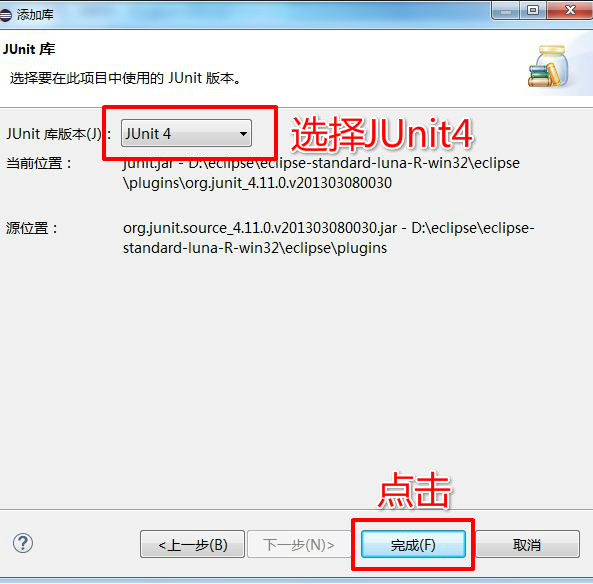
点击完成,JUnit4软件包就被包含进我们这个项目了。
第三步:
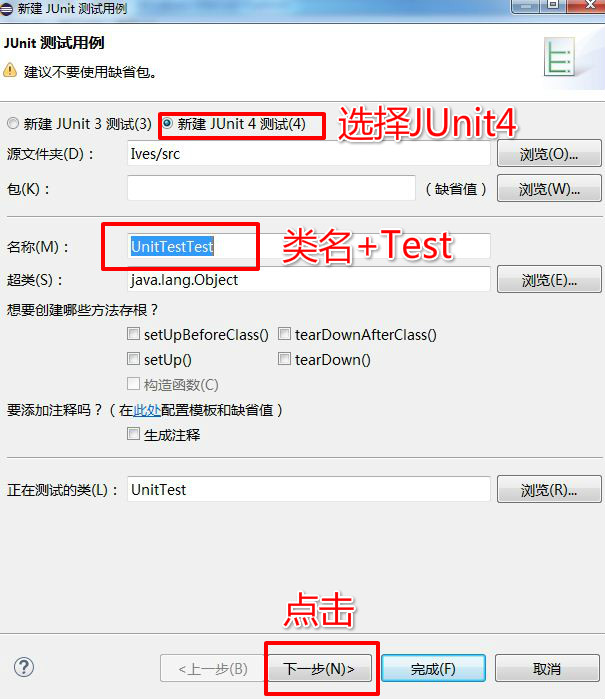
生成JUnit测试框架:在Eclipse的包资源管理器(Package Explorer)中用右键点击该类”UnitTest“弹出菜单,选择 新建 →JUnit测试用例 (New à JUnit Test Case)。如下图所示:

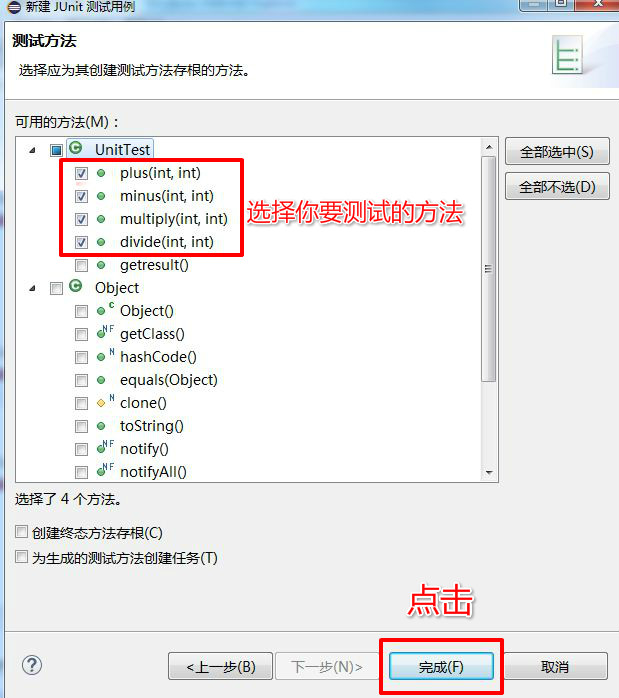
在弹出的对话框中,进行相应的选择,如下图所示:
点击完成之后会出现如下图:

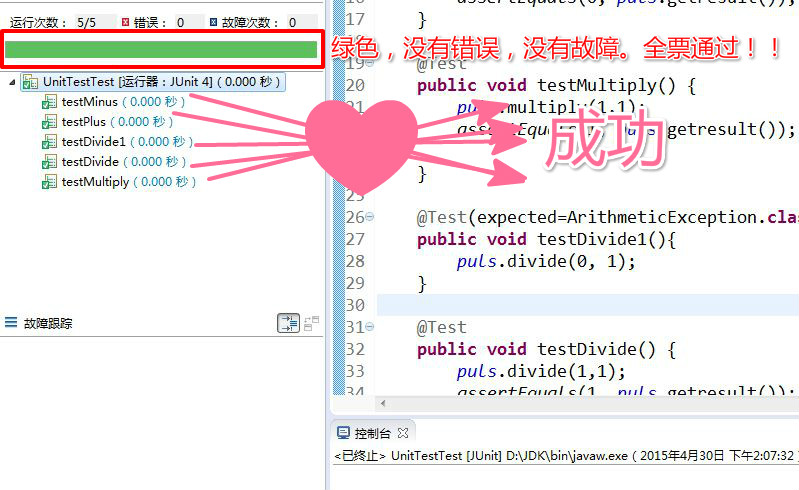
千万不要去删除@Test这个标志很重要的!!!!!然后把fail(“尚未实现”)删除,把自己的代码敲进去就可以了。我选择了测试4个方法,所以它会自动生成4个测试方法。
Duang!!!
那测试方法怎么写呢?举个例子,我想知道我的UnitTest里面的plus方法有没有写对,那我就对这个方法写个测试。把a,b两个数传递进去,例如a=1和b=1,那a+b就等2,所以这里我们又要了解新的东西了。那就是关于JUnit 的api了,下面有关于JUnit的api,到时候我看看要不要贴几个常用的方法出来,加上实例,这样会更加容易理解。
继续我们的话题:我们知道a+b=2,所以如果plus方法的result是2的话,那就说明了我们的这个plus暂时没有这类型的bug。所以我们要用到方法assertEquals(double expected, double actual)这个方法里的double expected是我们期望的值,double actual是实际的值。例如assertEquals(2, a+b),这样就可以测试方法有没有算错了。其实电脑一般都不会算错吧?哈哈
完整的测试代码如下:
import static org.junit.Assert.*;
import org.junit.Test;
public class UnitTestTest {
public static UnitTest puls = new UnitTest();
public static int answer;
@Test
public void testPlus() {
puls.plus(1,1);
assertEquals(2, puls.getresult());
}
@Test
public void testMinus() {
puls.minus(1,1);
assertEquals(0, puls.getresult());
}
@Test
public void testMultiply() {
puls.multiply(1,1);
assertEquals(1, puls.getresult());
}
@Test(expected=ArithmeticException.class)
public void testDivide1(){
puls.divide(0, 1);
}
@Test
public void testDivide() {
puls.divide(1,1);
assertEquals(1, puls.getresult());
}
}
 1 import static org.junit.Assert.*;
 2 import org.junit.Test;
 3
 4 public class UnitTestTest {
 5     public static UnitTest puls = new UnitTest();
 6     public static int answer;
 7     @Test
 8     public void testPlus() {
 9         puls.plus(1,1);
10         assertEquals(2, puls.getresult());
11     }
12
13     @Test
14     public void testMinus() {
15         puls.minus(1,1);
16         assertEquals(0, puls.getresult());
17     }
18
19     @Test
20     public void testMultiply() {
21         puls.multiply(1,1);
22         assertEquals(1, puls.getresult());
23
24     }
25
26     @Test(expected=ArithmeticException.class)
27     public void testDivide1(){
28         puls.divide(0, 1);
29     }
30
31     @Test
32     public void testDivide() {
33         puls.divide(1,1);
34         assertEquals(1, puls.getresult());
35     }
36 }
可能用心看的童鞋可能会发现我还写了一个测试时关于有没有抛出异常的。如果除数为0那就抛出异常,再去测试它除数为0是有没有抛出异常。有人可能会问,我不知道什么异常啊,很简单,看
我们写完代码,那么唰唰唰的快感马上就要到来了。

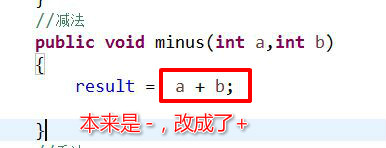
我把minus方法里的“减号”改成了“加号”:如下图
然后在运行测试类UnitTestTest.如下图:

被测试的代码有bug,也就是之前把-修改成了+,所以就会出故障。

 浙公网安备 33010602011771号