
【Vue3】前端Vue3最常用的 20 道面试题总结(含详细代码解析)
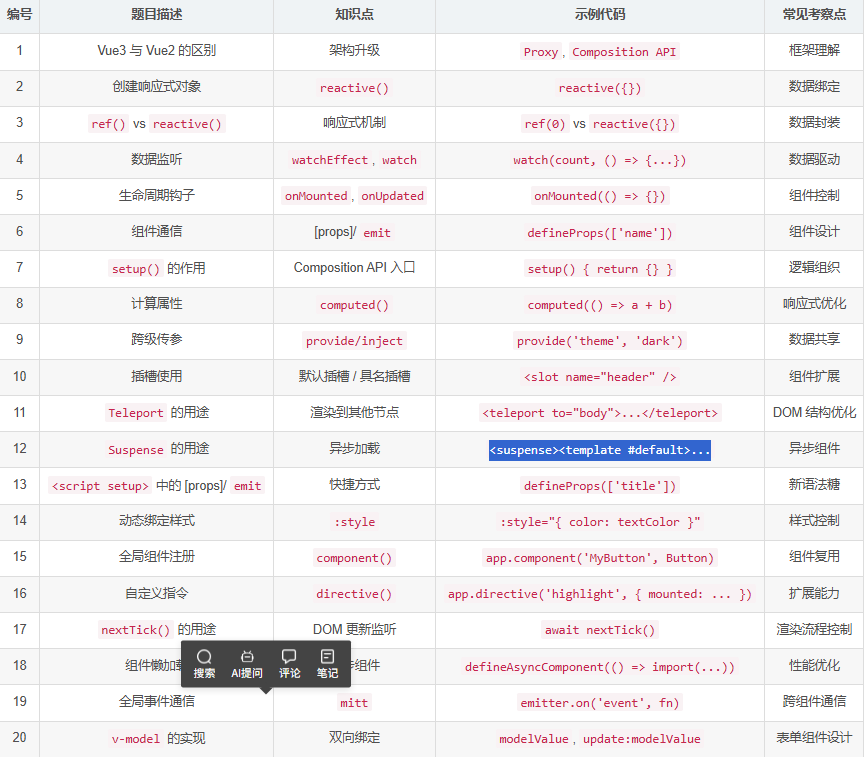
涵盖 Vue 3 的核心特性如 Composition API、响应式系统(ref / reactive)、生命周期钩子、组件通信、Teleport、Suspense、自定义指令等高频知识点
1. Vue 3 和 Vue 2 的区别是什么?
问题: 解释 Vue 3 相比 Vue 2 的主要改进点。
答案:
| 特性 | Vue 2 | Vue 3 |
| 响应式系统 | Object.defineProperty | Proxy |
| 架构 | 单一源码 | 模块化架构(Tree-shakable) |
| Composition API |
❌ options Api |
✅ |
| Fragment | ❌ | ✅ |
| Suspense组件 | ❌ | ✅ |
| 自定义渲染器支持 | 有限 | 更灵活 |
| 支持 TypeScript | ❌(需额外配置) | ✅ 原生支持 |
// Vue 3 示例:使用 Composition API
import { ref, onMounted } from 'vue';

export default {
setup() {
const count = ref(0);
function increment() {
count.value++;
}
onMounted(() => {
console.log('组件挂载');
});
return { count, increment };
}
};
2. 如何在 Vue 3 中创建一个响应式对象?
问题: 使用 reactive() 创建一个响应式用户对象。
答案:
使用 reactive() 创建深层响应式对象。
import { reactive } from 'vue';

const user = reactive({
name: 'Alice',
age: 25
});
3. ref() 和 reactive() 的区别?
问题: 写出两者的不同点及适用场景。
答案:
ref():适用于基本类型或单个值
reactive():适用于对象或复杂结构。
import { ref, reactive } from 'vue';

const count = ref(0); // 基本类型
const user = reactive({ name: 'Bob' }); // 对象

count.value++; // 必须用 .value
user.name = 'Tom'; // 不需要 .value
4. Vue 3 中如何监听数据变化?
问题: 使用 watchEffect 和 watch 的方式分别写出监听逻辑。
答案:
watchEffect:自动追踪依赖并执行副作用。
watch:手动指定监听的目标。
不同:
- watch 需要传入监听的数据源,而 watchEffect 可以自动收集数据源作为依赖。
- watch 可以访问到改变之前和之后的值,watchEffect 只能获取改变后的值。
- watch 运行的时候不会立即执行,值改变后才会执行,而 watchEffect 运行后可立即执行。这一点可以通过 watch 的配置项 immediate 改变。
import { ref, watchEffect, watch } from 'vue';

const count = ref(0);

// watchEffect
watchEffect(() => {
console.log('Count changed:', count.value);
});

// watch
watch(count, (newVal, oldVal) => {
console.log(`从 ${oldVal} 变为 ${newVal}`);
});
5. Vue 3 的生命周期钩子有哪些?如何使用?
问题: 在 setup() 中使用 onMounted 生命周期钩子。
答案:
Vue 3 提供了与 Vue 2 类似的生命周期钩子,但必须从 vue 导入使用。
import { onMounted } from 'vue';

export default {
setup() {
onMounted(() => {
console.log('组件已挂载');
});
}
};
6. Vue 3 中如何进行父子组件通信?
问题: 父组件向子组件传递数据,并触发事件。
答案:
使用 props接收父组件数据,使用 emit 触发事件。
// 子组件 Child.vue
export default {
props: ['title'],
emits: ['update'],
setup(props, { emit }) {
function handleClick() {
emit('update', 'New Value');
}
return { handleClick };
}
};

// 父组件 Parent.vue
<template>
<Child :title="msg" @update="handleUpdate" />
</template>

<script>
import Child from './Child.vue';

export default {
components: { Child },
data() {
return {
msg: 'Hello'
};
},
methods: {
handleUpdate(value) {
console.log('收到更新:', value);
}
}
};
</script>
7. Vue 3 的 setup() 函数的作用是什么?
问题: setup() 是什么?为什么它很重要?
答案:
setup() 是 Vue 3 Composition API 的入口函数。
替代 Vue 2 中的 data、methods、computed 等选项。
更好地组织逻辑复用和模块化代码。
export default {
setup() {
const message = ref('Hello Vue 3');
function changeMessage() {
message.value = 'Updated!';
}
return { message, changeMessage };
}
};
8. Vue 3 中如何实现响应式计算属性?
问题: 使用 computed() 实现一个计算属性。
答案:
使用 computed() 创建响应式计算属性。
import { ref, computed } from 'vue';

export default {
setup() {
const firstName = ref('John');
const lastName = ref('Doe');

const fullName = computed(() => `${firstName.value} ${lastName.value}`);

return { firstName, lastName, fullName };
}
};
9. provide() 和 inject() 的作用是什么?
问题: 如何跨层级传递数据?
答案:
用于祖先组件向后代组件注入依赖,不通过 props 逐层传递。
// 祖先组件
import { provide, ref } from 'vue';

export default {
setup() {
const theme = ref('dark');
provide('theme', theme);
return { theme };
}
};

// 后代组件
import { inject } from 'vue';

export default {
setup() {
const theme = inject('theme');
return { theme };
}
};
10. Vue 3 中如何使用插槽(Slot)?
问题: 实现一个默认插槽和具名插槽。
答案:
<!-- 父组件 -->
<template>
<Card>
<template #default>这是默认插槽内容</template>
<template #header>这是头部插槽</template>
</Card>
</template>

<!-- 子组件 Card.vue -->
<template>
<div class="card">
<header><slot name="header"></slot></header>
<main><slot></slot></main>
</div>
</template>
11. Vue 3 中的 Teleport 有什么用途?
问题: 如何将模态框渲染到 <body> 下?
答案:
Teleport 可以将组件渲染到 DOM 中任意位置。
<template>
<teleport to="body">
<div v-if="showModal" class="modal">这是一个模态框</div>
</teleport>
</template>
12. Vue 3 中的 Suspense 是什么?怎么用?
问题: 异步加载组件时显示加载状态。
答案:
Suspense 是一个内置组件,用于处理异步依赖。
<template>
<suspense>
<template #default>
<AsyncComponent />
</template>
<template #fallback>
加载中...
</template>
</suspense>
</template>

<script>
const AsyncComponent = defineAsyncComponent(() => import('./MyComponent.vue'));
</script>
13. Vue 3 中的 defineProps 和 defineEmits 是什么?
问题: 在 <script setup> 中如何声明 props 和 emits?
答案:
在 <script setup> 中直接使用 defineProps 和 defineEmits
<script setup>
import { defineProps, defineEmits } from 'vue';

const props = defineProps(['title']);
const emit = defineEmits(['update']);

function updateTitle() {
emit('update', 'New Title');
}
</script>

<template>
<h1>{{ title }}</h1>
<button @click="updateTitle">更新标题</button>
</template>
14. Vue 3 中如何动态绑定样式?
问题: 动态设置背景颜色。
答案:
使用 :style 绑定对象。
<template>
<div :style="{ backgroundColor: color }">{{ text }}</div>
</template>

<script>
export default {
data() {
return {
color: 'lightblue',
text: '动态样式'
};
}
};
</script>
15. Vue 3 中如何注册全局组件?
问题: 注册一个可全局使用的按钮组件。
答案:
// main.js
import { createApp } from 'vue';
import App from './App.vue';
import MyButton from './components/MyButton.vue';

const app = createApp(App);
app.component('MyButton', MyButton);
app.mount('#app');
<!-- 使用 -->
<template>
<my-button label="提交" />
</template>
16. Vue 3 中如何实现自定义指令?
问题: 实现一个高亮指令 v-highlight。
答案:
// main.js
import { createApp } from 'vue';
import App from './App.vue';

const app = createApp(App);

app.directive('highlight', {
mounted(el) {
el.style.backgroundColor = '#f0e68c';
}
});

app.mount('#app');
<!-- 使用 -->
<template>
<p v-highlight>这段文字被高亮了</p>
</template>
17. Vue 3 中的 nextTick() 怎么用?
问题: 修改 DOM 后等待更新完成。
答案:
使用 nextTick() 确保 DOM 更新完成后执行操作。
import { nextTick } from 'vue';

async function updateData() {
this.message = '更新后的内容';
await nextTick();
console.log('DOM 已更新');
}
18. Vue 3 中如何实现组件懒加载?
问题: 使用异步组件实现路由懒加载。
答案:
使用 defineAsyncComponent 实现懒加载。
import { defineAsyncComponent } from 'vue';

const AsyncComponent = defineAsyncComponent(() =>
import('./components/LazyComponent.vue')
);

export default {
components: {
AsyncComponent
}
};
19. Vue 3 中的 emitter 是什么?如何使用?
问题: 实现非父子组件之间的通信。
答案:
使用第三方库如 mitt 或 EventBus 实现全局通信。
npm install mitt
// eventBus.js
import mitt from 'mitt';
export const emitter = mitt();

// 发送事件
import { emitter } from './eventBus';
emitter.emit('update', 'Hello');

// 接收事件
import { emitter } from './eventBus';
emitter.on('update', (msg) => {
console.log(msg);
});
20. Vue 3 中如何使用 v-model 实现双向绑定?
问题: 实现一个输入框组件的双向绑定。
答案:
使用 modelValue + update:modelValue。
<template>
<input
:value="modelValue"
@input="$emit('update:modelValue', $event.target.value)"
/>
</template>

<script>
export default {
props: ['modelValue'],
emits: ['update:modelValue']
};
</script>
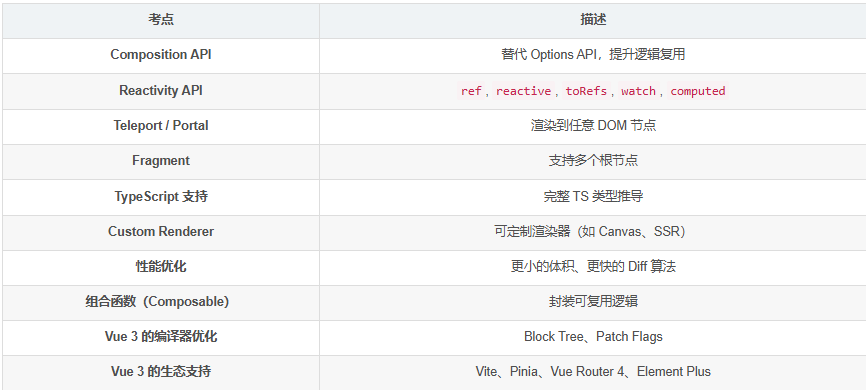
📋 总结表格
📌 高频考点补充

 浙公网安备 33010602011771号