【Spring】(五)依赖注入
依赖注入
1.构造器注入
2.set方式注入【重点】
- 依赖注入:Set注入
- 依赖:bean对象的创建依赖于容器
- 注入:bean对象中的所有属性,由容器来注入
【环境搭建】
-
1.Address
public class Address { private String address; ... } -
2.Student
public class Student { private String name; private Address address; private String[] books; private List<String> hobbys; private Map<String,String> card; private Set<String> games; private String wife; private Properties info; ... set方法。。。 } -
3.applicationContext.xml
<?xml version="1.0" encoding="UTF-8"?> <beans xmlns="http://www.springframework.org/schema/beans" xmlns:xsi="http://www.w3.org/2001/XMLSchema-instance" xsi:schemaLocation="http://www.springframework.org/schema/beans https://www.springframework.org/schema/beans/spring-beans.xsd"> <bean id="address" class="pojo.Address"> <property name="address" value="西安"></property> </bean> <bean id="student" class="pojo.Student"> <!--普通注入,value--> <property name="name" value="兰"/> <!--Bean注入,ref--> <property name="address" ref="address"/> <!--数组--> <property name="books"> <array> <value>红楼梦</value> <value>西游记</value> <value>水浒传</value> <value>三国演义</value> </array> </property> <!--list--> <property name="hobbys"> <list> <value>听歌</value> <value>敲代码</value> <value>看电影</value> </list> </property> <!--Map--> <property name="card"> <map> <entry key="身份证" value="111111111"/> <entry key="银行卡" value="222222222"/> </map> </property> <!--Set--> <property name="games"> <set> <value>LOL</value> <value>COC</value> <value>BOB</value> </set> </property> <!--null--> <property name="wife"> <null/> </property> <!--Properties--> <property name="info"> <props> <prop key="driver">20190525</prop> <prop key="url">男</prop> <prop key="username">root</prop> <prop key="password">123</prop> </props> </property> </bean> </beans> -
4.MyTest
public class MyTest {
    public static void main(String[] args) {
        ApplicationContext context = new ClassPathXmlApplicationContext("applicationContext.xml");
        Student student = (Student) context.getBean("student");
        System.out.println(student.toString());

        //结果
        /*Student{
            name='兰',
            address=Address{address='西安'},
            books=[红楼梦, 西游记, 水浒传, 三国演义],
            hobbys=[听歌, 敲代码, 看电影],
            card={身份证=111111111, 银行卡=222222222},
            games=[LOL, COC, BOB],
            wife='null',
            info={password=123, url=男, driver=20190525, username=root}}
         */

    }
}
3.拓展方式注入
-
User.java
public class User { private String name; private String age; public User() { } public User(String name, String age) { this.name = name; this.age = age; } ... } -
userbean.xml
<?xml version="1.0" encoding="UTF-8"?> <beans xmlns="http://www.springframework.org/schema/beans" xmlns:xsi="http://www.w3.org/2001/XMLSchema-instance" xmlns:p="http://www.springframework.org/schema/p" xmlns:c="http://www.springframework.org/schema/c" xsi:schemaLocation="http://www.springframework.org/schema/beans https://www.springframework.org/schema/beans/spring-beans.xsd"> <!--p命名空间注入,可以直接注入属性的值:property--> <bean id="user" class="pojo.User" p:name="蓝" p:age="18"></bean> <!--c命名空间注入,通过构造器注入:construct-args --> <bean id="user2" class="pojo.User" c:age="18" c:name="蓝紫"></bean> </beans> -
测试类
public void test2(){
        ApplicationContext context = new ClassPathXmlApplicationContext("userbean.xml");
        User user=context.getBean("user2",User.class);
        System.out.println(user);
}
*注意:p命名和c命名空间不能直接使用,需要导入xml约束
xmlns:p="http://www.springframework.org/schema/p"
xmlns:c="http://www.springframework.org/schema/c"
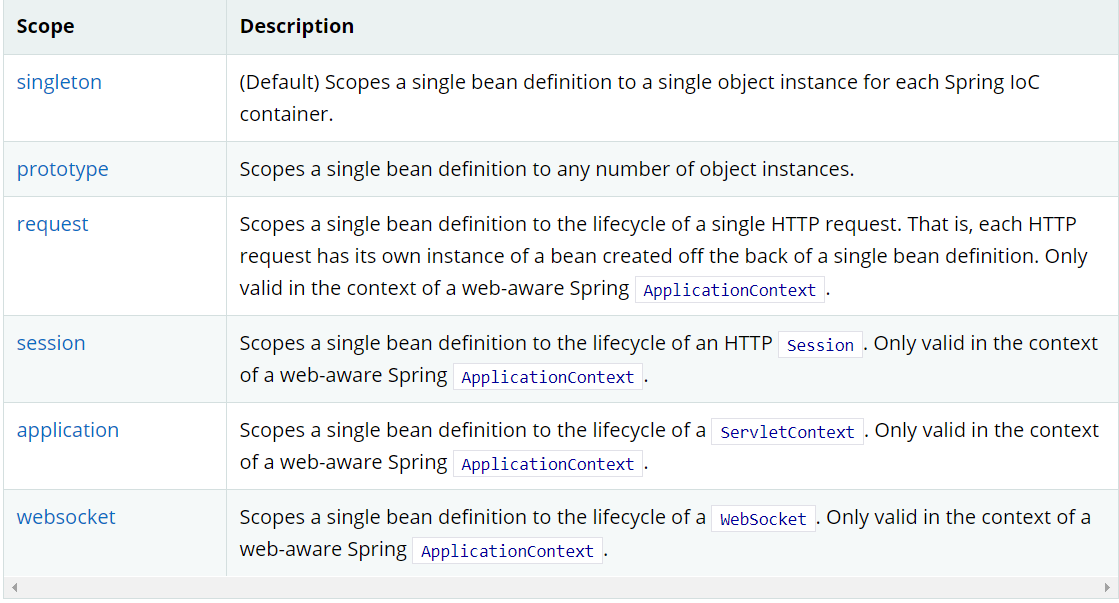
4.bean的作用域
-
1.单例模式(Spring默认机制)一个实例只会被创建一次
<bean id="user2" class="pojo.User" c:age="18" c:name="蓝紫" scope="singleton" />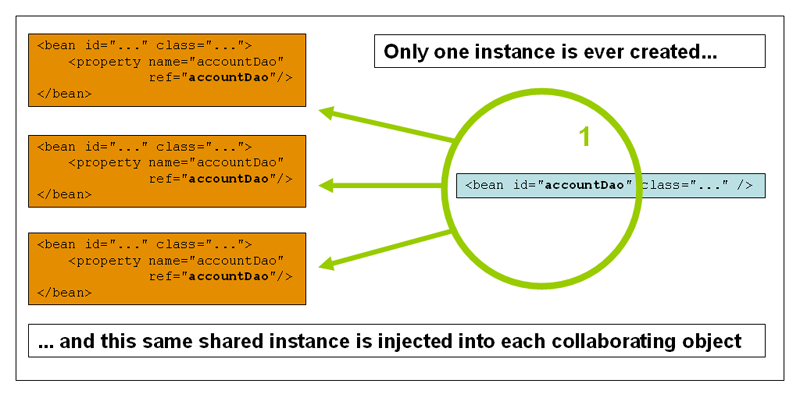
测试:一个实例只会被创建一次,所以取出来的对象是同一个
public void test2(){ ApplicationContext context = new ClassPathXmlApplicationContext("userbean.xml"); User user=context.getBean("user2",User.class); User user2=context.getBean("user2",User.class); System.out.println(user==user2);//true } -
2.原型模式:每次从容器中get时,都会产生一个新对象。
<bean id="user2" class="pojo.User" c:age="18" c:name="蓝紫" scope="prototype" />
测试
System.out.println(user==user2);//false -
3.其余的request、session、application,这些只能在web开发中使用到。

 浙公网安备 33010602011771号