
在net Core3.1上基于winform实现依赖注入实例
在net Core3.1上基于winform实现依赖注入实例
1.背景
net core3.1是微软LTS长期3年支持版本,正式发布于2019-12-03,并且在windows平台上支持了Winfrom跟WPF桌面应用。本文介绍了使用Winform时的第一步,将应用层以及ORM涉及到的DBconfig,仓储层等依赖注入到容器中,并通过构造函数法从容器中调用实例,供给各窗体控件使用。
备注:本文的依赖注入讲解基于微软原生自带的DI,通过Ninject或者AutoFac可自行仿照操作,原理相通。
2.依赖注入
2.1依赖注入是什么?
依赖注入是通过反转控制(IOC),设计模式属于代理模式+工厂模式,由serviceProvider根据实例接口或者实例类型调用,注入时生命周期的设置,控制实例化及配置实例生命周期,并返回实例给程序员调用,从而达到解放程序员的生产力,不用再去new 一个个实例,也不用去考虑实例之间的依赖关系,也不用去考虑实例的生命周期。实现,分为三个阶段,第一,程序员将服务注入服务容器阶段,第二程序员DI实例调用阶段,第三serviceProvider服务管理者根据注入时的配置返回给程序对应的实例以及配置好实例的生命周期。
一张图就可以理解依赖注入实例调用过程

图片来源出处,感谢作者。
这里再向读者做个说明ServiceCollection是服务容器,serviceProvider是服务管理者,管理着服务容器,当程序发送抽象接口,或者类型时,serviceProvider会根据设置好的生命周期,返回需要的实例配置好实例的生命周期给程序员使用。
2.1依赖注入的目的
通过代理模式serviceProvider控制反转,他将持有控制权,将所有需要用到的接口,类型,反射出对应的实例,实例化以及设置好实例的生命周期,然后将控制权返还给程序员,不用再去new 一个个实例,也不用去考虑实例之间的依赖关系,也不用去考虑实例的生命周期,最终目的就是解放程序员的生产力,让程序员更轻松地写程序。
2.2依赖注入带来的好处
2.2.1生命周期的控制
在注入的同时可以设置如下三种生命周期:
- Transient
每次注入时,都重新 new 一个新的实例。 - Scoped
每个 Request 都重新 new 一个新的实例,同一个 Request 不管经过多少个 Pipeline 都是用同一个实例。 - Singleton
被实例化后就不会消失,程序运行期间只会有一个实例。
2.2.1.1 生命周期测试举例
- 定义同一个例子对应三个不同生命周期的接口
public interface ISample
{
    int Id { get; }
}

public interface ISampleTransient : ISample
{
}

public interface ISampleScoped : ISample
{
}

public interface ISampleSingleton : ISample
{
}

public class Sample : ISampleTransient, ISampleScoped, ISampleSingleton
{
    private static int _counter;
    private int _id;

    public Sample()
    {
        _id = ++_counter;
    }

    public int Id => _id;
}
- 将对应的服务与接口注册到容器中
public class Startup
{
    public void ConfigureServices(IServiceCollection services)
    {
        services.AddTransient<ISampleTransient, Sample>();
        services.AddScoped<ISampleScoped, Sample>();
        services.AddSingleton<ISampleSingleton, Sample>();
        // Singleton 也可以用以下方法注册
        // services.AddSingleton<ISampleSingleton>(new Sample());
    }
}
- Controller中获取对应DI实例的HashCode
public class HomeController : Controller
{
    private readonly ISample _transient;
    private readonly ISample _scoped;
    private readonly ISample _singleton;

    public HomeController(
        ISampleTransient transient,
        ISampleScoped scoped,
        ISampleSingleton singleton)
    {
        _transient = transient;
        _scoped = scoped;
        _singleton = singleton;
    }

    public IActionResult Index() {
        ViewBag.TransientId = _transient.Id;
        ViewBag.TransientHashCode = _transient.GetHashCode();

        ViewBag.ScopedId = _scoped.Id;
        ViewBag.ScopedHashCode = _scoped.GetHashCode();

        ViewBag.SingletonId = _singleton.Id;
        ViewBag.SingletonHashCode = _singleton.GetHashCode();
        return View();
    }
}
- VewBag 显示组件
<table border="1">
    <tr><td colspan="3">Cotroller</td></tr>
    <tr><td>Lifetimes</td><td>Id</td><td>Hash Code</td></tr>
    <tr><td>Transient</td><td>@ViewBag.TransientId</td><td>@ViewBag.TransientHashCode</td></tr>
    <tr><td>Scoped</td><td>@ViewBag.ScopedId</td><td>@ViewBag.ScopedHashCode</td></tr>
    <tr><td>Singleton</td><td>@ViewBag.SingletonId</td><td>@ViewBag.SingletonHashCode</td></tr>
</table>
可自行做测试,具体可参考此博客
2.2.2 实现了展现层(调用者)与服务类之间的解耦
如上,实例是在HomeController中通过接口来调用实例的,因此修改程序只需要在实例中需改,而不需要在调用层修改。
这符合了6大程序设计原则中的依赖倒置原则:
1.高层模块不应该依赖于低层模块,两者都应该依赖其抽象
展现层Controller没有依赖Model层Sample类,两者都依赖了Sample的接口抽象ISample,ISampleTransient,ISampleScoped,ISampleSingleton.
2.抽象不应该依赖于细节
接口层只定义规范,没有定义细节。
public interface ISample
{
    int Id { get; }
}

public interface ISampleTransient : ISample
{
}

public interface ISampleScoped : ISample
{
}

public interface ISampleSingleton : ISample
{
}
3.细节应该依赖于抽象
DI中取实例依赖于接口:
ISampleTransient transient;
服务类的实现也依赖于接口:
public class Sample : ISampleTransient, ISampleScoped, ISampleSingleton
{
    private static int _counter;
    private int _id;

    public Sample()
    {
        _id = ++_counter;
    }

    public int Id => _id;
}
2.2.3 开发者不用再去考虑依赖之间的关系
使程序员不用再去考虑各个DI实例之间的依赖,以及new很多个相互依赖的实例。
2.3 依赖注入使用的设计模式
2.3.1 代理模式
在依赖注入的服务调用的地方,容器管理者serviceProvider从程序员手中取得控制权,控制所需服务实例化以及设置好他的生命周期,然后返回给程序员。
2.3.2 工厂模式
根据DI的生命周期设置,根据接口或者类型,生产出各种生命周期的实例,需要注意的是这里有可能是同一实例(scope的单次请求中,或者Transient生命周期),Transient每次产生的都是新的实例。
3.在Net Core 3.1上基于winform实现依赖注入
3.1 Net Core 3.1中对winform的支持。
笔者发现在最新的VS发行版中,能创建winform工程,但却无法打开设计器,也无法打开winform的工具箱。怎么办?
在微软官方博客中提到在VS16.5预览版中支持了winform设计器,根据博客中提到,需要在此下载链接下载VS16.5预览版。
NetCore3.1 winform截图如下:
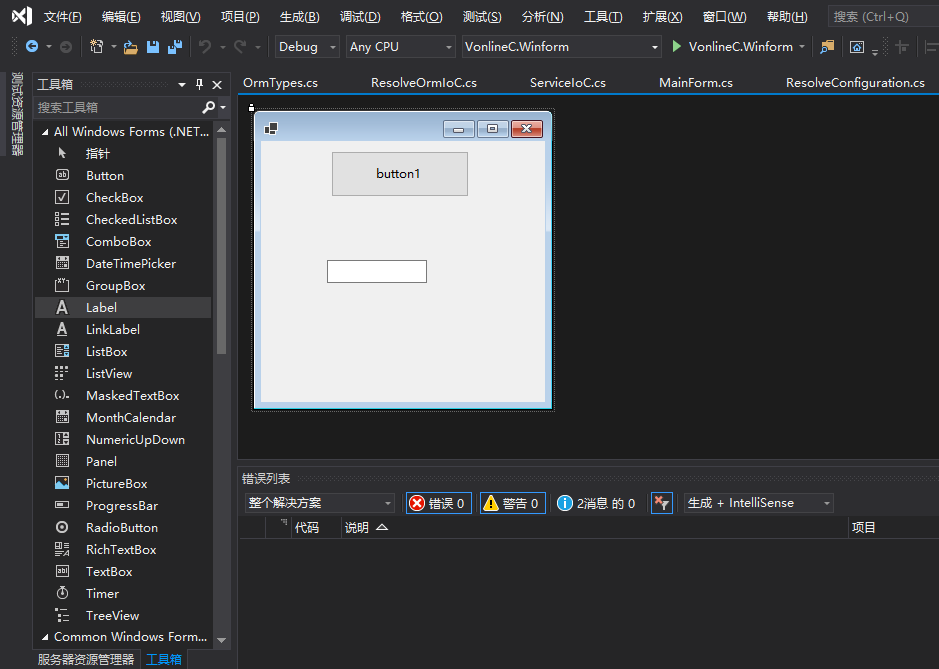
可以看到控件明显比基于dot Net Framework的好看很多,同时,工具箱中的控件很少,微软把一些老的已经有替代的控件删除了,并且以后会慢慢加入一些必要的控件。
3.2 winform依赖注入与net core MVC的不同?
net core MVC容器是自动创建好的,只需要在ConfigureServices方法里配置服务即可。而在Net Core3.1上创建了winform工程之后窗体是new实例,以单例的形式跑的。容器的配置创建,都需要自己来做。
    static class Program
    {
        /// <summary>
        ///  The main entry point for the application.
        /// </summary>
        [STAThread]
        static void Main()
        {
            Application.SetHighDpiMode(HighDpiMode.SystemAware);
            Application.EnableVisualStyles();
            Application.SetCompatibleTextRenderingDefault(false);
            Application.Run(new Form1());
        }
    }
那如果需要向Form窗体中注入服务就需要在new实例的时候就传入实参。
[STAThread]
  static void Main()
  {
      Application.SetHighDpiMode(HighDpiMode.SystemAware);
      Application.EnableVisualStyles();
      Application.SetCompatibleTextRenderingDefault(false);

      var services = new ServiceCollection();

      ConfigureServices(services);

      using (ServiceProvider serviceProvider = services.BuildServiceProvider())
      {
          var logg = services.BuildServiceProvider().GetRequiredService<ILogger<Form1>>();

          var businessObject = services.BuildServiceProvider().GetRequiredService<IBusinessLayer>();

          Application.Run(new Form1(logg, businessObject));
      }
  }
调用的时候用窗体的构造函数调用服务接口即可。
public partial class Form1 : Form
    {
        private readonly ILogger _logger;

        private readonly IBusinessLayer _business;
        public Form1(ILogger<Form1> logger, IBusinessLayer business)
        {
            _logger = logger;
            _business = business;
            InitializeComponent();
        }

        private void button1_Click(object sender, EventArgs e)
        {
            try
            {
                _logger.LogInformation("Form1 {BusinessLayerEvent} at {dateTime}", "Started", DateTime.UtcNow);

                // Perform Business Logic here
                _business.PerformBusiness();

                MessageBox.Show("Hello .NET Core 3.0 . This is First Forms app in .NET Core");

                _logger.LogInformation("Form1 {BusinessLayerEvent} at {dateTime}", "Ended", DateTime.UtcNow);

            }
            catch (Exception ex)
            {
                //Log technical exception
                _logger.LogError(ex.Message);
                //Return exception repsponse here
                throw;

            }

        }
    }
本方法摘自此文
这样至少有两个缺点:
- Form1中构造函数的依赖注入实例调用泄露在了他的调用层,这不符合6大程序设计原则中的依赖倒置原则;
- 当Form1中需要从DI中增加接口实例调用时,也需要在如下调用代码中增加对应实参。而且实参多了,会很冗长。
Application.Run(new Form1(logg, businessObject));
3.3 解决3.2的思路
把form的类型也以单例的形式注入到容器中,调用时,获取MainForm类型的服务。这样此服务实例依赖于其他的服务。ServiceProvider容器管理者会自动解决好服务之间的依赖关系,并将对应的服务实例化并根据生命周期设置好,交给程序员去使用。问题完美解决。
此思路有借鉴于以下两篇文章
微软MSDN
stackoverflow
这里向大家重点推荐下stackoverflow,这个基于世界级的程序员论坛,在我遇到很多的疑难杂症,孤立无援的时候,他都会给予我解决问题的思路,方向甚至方案,再次致敬感谢stackoverflow,同时也感谢谷歌。
3.4代码实现
3.4.1 在Program.cs中建立服务注册静态方法
        private static void ConfigureServices(ServiceCollection services)
        {
            //App
            services.ApplicationServiceIoC();
            //Infra

            //Repo
            services.InfrastructureORM<DapperIoC>();


            //Presentation 其他的窗体也可以注入在此处
            services.AddSingleton(typeof(MainForm));
        }
这里需要说明的是,笔者这里的IoC是应用层,展现层,仓储层分层注入了,每层都写了ServiceCollection服务容器的静态方法,所以服务可以在各层注入,读者可以不去追究,将自己的服务注入在此即可。
分层注入:
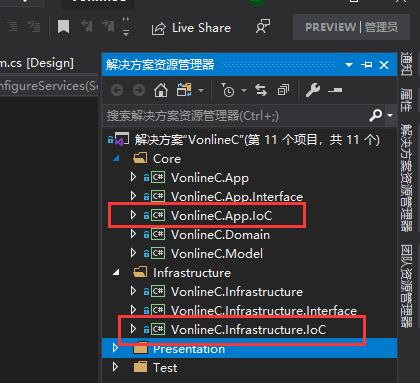
分层注入简单实现
CameraDM_Service注册在了ApplicationServiceIoC,ApplicationServiceIoC注册在了ConfigureServices。这就是我刚说的分层注入每层的依赖。
    public static class ServicesIoC
    {
        public static void ApplicationServiceIoC(this IServiceCollection services)
        {
            services.AddScoped(typeof(IServiceBase<>), typeof(ServiceBase<>));
            services.AddScoped<ICameraDM_Service, CameraDM_Service>();
        }
    }
重点关注
将窗体类型注入,当然后续加入其它窗体也可用同样方法进行注入。
services.AddSingleton(typeof(MainForm));
3.4.2 创建服务容器对象
var services = new ServiceCollection();
3.4.3 添加服务注册
ConfigureServices(services);
此步骤调用的就是3.4.1中的方法。
3.4.4 构建ServiceProvider对象
var serviceProvider = services.BuildServiceProvider();
3.4.5 运行MainForm服务
向服务管理者请求MainForm类型的实例服务,具体调用过程详见2.1。
Application.Run(serviceProvider.GetService<MainForm>());
这一步是重点,也是winform跟MVC使用上的区别,但是本质却是相同的,都是由serviceProvider管理着WPF,winform或者MVC这些实例以及他们对应的类型,只不过MVC容器已经创建好了,容器管理者serviceProvider也已经创建好了,直接往容器里Add服务即可,而winform,WPF,net core控制台程序需要我们自己去往容器里添加注册服务,并且创建容器管理者serviceProvider。因为ServiceCollection容器是死的,只有创建了serviceProvider容器管理者这个代理角色,容器才能体现出他的价值。而只有serviceProvider,没有ServiceCollection里的服务也是毫无意义的。
3.4.1到3.4.5整体代码如下:
    static class Program
    {
        /// <summary>
        ///  The main entry point for the application.
        /// </summary>
        [STAThread]
        static void Main()
        {
            Application.SetHighDpiMode(HighDpiMode.SystemAware);
            Application.EnableVisualStyles();
            Application.SetCompatibleTextRenderingDefault(false);
            //创建服务容器对象
            var services = new ServiceCollection();

            //添加服务注册
            ConfigureServices(services);
            //构建ServiceProvider对象
            var serviceProvider = services.BuildServiceProvider();
            //向服务管理者请求MainForm类型的实例服务
            Application.Run(serviceProvider.GetService<MainForm>());
        }
        private static void ConfigureServices(ServiceCollection services)
        {
            //App
            services.ApplicationServiceIoC();
            //Infra

            //Repo
            services.InfrastructureORM<DapperIoC>();


            //Presentation 其他的窗体也可以注入在此处
            services.AddSingleton(typeof(MainForm));
        }
    }
3.4.6构造函数法调用DI实例
    public partial class MainForm : Form
    {
        ICameraDM_Service _cameraDM_Service;
        public MainForm(ICameraDM_Service cameraDM_Service)
        {
            _cameraDM_Service = cameraDM_Service;
            InitializeComponent();
        }
        private async void button1_Click(object sender, EventArgs e)
        {
            MessageBox.Show(_cameraDM_Service.GetAllCameraInfo().ToList().Count().ToString());
            var _camera  =await _cameraDM_Service.GetAllIncludingTasksAsync();
            //textBox1.Text = _camera.ToList().Count().ToString();
            var _cameraNo3 = await _cameraDM_Service.GetByIdAsync(3);
            textBox1.Text = _cameraNo3.InstallTime.ToString();
        }
    }
3.5演示效果
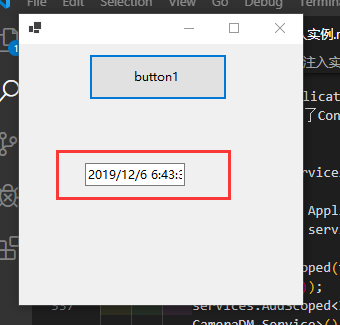
点击按钮之后从摄像头服务中获取到了摄像头的数量。

点击确定之后从摄像头服务中获取到了3号摄像头的安装时间。
3.6 如何调用用依赖注入在母窗体中调用子窗体
3.6属于12/23/13:33新增,为了答复1楼网友 编程老油条所问问题。
问题如下:
假设在MainForm中的button1_Click,还需要打开其他窗口,要如何实现?(只能往 MainForm 中传递serviceProvider吗?)
把serviceProvider设计成全局静态的,可设计成单例模式或直接放在Main的属性中,供全局任意子窗体访问获取DI实例即可,当然同时,其他窗体也需要注入到容器中。
3.6.1 注入子窗体
注入生命周期为瞬时的Form1类型。
services.AddTransient(typeof(Form1));
        private static void ConfigureServices(ServiceCollection services)
        {
            //App
            services.ApplicationServiceIoC();
            //Infra

            //Repo
            services.InfrastructureORM<DapperIoC>();

            //Presentation 其他的窗体也可以注入在此处
            services.AddSingleton(typeof(MainForm));
            services.AddTransient(typeof(Form1));

        }
因为Form1是MainForm的子窗体,而MainForm设置成了单例模式,所以在MainForm中打开Form1是属于同一次请求,姑不能用AddSingleton跟AddScope模式。如果使用以上两种模式,会报如下异常:
比如设置Form1生命周期为单例模式
            services.AddSingleton(typeof(MainForm));
            services.AddSingleton(typeof(Form1));
第一次调用正常,

关闭Form1第二次点击MainForm的button1时,报如下异常:
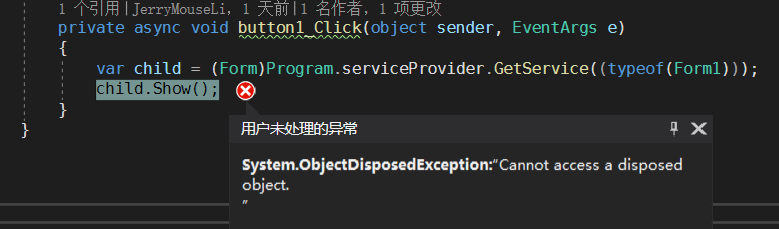
因为是单例模式,我们关闭了Form1,MainForm还在,再次点击button1,会找不到生命周期是单例模式的Form1实例,就会报如上异常。
修改成
services.AddTransient(typeof(Form1));
问题得到完美解决,无论关闭多少次Form1,都能通过MainForm的button1调用打开Form1。
3.6.2 设置全局serviceProvider容器服务管理者
修改serviceProvider为Program静态类的公用属性(全局),以给子窗体或其他winform中的组件来容器服务者获取DI实例
public static IServiceProvider serviceProvider { get; set; }
Program.cs全部代码如下。
    static class Program
    {
        public static IServiceProvider serviceProvider { get; set; }
        /// <summary>
        ///  The main entry point for the application.
        /// </summary>
        [STAThread]
        static void Main()
        {

            Application.SetHighDpiMode(HighDpiMode.SystemAware);
            Application.EnableVisualStyles();
            Application.SetCompatibleTextRenderingDefault(false);
            //创建服务容器对象
            var services = new ServiceCollection();

            //添加服务注册
            ConfigureServices(services);
            //构建ServiceProvider对象
            serviceProvider = services.BuildServiceProvider();

        //向服务管理者请求MainForm类型的实例服务
        Application.Run(serviceProvider.GetService<MainForm>());
        }
        private static void ConfigureServices(ServiceCollection services)
        {
            //App
            services.ApplicationServiceIoC();
            //Infra

            //Repo
            services.InfrastructureORM<DapperIoC>();

            //Presentation 其他的窗体也可以注入在此处
            services.AddSingleton(typeof(MainForm));
            services.AddTransient(typeof(Form1));

        }
    }
3.6.3 MainForm中调用Form1
到Program服务管理者属性手中拿到对应所需类型的设置好生命周期的Form1实例。显示Form1。
    public partial class MainForm : Form
    {
        public MainForm()
        {
            InitializeComponent();
        }

        private async void button1_Click(object sender, EventArgs e)
        {
            var child = (Form)Program.serviceProvider.GetService((typeof(Form1)));
            child.Show();
        }
    }
3.6.4 构造函数法调用DI实例
Form1调用camera服务
此处同3.5
    public partial class Form1 : Form
    {

        ICameraDM_Service _cameraDM_Service;
        public Form1(ICameraDM_Service cameraDM_Service)
        {
            _cameraDM_Service = cameraDM_Service;
            InitializeComponent();

        }
        private async  void button1_Click(object sender, EventArgs e)
        {
            MessageBox.Show(_cameraDM_Service.GetAllCameraInfo().ToList().Count().ToString());
        }
    }
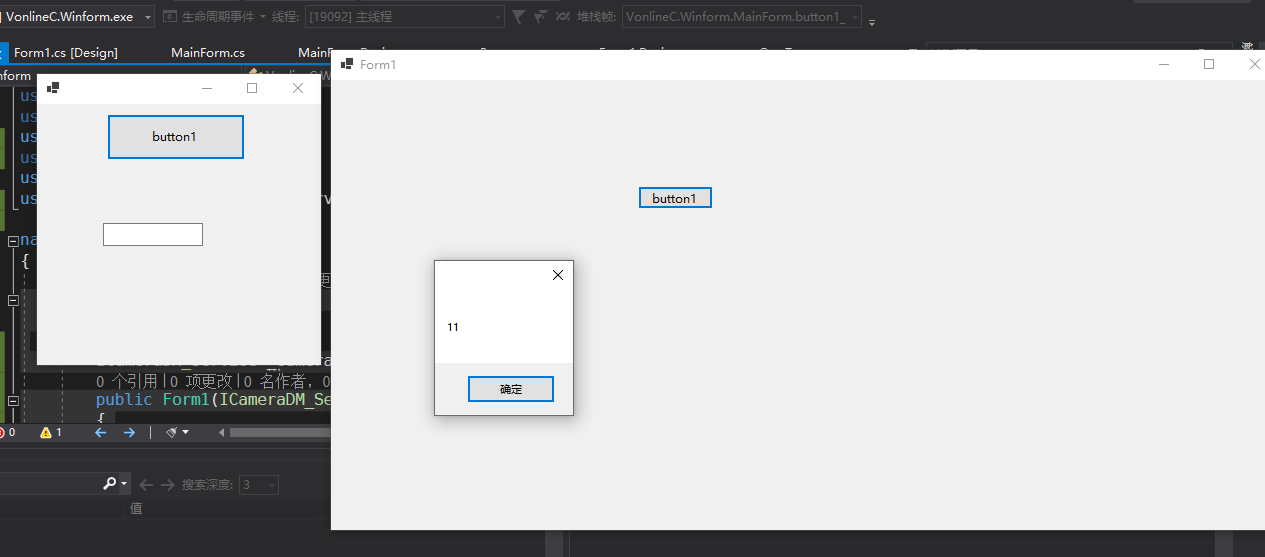
3.6.5效果
4.最后
本来就想写篇短文,谁知道洋洋洒洒还写得有点长。本文如果大家读了有疑惑,请提出来,我会耐心解答;如果知识点上有不妥当不正确或者不同见解的地方,也恳请指出,我同时也很渴望进步。最后祝大家冬至安康,阖家幸福。

 浙公网安备 33010602011771号