Centos7系统中Mysql数据库的安装
一:二进制mysql数据库的安装
环境:
1 [root@molson ~]# cat /etc/redhat-release 2 CentOS Linux release 7.3.1611 (Core)
二进制Mysql的版本:mysql5.7.29版本
1)上传二进制mysql包到/usr/local/src目录中,如下
1 [root@molson src]# ll
2 总用量 649172
3 -rw-r--r--. 1 root root 664749587 10月  1 18:14 mysql-5.7.29-linux-glibc2.12-x86_64.tar.gz
2)解压Mysql包并放到/apps目录中,如下
 1 [root@molson src]# tar xf mysql-5.7.29-linux-glibc2.12-x86_64.tar.gz
 2 [root@molson src]# mv mysql-5.7.29-linux-glibc2.12-x86_64 mysql-5.7.29
 3 [root@molson src]# mkdir /apps/
 4 [root@molson src]# mv mysql-5.7.29 /apps
 5 [root@molson src]# ln -sv /apps/mysql-5.7.29/ /apps/mysql
 6 "/apps/mysql" -> "/apps/mysql-5.7.29/"
 7 [root@molson src]# ll /apps
 8 总用量 0
 9 lrwxrwxrwx. 1 root root  19 10月  1 18:19 mysql -> /apps/mysql-5.7.29/
10 drwxr-xr-x. 9 root root 129 10月  1 18:18 mysql-5.7.29
11 [root@molson src]#
3)用户的创建,处理原始环境,相关目录的创建,如下
 1 [root@molson src]# rpm -qa | grep mariadb
 2 mariadb-libs-5.5.52-1.el7.x86_64
 3 [root@molson src]# yum remove mariadb-libs-5.5.52-1.el7.x86_64 -y
 4 [root@molson src]# rpm -qa | grep mariadb
 5 [root@molson src]#
 6
 7 [root@molson src]# useradd mysql -s /sbin/nologin
 8 [root@molson src]# getent passwd | grep mysql
 9 mysql:x:1000:1000::/home/mysql:/sbin/nologin
10 [root@molson src]#
11 [root@molson src]#mkdir /apps/
4)设置环境变量,并验证,如下
1 [root@molson src]# echo 'export PATH=/apps/mysql/bin:$PATH' >> /etc/profile
2 [root@molson src]# tail -1 /etc/profile
3 export PATH=/apps/mysql/bin:$PATH
4 [root@molson src]# source /etc/profile
5 [root@molson src]# mysql -V
6 mysql  Ver 14.14 Distrib 5.7.29, for linux-glibc2.12 (x86_64) using  EditLine wrapper
7 [root@molson src]#
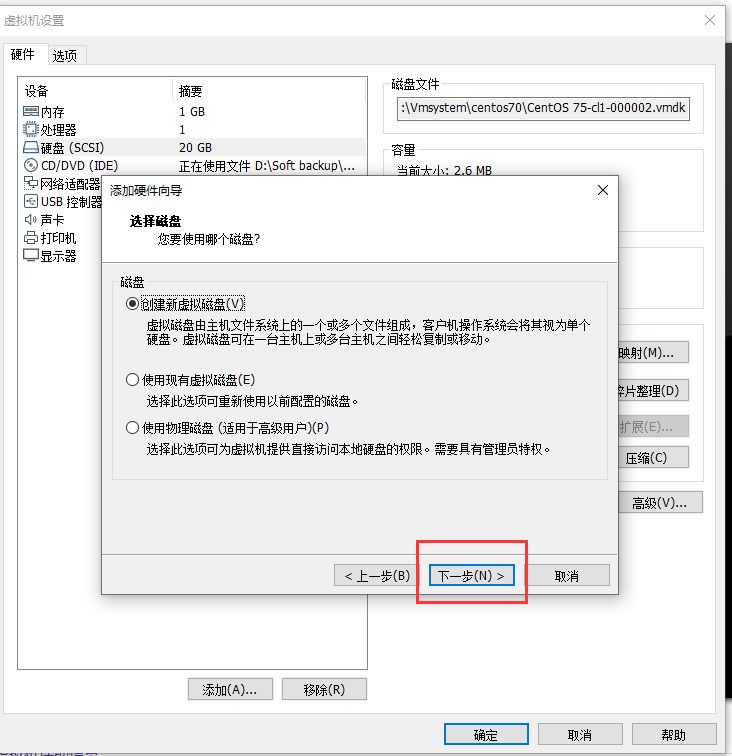
5)添加硬盘,首先关闭虚拟机,如下
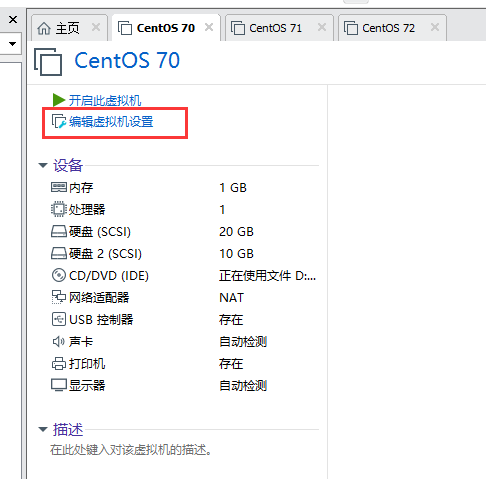
点击上图的点击虚拟机,如下
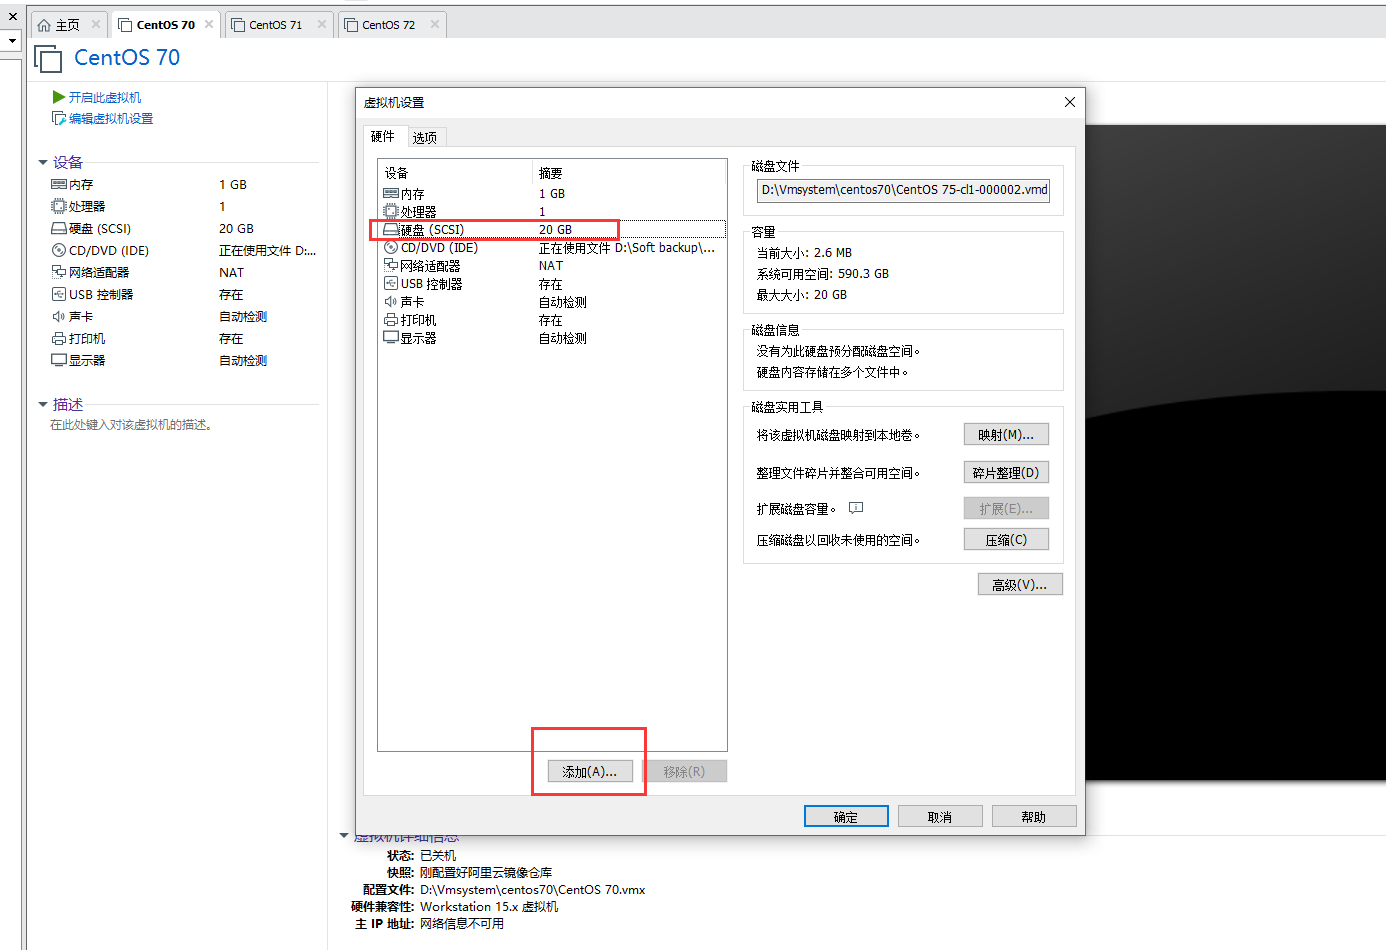
按照上图红色标记操作,会出现如下图
点击下一步,会出现如下图
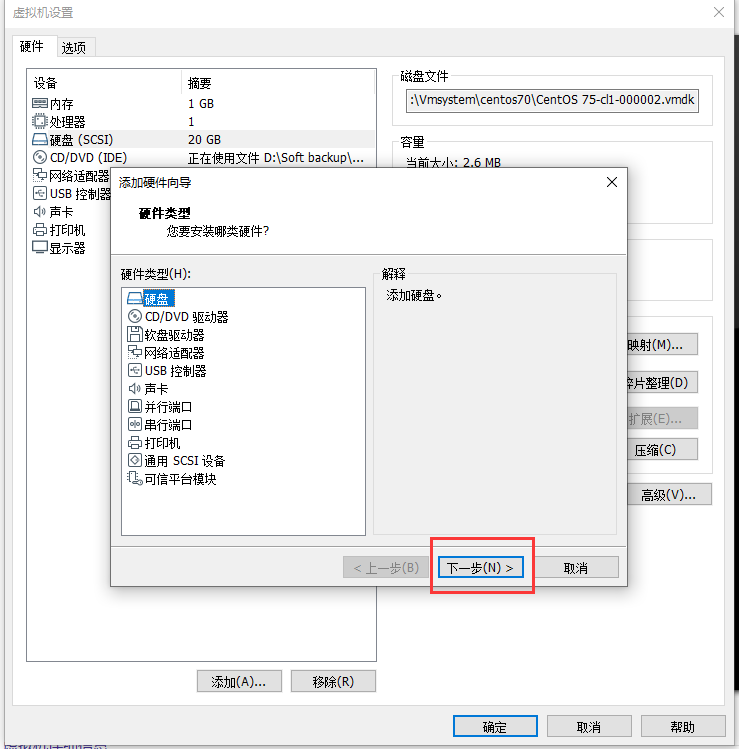
点击上图红色标记,会出现下图,如下

继续点击下一步,
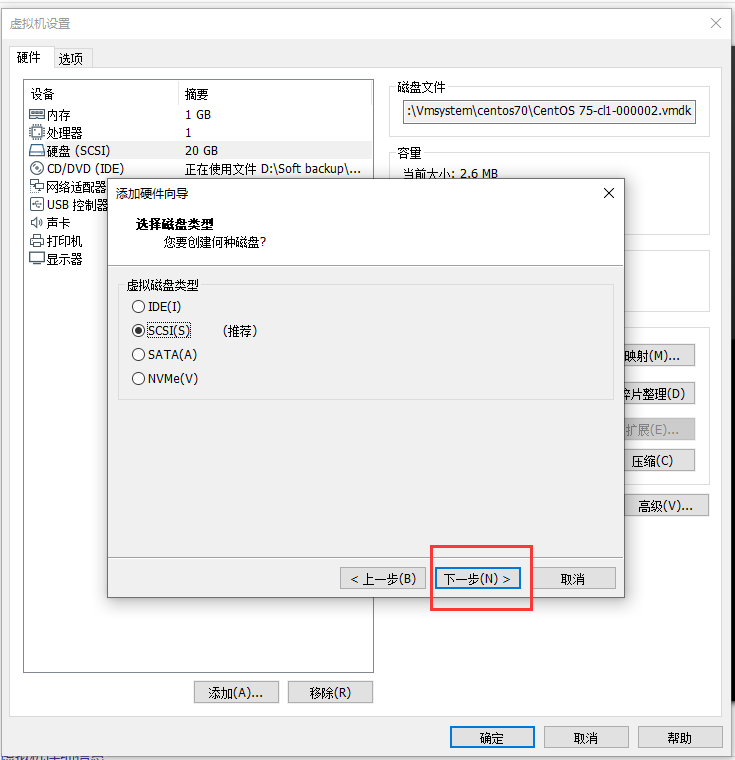
按照上图所示,继续点击下一步,会出现如下图
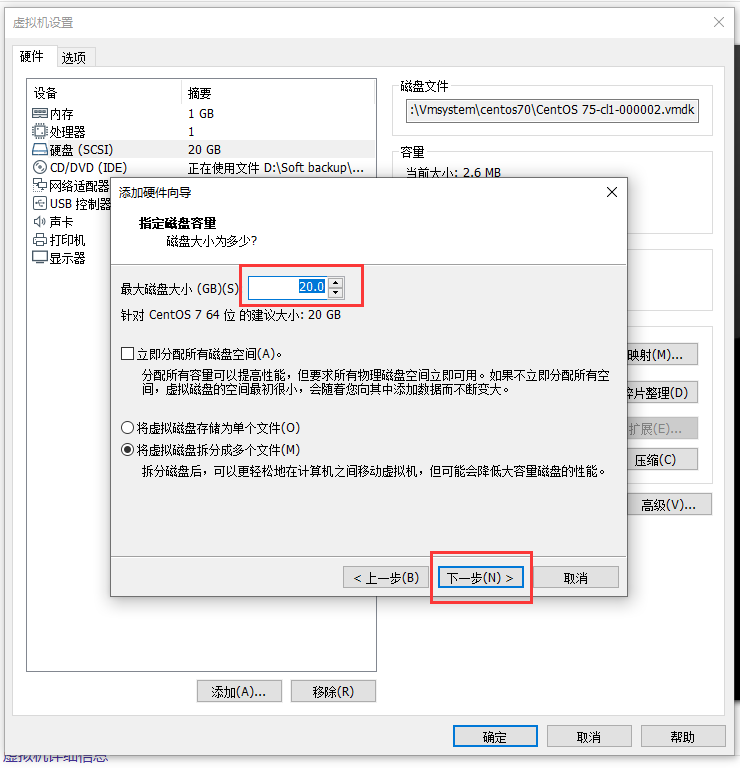
在上图红色标记的地方,选择硬盘的大小,并进行下一步

按照上图所示,点击完成
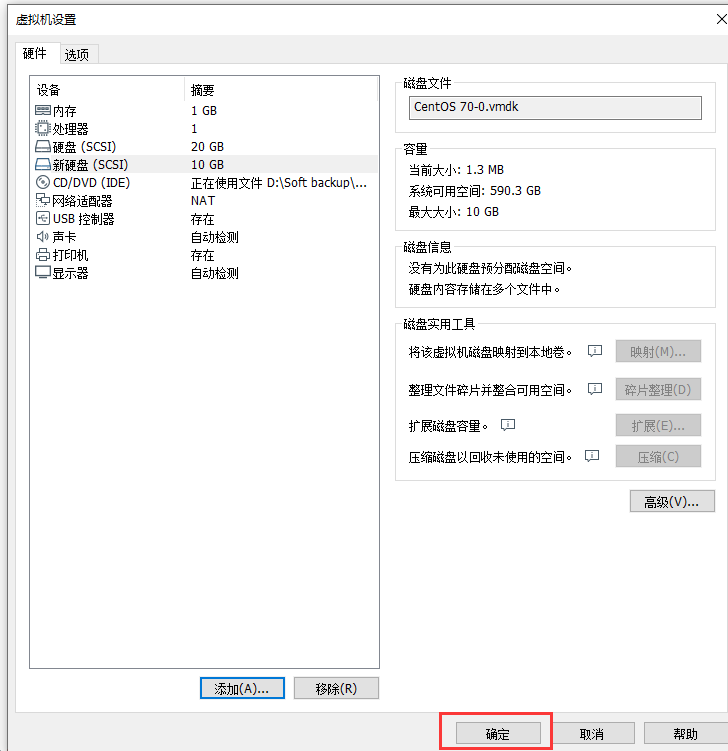
点击确定,硬盘添加完成
打开虚拟机,执行df -h验证磁盘信息,如下
 1 [root@molson ~]#  mkfs.xfs /dev/sdb
 2 meta-data=/dev/sdb               isize=512    agcount=4, agsize=655360 blks
 3          =                       sectsz=512   attr=2, projid32bit=1
 4          =                       crc=1        finobt=0, sparse=0
 5 data     =                       bsize=4096   blocks=2621440, imaxpct=25
 6          =                       sunit=0      swidth=0 blks
 7 naming   =version 2              bsize=4096   ascii-ci=0 ftype=1
 8 log      =internal log           bsize=4096   blocks=2560, version=2
 9          =                       sectsz=512   sunit=0 blks, lazy-count=1
10 realtime =none                   extsz=4096   blocks=0, rtextents=0
11 [root@molson ~]# blkid
12 /dev/sda1: UUID="edbdd70a-2ad0-4c06-b9fc-85feced3fe85" TYPE="xfs"
13 /dev/sda2: UUID="db1d012f-3a61-4f57-8661-9bd5064b2681" TYPE="swap"
14 /dev/sda3: UUID="fdfb2e53-958e-49ef-ba4d-dfd68efd0ad6" TYPE="xfs"
15 /dev/sr0: UUID="2016-12-05-13-55-45-00" LABEL="CentOS 7 x86_64" TYPE="iso9660" PTTYPE="dos"
16 /dev/sdb: UUID="3ba7b93d-3ea0-4c60-a041-d79c62ee26a2" TYPE="xfs"
开始挂载,把硬盘相关信息,写入到/etc/profile文件中,如下图
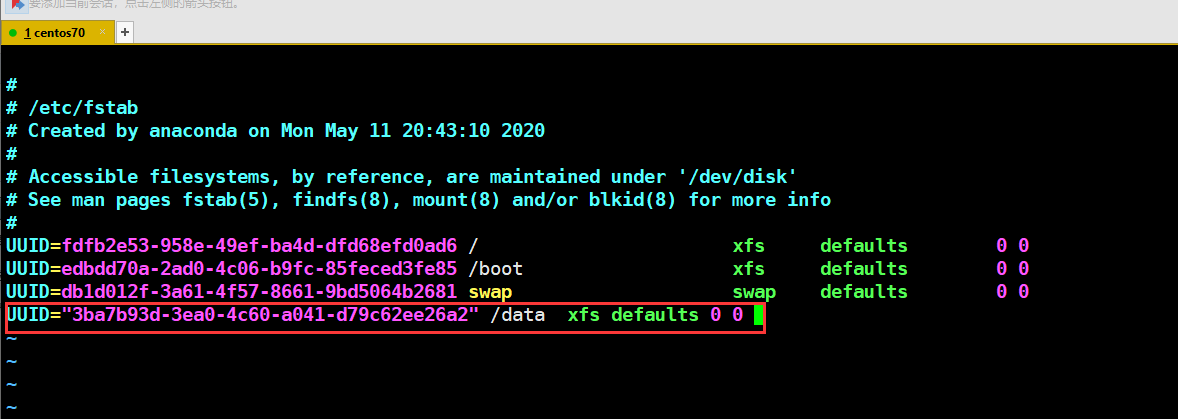
执行如下信息,使挂载信息生效,并验证,如下
 1 [root@molson ~]# mkdir /data/mysql -pv
 2 [root@molson ~]# mount -a
 3 [root@molson ~]# df -h
 4 文件系统        容量  已用  可用 已用% 挂载点
 5 /dev/sda3        14G  4.2G  9.8G   30% /
 6 devtmpfs        479M     0  479M    0% /dev
 7 tmpfs           489M     0  489M    0% /dev/shm
 8 tmpfs           489M  6.7M  482M    2% /run
 9 tmpfs           489M     0  489M    0% /sys/fs/cgroup
10 /dev/sda1       4.0G  131M  3.9G    4% /boot
11 tmpfs            98M     0   98M    0% /run/user/0
12 /dev/sdb         10G   33M   10G    1% /data
6)添加Mysql的配置文件,配置文件的信息如下
[root@molson etc]# cat my.cnf
[mysqld]
user=mysql
basedir=/apps/mysql
datadir=/data/mysql
socket=/tmp/mysql.sock
server_id=6
port=3306
[mysql]
socket=/tmp/mysql.sock
6)添加systemctl启动的配置文件信息,如下
 1 [root@molson system]# pwd
 2 /usr/lib/systemd/system
 3 [root@molson system]# cat mysql.service
 4 [Unit]
 5 Description=MySQL Server
 6 Documentation=man:mysqld(8)
 7 Documentation=http://dev.mysql.com/doc/refman/en/using-systemd.html
 8 After=network.target
 9 After=syslog.target
10 [Install]
11 WantedBy=multi-user.target
12 [Service]
13 User=mysql
14 Group=mysql
15 ExecStart=/apps/mysql/bin/mysqld --defaults-file=/etc/my.cnf
16 LimitNOFILE = 5000
17 [root@molson system]#
7)相关目录对mysql用户进行授权,如下
1 [root@molson ~]# chown -R mysql.mysql /apps/mysql/*
2 [root@molson ~]# chown -R mysql.mysql /data/mysql
8)数据库进行初始化,如下
1 [root@molson ~]# mysqld --initialize --user=mysql --basedir=/apps/mysql --datadir=/data/mysql
2 mysqld: error while loading shared libraries: libaio.so.1: cannot open shared object file: No such file or directory
注意:执行上述明明,报错,是因为缺少了一个库没有安装的,直接执行yum install -y libaio-devel 就可以安装,如下
1 [root@molson ~]# yum install -y libaio-devel
再一次初始化数据库,如下
1 [root@molson mysql]#  mysqld --initialize-insecure --user=mysql --basedir=/apps/mysql --datadir=/data/mysql
2 2020-10-01T11:07:05.093173Z 0 [Warning] TIMESTAMP with implicit DEFAULT value is deprecated. Please use --explicit_defaults_for_timestamp server option (see documentation for more details).
3 2020-10-01T11:07:06.553509Z 0 [Warning] InnoDB: New log files created, LSN=45790
4 2020-10-01T11:07:06.633960Z 0 [Warning] InnoDB: Creating foreign key constraint system tables.
5 2020-10-01T11:07:06.735867Z 0 [Warning] No existing UUID has been found, so we assume that this is the first time that this server has been started. Generating a new UUID: 3e427157-03d6-11eb-b605-000c296a99b4.
6 2020-10-01T11:07:06.736490Z 0 [Warning] Gtid table is not ready to be used. Table 'mysql.gtid_executed' cannot be opened.
7 2020-10-01T11:07:07.332095Z 0 [Warning] CA certificate ca.pem is self signed.
8 2020-10-01T11:07:07.598169Z 1 [Warning] root@localhost is created with an empty password ! Please consider switching off the --initialize-insecure option.
像上述一样,执行完成没有ERR,说明安装成功。
9)启动并设置开机启动数据库,并验证,如下
 1 [root@molson ~]# systemctl start mysql
 2 [root@molson ~]# systemctl enable mysql
 3 Created symlink from /etc/systemd/system/multi-user.target.wants/mysql.service to /usr/lib/systemd/system/mysql.service.
 4 [root@molson ~]# ss -ntl
 5 State       Recv-Q Send-Q                     Local Address:Port                                    Peer Address:Port
 6 LISTEN      0      128                                    *:22                                                 *:*
 7 LISTEN      0      80                                    :::3306                                              :::*
 8 LISTEN      0      128                                   :::22                                                :::*
 9 [root@molson ~]# ps -ef | grep mysql
10 mysql      2096      1 10 19:00 ?        00:00:01 /apps/mysql/bin/mysqld --defaults-file=/etc/my.cnf
11 root       2157   1476  0 19:01 pts/0    00:00:00 grep --color=auto mysql
12 [root@molson ~]#
综上所述,数据库安装成功

 浙公网安备 33010602011771号