Centos7系统中安装Nginx服务
1:最近在弄Tomcat常见部署方式的时候,发现Centos7无法使用Yum安装nginx,后面发现是Centos7中无Nginx的源,以下为安装过程
一:添加Nginx源
[root@molson ~]# rpm -Uvh http://nginx.org/packages/centos/7/noarch/RPMS/nginx-release-centos-7-0.el7.ngx.noarch.rpm
二:安装nginx服务
[root@molson ~]# yum install nginx -y
三:启动nginx服务
systemctl start nginx
四:关闭防火墙,如果防火墙没关闭的话,无法打开网页访问Nginx服务
1 #关闭防火墙
2 systemctl stop firewalld
3
4 #同时设置开机禁用防火墙
5 systemctl disable firewalld
五:验证是否安装成功
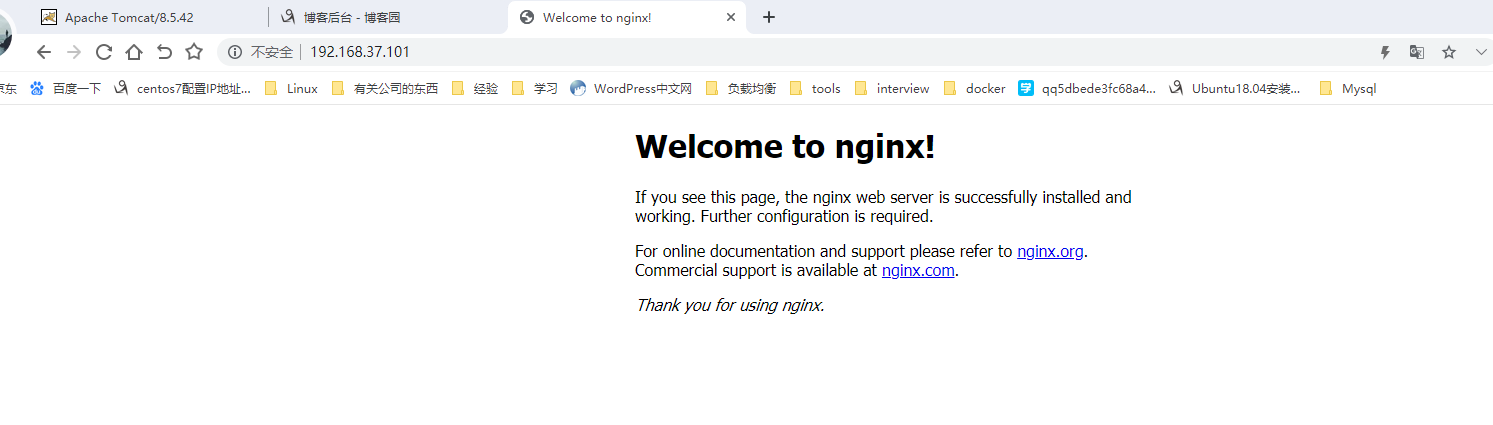
如果出现如上图的界面,说明Nginx服务安装成功
2:源码安装nginx
一:准备编译环境并下载相关依赖包,如下
[root@molson ~]# yum install -y vim lrzsz tree screen psmisc lsof tcpdump wget  ntpdategcc gcc-c++ glibc glibc-devel pcre pcre-devel openssl  openssl-devel systemd-develnet-tools iotop bc  zip unzip zlib-devel bash-completion nfs-utils automake libxml2libxml2-devel libxslt libxslt-devel perl perl-ExtUtils-Embed


gcc为GNU Compiler Collection的缩写,可以编译C和C++源代码等,它是GNU开发的C和C++以及其他很多种语言的编译器(最早的时候只能编译C,后来很快进化成一个编译多种语言的集合,如Fortran、Pascal、Objective-C、Java、Ada、 Go等。)

gcc 在编译C++源代码的阶段,只能编译 C++ 源文件,而不能自动和 C++ 程序使用的库链接(编译过程分为编译、链接两个阶段,注意不要和可执行文件这个概念搞混,相对可执行文件来说有三个重要的概念:编译(compile)、链接(link)、加载(load)。源程序文件被编译成目标文件,多个目标文件连同库被链接成一个最终的可执行文件,可执行文件被加载到内存中运行)。因此,通常使用 g++ 命令来完成 C++ 程序的编译和连接,该程序会自动调用 gcc 实现编译。
gcc-c++也能编译C源代码,只不过把会把它当成C++源代码,后缀为.c的,gcc把它当作是C程序,而g++当作是c++程序;后缀为.cpp的,两者都会认为是c++程序,注意,虽然c++是c的超集,但是两者对语法的要求是有区别的。
automake是一个从Makefile.am文件自动生成Makefile.in的工具。为了生成Makefile.in,automake还需用到perl,由于automake创建的发布完全遵循GNU标准,所以在创建中不需要perl。libtool是一款方便生成各种程序库的工具。
 pcre pcre-devel:在Nginx编译需要 PCRE(Perl Compatible Regular Expression),因为Nginx的Rewrite模块和HTTP 核心模块会使用到PCRE正则表达式语法。    zlip zlib-devel:nginx启用压缩功能的时候,需要此模块的支持。
openssl openssl-devel:开启SSL的时候需要此模块的支持。
二:上传源码包并解压编译,如下
[root@molson src]# tar xvf nginx -1.14.2
[root@molson nginx-1.14.2]#./configure --prefix=/apps/nginx \--user=nginx  \--group=nginx \--with-http_ssl_module \--with-http_v2_module \--with-http_realip_module \--with-http_stub_status_module  \--with-http_gzip_static_module \--with-pcre \--with-stream \--with-stream_ssl_module \--with-stream_realip_module
[root@molson nginx-1.14.2]# make && make install

#创建nginx用户
[root@molson nginx-1.14.2]# useradd  nginx -s  /sbin/nologin  -u 2000
#对Nginx用户进行授权
[root@molson nginx-1.14.2]# chown nginx.nginx -R /apps/nginx
三:启动nginx并验证,如下
[root@molson nginx-1.14.2]# /apps/nginx/sbin/nginx
[root@molson ~]# /apps/nginx/sbin/nginx -v
nginx version: nginx/1.14.2
通过上图可知,源码安装成功
四:创建nginx启动脚本并启动,如下
[root@molson ~]# vim  /usr/lib/systemd/system/nginx.service

[Unit]
Description=nginx - high performance web server
Documentation=http://nginx.org/en/docs/
After=network-online.target remote-fs.target nss-lookup.target
Wants=network-online.target

[Service]
Type=forking
PIDFile=/apps/nginx/logs/nginx.pid
ExecStart=/apps/nginx/sbin/nginx -c /apps/nginx/conf/nginx.conf
ExecReload=/bin/kill -s HUP $MAINPID
ExecStop=/bin/kill -s TERM $MAINPID

[Install]
WantedBy=multi-user.target
脚本启动nginx服务
[root@molson system]# systemctl start nginx

 浙公网安备 33010602011771号