校园论坛的搭建(关联闭社、抒发森林、comin、mastodon)
更新
这篇搭建太过早了,可以看看新的,然后域名可以提前发闭社的主页那个邮箱申请一个,就不用自己注册啦
如何部署站点:https://telegra.ph/从源码以白名单模式部署Mastodon-4x站点-03-14
前言
在看完前两篇博客之后,我们就可以开始实操阶段了,我采用尽量简单的方式进行搭建
博客虽然长,但操作其实并不多,我把每一步过程都详细写出来了
搭建校园论坛之前所需了解的(关联闭社、抒发森林、comin、mastodon)
校园论坛服务器的选购(关联闭社、抒发森林、comin、mastodon)
搭建所需
一个公网ip的服务器,能使用80端口,且能通过测试:Ping.cn:网站测速-ping检测-dns查询-ipv6网站测试-路由跟踪查询-站长工具
网络、linux,docker相关基础知识
一个测试用的域名(后续会分配closed.social结尾的域名
docker安装
apt-get update
如果这步失败了的话,换源,先把源配置文件备份下
cd /etc/apt/
mv sources.list sources.list.bak
nano sources.list
换成国内源,把以下内容黏贴进去
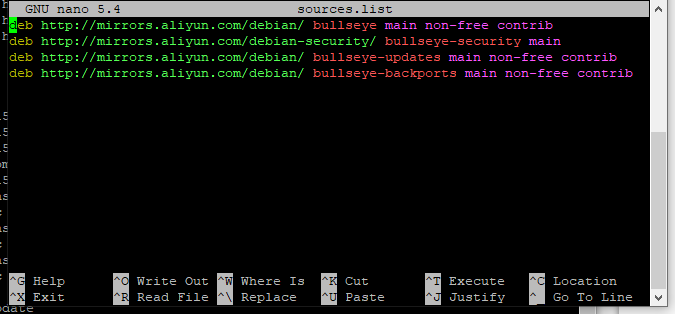
deb http://mirrors.aliyun.com/debian/ bullseye main non-free contrib
deb http://mirrors.aliyun.com/debian-security/ bullseye-security main
deb http://mirrors.aliyun.com/debian/ bullseye-updates main non-free contrib
deb http://mirrors.aliyun.com/debian/ bullseye-backports main non-free contrib
然后ctrl+x y 回车保存
再update一次,然后安装docker
curl -sSL https://get.daocloud.io/docker | sh
# 如果上面这句报错的话,用下面这句
curl -sSL https://get.docker.com/ | sh
耐心等待,然后安装docker-compose
curl -L https://get.daocloud.io/docker/compose/releases/download/v2.4.1/docker-compose-`uname -s`-`uname -m` > /usr/local/bin/docker-compose
chmod +x /usr/local/bin/docker-compose
ln -s /usr/local/bin/docker-compose /usr/bin/docker-compose
docker-compose --version
最后用docker-compose --version验证一下是否安装成功
下载mastodon
根据官方文档:https://gist.github.com/TrillCyborg/84939cd4013ace9960031b803a0590c4
cd ~
# Clone mastodon to ~/live directory
git clone https://github.com/tootsuite/mastodon.git live
# Change directory to ~/live
cd ~/live
# Checkout to the latest stable branch
git checkout $(git tag -l | grep -v 'rc[0-9]*$' | sort -V | tail -n 1)
这里可以看到一个样本文件
cp .env.production.sample .env.production
在该目录下赋予public目录权限
chown -R 991:991 public
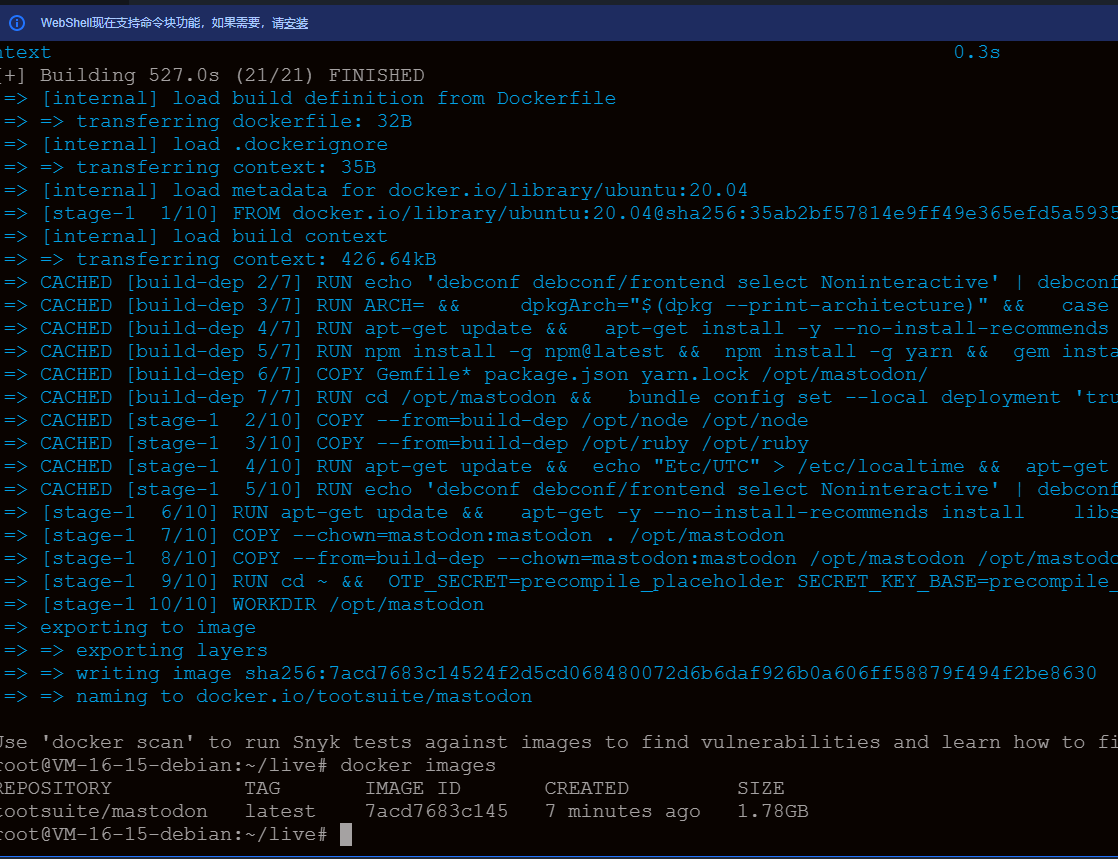
构建这个docker,需要等待一段时间,十多分钟就行
docker-compose build
最后使用docker images查看一下生成的镜像
配置mastodon
在开始配置前,你要先注册一个邮箱,国内外均可,要能在设置里开启SMTP服务,它将作为发送验证邮件的发件人
我在这里使用的是126邮箱为例(一天发了百来封邮件没被风控
使用命令:
docker-compose run --rm web bundle exec rake mastodon:setup
然后会出现以下内容,中文部分要注意
root@VM-16-15-debian:~/live# docker-compose run --rm web bundle exec rake mastodon:setup
[+] Running 15/15
 ⠿ redis Pulled                                                                                            16.9s
   ⠿ 213ec9aee27d Pull complete                                                                             9.0s
   ⠿ c99be1b28c7f Pull complete                                                                             9.1s
   ⠿ 8ff0bb7e55e3 Pull complete                                                                             9.5s
   ⠿ 477c33011f3e Pull complete                                                                             9.8s
   ⠿ 2bbc51a93257 Pull complete                                                                             9.9s
   ⠿ 2d27eae19281 Pull complete                                                                            10.0s
 ⠿ db Pulled                                                                                               34.1s
   ⠿ 85c3ef7cf9a6 Pull complete                                                                             6.6s
   ⠿ ac29cc04759a Pull complete                                                                             8.4s
   ⠿ 2a37e244d86b Pull complete                                                                            24.4s
   ⠿ 36d7202aa1cf Pull complete                                                                            24.5s
   ⠿ 3acdddb9790a Pull complete                                                                            24.6s
   ⠿ 9a938759f2bf Pull complete                                                                            24.7s
   ⠿ 5d65a6241248 Pull complete                                                                            24.8s
[+] Running 4/4
 ⠿ Network live_internal_network  Created                                                                   0.1s
 ⠿ Network live_external_network  Created                                                                   0.1s
 ⠿ Container live-redis-1         Created                                                                   0.4s
 ⠿ Container live-db-1            Created                                                                   0.4s
[+] Running 2/2
 ⠿ Container live-db-1     Started                                                                          1.1s
 ⠿ Container live-redis-1  Started                                                                          1.1s
Your instance is identified by its domain name. Changing it afterward will break things.
Domain name: 这里填上你的域名

Single user mode disables registrations and redirects the landing page to your public profile.
Do you want to enable single user mode? No

Are you using Docker to run Mastodon? Yes

PostgreSQL host: db
PostgreSQL port: 5432
Name of PostgreSQL database: postgres
Name of PostgreSQL user: postgres
Password of PostgreSQL user: (这里按回车就行)
Database configuration works! 🎆

Redis host: redis
Redis port: 6379
Redis password: (这里按回车就行)
Redis configuration works! 🎆

Do you want to store uploaded files on the cloud? No

Do you want to send e-mails from localhost? No
SMTP server: smtp.126.com(看你邮箱怎么配)
SMTP port: 25(我这里用的是非SSL的)
SMTP username: (你的邮箱)
SMTP password: (授权码,不是密码)
SMTP authentication: plain
SMTP OpenSSL verify mode: none
(这里如果还有让你选择STARTTL,选none)
E-mail address to send e-mails "from": (你的邮箱)
Send a test e-mail with this configuration right now? Yes
Send test e-mail to: (你的测试邮箱)

This configuration will be written to .env.production
Save configuration? Yes
Below is your configuration, save it to an .env.production file outside Docker:
(标记1)
# Generated with mastodon:setup on 2022-09-08 05:30:02 UTC

LOCAL_DOMAIN=mokou.
SINGLE_USER_MODE=false
SECRET_KEY_BASE=
OTP_SECRET=
VAPID_PRIVATE_KEY=
VAPID_PUBLIC_KEY=
DB_HOST=db
DB_PORT=5432
DB_NAME=postgres
DB_USER=postgres
DB_PASS=
REDIS_HOST=redis
REDIS_PORT=6379
REDIS_PASSWORD=
SMTP_SERVER=smtp.126.com
SMTP_PORT=25
SMTP_LOGIN=
SMTP_PASSWORD=
SMTP_AUTH_METHOD=plain
SMTP_OPENSSL_VERIFY_MODE=none
SMTP_FROM_ADDRESS=
(标记2)
It is also saved within this container so you can proceed with this wizard.

Now that configuration is saved, the database schema must be loaded.
If the database already exists, this will erase its contents.
(这里先别急着按回车,再开一个SSH连接,把标记1到2的内容复制下来放到.env.production文件中)
(在终端里先rm -f .env.production)
(再nano .env.production)
(做好这一切后,再回到配置mastodon里面,输入下面的Yes)
Prepare the database now? Yes
Running `RAILS_ENV=production rails db:setup` ...


Database 'postgres' already exists
Done!

All done! You can now power on the Mastodon server 🐘

Do you want to create an admin user straight away? Yes
Username: admin
E-mail: (你的邮箱,不要和上面那个邮箱一样!!!)
Error connecting to Redis on 127.0.0.1:6379 (Errno::ECONNREFUSED)
Error connecting to Redis on 127.0.0.1:6379 (Errno::ECONNREFUSED)
Switching object-storage-safely from green to red because Redis::CannotConnectError Error connecting to Redis on 127.0.0.1:6379 (Errno::ECONNREFUSED)
Error connecting to Redis on 127.0.0.1:6379 (Errno::ECONNREFUSED)
You can login with the password: (这里有个密码必须记住!!!!!!第一次用admin登录用这个密码!!!)
You can change your password once you login.
root@VM-16-15-debian:~/live#
现在完全配置好了,把.env.production文件删除,然后把上面标记1到标记2的内容
启动docker
docker-compose up -d
宝塔安装
宝塔的作用是让我们可以方便查看机器的性能监考
首先进入宝塔官网,下载新版本的宝塔:https://www.bt.cn/new/download.html
我用的是Debian版本的,根据不同需求进行更改
wget -O install.sh http://download.bt.cn/install/install-ubuntu_6.0.sh && bash install.sh ed8484bec
因为新版要手机认证以及注册账号,我不是很想暴露自己,所以现在要降级
降级版本有7.4.5,7.4.7,7.4.8,7.5.2,7.5.1,7.6.0可选,降级失败了在命令行输入bt,选择修复
wget http://xiutu.us/bt/LinuxPanel-7.6.0.zip
unzip LinuxPanel-7.6.0.zip
cd panel
bash update.sh
cd .. && rm -f LinuxPanel-7.6.0.zip && rm -rf panel
echo "{\"uid\":1000,\"username\":\"admin\",\"serverid\":1}" > /www/server/panel/data/userInfo.json
shell输入bt,进入14查看端口和账号密码
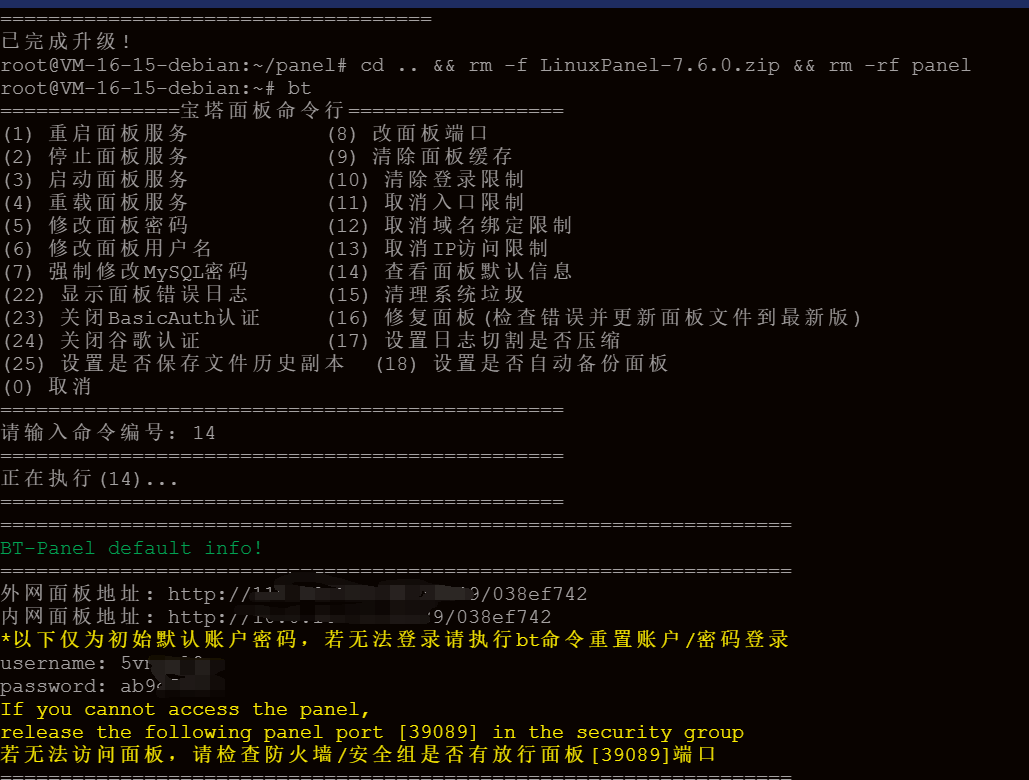
看看能不能进,能进的话取消手机号绑定
进入后开始安装基础网络环境

到这里宝塔已经安装差不多了
申请SSL证书
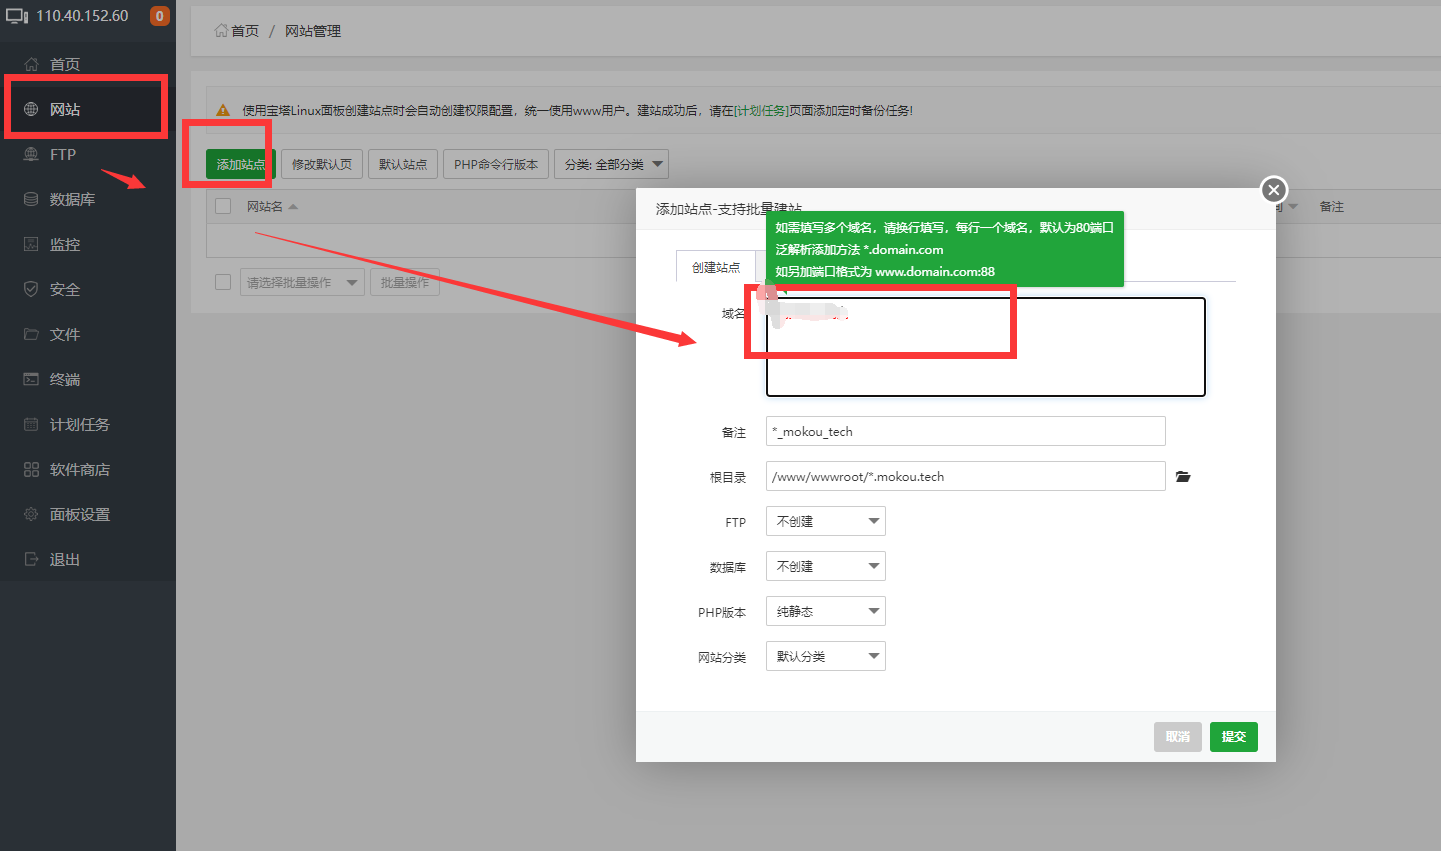
进入宝塔,先创建一个站点,你可以先用自己的域名进行测试,然后再向thu站长申请子域名(以closed.social结尾)
直接在宝塔后台就可以一键申请免费SSL证书,还可以自动续签
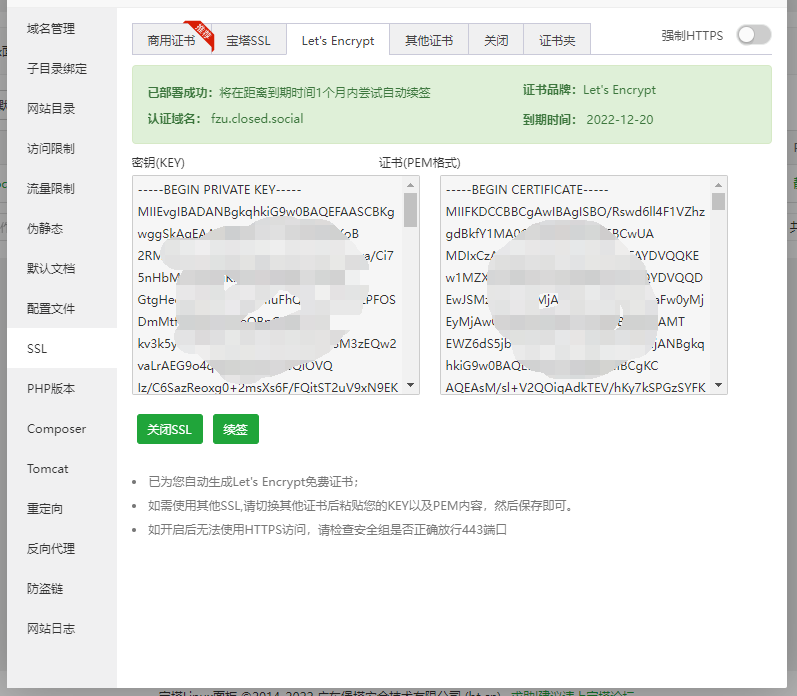
将key和pem的所有内容拷贝下来,放到任意目录下
比如我在/home/www/目录下
nano key.key
# 把上面左边那个框的内容放进来,保存退出
nano pem.pem
# 把上面右边那个框的内容放进来,保存退出
配置反向代理
然后开始配置反向代理,把“配置文件”原来的清空,然后将以下内容放到宝塔这个网站的“配置文件”里面,根据括号内修改
map $http_upgrade $connection_upgrade {
  default upgrade;
  ''      close;
}

upstream backend {
    server 127.0.0.1:3000 fail_timeout=0;
}

upstream streaming {
    server 127.0.0.1:4000 fail_timeout=0;
}

proxy_cache_path /var/cache/nginx levels=1:2 keys_zone=CACHE:10m inactive=7d max_size=1g;

server {
  listen 80;
  listen [::]:80;
  server_name fzu.closed.social(根据你的域名,要和你在.env.production里面的域名一样);
  root /root/live/public(根据你自己的public目录位置);
  location /.well-known/acme-challenge/ { allow all; }
  location / { return 301 https://$host$request_uri; }
}

server {
  listen 443 ssl http2;
  listen [::]:443 ssl http2;
  server_name fzu.closed.social(根据你的域名,要和你在.env.production里面的域名一样);

  ssl_protocols TLSv1.2 TLSv1.3;
  ssl_ciphers HIGH:!MEDIUM:!LOW:!aNULL:!NULL:!SHA;
  ssl_prefer_server_ciphers on;
  ssl_session_cache shared:SSL:10m;
  ssl_session_tickets off;

  # Uncomment these lines once you acquire a certificate:
  ssl_certificate     /home/www/pem.pem(上一步保存的SSL_pem文件);
  ssl_certificate_key /home/www/key.key(上一步保存的SSL_key文件);

  keepalive_timeout    70;
  sendfile             on;
  client_max_body_size 80m;

  root /root/live/public(根据你自己的public目录位置);

  gzip on;
  gzip_disable "msie6";
  gzip_vary on;
  gzip_proxied any;
  gzip_comp_level 6;
  gzip_buffers 16 8k;
  gzip_http_version 1.1;
  gzip_types text/plain text/css application/json application/javascript text/xml application/xml application/xml+rss text/javascript image/svg+xml image/x-icon;

  add_header Strict-Transport-Security "max-age=31536000" always;

  location / {
    try_files $uri @proxy;
  }

  location ~ ^/(emoji|packs|system/accounts/avatars|system/media_attachments/files) {
    add_header Cache-Control "public, max-age=31536000, immutable";
    add_header Strict-Transport-Security "max-age=31536000" always;
    try_files $uri @proxy;
  }

  location /sw.js {
    add_header Cache-Control "public, max-age=0";
    add_header Strict-Transport-Security "max-age=31536000" always;
    try_files $uri @proxy;
  }

  location @proxy {
    proxy_set_header Host $host;
    proxy_set_header X-Real-IP $remote_addr;
    proxy_set_header X-Forwarded-For $proxy_add_x_forwarded_for;
    proxy_set_header X-Forwarded-Proto $scheme;
    proxy_set_header Proxy "";
    proxy_pass_header Server;

    proxy_pass http://backend;
    proxy_buffering on;
    proxy_redirect off;
    proxy_http_version 1.1;
    proxy_set_header Upgrade $http_upgrade;
    proxy_set_header Connection $connection_upgrade;

    proxy_cache CACHE;
    proxy_cache_valid 200 7d;
    proxy_cache_valid 410 24h;
    proxy_cache_use_stale error timeout updating http_500 http_502 http_503 http_504;
    add_header X-Cached $upstream_cache_status;
    add_header Strict-Transport-Security "max-age=31536000" always;

    tcp_nodelay on;
  }

  location /api/v1/streaming {
    proxy_set_header Host $host;
    proxy_set_header X-Real-IP $remote_addr;
    proxy_set_header X-Forwarded-For $proxy_add_x_forwarded_for;
    proxy_set_header X-Forwarded-Proto $scheme;
    proxy_set_header Proxy "";

    proxy_pass http://streaming;
    proxy_buffering off;
    proxy_redirect off;
    proxy_http_version 1.1;
    proxy_set_header Upgrade $http_upgrade;
    proxy_set_header Connection $connection_upgrade;

    tcp_nodelay on;
  }

  error_page 500 501 502 503 504 /500.html;
}
改后的结果,如果没法保存,请检查这两步漏了什么
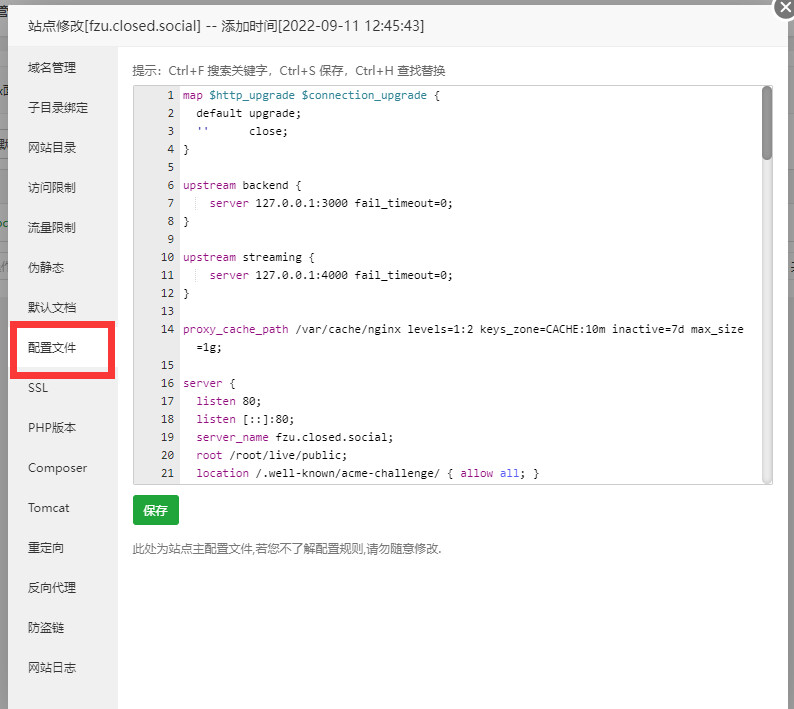
现在就可以通过网页访问了
限制本校邮箱注册
先在目录下关闭docker
docker-compose down
在目录下
nano .env.production
在文件内添加一行,根据你的学校进行修改
EMAIL_DOMAIN_ALLOWLIST=fzu.edu.cn
在目录下运行
docker-compose up -d
测试一下是否只能使用校园邮箱注册
切换白名单模式
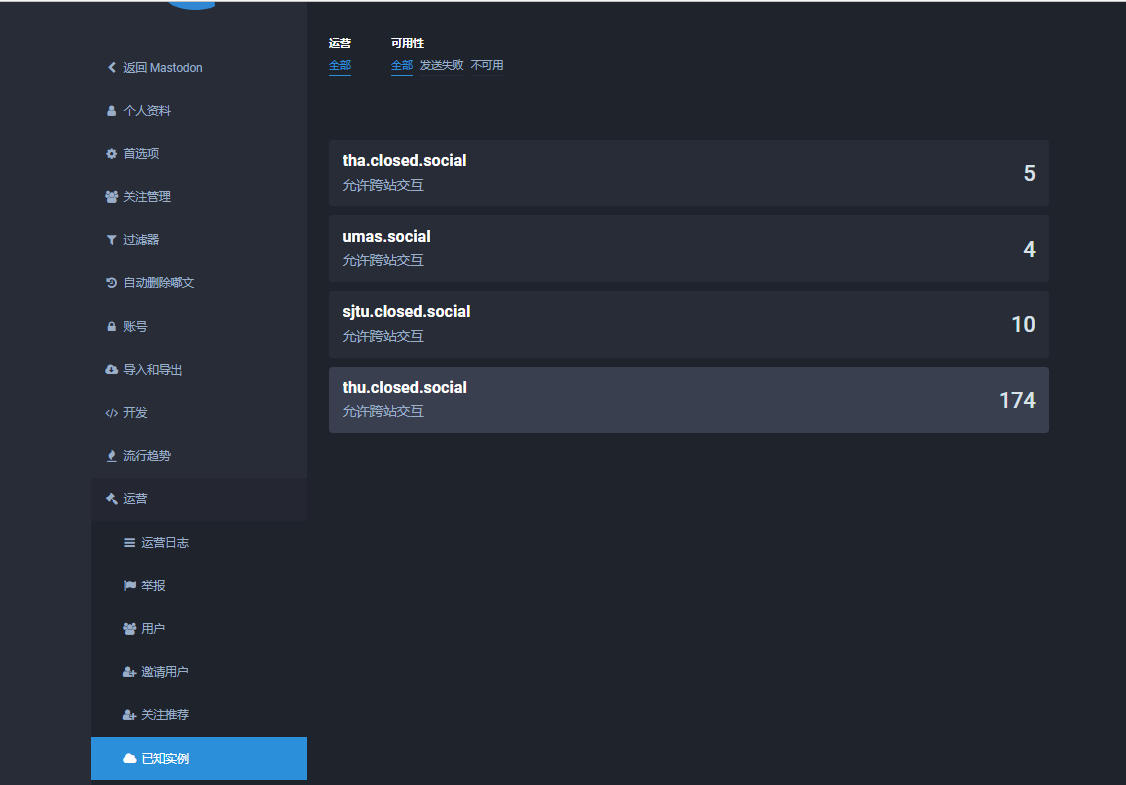
搭建好了后,mastodon默认使用的是黑名单模式,可以屏蔽几个域名的用户
白名单模式的意思是,只有这几个域名的服务器才可以互相交流访问,这就是高校网络的基础
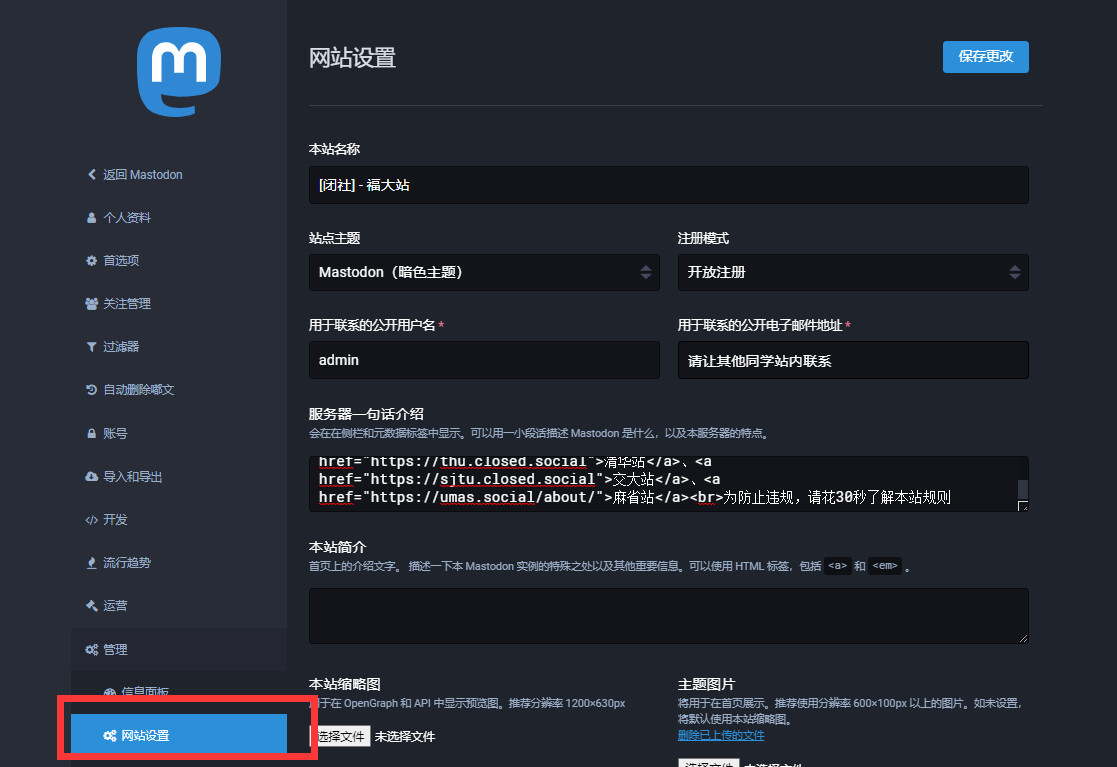
先在后台写好所有的内容,确认没问题后再开启白名单模式
因为切换白名单模式后,网页后台就无法直接修改/about页面,所以还是先改好了,再切白名单模式
切换白名单模式之前,先把docker内的文件拷贝出来,cp后面跟着的是docker的容器id
docker ps
# 查看名字为web的容器ID是什么
docker cp 03526798b324:/opt/mastodon/app/controllers/ /root/mastodon/controllers/
# 这句话的意思是,将03526798b324的容器内的/opt/mastodon/app/controllers/复制到主机的/root/mastodon/controllers/
去目录下确认一下文件在不在
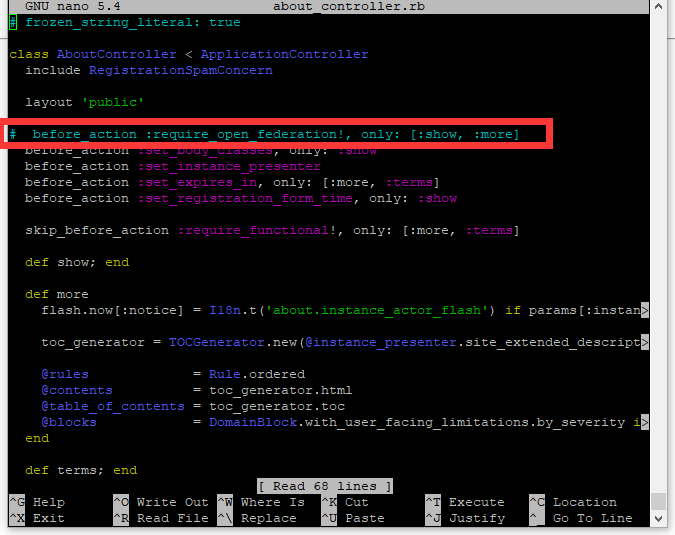
然后修改其中的两个文件
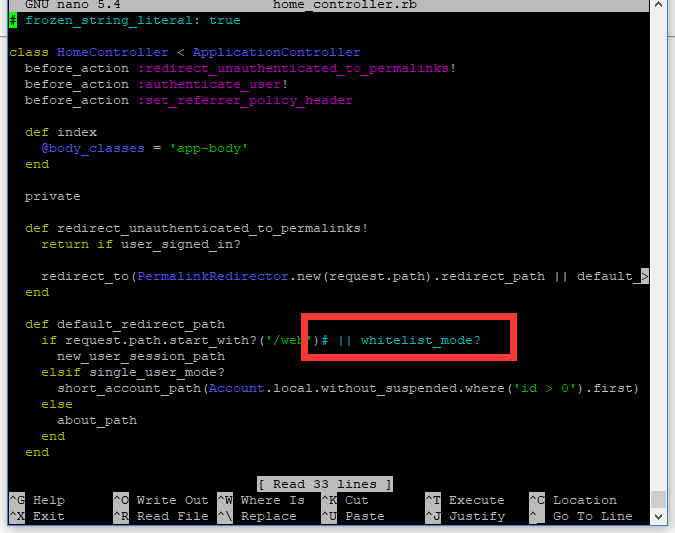
nano about_controller.rb
nano home_controller.rb
注释该行
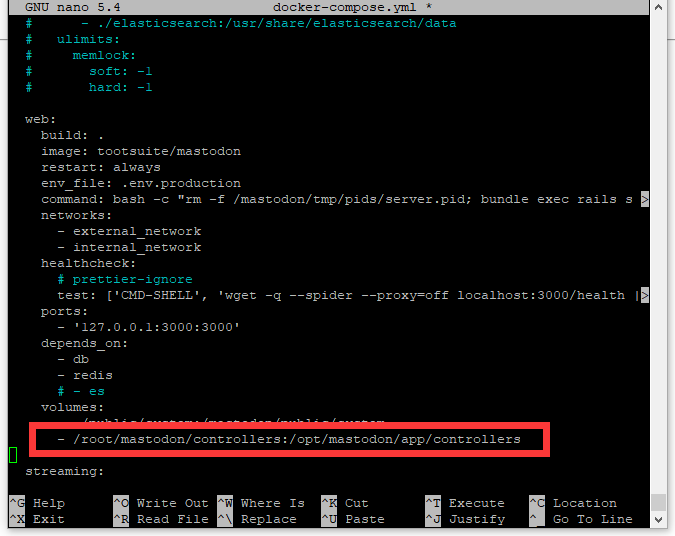
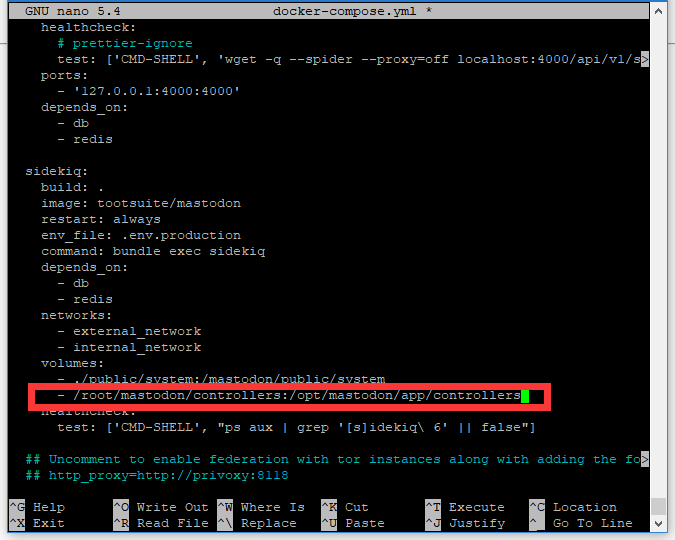
回到live目录,先关闭docker,编辑docker-compose.yml文件
docker-compose down
nano docker-compose.yml
在web和sidekiq的volume中添加刚才映射出来的目录,容器内外两者内容一样就行
保存退出后,再修改一次环境
nano .env.production
加入一行
LIMITED_FEDERATION_MODE=true
现在的环境文件如下

保存退出后,就可以直接运行了
docker-compose up -d
好了,现在就可以在后台添加其他学校的域名了

 浙公网安备 33010602011771号