Nginx 搭建与部署
Nginx特点
1.高性能
2.高并发
3.轻量
4.可扩展性
5.高可靠性
6.支持热部署
7.nginx使用epoll网络模型
8.nginx功能全面
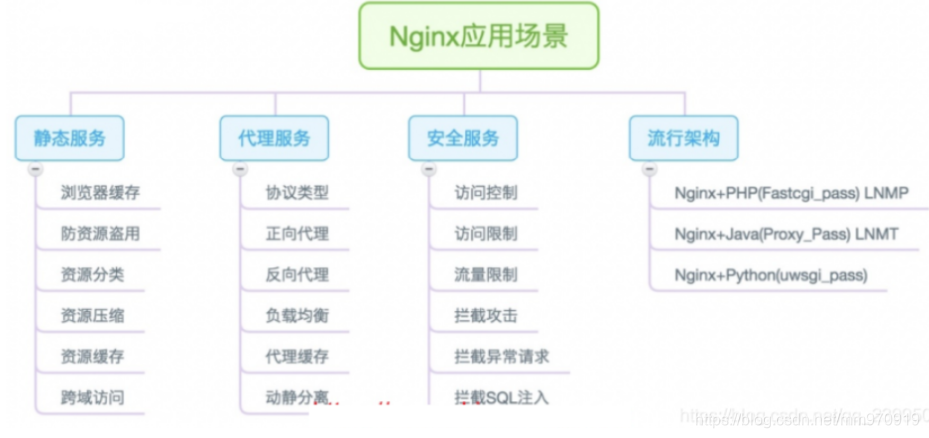
nginx使用场景
Nginx安装 —重要
## 1.安装方式

1.epol源安装
2.官方源安装
3.源码包安装
eool装
1.epol源安装
[root@web03 ~]# yum install -y nginx
### 查看nginx   nginx -t

## 站点目录  /usr/share/nginx/html/index.html
## 配置文件  /etc/nginx/nginx.conf

启动nginx
systemctl start nginx
官方源安装
![[外链图片转存失败,源站可能有防盗链机制,建议将图片保存下来直接上传(img-grj82EPm-1617078604397)(C:\Users\17155\Desktop\下载图片\1617071524370.png)]](https://img-blog.csdnimg.cn/20210330123122477.png?x-oss-process=image/watermark,type_ZmFuZ3poZW5naGVpdGk,shadow_10,text_aHR0cHM6Ly9ibG9nLmNzZG4ubmV0L21tOTcwOTE5,size_16,color_FFFFFF,t_70)
1、配置官方源
[root@web01 ~]# vim /etc/yum.repos.d/nginx.repo
[nginx-stable]
name=nginx stable repo
baseurl=http://nginx.org/packages/centos/7/$basearch/
gpgcheck=1
enabled=1
gpgkey=https://nginx.org/keys/nginx_signing.key
module_hotfixes=true

2、安装依赖
yum install -y gcc gcc-c++ autoconf pcre pcre-devel make automake wget httpd-tools vim tree
1
3、安装nginx
[root@web01 ~]# yum install -y nginx
1
4、配置nginx
[root@web01 ~]# vim /etc/nginx/nginx.conf
user  www;
H1名字修改
## 站点目录  /usr/share/nginx/html/index.html

名字修改:h1>Welcome to linux 12 MM!</h1>
![[外链图片转存失败,源站可能有防盗链机制,建议将图片保存下来直接上传(img-8L6EJIgL-1617078604399)(C:\Users\17155\Desktop\下载图片\1617077667912.png)]](https://img-blog.csdnimg.cn/20210330123149932.png?x-oss-process=image/watermark,type_ZmFuZ3poZW5naGVpdGk,shadow_10,text_aHR0cHM6Ly9ibG9nLmNzZG4ubmV0L21tOTcwOTE5,size_16,color_FFFFFF,t_70)
启动服务 --多种
1.方法一:
[root@web01 ~]# systemctl start nginx     ## 查看是否80端口是否占用

2.方法二:
[root@web01 ~]# nginx

6)检查启动
1.方式一
[root@web01 ~]# systemctl status nginx

2.方式二:
[root@web01 ~]# ps -ef | grep nginx

3.方式三:
[root@web01 ~]# netstat -lntp | grep 80

4.方式四:

直接访问网站  http://10.0.0.7/

5.方式五
[root@web01 ~]# curl 10.0.0.7

6.方式六:
[root@web01 ~]# nginx -v

### nginx -V 模板
nginx常用命令
# 1.nginx启动
    方法一:
    [root@web01 ~]# systemctl start nginx
    方法二:
    [root@web01 ~]# nginx

###注意:使用什么方式启动的,就使用对应的方式关闭

# 2.nginx停止
     方法一:
    [root@web01 ~]# systemctl stop nginx
     方法二:
    [root@web01 ~]# nginx -s stop

# 3.nginx重启
     方法一:
	[root@web01 ~]# systemctl restart nginx

# 4.nginx重载,重新加载配置文件
     方法一:
	[root@web01 ~]# systemctl reload nginx
     方法二:
	[root@web01 ~]# nginx -s reload

5.加入开机自启
	[root@web01 ~]# systemctl enable nginx  -- 关闭  disable


#Centos6:
	启动:nginx
		service nginx start
		/etc/init.d/nginx start
	加入开机自启:
		chkconfig nginx on
源码包安装
1、下载安装包
[root@web02 ~]# wget http://nginx.org/download/nginx-1.16.1.tar.gz
1
2、解压到指定目录
[root@web02 ~]# tar xvf nginx-1.16.1.tar.gz -C /opt/
1
3、创建用户
[root@web02 ~]# groupadd www -g 666
[root@web02 ~]# useradd www -u 666 -g 666 -s /sbin/nologin -M
1
2
4、生成
[root@web02 ~]# cd nginx-1.16.1
[root@web02 nginx-1.16.1]# ./configure --prefix=/usr/local/nginx-1.16.1 --user=www --group=www

[root@web02 nginx-1.16.1]# rm -r Makefile (删除这个文件后,在执行下面的命令)

[root@web02 nginx-1.16.1]# ./configure --prefix=/usr/local/nginx-1.16.1 --user=www --group=www --without-http_gzip_module --without-http_rewrite_module

5、编译安装
[root@web02 nginx-1.16.1]# make && make install

6、做软连接
[root@web02 nginx-1.16.1]# ln -s /usr/local/nginx-1.16.1 /usr/local/nginx

7、配置环境变量
[root@web02 ~]# vim /etc/profile.d/nginx.sh
export PATH=$PATH:/usr/local/nginx/sbin

[root@web02 ~]# source /etc/profile

8、启动nginx

#启动时没有办法使用system管理,需要我们自己配置
[root@web02 ~]# vim /usr/lib/systemd/system/nginx.service
[Unit]
Description=nginx
After=network.target
[Service]
Type=forking
PIDFile=/usr/local/nginx-1.18.0/logs/nginx.pid
ExecStart=/usr/local/nginx-1.18.0/sbin/nginx
ExecReload=/usr/local/nginx-1.18.0/sbin/nginx -s reload
ExecStop=/usr/local/nginx-1.18.0/sbin/nginx -s stop
PrivateTmp=true
[Install]
#启动
[root@web02 ~]# systemctl start nginx
H1标题修改
#### 名字修改
[root@web02 nginx-1.16.1]# vim /usr/local/nginx-1.16.1/html/index.html


 浙公网安备 33010602011771号