springboot03-shiro
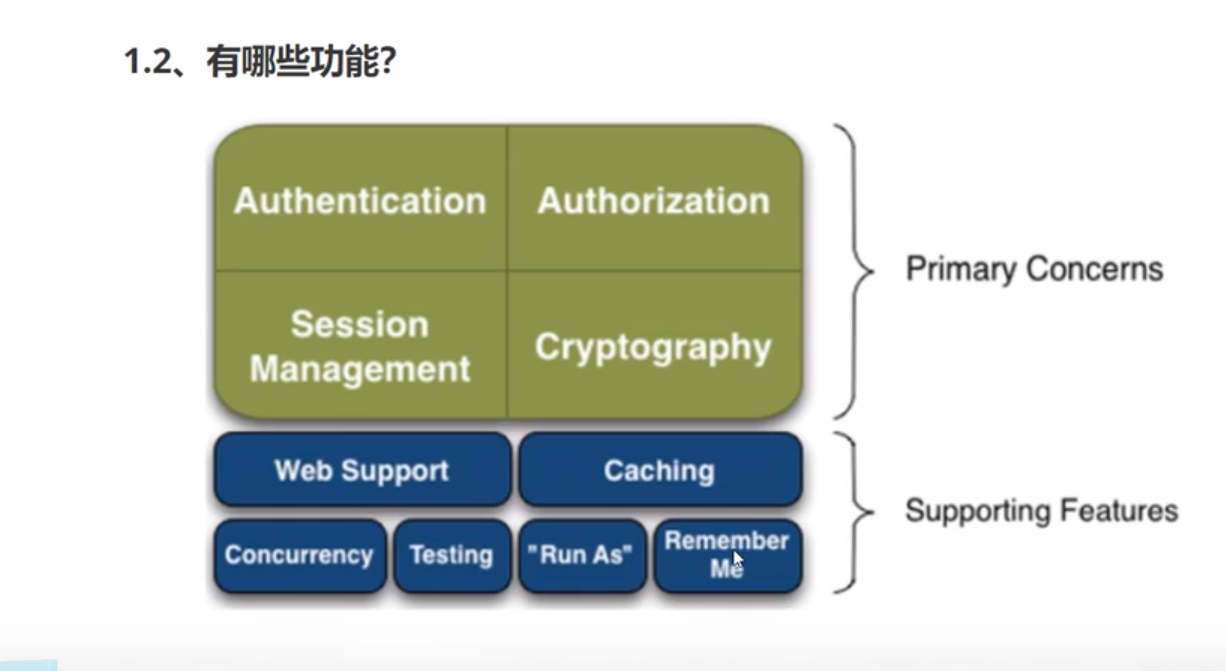
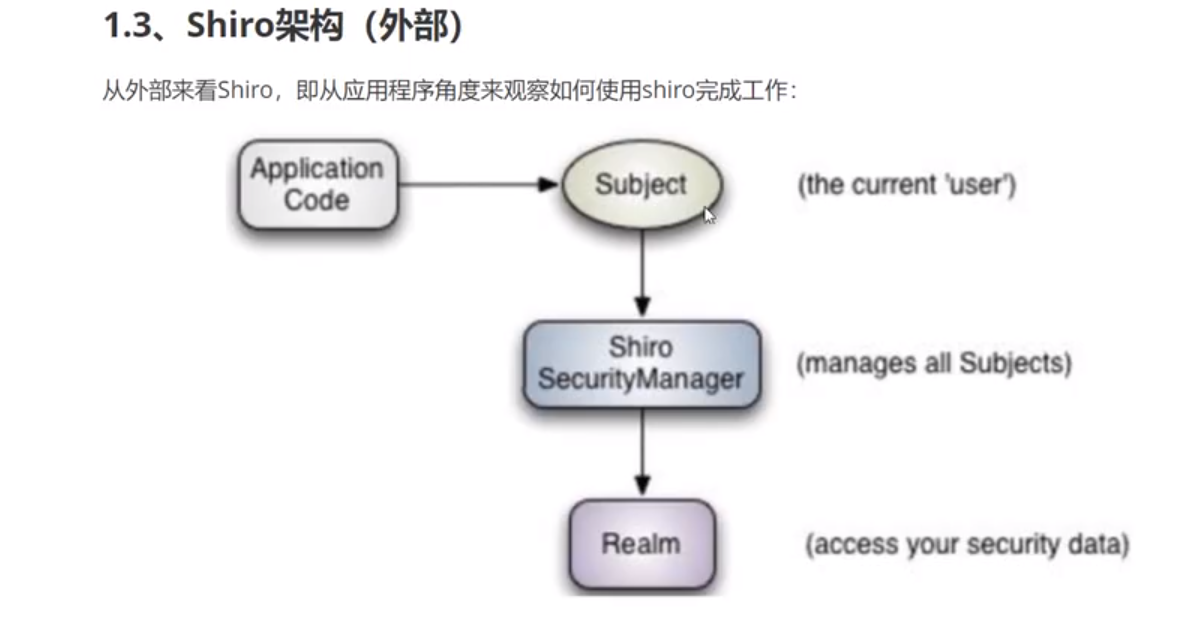
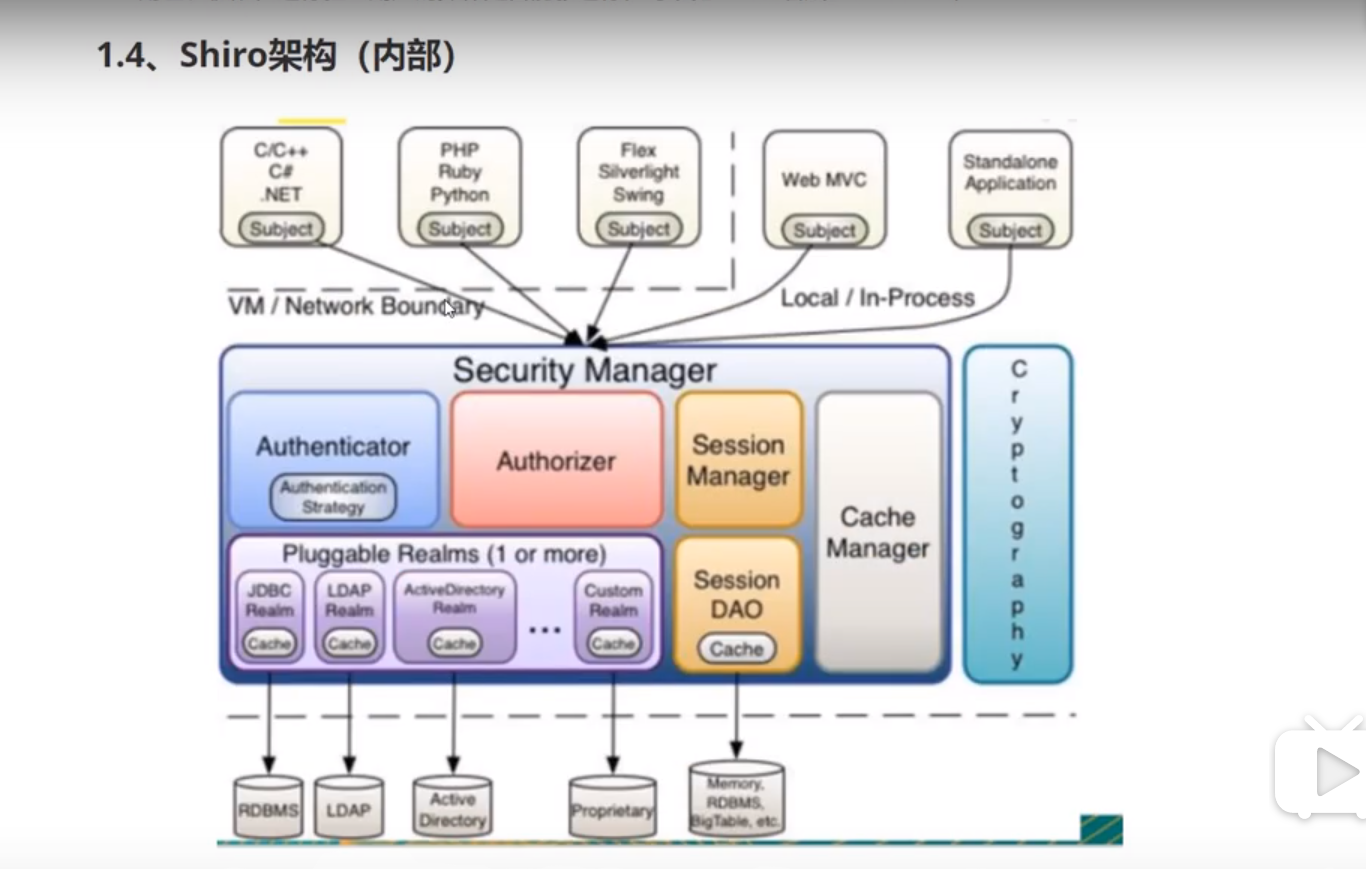
shiro


使用shiro需配置如下几个步骤
//获取当前的用户对象 Session
Subject currentUser = SecurityUtils.getSubject();
//判断当前的用户是否被认证~
 currentUser.isAuthenticated()
 currentUser.getPrincipal()
 //test a role:
 currentUser.hasRole("schwartz")
 currentUser.isPermitted("winnebago:drive:eagle5")
 currentUser.logout();
案例:
springboot整合shiro-mybatis
1.导入jar包
<dependencies>

		<dependency>
			<groupId>org.springframework.boot</groupId>
			<artifactId>spring-boot-starter-web</artifactId>
		</dependency>
        <dependency>
            <groupId>org.thymeleaf</groupId>
            <artifactId>thymeleaf-spring5</artifactId>
        </dependency>
        <dependency>
            <groupId>org.thymeleaf.extras</groupId>
            <artifactId>thymeleaf-extras-java8time</artifactId>
            <version></version>
        </dependency>
        <!-- https://mvnrepository.com/artifact/org.apache.shiro/shiro-spring -->
        <dependency>
            <groupId>org.apache.shiro</groupId>
            <artifactId>shiro-spring</artifactId>
            <version>1.5.3</version>
        </dependency>

        <dependency>
			<groupId>org.springframework.boot</groupId>
			<artifactId>spring-boot-starter-test</artifactId>
			<scope>test</scope>
			<exclusions>
				<exclusion>
					<groupId>org.junit.vintage</groupId>
					<artifactId>junit-vintage-engine</artifactId>
				</exclusion>
			</exclusions>
		</dependency>
	</dependencies>
2.编写shiro配置类
ShiroConfig配置
package com.mjh.config;

import org.apache.shiro.spring.web.ShiroFilterFactoryBean;
import org.apache.shiro.web.mgt.DefaultWebSecurityManager;
import org.slf4j.Logger;
import org.slf4j.LoggerFactory;
import org.springframework.beans.factory.annotation.Qualifier;
import org.springframework.context.annotation.Bean;
import org.springframework.context.annotation.Configuration;

import java.util.LinkedHashMap;
import java.util.Map;


@Configuration
public class ShiroConfig {
    private static final Logger log = LoggerFactory.getLogger(ShiroFilterFactoryBean.class);
    //ShiroFilterFactoryBean
    @Bean
    public ShiroFilterFactoryBean getShiroFilterFactoryBean(@Qualifier("securityManager") DefaultWebSecurityManager defaultWebSecurityManager) {
        ShiroFilterFactoryBean shiroFilterFactoryBean = new ShiroFilterFactoryBean();

        // 必须设置 SecurityManager
        shiroFilterFactoryBean.setSecurityManager(defaultWebSecurityManager);

        /**
         * 添加shiro的内置过滤器
             * anon:无需认证可以访问
             * authc:必须认证了才能访问
             * user:必须拥有记住我功能才能访问
             * perms:拥有对某资源的权限才能访问
             * roles:拥有某个角色权限才能访问
         */
        // 拦截器.
        Map<String, String>  map = new LinkedHashMap<String, String>();

        map.put("/logout", "logout");
       // map.put("/user/add", "authc");
        map.put("/user/*", "authc");

        // 如果不设置默认会自动寻找Web工程根目录下的"/login.jsp"页面
        shiroFilterFactoryBean.setLoginUrl("/login");
        // 登录成功后要跳转的链接
       // shiroFilterFactoryBean.setSuccessUrl("/index");
        // 未授权界面;
        //shiroFilterFactoryBean.setUnauthorizedUrl("/unauthorized");

        shiroFilterFactoryBean.setFilterChainDefinitionMap(map);
        return shiroFilterFactoryBean;
    }

    //DefaultWebSecurityManager:2
    @Bean(name = "securityManager")
    public DefaultWebSecurityManager getDefaultWebSecurityManager(@Qualifier("userRealm") UserRealm userRealm)  {
        DefaultWebSecurityManager securityManager = new DefaultWebSecurityManager();
        // 关联设置Userrealm.
        securityManager.setRealm(userRealm);

        return securityManager;
    }


    /**
     * 创建一个realm对象,需要自定义类
     *
     * @return
     */
    @Bean
    public UserRealm userRealm(){

        return new UserRealm();
    }


}
UserRealm配置
package com.mjh.config;

import com.mjh.pojo.User;
import com.mjh.service.UserService;
import org.apache.shiro.authc.*;
import org.apache.shiro.authz.AuthorizationInfo;
import org.apache.shiro.realm.AuthorizingRealm;
import org.apache.shiro.subject.PrincipalCollection;
import org.springframework.beans.factory.annotation.Autowired;

public class UserRealm extends AuthorizingRealm {
    @Autowired
   UserService userService;
//授权
    @Override
    protected AuthorizationInfo doGetAuthorizationInfo(PrincipalCollection principalCollection) {
        System.out.println("执行了----->授权doGetAuthorizationInfo");
        return null;
    }
//认证
    @Override
    protected AuthenticationInfo doGetAuthenticationInfo(AuthenticationToken token) throws AuthenticationException {
        System.out.println("执行了------>认证doGetAuthenticationInfo");


        UsernamePasswordToken usernameToken=(UsernamePasswordToken) token;
      //注入真实的数据
        User user = userService.queryListUser(usernameToken.getUsername());
        if(user==null){
            return null;//UnknownAccountException
        }
        //密码认证 shiro做
        return new SimpleAuthenticationInfo("",user.getPassword(),"" );
    }


}
3.编写配置文件config文件
spring:
  datasource:
    username: root
    password: 123456
    url: jdbc:mysql://localhost:3306/17java?useUnicode=true&characterEncoding=utf-8&serverTimezone=UTC
    driver-class-name: com.mysql.cj.jdbc.Driver
    type: com.alibaba.druid.pool.DruidDataSource

#springboot 默认不注入这些属性值,需要自己设置
#druid  数据源专有配置
    initialSize: 5
    minIdle: 5
    maxActive: 20
    maxWait: 60000
    timeBetweenEvictionRunsMillis: 60000
    minEvictableIdleTimeMills: 300000
    testWhileIdle: true
    testOnBorrow: false
    validationQuery: SELECT 1 FROM DUAL
    poolPreparedStatements: true

    #配置监控器拦截的filters,stat:监控统计,log4j:日志记录、wall:防御sql注入
    #如果允许时报错  java.lang.ClassNotFoundException:org.apache.log4j.Priority
    #侧导入log4j依赖即可,maven 地址:https:https://mvnrepository.com/
    filters: stat,wall,log4j
    maxOpenPreparedStatementsPerConnectionSize: 20
    useGlobalDataSourceStat: true
    connectionProperties: druid.stat.mergeSql=true,druid.stat.slowSqlMillis=500
4.编写mybatis的配置 pom.xm文件
首先要先引入依赖包,为了编写pojo文件方便,也导入一下lombok
<dependency>
            <groupId>org.mybatis.spring.boot</groupId>
            <artifactId>mybatis-spring-boot-starter</artifactId>
            <version>2.1.1</version>
        </dependncy>
 <dependency>
        <groupId>org.projectlombok</groupId>
        <artifactId>lombok</artifactId>
        <optional>true</optional>
    </dependency>
mybatis.type-aliases-package=com.mjh.pojo
mybatis.mapper-locations=classpath:mapper/*.xml
5.之后根据配置文件写pojo,dao层和mapper.xml层
pojo层
    @Data
    @AllArgsConstructor
    @NoArgsConstructor
    public class User {
        private int id;
        private String name;
        private String password;
    }
dao层

    package com.mjh.dao;

import com.mjh.pojo.User;
import org.apache.ibatis.annotations.Mapper;
import org.springframework.stereotype.Repository;

import java.util.List;


@Mapper
@Repository
public interface UserDao {
   public User queryListUser(String name);
}
UserMapper.xml
   <?xml version="1.0" encoding="UTF-8" ?>
<!DOCTYPE mapper
        PUBLIC "-//mybatis.org//DTD Mapper 3.0//EN"
        "http://mybatis.org/dtd/mybatis-3-mapper.dtd">
<mapper namespace="com.mjh.dao.UserDao">
    <select id="queryUserList" parameterType="String" resultType="User">
        select * from user  where name=#{name}
    </select>
接下来是service层
package com.mjh.service;

import com.mjh.pojo.User;

public interface UserService {
    public User queryListUser(String name);
}
package com.mjh.service;

import com.mjh.dao.UserDao;
import com.mjh.pojo.User;
import org.springframework.beans.factory.annotation.Autowired;
import org.springframework.stereotype.Service;

@Service
public class UserServiceImpl implements UserService {
    @Autowired
    private UserDao userDao;
    @Override
    public User queryListUser(String name) {
        return userDao.queryListUser(name);
    }
}
以上是通过shiro认证的事例,下面在补充一下授权
在controller层添加方法
 @RequestMapping("/unauthorized")
    @ResponseBody
    public String unauthorized(){
        return "未经授权无法访问此页面";
    }
}
要使授权生效,就要配置shiroConfig,所以在shiroConfig的getShiroFilterFactoryBean()方法里添加代码
//授权,正常的情况下,没有授权会跳到不授权页面上
map.put("/user/add","perms[user:add]"); map.put("/user/update","perms[user:update]"/授权,正常的情况下,没有授权会跳到不授权页面上
map.put("/user/add","perms[user:add]"); map.put("/user/update","perms[user:update]");
// 未授权界面;
  shiroFilterFactoryBean.setUnauthorizedUrl("/unauthorized");
我们还可以把权限给用户,把user:add这个权限给用户,在Realm里的doGetAuthorizationInfo方法里添加代码,这样我们刚才给add功能里添加授权方法,现在也可以访问了;
SimpleAuthorizationInfo info=new SimpleAuthorizationInfo();
info.addStringPermission("user:add");
return info;
但是这种方式有一个缺点,我们数据库里的用户都可以有这个权限,我们的思路是要对每一个用户都有不同的权限,这样做完全是不行的,就是我们把它写死了,它权限应该在数据库里实现,所以一般数据表里都具有权限这一个perms属性,之后赋予用户不同的权限;之后只需要在realm中添加如下代码即可
    //拿到当前用户权限
    Subject subject= SecurityUtils.getSubject();
    User currentUser= (User) subject.getPrincipal();//拿到User对象

    //设置当前用户权限
    info.addStringPermission(currentUser.getPerms());
    return info;
}

//之后的密码认证变为如下
     //密码认证 shiro做
return new SimpleAuthenticationInfo(user,user.getPassword(),"" );
shiro整合thymeleaf
1.导入jar包
<!--shiro-thymeleaf整合-->
        <dependency>
            <groupId>com.github.theborakompanioni</groupId>
            <artifactId>thymeleaf-extras-shiro</artifactId>
            <version>2.0.0</version>
        </dependency>
2.在shiro配置文件中注入整合thymeleaf的shiro方法
//整合shiroDialect:用来整合shiro thymeleaf
@Bean
public ShiroDialect getShiroDialect(){
    return new ShiroDialect();
}
3.给前端使用shiro——就是给由于这个权限的用户只显示相应的权限,没有权限访问的功能不显示,还有引入头文件
<!DOCTYPE html>
<html lang="en"  xmlns:th="http://www.thymeleaf.org"
xmlns:shiro="http://www.thymeleaf.org/thymeleaf-extras-shiro">
<head>
    <meta charset="UTF-8">
    <title>Title</title>
</head>
<body>
<p th:text="${msg}"></p>
<div shiro:hasPermission="user:add">
    <a th:href="@{/user/add}" >add</a>
</div>
<div shiro:hasPermission="user:add">
    <a  th:href="@{/user/update}">update</a>
</div>
    <a th:href="@{/logout}" >logout</a>
</body>
</html>
4.之后还要从session里判断用户是否登录,否则显示登录链接
先在Realm配置文件中配置session来获取当前用户登录信息
        Subject currentSubject=SecurityUtils.getSubject();
        Session session=currentSubject.getSession();
        session.setAttribute("loginUser",user);


 浙公网安备 33010602011771号