开源 Swift AutoLayout 框架 SnapKit 介绍
2015-07-29 16:19 迷思的猫 阅读(5296) 评论(16) 收藏 举报自从水果发布了5代,苹果为了适配多种屏幕尺寸,搞出了一个所谓的AutoLayout来解决问题,iOS程序员们从此走上了苦逼的适配路。
“适配”本身其实并不是一个头疼的事情,对于4-6寸的手机来说,只要制定一套规则,就不会有太大的问题。但是令我痛苦的部分在于——iOS的 Constraints 和 VFL。
痛苦的NSLayoutConstraints
这里借用iOS开源项目 Masonry 的描述,假如我们要让一个view在superview里居中,然后每条边留出10像素的空白,代码是这样写的:
UIEdgeInsets padding = UIEdgeInsetsMake(10, 10, 10, 10);

[superview addConstraints:@[

    //view1 constraints
    [NSLayoutConstraint constraintWithItem:view1
                                 attribute:NSLayoutAttributeTop
                                 relatedBy:NSLayoutRelationEqual
                                    toItem:superview
                                 attribute:NSLayoutAttributeTop
                                multiplier:1.0
                                  constant:padding.top],

    [NSLayoutConstraint constraintWithItem:view1
                                 attribute:NSLayoutAttributeLeft
                                 relatedBy:NSLayoutRelationEqual
                                    toItem:superview
                                 attribute:NSLayoutAttributeLeft
                                multiplier:1.0
                                  constant:padding.left],

    [NSLayoutConstraint constraintWithItem:view1
                                 attribute:NSLayoutAttributeBottom
                                 relatedBy:NSLayoutRelationEqual
                                    toItem:superview
                                 attribute:NSLayoutAttributeBottom
                                multiplier:1.0
                                  constant:-padding.bottom],

    [NSLayoutConstraint constraintWithItem:view1
                                 attribute:NSLayoutAttributeRight
                                 relatedBy:NSLayoutRelationEqual
                                    toItem:superview
                                 attribute:NSLayoutAttributeRight
                                multiplier:1
                                  constant:-padding.right],

 ]];
如果你刚刚接触iOS开发,你可能认为这并不是什么问题。但是让我们做个对比,在web开发中,应该怎么写呢?
#view{margin:10px;}
一行代码搞定问题,CSS是世界上最伟大的排版引擎,没有之一。明明很简单的事情,为什么放到iOS上,竟然变得这么这么这么复杂了?
仍然痛苦的VFL
然后苹果又搞出了VFL,网上对此描述最多的是“象形文字”,虽然它真的真的改善了我们创建constraints的方式,让这一切变得更快更方便,但是对于下面这段代码,我仍然是不满的。
constraints += NSLayoutConstraint.constraintsWithVisualFormat("V:[trackBtn]-15-[filterBtn(40)]-15-|", options: NSLayoutFormatOptions.AlignAllRight, metrics: nil, views: views)
constraints += NSLayoutConstraint.constraintsWithVisualFormat("[trackBtn]-15-|", options: NSLayoutFormatOptions.AlignmentMask, metrics: nil, views: views)
constraints += NSLayoutConstraint.constraintsWithVisualFormat("|-15-[filterBtn]-15-|", options: NSLayoutFormatOptions.AlignmentMask, metrics: nil, views: views)
莫名其妙的options,metrics和views参数的组合,长成狗一样的函数名。而且即使是有了VFL,我们还是离不开 constraints ,VFL并没有真的满足我们的所有需求,比如你看看 这个需求。
那么,我们是不是只能一声叹气,说,iOS的世界就这样了呢?
NO!!!我们有Masonry和SnapKit!!!
SnapKit能搞定什么
SnapKit是Masonry的Swift版,项目发布至今大约1年的时间,已经在github上有两千多个star,当然了,这其中也少不了"他爹"Masonry给他打的那些广告。
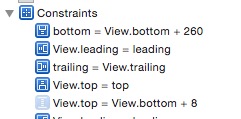
如果你还记得你在 StoryBoard 里面拉的那些线条,那你也一定记得其中 constriants 的表示方法:
SnapKit所做的就是这样一件事——让你这样写 constraints。
我们看看文章最顶部的那个需求用 SnapKit 如何实现:
view1.snp_makeConstraints { (make) -> Void in
    make.top.equalTo(superview).offset(10)
    make.left.equalTo(superview).offset(10)
    make.bottom.equalTo(superview).offset(-10)
    make.right.equalTo(superview).offset(-10)
}
对!就是这么简单!还可以更简单!!
view1.snp_makeConstraints { (make) -> Void in
    make.edges.equalTo(superview).insets(UIEdgeInsetsMake(10, 10, 10, 10))
}

来,请跟我一起大叫三声爽!
爽!
爽!
叫完之后我们继续看还能怎么爽:
// 不只是相等哦,大于等于也是有的
make.centerX.lessThanOrEqualTo(view2.snp_left)
make.left.greaterThanOrEqualTo(label.snp_left)

// 不止是边缘哦,宽度高度也是有的
// width >= 200 && width <= 400
make.width.greaterThanOrEqualTo(200)
make.width.lessThanOrEqualTo(400)

// 其实可以简单点,一行搞定一个size
make.size.equalTo(CGSizeMake(50, 100))

// 链式操作,优先级想怎么搞就怎么搞
make.left.greaterThanOrEqualTo(label.snp_left).priorityLow()

// 妈妈再也不担心我不会排版了,什么向左5像素向下10像素我一行代码就搞定啦
make.center.equalTo(superview).offset(CGPointMake(-5, 10))
做起动画来也是一把好手!
view1.snp_makeConstraints { (make) -> Void in
  self.topConstraint = make.top.equalTo(superview).offset(padding.top).constraint
  make.left.equalTo(superview).offset(padding.left)
}

// then later you can call
self.topConstraint.uninstall()

// or if you want to update the constraint
self.topConstraint.updateOffset(5)

// 也可以用 snp_updateConstraints 实现上述需求
这么好的东西,我去哪里搞!
如果你用CocoaPods,那么Podfile你懂的:
pod 'SnapKit', :git => 'https://github.com/SnapKit/SnapKit.git', :branch => 'swift-2.0'
如果你用Carthege……这个我没用过我就不瞎说了……
总之呢,不用CocoaPods的朋友可以去 这里 下载,至于怎么弄进项目我就不管了(好好滴干嘛不用CocoaPods..)
成果
我用SnapKit做了下面这个界面:
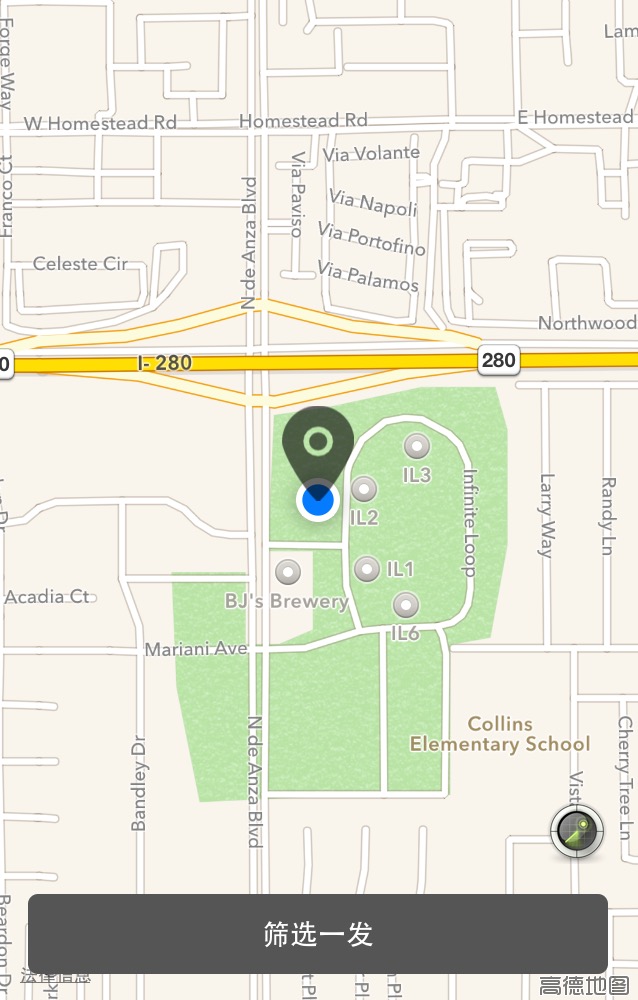
体验之后发现,其实用SnapKit和原生constraints的代码行数差不多,但是每一行从原来的极为冗长的一坨东西,变成了很容易阅读和维护的短小精干的代码,代码像下面这样优雅,这便是SnapKit最大的作用。
mapView.snp_makeConstraints { (make) -> Void in
    make.edges.equalTo(view)
}
locateImage.snp_makeConstraints { (make) -> Void in
    let topHeight = navigationController!.navigationBar.frame.height + UIApplication.sharedApplication().statusBarFrame.height
    make.centerX.equalTo(mapView)
    make.bottom.equalTo(mapView.snp_centerY).offset(topHeight/2)
}
filterBtn.snp_makeConstraints { (make) -> Void in
    make.left.equalTo(mapView).offset(15)
    make.right.equalTo(mapView).offset(-15)
    make.height.equalTo(40)
    make.bottom.equalTo(mapView).offset(-15)
}
trackBtn.snp_makeConstraints { (make) -> Void in
    make.bottom.equalTo(filterBtn.snp_top).offset(-15)
    make.right.equalTo(mapView).offset(-15)
}

 浙公网安备 33010602011771号