

APK
APK RE
APK Structure
1.AndroidManifest.xml
这是每个Android应用不可或缺的配置文件,它包含了应用的关键信息。我们可以把它看作是应用的“蓝图”或“说明书”,它向系统声明了应用的基本属性、组件以及权限等。
<intent-filter>用于在应用的组件声明中指定哪些Intent可以触发该组件。<action>用于指定该Intent过滤器能够处理的操作(Action)。它告诉 Android 系统,当有一个Intent的动作(action)匹配时,应该触发相应的组件(如BroadcastReceiver)。
2.classes.dex 文件包含了应用程序的可执行代码。它是应用的Dalvik字节码文件,也是Android应用在运行时通过 Dalvik虚拟机 或 ART(Android Runtime) 解释执行的核心文件。
3.resources.arsc 文件包含了应用程序的所有编译后的资源映射信息。这个文件并不存储实际的资源内容(如图片或字符串),而是存储资源与资源ID的映射关系。例如,它会保存应用中的字符串、颜色、尺寸、样式等信息以及这些资源的ID。通过这个文件,Android系统能够在应用运行时快速访问和加载所需的资源。
4.assets/ 目录包含了应用程序的原始资源文件,这些资源不经过编译,直接以原始形式存储。通常,开发者可以在该目录中存放字体文件、音频文件、HTML文件等,应用在运行时通过API来读取这些资源。例如,游戏可能会将所有的地图文件或纹理图像存放在此目录中。通过AssetManager API,应用可以访问这些文件。
5.lib/ 目录包含了本地库文件,通常是通过 JNI(Java Native Interface) 与C/C++编写的本地代码。这些库文件可以针对不同的硬件架构(如arm、x86等)进行编译,因此lib/目录下通常会为每个架构创建相应的子目录。这个目录中存放的本地库可以通过Java代码调用JNI接口实现与系统底层的交互。
6.res/ 目录包含了Android应用所需的所有资源文件。与 assets/ 目录不同,res/ 目录中的资源文件是经过编译的
7.META-INF/ 目录与Java的JAR文件类似,用于存放APK文件的元数据,如签名文件、校验信息等。
Analysis process(basic)
一、用Jadx打开分析AndroidMainfest.xml。查找 <activity> 标签,它们通常定义了应用的各个 Activity(包括启动 Activity)。入口点通常如下表示:

方法:
(1) 直接查看 AndroidManifest.xml
- 在 Jadx 中打开 APK,导航至
Resources → AndroidManifest.xml。 - 搜索
action.MAIN和category.LAUNCHER,找到对应的 Activity。
(2) 搜索 onCreate() 方法
- 入口 Activity 的
onCreate()是应用启动后第一个执行的用户代码。 - 在 Jadx 的 搜索栏(
Ctrl + F)输入:onCreate((注意括号)- 或直接搜索
MainActivity(根据AndroidManifest.xml的结果)。
(3) 查找 Application 类
- 如果存在自定义
Application类,其onCreate()会比 Activity 更早执行。 - 在 Jadx 中搜索:
extends Application- 或查看
AndroidManifest.xml中<application android:name="...">指定的类。
最终得出该app的程序入口点代码是在android:name="com.example.flag.MainActivity"处
二、成功寻找到activity的代码入口处,开始分析activity的生命执行流程:
根据android:name="com.example.flag.MainActivity"字段成功找到Activity的功能实现代码位置,一个Activity的生命周期是:onCreate()->onStart()->onResume()->onPause()->onStop()->onDestroy(),所以可以先锁定onCreate函数,锁定app加载的主要逻辑。
三、分析Java层代码,程序逻辑
如果方法在Native层,用IDA Pro对对应的.so文件进行逆向。可能需要导入jni.h.
File–>Load File–>Prase C Header File–>选择jni.h
查找与 Java 层交互的 JNI 函数。JNI 函数通常以 Java_ 开头,例如 Java_com_example_app_NativeMethod。
加壳app分析(以网鼎杯_2020_青龙组_bang为例)
一、先分析AndroidMainfest.xml
<?xml version="1.0" encoding="utf-8"?>
<manifest xmlns:android="http://schemas.android.com/apk/res/android" android:versionCode="1" android:versionName="1.0" android:compileSdkVersion="29" android:compileSdkVersionCodename="10" platformBuildVersionName="10" platformBuildVersionCode="29" package="com.example.how_debug">
    <uses-sdk android:minSdkVersion="15" android:targetSdkVersion="29"/>
    <application android:theme="@style/AppTheme" android:label="@string/app_name" android:icon="@mipmap/ic_launcher" android:name="com.SecShell.SecShell.ApplicationWrapper" android:allowBackup="true" android:supportsRtl="true" android:roundIcon="@mipmap/ic_launcher_round" android:appComponentFactory="androidx.core.app.CoreComponentFactory">
        <activity android:name="com.example.how_debug.MainActivity">
            <intent-filter>
                <action android:name="android.intent.action.MAIN"/>
                <category android:name="android.intent.category.LAUNCHER"/>
            </intent-filter>
        </activity>
    </application>
</manifest>
入口应该在how_debug类,但进去发现没有MainActivity方法,只有资源文件。

可以判断被加壳。
还可以通过观察APK文件是否在AndroidManifest.xml配置Applicaiton信息来判定,该app实现了一个自定义操作将Application 类进行了自定义修改成了com.SecShell.SecShell.ApplicationWrapper来实现自己的加壳逻辑。
二、脱壳
python查壳脚本:
python detect_shell_name.py file_name
使用frida-dexdump来脱壳。adb connect 127.0.0.1:7555连接到Mumu模拟器,然后在adb shell下启动frida-server
然后Mumu前台运行how_debug,frida-dexdump出dex:
frida-dexdump -U -n how_debug -o ./
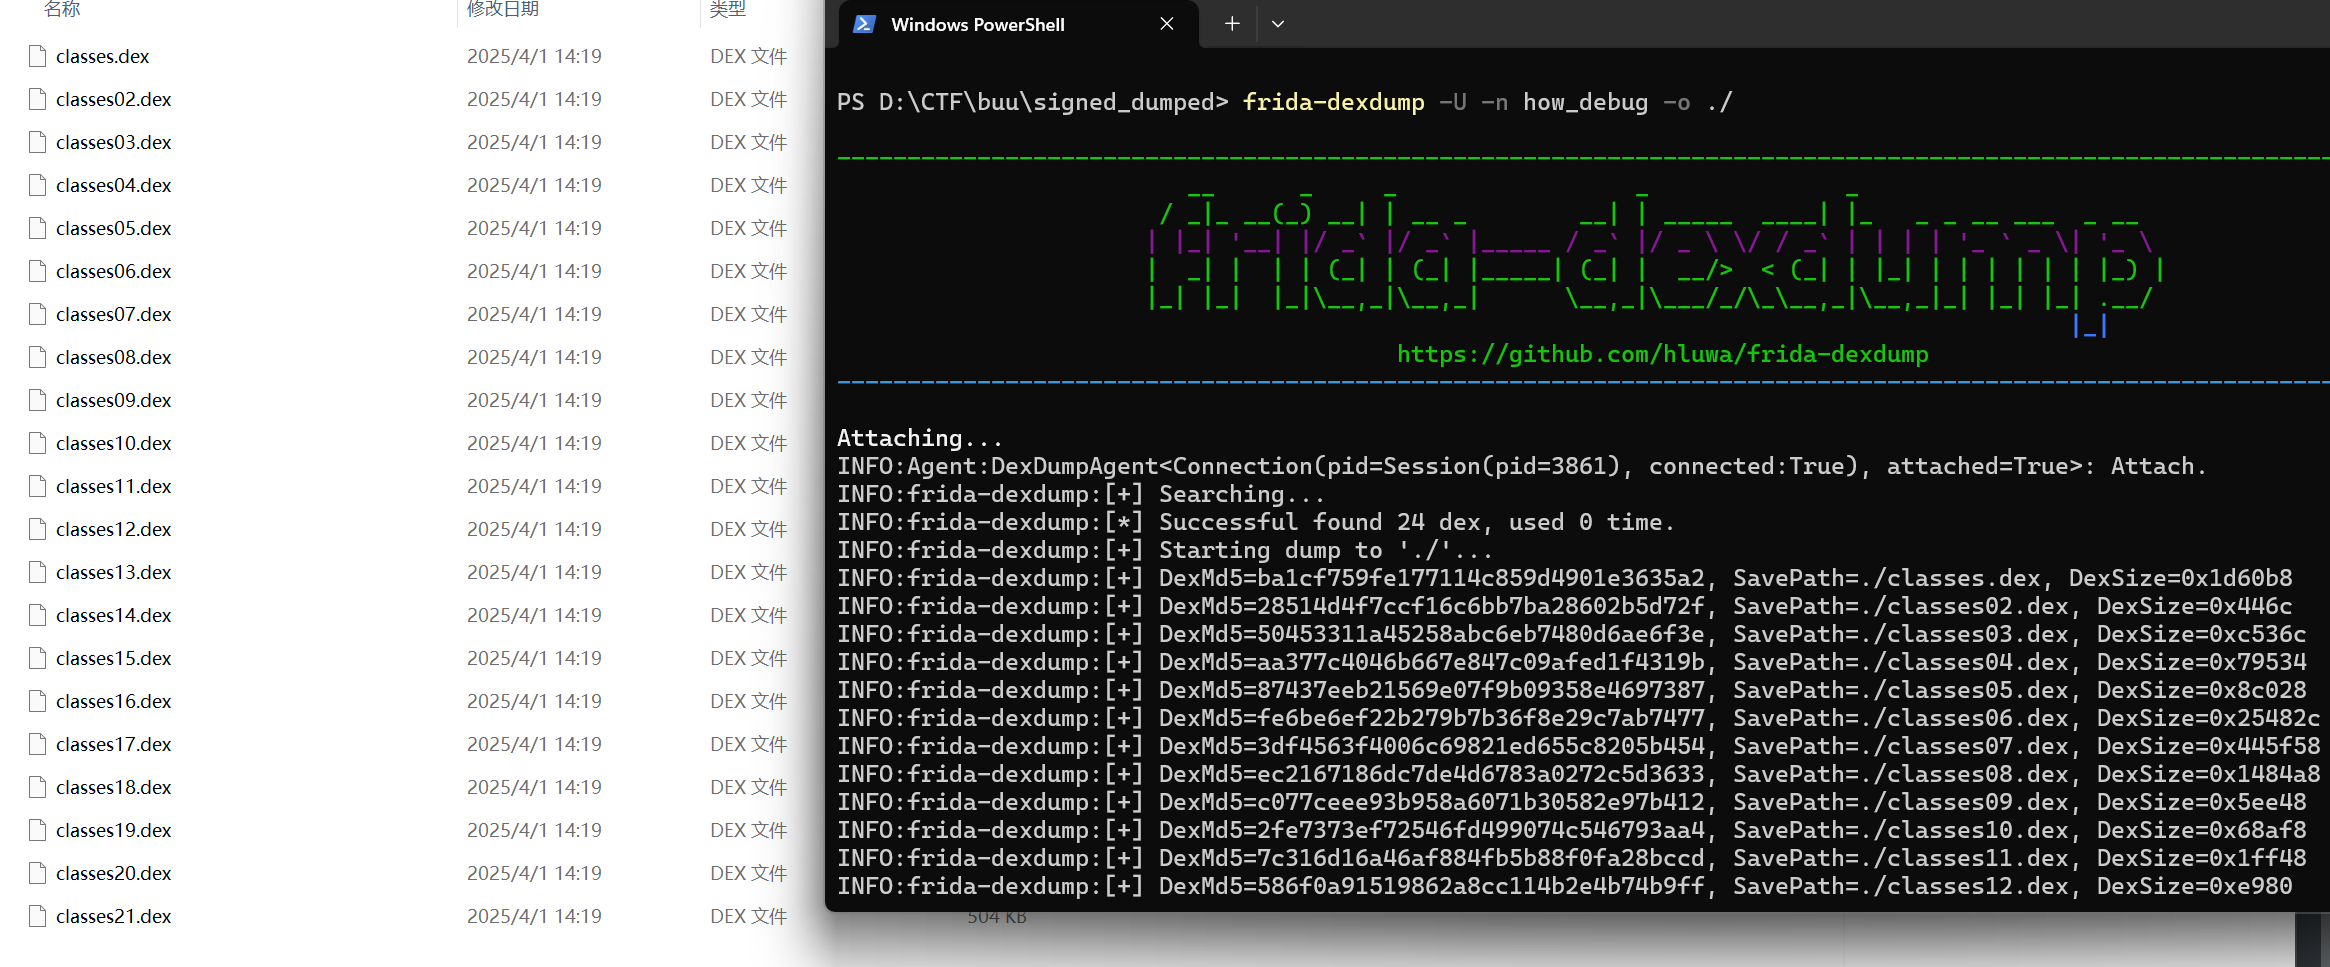
3.把dump出来的dex文件夹用jadx打开,就可以分析到com.example.how_debug的MainActivity,找到onCreate()方法:
    public void onCreate(Bundle bundle) {
        super.onCreate(bundle);
        setContentView(R.layout.activity_main);
        mContext = getApplicationContext();
        jinit();
        Log.i("tag", "protect MainActivity onCreate");
        ((TextView) findViewById(R.id.textView2)).setText(stringFromJNI1());
        final EditText editText = (EditText) findViewById(R.id.editText3);
        final EditText editText2 = (EditText) findViewById(R.id.editText2);
        ((Button) findViewById(R.id.button)).setOnClickListener(new View.OnClickListener() { // from class: com.example.how_debug.MainActivity.1
            @Override // android.view.View.OnClickListener
            public void onClick(View view) {
                String obj = editText.getText().toString();
                String obj2 = editText2.getText().toString();
                if (obj.equals(obj2)) {
                    MainActivity.showmsg("user is equal passwd");
                } else if (obj.equals("admin") && obj2.equals("pass71487")) {
                    MainActivity.showmsg("success");
                    MainActivity.showmsg("flag is flag{borring_things}");
                } else {
                    MainActivity.showmsg("wrong");
                }
            }
        });
    }
定位资源文件(以攻防世界-基础Android,buu-[FlareOn6]FlareBear为例)
每个 Activity 在启动时通常会加载一个或多个布局文件。要找到与 Activity 关联的 XML 布局文件,可以按照以下步骤进行:
setContentView(x) 是 Android 中的一个方法,用于设置当前 Activity 的界面视图(UI)。这个方法通常在 Activity 的 onCreate() 方法中调用,用来加载布局文件,并将其显示在当前界面上。
x 是一个整数值(有时直接给出了文件名称),代表一个资源的 ID。这个资源 ID 对应的是一个 XML 布局文件(通常位于 res/layout/ 目录下),在编译过程中由 Android 构建工具自动生成。所以我们可以手动寻找到布局文件或通过jadx的搜索功能寻找到目标资源的名称。
成功获得资源的id和名称,接下来就是在布局文件中寻找了。成功在res目录下的layout目录下找到了activity的页面布局文件:
通过这个 ID(如 R.layout.activity_main),你可以定位到 res/layout 目录下的 XML 布局文件。
在分析 Android 应用时,了解按钮(Button)是如何与函数进行绑定的非常重要。按钮的绑定方式通常有两种:动态绑定和静态绑定。
动态绑定
动态绑定函数是指通过代码在运行时绑定事件处理程序(如点击事件)到 UI 元素(如按钮)上。通常,按钮的动态绑定是通过 setOnClickListener()方法来实现的,这个方法为按钮设置了点击事件监听器。
public class MainActivity extends AppCompatActivity {
    private Button login;
    private EditText passWord;

    protected void onCreate(Bundle savedInstanceState) {
        super.onCreate(savedInstanceState);
        setContentView(0x7f04001a); // 加载activity的页面内容,资源文件的id是0x7f04001a

        // 动态绑定 EditText 和 Button
        this.passWord = (EditText) findViewById(0x7f0b0055); // 获取 EditText 组件
        this.login = (Button) findViewById(0x7f0b0056); // 获取 Button 组件

        // 给按钮设置点击事件监听器
        this.login.setOnClickListener(new View.OnClickListener() {
            @Override // android.view.View.OnClickListener
            public void onClick(View v) {
                String str = MainActivity.this.passWord.getText().toString(); // 获取密码输入框的内容
                Check check = new Check(); // 调用 Check 类中的函数
                // 处理逻辑...
            }
        });
    }
}
findViewById()方法用于查找页面中的 UI 组件,这里查找的是Button和EditText组件。setOnClickListener()方法是动态绑定的核心,表示为按钮设置了点击事件监听器。当用户点击按钮时,onClick()方法会被调用。- 在
onClick()方法内部,开发者可以实现点击事件的逻辑,例如获取输入框内容、进行检查等。
本题:过第一步Check()后来到第二步:
public class MainActivity2 extends AppCompatActivity {
    Button button;
    EditText editText;
    ImageView imageView;

    /* JADX INFO: Access modifiers changed from: protected */
    @Override // android.support.v7.app.AppCompatActivity, android.support.v4.app.FragmentActivity, android.support.v4.app.BaseFragmentActivityGingerbread, android.app.Activity
    public void onCreate(Bundle savedInstanceState) {
        super.onCreate(savedInstanceState);
        setContentView(R.layout.activity_main_2);
        init();
        this.button.setOnClickListener(new View.OnClickListener() { // from class: com.example.test.ctf02.MainActivity2.1
            @Override // android.view.View.OnClickListener
            public void onClick(View v) {
                MainActivity2.this.sendBroadcast(new Intent(MainActivity2.this.editText.getText().toString()));
            }
        });
    }

    public void init() {
        this.imageView = (ImageView) findViewById(R.id.image);
        this.imageView.setImageResource(R.drawable.timg);
        this.editText = (EditText) findViewById(R.id.pwd);
        this.button = (Button) findViewById(R.id.button);
    }
}
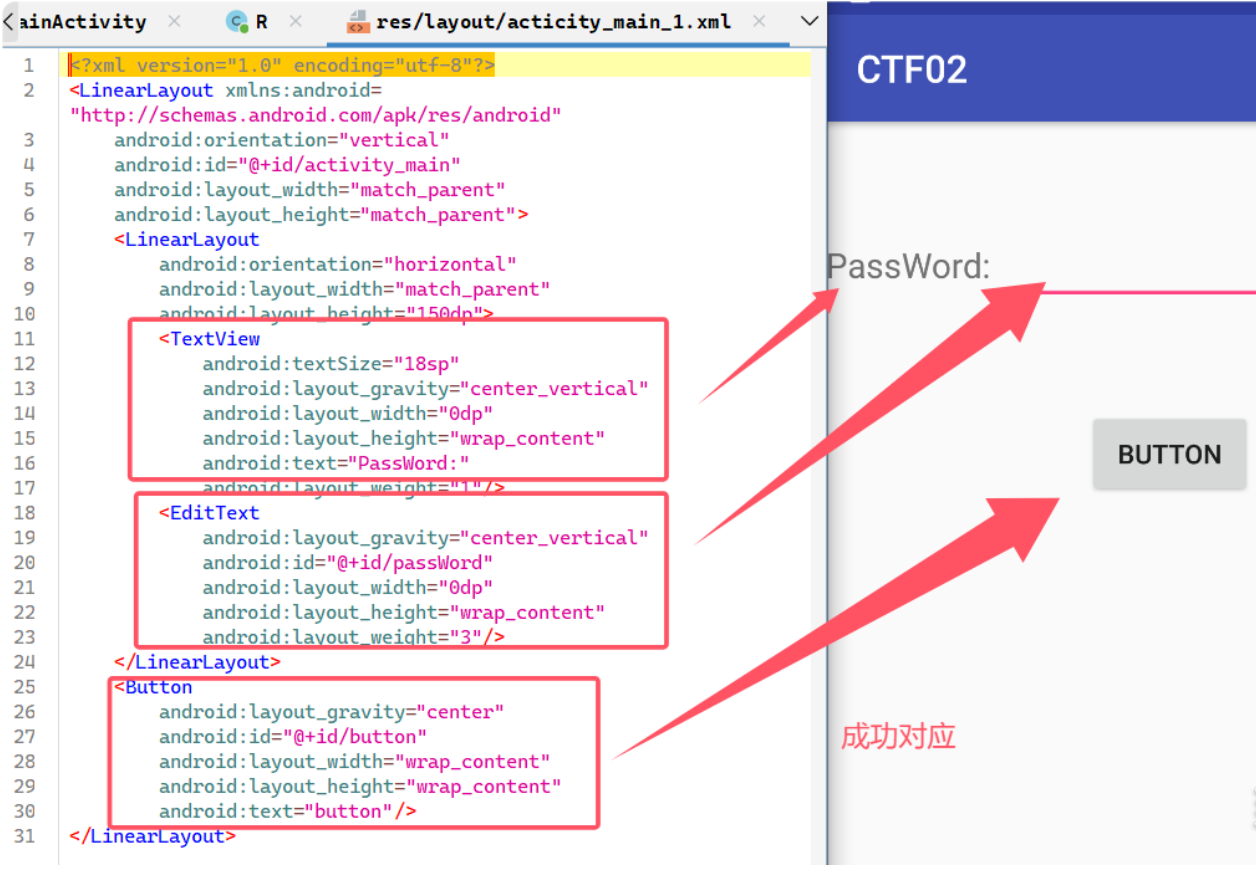
与第一步类似分析可以得到按钮布局,分析可知就是将editText的内容广播出去。在AndroidMainfest中有一个receiver:
        <receiver android:name="com.example.test.ctf02.GetAndChange" android:enabled="true" android:exported="true">
            <intent-filter>
                <action android:name="android.is.very.fun"/>
            </intent-filter>
        </receiver>
        <activity android:name="com.example.test.ctf02.NextContent"/>
        <activity android:name="com.example.test.ctf02.MainActivity2"/>
接收到android.is.very.fun后,看com.example.test.ctf02.GetAndChange:
public class GetAndChange extends BroadcastReceiver {
    @Override // android.content.BroadcastReceiver
    public void onReceive(Context context, Intent intent) {
        context.startActivity(new Intent(context, NextContent.class));
    }
}
执行NextContent,拿到flag。
也可以直接构造广播发送:
adb shell am broadcast -a android.is.very.fun
静态绑定
flare bear通过同样方法可以定位到activity_main.xml:
<?xml version="1.0" encoding="utf-8"?>
<android.support.constraint.ConstraintLayout xmlns:android="http://schemas.android.com/apk/res/android" xmlns:app="http://schemas.android.com/apk/res-auto" android:background="@drawable/bgrepeat" android:layout_width="match_parent" android:layout_height="match_parent">
    <TextView android:textSize="46sp" android:typeface="normal" android:textStyle="bold" android:id="@+id/textView" android:layout_width="wrap_content" android:layout_height="wrap_content" android:layout_marginTop="8dp" android:text="@string/text_flare_bear" android:fontFamily="casual" app:layout_constraintLeft_toLeftOf="0" app:layout_constraintRight_toRightOf="0" app:layout_constraintTop_toTopOf="0"/>
    <Button android:enabled="false" android:textSize="24sp" android:id="@+id/buttonContinue" android:layout_width="250dp" android:layout_height="80dp" android:layout_marginBottom="24dp" android:text="@string/text_continue" android:onClick="continueGame" android:fontFamily="casual" app:layout_constraintBottom_toTopOf="@+id/buttonNew" app:layout_constraintEnd_toEndOf="0" app:layout_constraintHorizontal_bias="0.497" app:layout_constraintStart_toStartOf="0"/>
    <Button android:textSize="24sp" android:id="@+id/buttonNew" android:layout_width="250dp" android:layout_height="80dp" android:layout_marginTop="8dp" android:layout_marginBottom="4dp" android:text="@string/text_new_flare_bear" android:onClick="newGame" android:fontFamily="casual" app:layout_constraintBottom_toBottomOf="0" app:layout_constraintEnd_toEndOf="0" app:layout_constraintHorizontal_bias="0.5" app:layout_constraintStart_toStartOf="0" app:layout_constraintTop_toBottomOf="@+id/textView"/>
    <LinearLayout android:orientation="horizontal" android:layout_width="wrap_content" android:layout_height="wrap_content" android:layout_marginBottom="8dp" android:layout_marginStart="8dp" android:layout_marginEnd="8dp" app:layout_constraintBottom_toBottomOf="0" app:layout_constraintEnd_toEndOf="0" app:layout_constraintStart_toStartOf="0">
        <Button android:textSize="24sp" android:id="@+id/button2" android:layout_width="wrap_content" android:layout_height="80dp" android:text="Help" android:onClick="showHelp" android:fontFamily="casual"/>
        <Button android:textSize="24sp" android:id="@+id/buttonCredits" android:layout_width="wrap_content" android:layout_height="80dp" android:layout_marginLeft="20dp" android:text="@string/text_credits" android:onClick="showCredits" android:fontFamily="casual"/>
    </LinearLayout>
</android.support.constraint.ConstraintLayout>
- 在 XML 文件中,
android:onClick="onLoginClick"表示按钮的点击事件将绑定到onLoginClick()方法。 - 在
Activity中,onLoginClick()方法的参数必须是View类型,它会自动接收点击的视图(在这里是Button)。 - 按钮的点击事件处理是通过静态绑定(XML 声明)完成的,事件处理函数在代码中定义好,并且由 Android 系统自动调用。
四大组件
1.活动(activity) :用于表现功能
xml声明:
<activity
    android:name=".MainActivity"  <!-- 活动类的名称 -->
    android:label="Main Activity"  <!-- 活动的名称标签 -->
    android:theme="@style/Theme.AppCompat.Light"  <!-- 活动的主题 -->
    android:launchMode="singleTask"  <!-- 启动模式 -->
    android:screenOrientation="landscape"  <!-- 屏幕方向 -->
    android:exported="true"  <!-- 是否允许外部启动 -->
    android:configChanges="orientation|keyboardHidden"  <!-- 配置变化 -->
    android:permission="android.permission.INTERNET">  <!-- 需要的权限 -->

    <!-- 可选:定义Intent过滤器,用于匹配启动Activity的Intent -->
    <intent-filter>
        <action android:name="android.intent.action.MAIN" />
        <category android:name="android.intent.category.LAUNCHER" />
    </intent-filter>

</activity>
2.服务(service):后台运行服务,不提供界面呈现
声明:
<service
    android:name=".MyService"   <!-- 声明服务的类名,可以是全名或相对路径 -->
    android:enabled="true"      <!-- 指定服务是否启用,如果为 false,系统不会启动此服务 -->
    android:exported="false"    <!-- 控制该服务是否允许其他应用程序访问,true表示服务可以被外部应用调用,false表示只能在当前应用内调用 -->
    android:permission="android.permission.BIND_JOB_SERVICE">  <!-- 为服务定义一个权限,表示访问此服务的应用必须声明相应的权限 -->

    <!-- 可选:定义服务的最小 SDK 版本要求 -->
    <meta-data
        android:name="com.example.myapp.SERVICE_META"
        android:value="some_value" />

    <!-- 可选:声明该服务能够响应的 Intent -->
    <intent-filter>
        <action android:name="com.example.myapp.ACTION_START_SERVICE" />
    </intent-filter>

    <!-- 可选:指定服务所依赖的特定权限 -->
    <uses-permission android:name="android.permission.INTERNET" />
</service>
3.广播接收者(Broadcast reciver) :用于接受广播
声明:
<receiver
    android:name=".MyReceiver"              <!-- 广播接收器类的名称 -->
    android:enabled="true"                  <!-- 是否启用该广播接收器 -->
    android:exported="false"                <!-- 是否允许外部应用访问 -->
    android:permission="android.permission.RECEIVE_BOOT_COMPLETED"> <!-- 需要的权限 -->

    <!-- 可选:定义接收的广播事件 -->
    <intent-filter>
        <action android:name="android.intent.action.BOOT_COMPLETED" /> <!-- 广播事件 -->
        <category android:name="android.intent.category.DEFAULT" />   <!-- 广播分类 -->
    </intent-filter>

    <!-- 可选:声明接收器需要的权限 -->
    <uses-permission android:name="android.permission.RECEIVE_BOOT_COMPLETED" />
</receiver>
4.内容提供者(Content provider):支持多个应用中存储和读取数据,相当于数据库
ContentProvider 用于跨应用共享数据。它提供了一个统一的接口,使得一个应用可以访问另一个应用的数据。ContentProvider 可以封装数据库操作、文件操作或者其他数据存储方式,并通过 ContentResolver 提供访问权限。
<provider
    android:name=".MyProvider"                   <!-- ContentProvider 的类名 -->
    android:authorities="com.example.myapp.provider" <!-- ContentProvider 的 URI 标识符 -->
    android:exported="true"                      <!-- 是否允许外部应用访问 -->
    android:permission="android.permission.READ_CONTACTS"  <!-- 需要的权限 -->
    android:enabled="true"                       <!-- 是否启用 ContentProvider -->
    android:multiProcess="true"                  <!-- 是否支持多进程访问 -->
    android:readPermission="android.permission.READ_EXTERNAL_STORAGE"   <!-- 读取权限 -->
    android:writePermission="android.permission.WRITE_EXTERNAL_STORAGE" /> <!-- 写入权限 -->

 浙公网安备 33010602011771号