
nio编程
NIO主要有三大核心部分:Channel(通道),Buffer(缓冲区), Selector。传统IO基于字节流和字符流进行操作,而NIO基于Channel和Buffer(缓冲区)进行操作,数据总是从通道读取到缓冲区中,或者从缓冲区写入到通道中。Selector(选择区)用于监听多个通道的事件(比如:连接打开,数据到达)。因此,单个线程可以监听多个数据通道。
NIO和传统IO(一下简称IO)之间第一个最大的区别是,IO是面向流的,NIO是面向缓冲区的。 Java IO面向流意味着每次从流中读一个或多个字节,直至读取所有字节,它们没有被缓存在任何地方。此外,它不能前后移动流中的数据。如果需要前后移动从流中读取的数据,需要先将它缓存到一个缓冲区。NIO的缓冲导向方法略有不同。数据读取到一个它稍后处理的缓冲区,需要时可在缓冲区中前后移动。这就增加了处理过程中的灵活性。但是,还需要检查是否该缓冲区中包含所有您需要处理的数据。而且,需确保当更多的数据读入缓冲区时,不要覆盖缓冲区里尚未处理的数据。
IO的各种流是阻塞的。这意味着,当一个线程调用read() 或 write()时,该线程被阻塞,直到有一些数据被读取,或数据完全写入。该线程在此期间不能再干任何事情了。 NIO的非阻塞模式,使一个线程从某通道发送请求读取数据,但是它仅能得到目前可用的数据,如果目前没有数据可用时,就什么都不会获取。而不是保持线程阻塞,所以直至数据变得可以读取之前,该线程可以继续做其他的事情。 非阻塞写也是如此。一个线程请求写入一些数据到某通道,但不需要等待它完全写入,这个线程同时可以去做别的事情。 线程通常将非阻塞IO的空闲时间用于在其它通道上执行IO操作,所以一个单独的线程现在可以管理多个输入和输出通道(channel)。
传统IO vs NIO
import java.io.*;
import java.nio.ByteBuffer;
import java.nio.channels.FileChannel;

public class SimpleFileTransferTest {

    private long transferFile(File source, File des) throws IOException {
        long startTime = System.currentTimeMillis();
        if (!des.exists()) {
            des.createNewFile();
        }
        BufferedInputStream bis = new BufferedInputStream(new FileInputStream(source));
        BufferedOutputStream bos = new BufferedOutputStream(new FileOutputStream(des));

        //将数据源读到的内容写入目的地--使用数组
        byte[] bytes = new byte[bis.available()];
        int len;
        while ((len = bis.read(bytes)) != -1) {
            bos.write(bytes, 0, len);
        }

        long endTime = System.currentTimeMillis();
        return endTime - startTime;
    }

    private long transferFileWithNIO(File source, File des) throws IOException {
        long startTime = System.currentTimeMillis();
        int length = 0x8FFFFFF;
        if (!des.exists()) {
            des.createNewFile();
        }
        //FileChannel对象只能通过调用来获得getChannel()方法的开放上RandomAccessFile,FileInputStream或FileOutputStream对象。
        // 无法FileChannel直接创建对象。
        RandomAccessFile read = new RandomAccessFile(source, "rw");
        RandomAccessFile write = new RandomAccessFile(des, "rw");
        FileChannel readChannel = read.getChannel();
        FileChannel writeChannel = write.getChannel();

        //1M缓冲区
        ByteBuffer byteBuffer = ByteBuffer.allocate(1024*1024);
//        MappedByteBuffer out = read.getChannel()
//                .map(FileChannel.MapMode.READ_WRITE, 0, length);
        while (readChannel.read(byteBuffer) > 0) {
            //byteBuffer.limit( byteBuffer.position() ).position(0);
            byteBuffer.flip();
            writeChannel.write(byteBuffer);
            byteBuffer.clear();
        }

        writeChannel.close();
        readChannel.close();
        long endTime = System.currentTimeMillis();
        return endTime - startTime;
    }

    public static void main(String[] args) throws IOException {
        SimpleFileTransferTest simpleFileTransferTest = new SimpleFileTransferTest();
        File source = new File("C:\\Users\\Administrator\\Desktop\\事务.png");
        File des = new File("C:\\Users\\Administrator\\Desktop\\io.txt");
        File nio = new File("C:\\Users\\Administrator\\Desktop\\nio.txt");

        long time = simpleFileTransferTest.transferFile(source, des);
        System.out.println(time + ":普通字节流时间");

        long timeNio = simpleFileTransferTest.transferFileWithNIO(source, nio);
        System.out.println(timeNio + ":NIO时间");
    }
}
一、为什么要使用NIO
可以看到使用过NIO重新实现过的传统IO根本不虚,在大文件下效果还比NIO要好(当然了,个人几次的测试,或许不是很准)
-
而NIO要有一定的学习成本,也没有传统IO那么好理解。
IO操作往往在两个场景下会用到:
-
文件IO
-
网络IO
NIO的魅力:在网络中使用IO就可以体现出来了!
二、NIO快速入门
io和nio的区别
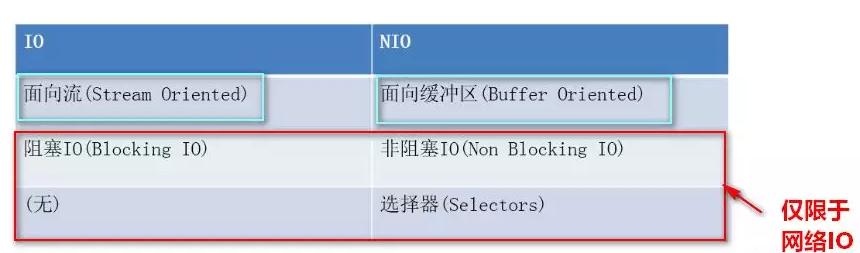
可简单认为:IO是面向流的处理,NIO是面向块(缓冲区)的处理
-
面向流的I/O 系统一次一个字节地处理数据。
-
一个面向块(缓冲区)的I/O系统以块的形式处理数据。
NIO主要有三个核心部分组成:
-
buffer缓冲区
-
Channel管道
-
Selector选择器
2.1buffer缓冲区和Channel管道
在NIO中并不是以流的方式来处理数据的,而是以buffer缓冲区和Channel管道配合使用来处理数据。
简单理解一下:
-
Channel管道比作成铁路,buffer缓冲区比作成火车(运载着货物)
而我们的NIO就是通过Channel管道运输着存储数据的Buffer缓冲区的来实现数据的处理!
-
要时刻记住:Channel不与数据打交道,它只负责运输数据。与数据打交道的是Buffer缓冲区
-
Channel-->运输
-
Buffer-->数据
相对于传统IO而言,流是单向的。对于NIO而言,有了Channel管道这个概念,读写都是双向的。
2.1.3FileChannel通道核心要点
Channel通道只负责传输数据、不直接操作数据的。操作数据都是通过Buffer缓冲区来进行操作!
三、网络IO(没有Selector选择器)
客户端
public class IOBlockClient {

    public static void main(String[] args) throws IOException {

        // 1. 获取通道
        SocketChannel socketChannel = SocketChannel.open(new InetSocketAddress("127.0.0.1", 6666));

        // 2. 发送一张图片给服务端吧
        FileChannel fileChannel = FileChannel.open(Paths.get("C:\\Users\\Administrator\\Desktop\\nio.png"), StandardOpenOption.READ);

        // 3.要使用NIO,有了Channel,就必然要有Buffer,Buffer是与数据打交道的呢
        ByteBuffer buffer = ByteBuffer.allocate(1024);

        // 4.读取本地文件(图片),发送到服务器
        while (fileChannel.read(buffer) != -1) {

            // 在读之前都要切换成读模式
            buffer.flip();

            socketChannel.write(buffer);

            // 读完切换成写模式,能让管道继续读取文件的数据
            buffer.clear();
        }

        // 5. 关闭流
        fileChannel.close();
        socketChannel.close();
    }
}
服务端
public class IOBlockServer {

    public static void main(String[] args) throws IOException {

        // 1.获取通道
        ServerSocketChannel server = ServerSocketChannel.open();

        // 2.得到文件通道,将客户端传递过来的图片写到本地项目下(写模式、没有则创建)
        FileChannel outChannel = FileChannel.open(Paths.get("io.png"), StandardOpenOption.WRITE, StandardOpenOption.CREATE);

        // 3. 绑定链接
        server.bind(new InetSocketAddress(6666));

        // 4. 获取客户端的连接(阻塞的)
        SocketChannel client = server.accept();

        // 5. 要使用NIO,有了Channel,就必然要有Buffer,Buffer是与数据打交道的呢
        ByteBuffer buffer = ByteBuffer.allocate(1024);

        // 6.将客户端传递过来的图片保存在本地中
        while (client.read(buffer) != -1) {

            // 在读之前都要切换成读模式
            buffer.flip();

            outChannel.write(buffer);

            // 读完切换成写模式,能让管道继续读取文件的数据
            buffer.clear();

        }

        // 7.关闭通道
        outChannel.close();
        client.close();
        server.close();
    }
}
如果仅仅是上面的代码是不行的!这个程序会阻塞起来!
-
因为服务端不知道客户端还有没有数据要发过来(与刚开始不一样,客户端发完数据就将流关闭了,服务端可以知道客户端没数据发过来了),导致服务端一直在读取客户端发过来的数据。
-
进而导致了阻塞!
网络NIO
客户端
public class NoBlockClient {

    public static void main(String[] args) throws IOException {

        // 1. 获取通道
        SocketChannel socketChannel = SocketChannel.open(new InetSocketAddress("127.0.0.1", 6666));

        // 1.1切换成非阻塞模式
        socketChannel.configureBlocking(false);

        // 2. 发送一张图片给服务端吧
        FileChannel fileChannel = FileChannel.open(Paths.get("C:\Users\Administrator\Desktop\nio.png"), StandardOpenOption.READ);

        // 3.要使用NIO,有了Channel,就必然要有Buffer,Buffer是与数据打交道的呢
        ByteBuffer buffer = ByteBuffer.allocate(1024);

        // 4.读取本地文件(图片),发送到服务器
        while (fileChannel.read(buffer) != -1) {

            // 在读之前都要切换成读模式
            buffer.flip();

            socketChannel.write(buffer);

            // 读完切换成写模式,能让管道继续读取文件的数据
            buffer.clear();
        }

        // 5. 关闭流
        fileChannel.close();
        socketChannel.close();
    }
}
服务端
public class NoBlockServer {

    public static void main(String[] args) throws IOException {

        // 1.获取通道
        ServerSocketChannel server = ServerSocketChannel.open();

        // 2.切换成非阻塞模式
        server.configureBlocking(false);

        // 3. 绑定连接
        server.bind(new InetSocketAddress(6666));

        // 4. 获取选择器
        Selector selector = Selector.open();

        // 4.1将通道注册到选择器上,指定接收“监听通道”事件
        //方法的第二个参数,表示一个“interest 集合”,意思是通过 Selector 监听 Channel 时,对哪些( 可以是多个 )事件感兴趣。可以监听四种不同类型的事件:
        //Connect :连接完成事件( TCP 连接 ),仅适用于客户端,对应 SelectionKey.OP_CONNECT 。
        //Accept :接受新连接事件,仅适用于服务端,对应 SelectionKey.OP_ACCEPT 。
        //Read :读事件,适用于两端,对应 SelectionKey.OP_READ ,表示 Buffer 可读。
        //Write :写时间,适用于两端,对应 SelectionKey.OP_WRITE ,表示 Buffer 可写。
        //Selector 可以对 Channel 的多个事件感兴趣,所以在我们想要注册 Channel 的多个事件到 Selector 中时,可以使用或运算 | 来组合多个事件
        server.register(selector, SelectionKey.OP_ACCEPT);

        // 5. 轮训地获取选择器上已“就绪”的事件--->只要select()>0,说明已就绪
        while (selector.select() > 0) {
            // 6. 获取当前选择器所有注册的“选择键”(已就绪的监听事件)
            Iterator<SelectionKey> iterator = selector.selectedKeys().iterator();

            // 7. 获取已“就绪”的事件,(不同的事件做不同的事)
            while (iterator.hasNext()) {

                SelectionKey selectionKey = iterator.next();

                // 接收事件就绪
                if (selectionKey.isAcceptable()) {

                    // 8. 获取客户端的链接
                    SocketChannel client = server.accept();

                    // 8.1 切换成非阻塞状态
                    client.configureBlocking(false);

                    // 8.2 注册到选择器上-->拿到客户端的连接为了读取通道的数据(监听读就绪事件)
                    client.register(selector, SelectionKey.OP_READ);
                    // 读事件就绪
                } else if (selectionKey.isReadable()) {

                    // 9. 获取当前选择器读就绪状态的通道
                    SocketChannel client = (SocketChannel) selectionKey.channel();

                    // 9.1读取数据
                    ByteBuffer buffer = ByteBuffer.allocate(1024);

                    // 9.2得到文件通道,将客户端传递过来的图片写到本地项目下(写模式、没有则创建)
                    FileChannel outChannel = FileChannel.open(Paths.get("2.png"), StandardOpenOption.WRITE, StandardOpenOption.CREATE);

                    while (client.read(buffer) > 0) {
                        // 在读之前都要切换成读模式
                        buffer.flip();

                        outChannel.write(buffer);

                        // 读完切换成写模式,能让管道继续读取文件的数据
                        buffer.clear();
                    }
                }
                // 10. 取消选择键(已经处理过的事件,就应该取消掉了)
                //从 selected keys 集合中,获取到一个 key ,但是没有将它删除,那么下一次 #select 时, 这个 SelectionKey 还在 selectedKeys 中
                iterator.remove();
            }
        }
    }
}
在客户端上要想获取得到服务端的数据,也需要注册在register上(监听读事件)!
public class NoBlockClient2 {

    public static void main(String[] args) throws IOException {

        // 1. 获取通道
        SocketChannel socketChannel = SocketChannel.open(new InetSocketAddress("127.0.0.1", 6666));

        // 1.1切换成非阻塞模式
        socketChannel.configureBlocking(false);

        // 1.2获取选择器
        Selector selector = Selector.open();

        // 1.3将通道注册到选择器中,获取服务端返回的数据
        socketChannel.register(selector, SelectionKey.OP_READ);

        // 2. 发送一张图片给服务端吧
        FileChannel fileChannel = FileChannel.open(Paths.get("C\\Users\\\administrator\\Desktop\\nio.png"), StandardOpenOption.READ);

        // 3.要使用NIO,有了Channel,就必然要有Buffer,Buffer是与数据打交道的呢
        ByteBuffer buffer = ByteBuffer.allocate(1024);

        // 4.读取本地文件(图片),发送到服务器
        while (fileChannel.read(buffer) != -1) {

            // 在读之前都要切换成读模式
            buffer.flip();

            socketChannel.write(buffer);

            // 读完切换成写模式,能让管道继续读取文件的数据
            buffer.clear();
        }


        // 5. 轮训地获取选择器上已“就绪”的事件--->只要select()>0,说明已就绪
        while (selector.select() > 0) {
            // 6. 获取当前选择器所有注册的“选择键”(已就绪的监听事件)
            Iterator<SelectionKey> iterator = selector.selectedKeys().iterator();

            // 7. 获取已“就绪”的事件,(不同的事件做不同的事)
            while (iterator.hasNext()) {

                SelectionKey selectionKey = iterator.next();

                // 8. 读事件就绪
                if (selectionKey.isReadable()) {

                    // 8.1得到对应的通道
                    SocketChannel channel = (SocketChannel) selectionKey.channel();

                    ByteBuffer responseBuffer = ByteBuffer.allocate(1024);

                    // 9. 知道服务端要返回响应的数据给客户端,客户端在这里接收
                    int readBytes = channel.read(responseBuffer);

                    if (readBytes > 0) {
                        // 切换读模式
                        responseBuffer.flip();
                        System.out.println(new String(responseBuffer.array(), 0, readBytes));
                    }
                }

                // 10. 取消选择键(已经处理过的事件,就应该取消掉了)
                iterator.remove();
            }
        }
    }
}

 浙公网安备 33010602011771号