TensorFlow1学习
1.简介与基础
深度学习的框架有很多:TensorFlow、Caffe、Theano、Torch等,其中Keras是在TensorFlow基础上构建的高层API,Keras在TensorFlow中,本次使用的tensorflow为1.12.0。
tensorflow包括两个阶段:
-
构建计算图(tf.Graph):
-
张量/数据(Tensor):主要包括[名称、维度、类型],即[name,shape,type]
-
操作(OPeration):我们构建的计算图的节点
-
-
运行计算图/会话(tf.Session)
-
以下为一个简单的tensorflow示例:
import tensorflow as tf
#第一阶段,构建计算图(用的是默认图)
a = tf.constant(2.0, dtype=tf.float32)
b = tf.constant(3.0)
c = tf.add(a, b)
print('a', a)
print('b', b)
print('c', c)
#第二阶段,运行计算图(默认图)
with tf.Session() as sess:
print(sess.run(b))
print('在会话中run后的加法结果', sess.run(c))
#运行结果
a Tensor("Const:0", shape=(), dtype=float32)
b Tensor("Const_1:0", shape=(), dtype=float32)
c Tensor("Add:0", shape=(), dtype=float32)
3.0
在会话中run后的加法结果 5.0
1.1 构建计算图(Graph)
1.1.1默认图
通常Tensorflow会默认帮我们创建一张图,查看默认图有两种方法;
-
default_g = tf.get_default_graph() #创建一个默认图,赋值给default_g
-
使用上面代码的a与sess,a.graph或sess.graph,因为这两个便是节点与运行,且都有默认的graph属性。
其运行的代码如下(拼接上面的代码,下面没有重新import的都一样,之后不重复说明):
default_g = tf.get_default_graph()
print('attribute', default_g)
print('attribute', a.graph)
print('attribute', sess.graph)
#结果显示
attribute <tensorflow.python.framework.ops.Graph object at 0x000001CB0F8DE748>
attribute <tensorflow.python.framework.ops.Graph object at 0x000001CB0F8DE748>
attribute <tensorflow.python.framework.ops.Graph object at 0x000001CB0F8DE748>
1.1.2创建新图
与上面的默认图差不多的形式:
new_g = tf.Graph() #创建一个新的图,赋值给new_g
如果要对新图进行相关处理,则用new_g.as_default()。
代码如下:
new_g = tf.Graph()
with new_g.as_default():
    a_new = tf.constant([15])
    print('a_new', a_new)
#结果显示
a_new Tensor("Const:0", shape=(1,), dtype=int32)
1.1.3Tensor张量/数据
张量Tensor有3个属性(attrtibute):名称(name)、维度(shape)、类型(type)
(1). 0阶张量
mammal = tf.Variable("Elephant", tf.string)
ignition = tf.Variable(451, tf.int16)
floating = tf.Variable(3.14159265359, tf.float64)
its_complicated = tf.Variable(12.3 - 4.85j, tf.complex64)
print(mammal, type(mammal))
print(ignition, type(ignition))
print(floating, type(floating))
print(its_complicated, type(its_complicated))
#结果显示
<tf.Variable 'Variable:0' shape=() dtype=string_ref> <class 'tensorflow.python.ops.variables.Variable'>
<tf.Variable 'Variable_1:0' shape=() dtype=int32_ref> <class 'tensorflow.python.ops.variables.Variable'>
<tf.Variable 'Variable_2:0' shape=() dtype=float32_ref> <class 'tensorflow.python.ops.variables.Variable'>
<tf.Variable 'Variable_3:0' shape=() dtype=complex128_ref> <class 'tensorflow.python.ops.variables.Variable'>
0阶张量就是一个数,其中tf.variable就是构造一个variable(变量)添加进图中,而variable()则是构造函数所需要的变量的初始值可以是一个任意形状、任意类型的张量/数据Tensor,而括号里的格式形如(initialization,name)分别是初始化的参数,即我们要的数据值,和数据的名字,所以下面一阶、二阶都用了,具体使用方法在下方变量相关操作中提到。
(2). 1阶张量
myst = tf.Variable(["Hello"], tf.string)
cool_numbers = tf.Variable((3.14159, 2.71828), tf.float32)
first_primes = tf.Variable((2, 3, 5, 7, 11), tf.int32)
its_very_complicated = tf.Variable([12.3 - 4.85j, 7.5 - 6.23j], tf.complex64)
print(myst, type(myst))
print(cool_numbers, type(cool_numbers))
print(first_primes, type(first_primes))
print(its_very_complicated, type(its_very_complicated))
#结果显示
<tf.Variable 'Variable_4:0' shape=(1,) dtype=string_ref> <class 'tensorflow.python.ops.variables.Variable'>
<tf.Variable 'Variable_5:0' shape=(2,) dtype=float32_ref> <class 'tensorflow.python.ops.variables.Variable'>
<tf.Variable 'Variable_6:0' shape=(5,) dtype=int32_ref> <class 'tensorflow.python.ops.variables.Variable'>
<tf.Variable 'Variable_7:0' shape=(2,) dtype=complex128_ref> <class 'tensorflow.python.ops.variables.Variable'>
(3). 2阶张量
mymat = tf.Variable([[7],[11]], tf.int16)
myxor = tf.Variable([[False, True],[True, False]], tf.bool)
linear = tf.Variable([[4], [9], [16], [25]], tf.int32)
squarish_squares = tf.Variable([ [4, 9], [16, 25] ], tf.int32)
rank = tf.rank(squarish_squares)
print(mymat, type(mymat))
print(myxor, type(myxor))
print(linear,type(linear))
print(squarish_squares,type(squarish_squares))
print(rank, type(rank))
#结果显示
<tf.Variable 'Variable_8:0' shape=(2, 1) dtype=int32_ref> <class 'tensorflow.python.ops.variables.Variable'>
<tf.Variable 'Variable_9:0' shape=(2, 2) dtype=bool_ref> <class 'tensorflow.python.ops.variables.Variable'>
<tf.Variable 'Variable_10:0' shape=(4, 1) dtype=int32_ref> <class 'tensorflow.python.ops.variables.Variable'>
<tf.Variable 'Variable_11:0' shape=(2, 2) dtype=int32_ref> <class 'tensorflow.python.ops.variables.Variable'>
Tensor("Rank:0", shape=(), dtype=int32) <class 'tensorflow.python.framework.ops.Tensor'>
其中tf.rank()为返回矩阵秩的函数, 注意:张量的秩与矩阵的秩不一样。张量的秩是唯一选择张量的每个元素所需的索引的数量。秩也被称为 “order”,“degree” 或 “ndims”。
在图像处理过程中,还有很多4阶张量,形如:
my_image = tf.zeros([10, 299, 299, 3]) #参数依次为:批处理大小、图像宽、图像高、图像颜色通道数
(4). 关于张量的一些操作
1.tf.reshape(x,shape)
作用是改变形状
matrix = tf.ones([3, 4, 5])
matrixA = tf.reshape(matrix, [6, 10])  #重塑成 6*10
matrixB = tf.reshape(matrixA, [3, -1])  # 重塑成 3x20
print(matrix)
print(matrixA)
print(matrixB)
#结果显示
Tensor("ones:0", shape=(3, 4, 5), dtype=float32)
Tensor("Reshape:0", shape=(6, 10), dtype=float32)
Tensor("Reshape_1:0", shape=(3, 20), dtype=float32)
2.Tensor中的常量(constant)
-
生成0的张量函数 tf.zeros(shape=[2,2], dtypt=tf.float32, namhanghe=None)
-
生成1的张量函数 tf.ones(shape=[2,2], dtypt=tf.float32, namhanghe=None)
-
生成常数 tf.constant(value, dtype=None, Shape=None, name="Const")
-
numpy变为tensorflow数:data_tensor= tf.convert_to_tensor(data_numpy)
-
生成都是value值的dims形状的张量 tf.fill(dims, value, name=None) ,形如:
import tensorflow as tf
t1 = tf.fill([2, 3], 3)
print(t1)
sess = tf.Session()#这部分其实是计算部分,先用,看我们的t1变成了什么
print(sess.run(t1))
#结果显示
Tensor("Fill:0", shape=(2, 3), dtype=int32)
[[3 3 3]
 [3 3 3]]
3.Tensor中的随机数(random)
-
tf.random_normal(shape, mean=0.0, stddev=1.0, dtype=tf.float32, seed=None, name=None)
生成标准正态分布的随机张量
-
tf.truncated_normal(shape, mean=0.0, stddev=1.0, dtype=tf.float32, seed=None, name=None)
shape表示生成张量的维度,mean是均值,stddev是标准差。这个函数产生截断的正态分布,就是说产生正态分布的值与均值的差值大于两倍的标准差,那就重新生成。和一般的正态分布的产生随机数据比起来,这个函数产生的随机数与均值的差距不会超过两倍的标准差,但是一般的别的函数是可能的。
-
tf.random_uniform(shape, minval=0, maxval=None, dtype=tf.float32, seed=None, name=None)
从均匀分布中返回随机值,shape形状、minval最小值、maxval最大值。
-
tf.random_shuffle(value, seed=None, name=None)
沿着要被洗牌的张量的第一个维度,随机打乱。value要洗牌的张量
4.Tensor中的初始化(initialize)
-
tf.constant_initializer(value=0, dtype=tf.float32)
也可以简写为tf.Constant(),初始化为常数,这个非常有用,通常偏置项就是用它初始化的。
由它衍生出的几个初始化方法:
-
tf.zeros_initializer(shape, dtype=tf.float32, partition_info=None)
-
tf.ones_initializer(dtype=tf.float32, partition_info=None)
-
tf.constant_initializer(0),tf.Constant(0)
-
tf.truncated_normal_initializer(mean=0.0, stddev=1.0, seed=None, dtype=tf.float32)
可简写为tf.TruncatedNormal(),生成截断正态分布的随机数,在tf中使用较多。
-
tf.ranndom_normal_initializer (mean=0.0, stddev=1.0, seed=None, dtype=tf.float32)
使用正态分布张量的初始化器,参数依次为:均值、方差、随机种子、数据类型
-
tf.random_uniform_initializer(minval=0, maxval=None, seed=None, dtype=tf.float32)
使用均匀分布张量的初始化器,参数依次为:最小值、最大值、随机种子、数据类型
-
tf.cast(x, dtype, name=None)
把张量x,变成任何的dtype,这里要与reshap分开,cast是变类型,如float32变成float16;reshap变的是维度,也就是我们说的形状,如zero[2, 3]变成zero[1, 6]。
注意:这些数据的类型都为float32,如果直接用都应该在tf.get_variable()中的initializer中
(5). 关于变量的一些操作
注意:所有变量进行相关操作都需要进行初始化。
1.变量创建variable相关
tf.Variable(initial_value=None, trainable=None, collections=None, validate_shape=True, caching_device=None, name=None, variable_def=None, dtype=None, expected_shape=None, import_scope=None, constraint=None, use_resource=None, shape=None)
在graph中创建变量,详细讲述请点击函数名,以下介绍了其常用参数。
-
initial_value:Tensor,定义Variable的初始值。
-
trainable:如果为True,则会默认将变量添加到图形集合GraphKeys.TRAINABLE_VARIABLES中,此集和用于优化器优化的默认变量列表 。
-
collections:graph集合列表的关键字。新变量将添加到这个集合中。默认为[GraphKeys.GLOBAL_VARIABLES]。
-
validate_shape:如果为True,则默认为initial_value的形状必须已知。如果为False,则允许使用未知形状的值初始化变量。
-
name:变量名,可选,默认为“Variable”并自动获取
-
dtype:数据类型
tf.get_variable(name,shape=None, dtype=None, initializer=None, regularizer=None, trainable=None, collections=None, caching_device=None, partitioner=None, validate_shape=True, use_resource=None, custom_getter=None, constraint=None)
这也是获取或创建一个变量的形式,与tf.Variable参数区别最主要在于如果新建变量名称原来存在,就会显示错误,不会像Variable一样,自动处理相同的变量名称,另外tf.get_variable还可以读取以前有的变量,也可以创建新的变量,而Variable只是直接创建,不管之前有没有存在,以下介绍了其常用参数。
-
name:新变量或现有变量的name
-
shape:新变量或现有变量的shape
-
dtype:新变量或现有变量的类型(默认为DT_FLOAT)。
-
initializer:变量的初始化方式
-
regularizer:函数(tensor-->tensor),将函数应用于新创建的变量,结果将添加到集合tf.GraphKeys.REGULARIZATION_LOSSES中,并可用于正则化。
-
trainable:如果为True,还将变量添加到图形集合GraphKeys.TRAINABLE_VARIABLES,此集和用于优化器优化的默认变量列表 。
-
collections:要将变量添加到的图表集合列表。默认为[GraphKeys.GLOBAL_VARIABLES](参见tf.Variable) 。
-
validate_shape:如果为True,则默认为initial_value的形状必须已知。如果为False,则允许使用未知形状的值初始化变量。
-
use_resource:如果为False,则创建常规变量。如果为true,则使用定义良好的语义创建实验性ResourceVariable。默认为False(以后版本中将更改为True)。在Eager模式下,此参数始终强制为True。
v = tf.get_variable("v", shape=(), initializer=tf.zeros_initializer())
u = tf.Variable([1, 2], trainable=True, validate_shape=True, name='u')
w = v + 1
w1 = u + 2

print(v, type(v))
print(u, type(u))
print(w, type(w))
print(w1, type(w1))
#结果显示
<tf.Variable 'v:0' shape=() dtype=float32_ref> <class 'tensorflow.python.ops.variables.Variable'>
<tf.Variable 'u:0' shape=(2,) dtype=int32_ref> <class 'tensorflow.python.ops.variables.Variable'>
Tensor("add:0", shape=(), dtype=float32) <class 'tensorflow.python.framework.ops.Tensor'>
Tensor("add_1:0", shape=(2,), dtype=int32) <class 'tensorflow.python.framework.ops.Tensor'>
tf.global_variables_initializer(),一般只用于统一初始化,因为其不会指定变量的初始化顺序,当一个变量的初始值取决于另一个变量的值时,使用这种方法可能会出现错误,所以我们要在命名时就进行初始化。
#形如:init = tf.global_variables_initializer()
使用assign与assign_add方法对tf.Variable进行值的变换
import tensorflow as tf

a = tf.Variable(initial_value=0, name='counter') # 创建一个变量,初始化为标量0
b = tf.constant(1)
c = tf.get_variable('c', shape=(), initializer=tf.zeros_initializer())

assignment = c.assign_add(1) # 利用assign_add实现变量c初始值+1
new_value = tf.add(a, b) # 利用add实现a与b的相加
update = tf.assign(a, new_value) # 将新的值new_value赋值给a,只是描绘图,并不会执行

#启动图前,变量必须经过初始化(init)
init = tf.global_variables_initializer() # 统一初始化

#启动图,运行op,这部分在运行计算图中会再详细介绍
with tf.Session() as sess:
    sess.run(init) # 运行‘init’
    print(sess.run(a)) # 打印‘a’的值
    print(sess.run(assignment)) # 打印‘assignment’的值
    #运行op,更新a,并打印a
    for _ in range(2): # 补充一个小知识,range是一种与list与tuple同等类型的数据类型
        sess.run(update)
        print(sess.run(update))
#结果显示
0
1.0
2
4
2.对列表中变量的相关操作
-
tf.add_to_collection:把变量放入一个集合,把很多变量变成一个列表
-
tf.get_collection:从一个列表中取出全部变量,是一个列表
-
tf.add_n:把一个列表的东西都依次加起来
import tensorflow as tf

v1 = tf.get_variable(name='v1', shape=[1], initializer=tf.constant_initializer(2))
tf.add_to_collection('loss', v1) # 将v1放入loss列表中
v2 = tf.get_variable(name='v2', shape=[1], initializer=tf.constant_initializer(1))
tf.add_to_collection('loss', v2)

init = tf.global_variables_initializer()

with tf.Session() as sess:
    sess.run(init)
    print(tf.get_collection('loss')) # 将上面加进去的v1与v2从loss列表取出并打印
    print(sess.run(tf.get_collection('loss')))
    print(sess.run(tf.add_n(tf.get_collection('loss')))) # 将v1与v2取出相加再打印最后运行的结果
#结果显示
[<tf.Variable 'v1:0' shape=(1,) dtype=float32_ref>,
 <tf.Variable 'v2:0' shape=(1,) dtype=float32_ref>]
[array([2.], dtype=float32),
 array([1.], dtype=float32)]
[3.]
3.变量命名空间
-
tf.name_scope() # 修改变量的命名空间
tf.name_scope主要结合tf.Variable()来使用,它的主要目的是为了方便管理参数命名,以下为它的一个简单示例:
import tensorflow as tf

with tf.name_scope('conv1'):
    weights1 = tf.Variable([1.0, 2.0], name='weights')
    bias1 = tf.Variable([0, 3], name='bias')

# 下面是在另一个命名空间来定义变量
with tf.name_scope('conv2'):
    weights2 = tf.Variable([4.0, 2.0], name='weights')
    bias2 = tf.Variable([0, 44], name='bias')

print(weights1.name)
print(weights2.name)

#如果重复执行,则会生成新的命名空间
with tf.name_scope('conv1'):
    weights1 = tf.Variable([1.0, 2.0], name='weights')
    bias1 = tf.Variable([0, 3], name='bias')

# 下面是在另一个命名空间来定义变量
with tf.name_scope('conv2'):
    weights2 = tf.Variable([4.0, 2.0], name='weights')
    bias2 = tf.Variable([0, 44], name='bias')

print(weights1.name)
print(weights2.name)
#结果显示
conv1/weights:0
conv2/weights:0
conv1_1/weights:0
conv2_1/weights:0
-
tf.variable_scope('scope_name')
这种方法主要是与tf.get_variable()来使用,实现变量共享,以下为它的一个简单示例:
with tf.variable_scope('v_scope'):
    Weights1 = tf.get_variable('Weights', shape=[2, 3])
    bias1 = tf.get_variable('bias', shape=[3, ])
# print(Weights1, type(Weights1))
# print(bias1, type(bias1))
# 下面共享上面已经定义好的变量
# 在下面的scope中的变量必须经过get.variable()定义过了,才能设置reuse=True,否则会报错
with tf.variable_scope('v_scope', reuse=True):
    Weights2 = tf.get_variable('Weights')

print(Weights1.name)
print(Weights2.name)
#结果显示
v_scope/Weights:0
v_scope/Weights:0
共享变量有两种方法:
#方法一:
with tf.variable_scope('name') as scope:
    我们定义的变量,最好使用tf.get_variable生成
#方法二:
with tf.variable_scope('name', reuse=True):
    我们定义的变量,只有tf.get_variable定义变量,才能是reuse(重复使用)为真的必要条件
总结:这两种都是变量空间操作,但是name_scope一般是与Variable一起用,variable_scope一般与tf.get_variable一起使用。
1.2 会话/运行计算图(Session)
要评估张量,就需要实例化一个tf.Session()对象,在会话/运行计算图中,调用run方法来运行图节点以及查看张量。
-
sess.run(张量)与Tensor.eval(),即张量.eval(),都是返回与张量内容相同的numpy数组。
-
Tensor.eval与sess.run方法能运行的前提都是tf.Session处于活跃状态。
下面是两种方法的简单示例(接的是一开始的总体简单示例):
with tf.Session() as sess:
    print(a.eval())
    print(sess.run(a))
#结果显示
2.0
2.0
1.2.1会话/运行计算图的两种方式
-
tf.Session(graph=None, config=None) #如果括号内什么都不写就默认为None。
也可以graph=new_graph # new_graph是自定义创建的新的图的对象实例
config:清晰地显示操作运行在哪些设备上 如果想要知道设备信息,把config设置成config = tf.ConfigProto(allow_soft_placement=True, log_device_placement=True)
-
tf.InteractiveSession() #用于在交互模式中打开会话,ipython,shell,jupyter Notebook。
最后,会话/运行计算图(Session)在使用完后需要释放资源,除了使用sess.close()外,一般使用“with代码块”来自动关闭。
1.2.2会话/运行计算图的run
run(fetches, feed_dict=None, options=None, run_metadata=None)
其中的几个参数介绍:
-
fetches:单一的operation(操作或者叫节点),或者元组operation、列表operation
-
feed_dict:参数允许调用者覆盖图中张量的值,运行时赋值。与tf.placeholder(),即我们所说的feed操作配合使用,则会检测值的形状是否与占位符匹配。
以下为run的简单示例:
import tensorflow as tf

a = tf.constant(2.)
b = tf.constant(3.)
c = a + b

sess = tf.Session() # 等价与with tf.Session() as sess:
s = sess.run(c)
print(s)
print(c.eval(session=sess)) # 如果上面用的是with则Session是活跃的不用在()中再声明
#结果显示
5.0
5.0
以下是feed_dict的相关操作(接上面的代码):
input1 = tf.constant(2.0)
input2 = tf.constant(3.0)
input3 = tf.constant(4.0)
input4 = tf.add(input2, input3)
input5 = tf.multiply(input1, input4)

with tf.Session() as sess:
    result = sess.run([input5, input4])#通过run取回多个张量
    print(result, type(result))
#结果显示
[14.0, 7.0] <class 'list'>
结合tf.placeholder()进行相关操作:
import tensorflow as tf

a = tf.placeholder(tf.float32) # 就是用placeholder创建一个占位符,最后必须通过feed_dict进行参数替换
b = tf.placeholder(tf.float32)
c = tf.add(a, b)

with tf.Session() as sess:
    re1 = sess.run(c, feed_dict={a: 1, b: 2.5})
    print(re1)
    print(sess.run(c, feed_dict={a: [1., 2.], b: [2., 2.]}))
#结果显示
3.5
[3. 4.]
2.TensorBoard:可视化学习
TensorBoard是tensorflow的可视化工具,实现程序可视化的过程。
2.1数据序列化-event文件
tf.summary.FileWriter('path', garph=sess.graph) #在会话/运行计算图中写入事件文件,然后在path路径创建一个even文件。
-
path 事件文件的写入地址
-
graph 选择描绘的计算图,sess.graph或tf.get_default_graph()都是默认图,tf.graph()是新图
以下是一个简单示例:
import tensorflow as tf

a = tf.constant(20, name='ax')
b = tf.constant(30, name='bx')
c = a + b

with tf.Session() as sess:
    c = sess.run(c)
    writer = tf.summary.FileWriter('./', sess.graph) # 写入事件文件
    writer.close() # 写完之后的关闭操作,必须要有
#这只是写入事件的代码,并没有打印什么结果
2.2启动TensorBoard
-
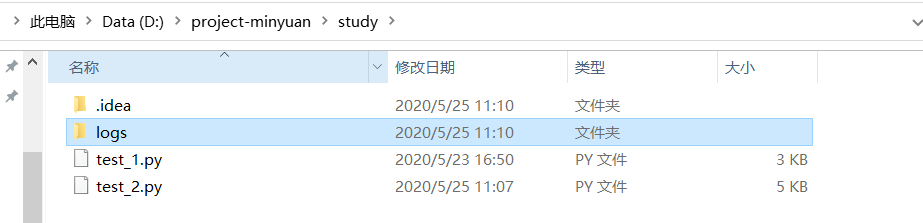
将项目中的.py文件(这个py文件是拥有写入事件语句的)运行,生成event文件,如图:

-
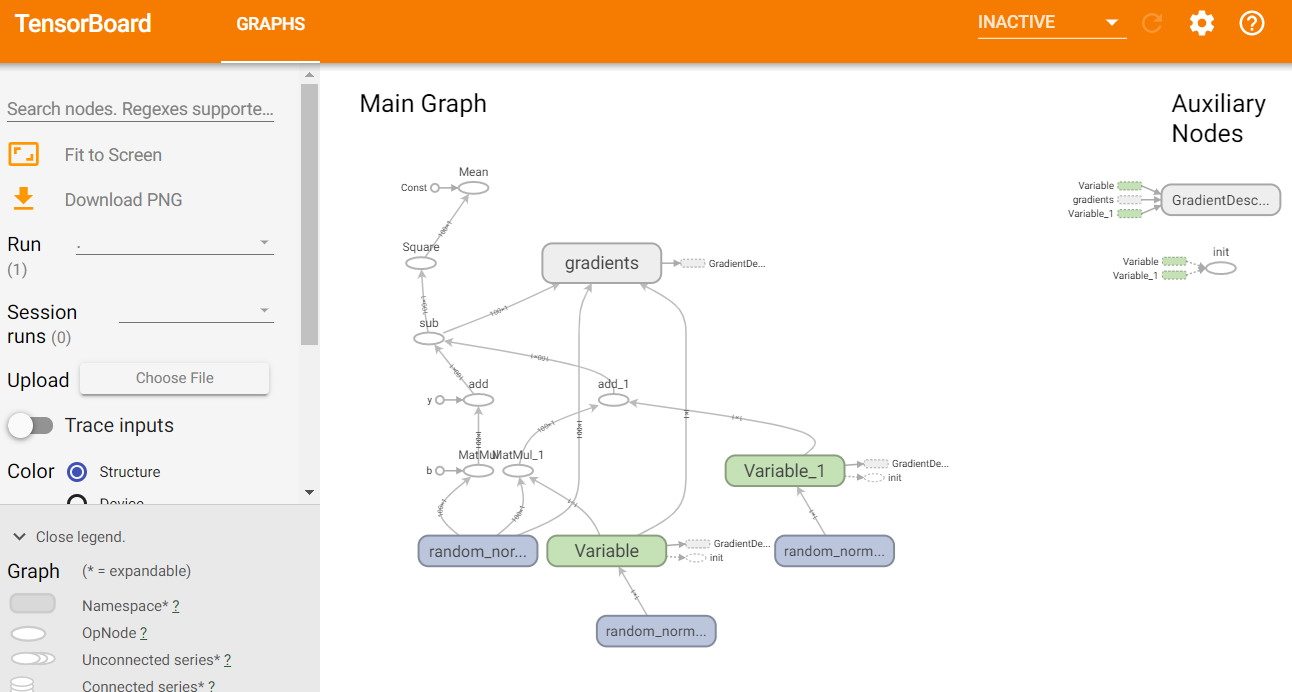
在cmd中或者Git Bash中运行 tensorboard --logdir="path" (注意,一定要是在event存在的文件夹中打开cmd,在命令中path一定要用双引号,单引号会出错),如图:

-
然后在谷歌浏览器中 localhost:6006 就可以看到图了 ,如图:
下面是一个py文件显示tensorboard示例:
# 实现一个线性回归
import tensorflow as tf
import os
os.environ["TF_CPP_MIN_LOG_LEVEL"] = "2"
# 准备数据
X = tf.random_normal(shape=[100, 1])
y_true = tf.matmul(X, [[0.8]]) + 0.7
# 构建线性模型的tensor变量Weight, bias
Weight = tf.Variable(initial_value=tf.random_normal(shape=[1, 1]))
bias = tf.Variable(initial_value=tf.random_normal(shape=[1, 1]))
y_predict = tf.matmul(X, Weight) + bias
# 构建损失方程,优化器及训练模型操作train
loss = tf.reduce_mean(tf.square(y_predict - y_true))
optimizer = tf.train.GradientDescentOptimizer(learning_rate=0.5)
train = optimizer.minimize(loss)
init = tf.global_variables_initializer() # 构建变量初始化操作init
with tf.Session() as sess:
sess.run(init)
writer = tf.summary.FileWriter("D:/project-minyuan/study/logs", sess.graph)
for step in range(1000):
sess.run(train)
if step % 20 == 0: # 每20次打印一次
print(step, sess.run(Weight), sess.run(bias))
writer.close()
目的:在TensorBoard中观察模型参数、损失值等变量的变化
-
收集变量用于tensorboard可视化
-
tf.summary.scalar(name="", tensor) # 收集标量,例:loss、accuary、learing_rate
-
tf.summary.histogram(name="", tensor) # 收集高维度的变量,例:训练过程中的变量, 以直方图的形式显示变量分布情况 。
-
tf.summaty.image(name="", tensor) # 收集图片张量[image_num, height, width, channels],展示训练过程中记录的图像
-
tf.summaty.audio(name="", tensor) # 收集音频张量[audio_num, frames, channels],播放训练过程中记录的音频
数据的tensorboard可视化展现 :网址
import tensorflow as tf
import os
os.environ["TF_CPP_MIN_LOG_LEVEL"] = "2"
# 准备数据
X = tf.random_normal(shape=[100, 1])
y_true = tf.matmul(X, [[0.8]]) + 0.7
# 构建线性模型的tensor变量Weight, bias
Weight = tf.Variable(initial_value=tf.random_normal(shape=[1, 1]))
bias = tf.Variable(initial_value=tf.random_normal(shape=[1, 1]))
y_predict = tf.matmul(X, Weight) + bias
# 构建损失方程,优化器及训练模型操作train
loss = tf.reduce_mean(tf.square(y_predict - y_true))
optimizer = tf.train.GradientDescentOptimizer(learning_rate=0.01)
train = optimizer.minimize(loss)
# 收集变量
tf.summary.scalar("error", loss) # 收集标量
tf.summary.histogram("Weight", Weight) # 收集高维变量
tf.summary.histogram("bias", bias)
merged = tf.summary.merge_all() # 合并变量
init = tf.global_variables_initializer() # 变量初始化操作
with tf.Session() as sess:
sess.run(init)
event_file = tf.summary.FileWriter("D:/project-minyuan/study/logs", sess.graph) # 创建事件文件
for step in range(100):
sess.run(train)
if step % 20 == 0: # 每20次打印一次
print(step, sess.run(Weight), sess.run(bias))
summary = sess.run(merged) # 运行合并变量的操作
event_file.add_summary(summary, step) # 将每次迭代后的变量写入事件文件
event_file.close()
其中一些参数的解释:
-
merged = tf.summary.merge_all() # 将所有的summary保存到磁盘,以便tensorboard可视化
-
event_file = tf.summary.FileWriter("./", sess.graph) # 在会话中创建事件文件保存图
-
summary = sess.run(merged) # 在会话中运行合并操作
-
event_file.add_summary(summary, step) # 将每次迭代更新后的summary写入事件文件
-
event_file.close() # 最后记得关闭事件文件
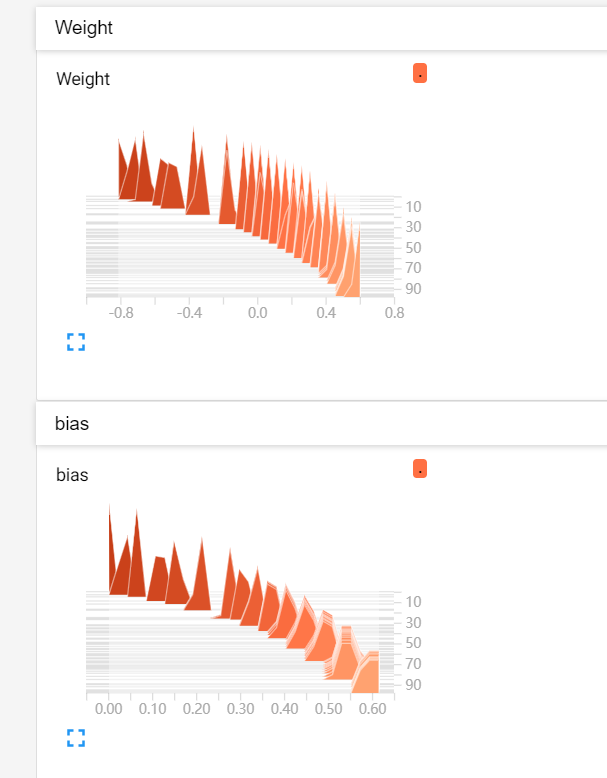
结果如图:


3.模型的保存与加载
3.1 模型保存
-
saver = tf.train.Saver(var_list=None, max_to_keep=5) # 保存和加载模型
其中相关参数:
-
var_list:指定要保存的变量,可以作为一个dict或列表传递,如果为None,就是保存所有变量。
-
max_to_keep:保留检查点文件的数量,创建新文件时会删除旧的文件 。
-
saver.save(sess, save_path="./liner.ckpt", global_step=step) # 保存模型
-
sess:会话名字 。
-
save_path:设定权重参数保存的路径和文件名。
-
global_step=step:将训练的次数作为后缀加入到模型名字中。
以下是一个简单训练模型并保存的示例:
import tensorflow as tf
import os
os.environ["TF_CPP_MIN_LOG_LEVEL"] = "2"
v1 = tf.get_variable("v1", shape=[3], initializer=tf.zeros_initializer)
v2 = tf.get_variable("v2", shape=(5), initializer=tf.zeros_initializer)
# inc_v1 = v1.assign(v1+1) # v1变量+1
a = tf.constant(1.0)
b = tf.add(v1, a)
inc_v1 = tf.assign(v1, b)
dec_v2 = v2.assign(v2-1) # v2变量-1
init = tf.global_variables_initializer()
saver = tf.train.Saver() # 创建Saver对象
with tf.Session() as sess:
sess.run(init)
inc_v1.op.run()
dec_v2.op.run()
for epoch in range(300):
if epoch % 10 ==0:
# 在会话中保存模型
save_path = saver.save(sess, save_path="./model/model.ckpt", global_step=epoch)
print("Model saved in path: %s" % save_path)
运行完代码在model文件夹中生成下列几个文件:
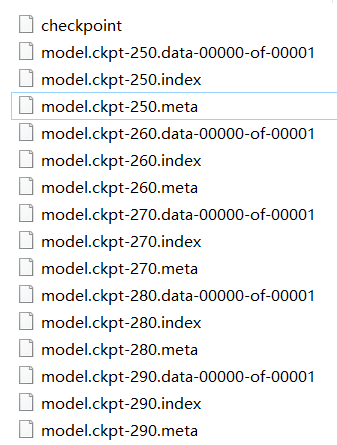
其中几个文件名的意思如下:
-
checkpoint 记录最新的模型
-
().data/ ().index 存储训练好的参数
-
().meta 存储网络结构
3.2 模型加载
-
saver.restore(sess, "./liner.ckpt") # 加载模型
-
checkpoint = tf.train.latest_checkpoint("./model/") # 获取最新的模型
import tensorflow as tf
import os
os.environ["TF_CPP_MIN_LOG_LEVEL"] = "2"
v1 = tf.get_variable("v1", shape=[3])
v2 = tf.get_variable("v2", shape=[5])
tf.add_to_collection("variable", v1)
tf.add_to_collection("variable", v2)
def load_model(sess, ckpt):
# ckpt是模型路径
if os.path.isdir(ckpt):
# 获取最新的模型
checkpoint = tf.train.latest_checkpoint(ckpt)
else:
checkpoint = ckpt
print(checkpoint) # ./model/model.ckpt-290
meta = checkpoint + '.meta' # ./model/model.ckpt-290.meta
print(meta)
saver = tf.train.import_meta_graph(meta) # 加载graph图结构
saver.restore(sess, checkpoint) # 加载模型参数
with tf.Session() as sess:
sess.run(tf.global_variables_initializer())
model_dir = "./model/"
load_model(sess, model_dir)
# 从变量集和名为"variable"的集和中取出变量
a, b = tf.get_collection('variable')
print(a, b)
print("模型恢复....")
print("v1 : %s" % v1.eval())
print("v2 : %s" % v2.eval())
#结果显示
./model/model.ckpt-290
./model/model.ckpt-290.meta
<tf.Variable 'v1:0' shape=(3,) dtype=float32_ref> <tf.Variable 'v2:0' shape=(5,) dtype=float32_ref>
模型恢复....
v1 : [-0.30017233 0.87121487 -0.7292707 ]
v2 : [-0.301401 -0.7233736 0.5275371 0.37816596 -0.61047554]
3.3 通过checkpoint找到模型文件名
tf.train.get_checkpoint_state(checkpoint_dir,latest_filename=None)
其中参数解释:
-
checkpoint_dir:checkpoint文件的路径
-
latest_filename:指定checkpoint的名字,返回的是CheckpointState proto对象,CheckpointState proto对象有两个可用属性。
命令行参数的使用
tensorflow支持程序从命令行接受参数,即使用tf.app.flag,tf.app.flag可以定义各种参数类型
-
整形参数 tf.app.flag.DEFINE_integer(flag_name, default, docstring)
-
字符串参数 tf.app.flag.DEFINE_string(flag_name, default, docstring)
-
布尔值参数 tf.app.flag.DEFINE_boolean(flag_name, default, docstring)
-
浮点值参数 tf.app.flag.DEFINE_float(flag_name, default, docstring)
4.一些小技巧
-
tf.app.run()可以自动运行脚本中的main(argv)函数,如果脚本没有main(argv)函数,会报错。
-
运行tensorflow的时候,会出现红色警告I tensorflow/core/platform/cpu_feature_guard.cc:141] Your CPU supports instructions that this TensorFlow binary was not compiled to use: AVX2
如果不想看到这个,在脚本开始的时候,加
import os
os.environ["TF_CPP_MIN_LOG_LEVEL"]= "2"

 浙公网安备 33010602011771号