
Kubernetes之使用kubeadm部署
参考:https://www.cnblogs.com/caoxb/p/11243472.html
部署需要的脚本下载
git clone https://gitee.com/liuyueming/k8s-kubeadm.git
部署虚拟机规划
192.168.1.11 k8s-master
192.168.1.12 k8s-node1
192.168.1.13 k8s-node2
备注:第1步~第8步,所有的节点都要操作,第9、10步Master节点操作,第11步Node节点操作。
如果第9、10、11步操作失败,可以通过 kubeadm reset 命令来清理环境重新安装。
1,关闭防火墙
systemctl stop firewalld
systemctl disable firewalld
2,关闭selinux
setenforce 0
修改
/etc/selinux/config
修改
SELINUX=disabled
3,关闭swapoff
swapoff -a
查看是否关闭
free

4,设置主机名和hosts
修改主机名并修改/etc/hosts
192.168.1.11 k8s-master
192.168.1.12 k8s-node1
192.168.1.13 k8s-node2
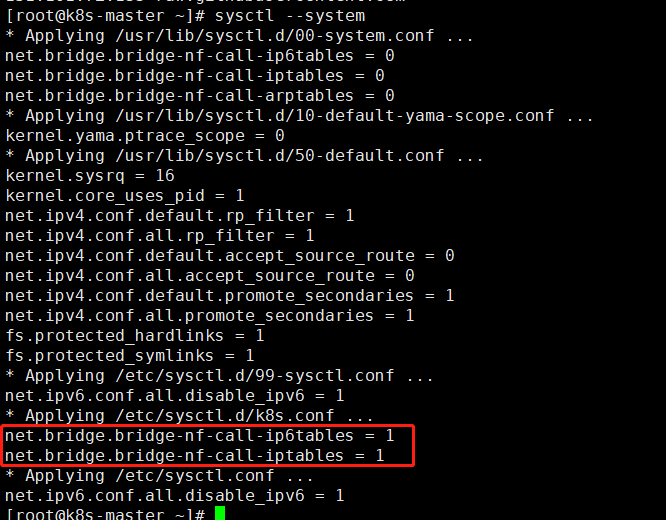
5,将桥接的IPV4流量传递到iptables的链
#cat > /etc/sysctl.d/k8s.conf << EOF
net.bridge.bridge-nf-call-ip6tables = 1
net.bridge.bridge-nf-call-iptables = 1
EOF
#sysctl --system
6,安装docker
设置国内源并且安装
# wget https://mirrors.aliyun.com/docker-ce/linux/centos/docker-ce.repo -O/etc/yum.repos.d/docker-ce.repo
#yum -y install docker-ce-18.06.1.ce-3.el7
启动
#systemctl enable docker
#systemctl start docker
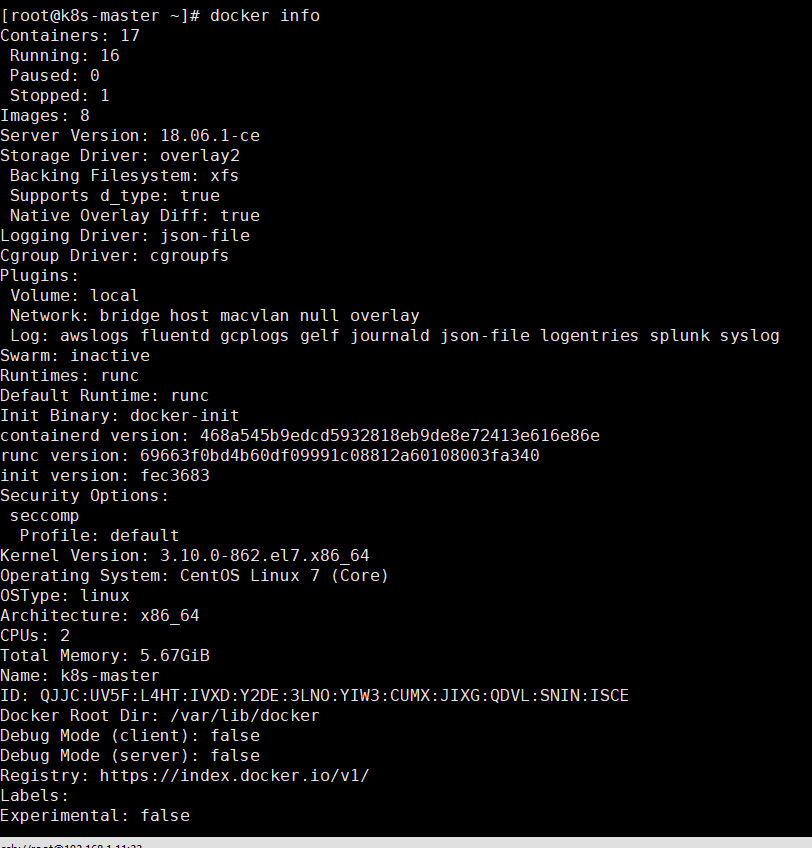
查看版本
docker info
7,添加阿里云YUM软件源
cat <<EOF > /etc/yum.repos.d/kubernetes.repo
[kubernetes]
name=Kubernetes
baseurl=https://mirrors.aliyun.com/kubernetes/yum/repos/kubernetes-el7-x86_64/
enabled=1
gpgcheck=1
repo_gpgcheck=1
gpgkey=https://mirrors.aliyun.com/kubernetes/yum/doc/yum-key.gpg https://mirrors.aliyun.com/kubernetes/yum/doc/rpm-package-key.gpg
EOF
8,安装kubeadm,kubelet和kubectl
在部署kubernetes时,要求master node和worker node上的版本保持一致,否则会出现版本不匹配导致奇怪的问题出现。本文将介绍如何在CentOS系统上,使用yum安装指定版本的Kubernetes。
本次指定安装1.15.0版本
yum -y install kubelet-1.15.0 kubeadm-1.15.0 kubectl-1.15.0
9,部署kubernetes master
初始化kubeadm
kubeadm init \
--apiserver-advertise-address=192.168.1.11 \
--image-repository registry.aliyuncs.com/google_containers \
--kubernetes-version v1.15.0 \
--service-cidr=10.1.0.0/16 \
--pod-network-cidr=10.244.0.0/16
PS:--apiserver-advertise-address参数指定master主机ip
--image-repository指定源为阿里云
    --kubernetes-version指定版本号
    --service-cidr#指定proxy的网段
--pod-network-cidr指定pod的网段
出现以下提示表示初始化正确

PS: 如果在安装时忘记记录这个加入集群命令可输入以下命令重新获取
kubeadm token create --print-join-command
建议至少2 cpu ,2G
查看镜像
docker images

使用kubectl工具,按照提示执行以下命令
mkdir -p $HOME/.kube
 sudo cp -i /etc/kubernetes/admin.conf $HOME/.kube/config
 sudo chown $(id -u):$(id -g) $HOME/.kube/config
设置自启动
systemctl status kubelet
systemctl start kubelet
PS:kubeadm不是需要开机启动kubelet否则集群不启动
下面可以使用kubectl命令了
kubectl get node

是没有准备状态
10,安装Pod网络插件
kubectl apply -f https://raw.githubusercontent.com/coreos/flannel/a70459be0084506e4ec919aa1c114638878db11b/Documentation/kube-flannel.yml

如提示无法无法连接设置host
151.101.72.133 raw.githubusercontent.com
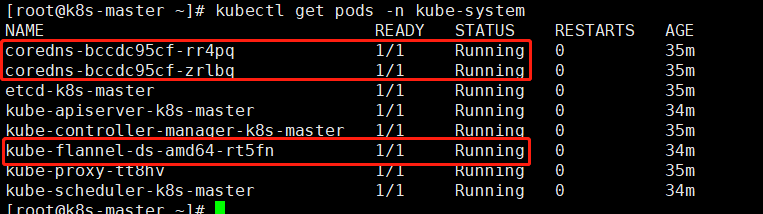
查看部署是否成功
kubectl get pods -n kube-system

如果下载镜像或者其他原因导致没有正常running可以删除在试一次
kubectl delete -f kube-flannel.yml
等一会再查看
master处于准备好状态

如果安装失败了重新清理环境再次安装
kubeadm reset
需要输入y确定
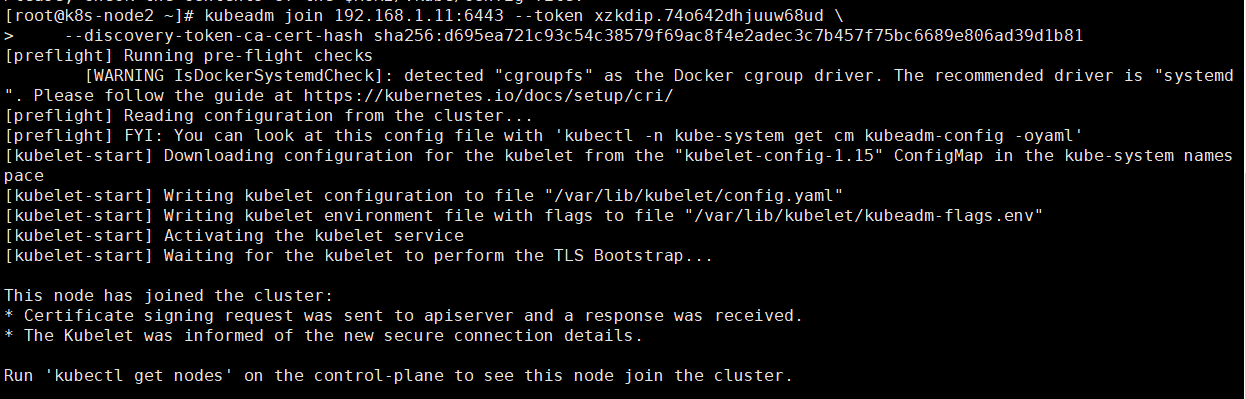
11,node加入集群
在node节点输入
kubeadm join 192.168.1.11:6443 --token xzkdip.74o642dhjuuw68ud \
    --discovery-token-ca-cert-hash sha256:d695ea721c93c54c38579f69ac8f4e2adec3c7b457f75bc6689e806ad39d1b81
通过master节点查看node发现已经加入集群
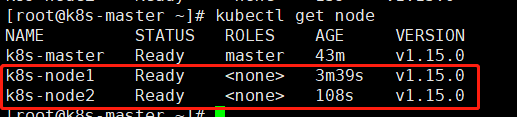
如果没有显示Ready状态可以在master查看
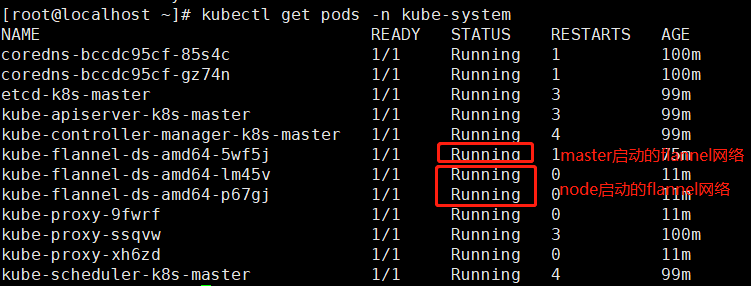
两个node节点的flannel需要显示Running状态如果是其他错误状态可能是网络原因导致镜像未下载,需要在node节点重置一下再运行加入集群命令
kubeadm reset
12,测试kubernetes集群
在master上面创建运行
#创建一个deployment名称为nginx使用镜像未nginx
kubectl create deployment nginx --image=nginx
#创建一个service对应的deloyment为nginx 集群内部端口为80对外使用NodePort暴露端口
kubectl expose deployment nginx --port=80 --type=NodePort
#查看pod和svc
kubectl get pod,svc
如果pod无法启动可以使用以下命令查看日志判断原因,最后参数为pod名称
kubectl describe pod nginx-554b9c67f9-9kv6x
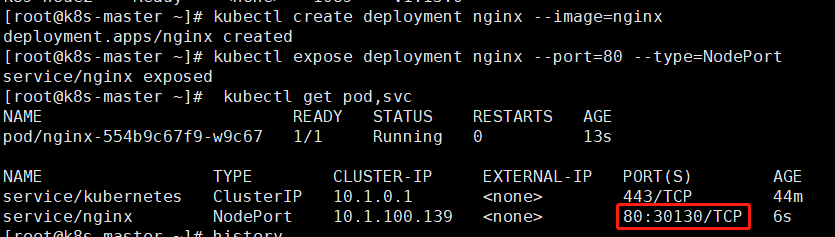
通过web页面访问
http://192.168.1.11:30130/
13,安装dashboard
下载dashboard.yaml
wget https://raw.githubusercontent.com/kubernetes/dashboard/v1.10.1/src/deploy/recommended/kubernetes-dashboard.yaml
修改

修改后的文档内容
# Copyright 2017 The Kubernetes Authors.
#
# Licensed under the Apache License, Version 2.0 (the "License");
# you may not use this file except in compliance with the License.
# You may obtain a copy of the License at
#
# http://www.apache.org/licenses/LICENSE-2.0
#
# Unless required by applicable law or agreed to in writing, software
# distributed under the License is distributed on an "AS IS" BASIS,
# WITHOUT WARRANTIES OR CONDITIONS OF ANY KIND, either express or implied.
# See the License for the specific language governing permissions and
# limitations under the License.
# ------------------- Dashboard Secret ------------------- #
apiVersion: v1
kind: Secret
metadata:
labels:
k8s-app: kubernetes-dashboard
name: kubernetes-dashboard-certs
namespace: kube-system
type: Opaque
---
# ------------------- Dashboard Service Account ------------------- #
apiVersion: v1
kind: ServiceAccount
metadata:
labels:
k8s-app: kubernetes-dashboard
name: kubernetes-dashboard
namespace: kube-system
---
# ------------------- Dashboard Role & Role Binding ------------------- #
kind: Role
apiVersion: rbac.authorization.k8s.io/v1
metadata:
name: kubernetes-dashboard-minimal
namespace: kube-system
rules:
# Allow Dashboard to create 'kubernetes-dashboard-key-holder' secret.
- apiGroups: [""]
resources: ["secrets"]
verbs: ["create"]
# Allow Dashboard to create 'kubernetes-dashboard-settings' config map.
- apiGroups: [""]
resources: ["configmaps"]
verbs: ["create"]
# Allow Dashboard to get, update and delete Dashboard exclusive secrets.
- apiGroups: [""]
resources: ["secrets"]
resourceNames: ["kubernetes-dashboard-key-holder", "kubernetes-dashboard-certs"]
verbs: ["get", "update", "delete"]
# Allow Dashboard to get and update 'kubernetes-dashboard-settings' config map.
- apiGroups: [""]
resources: ["configmaps"]
resourceNames: ["kubernetes-dashboard-settings"]
verbs: ["get", "update"]
# Allow Dashboard to get metrics from heapster.
- apiGroups: [""]
resources: ["services"]
resourceNames: ["heapster"]
verbs: ["proxy"]
- apiGroups: [""]
resources: ["services/proxy"]
resourceNames: ["heapster", "http:heapster:", "https:heapster:"]
verbs: ["get"]
---
apiVersion: rbac.authorization.k8s.io/v1
kind: RoleBinding
metadata:
name: kubernetes-dashboard-minimal
namespace: kube-system
roleRef:
apiGroup: rbac.authorization.k8s.io
kind: Role
name: kubernetes-dashboard-minimal
subjects:
- kind: ServiceAccount
name: kubernetes-dashboard
namespace: kube-system
---
# ------------------- Dashboard Deployment ------------------- #
kind: Deployment
apiVersion: apps/v1
metadata:
labels:
k8s-app: kubernetes-dashboard
name: kubernetes-dashboard
namespace: kube-system
spec:
replicas: 1
revisionHistoryLimit: 10
selector:
matchLabels:
k8s-app: kubernetes-dashboard
template:
metadata:
labels:
k8s-app: kubernetes-dashboard
spec:
containers:
- name: kubernetes-dashboard
#image: k8s.gcr.io/kubernetes-dashboard-amd64:v1.10.1
image: lizhenliang/kubernetes-dashboard-amd64:v1.10.1
ports:
- containerPort: 8443
protocol: TCP
args:
- --auto-generate-certificates
# Uncomment the following line to manually specify Kubernetes API server Host
# If not specified, Dashboard will attempt to auto discover the API server and connect
# to it. Uncomment only if the default does not work.
# - --apiserver-host=http://my-address:port
volumeMounts:
- name: kubernetes-dashboard-certs
mountPath: /certs
# Create on-disk volume to store exec logs
- mountPath: /tmp
name: tmp-volume
livenessProbe:
httpGet:
scheme: HTTPS
path: /
port: 8443
initialDelaySeconds: 30
timeoutSeconds: 30
volumes:
- name: kubernetes-dashboard-certs
secret:
secretName: kubernetes-dashboard-certs
- name: tmp-volume
emptyDir: {}
serviceAccountName: kubernetes-dashboard
# Comment the following tolerations if Dashboard must not be deployed on master
tolerations:
- key: node-role.kubernetes.io/master
effect: NoSchedule
---
# ------------------- Dashboard Service ------------------- #
kind: Service
apiVersion: v1
metadata:
labels:
k8s-app: kubernetes-dashboard
name: kubernetes-dashboard
namespace: kube-system
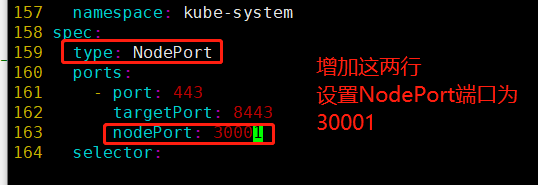
spec:
type: NodePort
ports:
- port: 443
targetPort: 8443
nodePort: 30001
selector:
k8s-app: kubernetes-dashboard
修改以后安装
kubectl apply -f kubernetes-dashboard.yaml

查看是否运行
kubectl get pods -n kube-system
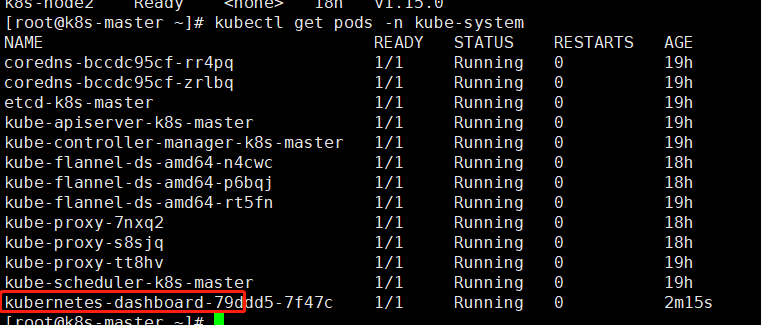
启动了30001端口

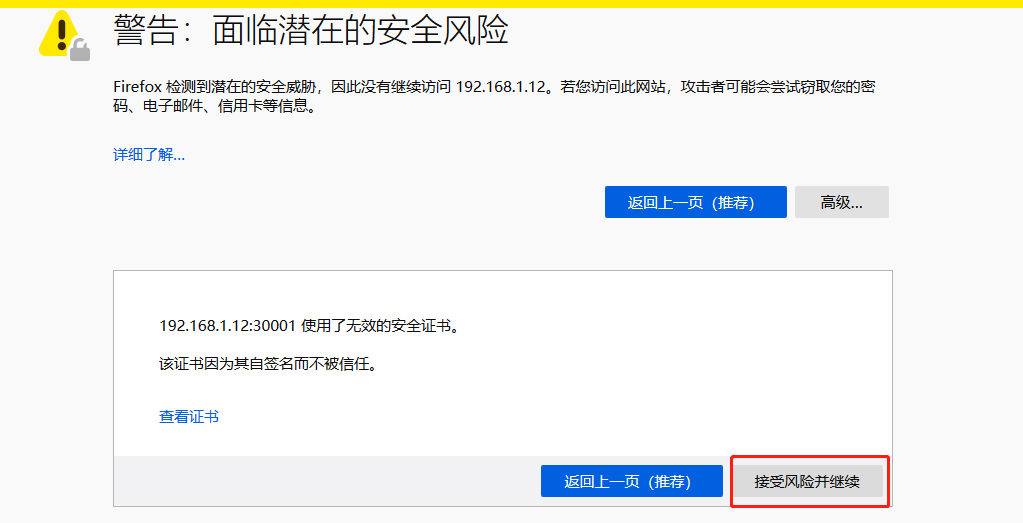
需要使用https访问
https://192.168.1.12:30001/
页面不信任
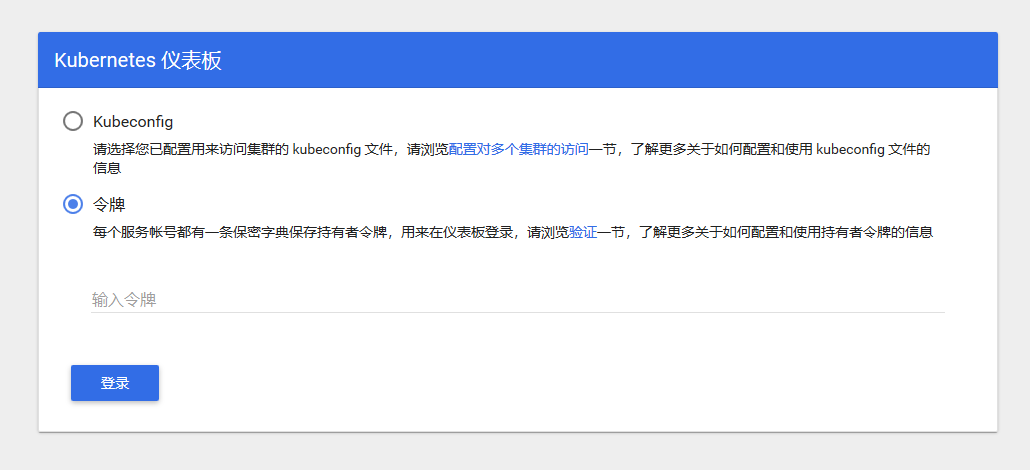
使用令牌登录,下面创建用户和生成令牌
创建面向应用的用户
kubectl create serviceaccount dashboard-admin -n kube-system
集群角色绑定,设置最高的管理员权限
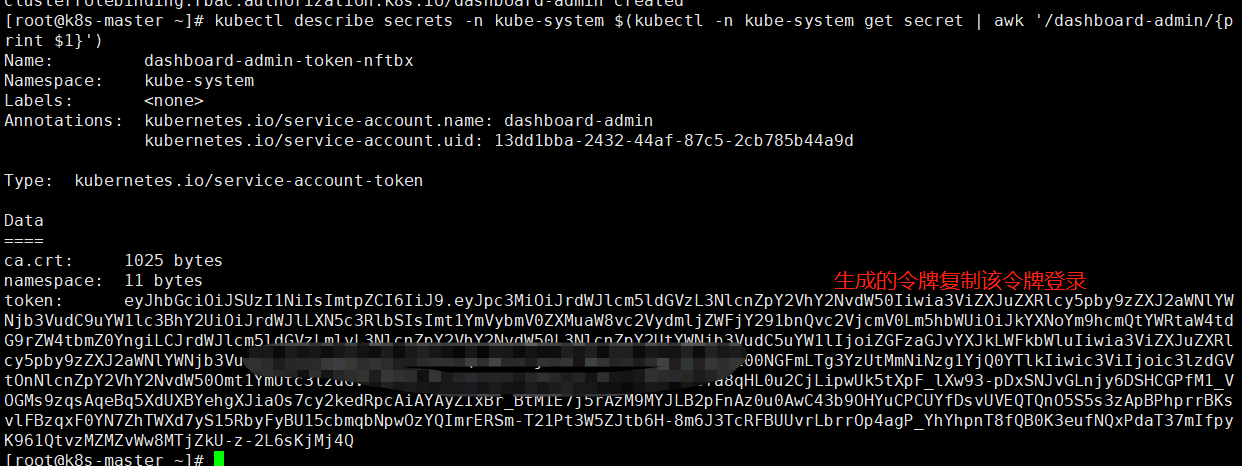
kubectl create clusterrolebinding dashboard-admin --clusterrole=cluster-admin --serviceaccount=kube-system:dashboard-admin
获取登录的token令牌
kubectl describe secrets -n kube-system $(kubectl -n kube-system get secret | awk '/dashboard-admin/{print $1}')

2025-11-26补充开始
使用kubeadm安装K8S集群1.33版本
参考官网https://v1-33.docs.kubernetes.io/zh-cn/docs/setup/production-environment/tools/kubeadm/install-kubeadm/
环境查看
系统环境
本次安装在Ubuntu22系统,如果使用Rocky系统则会因为没有网络模块加载导致无法安装flanneld
# uname  -a
#60~22.04.1-Ubuntu SMP PREEMPT_DYNAMIC Fri Mar 28 16:09:21 UTC 2 x86_64 x86_64 x86_64 GNU/Linux
root@Ubuntu22K8SNode003172:~# lsb_release -a
No LSB modules are available.
Distributor ID:Ubuntu
Description:Ubuntu 22.04.4 LTS
Release:22.04
Codename:jammy
软件环境
# kubectl version
Client Version: v1.33.6
Kustomize Version: v5.6.0
Server Version: v1.33.6
安装kubeadm,kubectl,kubelet
sudo apt-get update
# apt-transport-https 可能是一个虚拟包(dummy package);如果是的话,你可以跳过安装这个包
sudo apt-get install -y apt-transport-https ca-certificates curl gpg

# 如果 `/etc/apt/keyrings` 目录不存在,则应在 curl 命令之前创建它,请阅读下面的注释。
# sudo mkdir -p -m 755 /etc/apt/keyrings
curl -fsSL https://pkgs.k8s.io/core:/stable:/v1.33/deb/Release.key | sudo gpg --dearmor -o /etc/apt/keyrings/kubernetes-apt-keyring.gpg

# 此操作会覆盖 /etc/apt/sources.list.d/kubernetes.list 中现存的所有配置。
echo 'deb [signed-by=/etc/apt/keyrings/kubernetes-apt-keyring.gpg] https://pkgs.k8s.io/core:/stable:/v1.33/deb/ /' | sudo tee /etc/apt/sources.list.d/kubernetes.list

sudo apt-get update
sudo apt-get install -y kubelet kubeadm kubectl
sudo apt-mark hold kubelet kubeadm kubectl
初始化集群
# 需要添加网络默认参数10.244.0.0/16网段
# 其余使用默认配置即可
# 如果不加这个网络参数则在后面安装flanneld会出现问题
kubeadm init --pod-network-cidr=10.244.0.0/16
安装完成出现以下提示
Your Kubernetes control-plane has initialized successfully!

To start using your cluster, you need to run the following as a regular user:

  mkdir -p $HOME/.kube
  sudo cp -i /etc/kubernetes/admin.conf $HOME/.kube/config
  sudo chown $(id -u):$(id -g) $HOME/.kube/config

Alternatively, if you are the root user, you can run:

  export KUBECONFIG=/etc/kubernetes/admin.conf

You should now deploy a pod network to the cluster.
Run "kubectl apply -f [podnetwork].yaml" with one of the options listed at:
  https://kubernetes.io/docs/concepts/cluster-administration/addons/

Then you can join any number of worker nodes by running the following on each as root:

kubeadm join 192.168.3.172:6443 --token ni4hqg.k2tixjhd6w9902bu \
--discovery-token-ca-cert-hash sha256:c2ceb10fb1089827eeca0739cbb5ef2881bc937c5ef2c6f52407dda1ec1626fb
按提示设置config配置文件即可使用kubectl命令
在客户端安装3个工具后可使用命令添加worker节点
如果containerd使用默认则在加入时会报以下错误
W1125 09:30:32.116156   98665 checks.go:1062] [preflight] WARNING: Couldn't create the interface used for talking to the container runtime: failed to create new CRI runtime service: validate service connection: validate CRI v1 runtime API for endpoint "unix:///var/run/containerd/containerd.sock": rpc error: code = Unavailable desc = connection error: desc = "transport: Error while dialing: dial unix /var/run/containerd/containerd.sock: connect: no such file or directory"
[WARNING Swap]: swap is supported for cgroup v2 only. The kubelet must be properly configured to use swap. Please refer to https://kubernetes.io/docs/concepts/architecture/nodes/#swap-memory, or disable swap on the node
error execution phase preflight: [preflight] Some fatal errors occurred:
解决方法:恢复containerd默认配置
containerd config default > /etc/containerd/config.toml
# 重启
systemctel restart containerd
一个完整的配置如下
# cat /etc/containerd/config.toml
version = 3
root = '/var/lib/containerd'
state = '/run/containerd'
temp = ''
disabled_plugins = []
required_plugins = []
oom_score = 0
imports = []

[grpc]
  address = '/run/containerd/containerd.sock'
  tcp_address = ''
  tcp_tls_ca = ''
  tcp_tls_cert = ''
  tcp_tls_key = ''
  uid = 0
  gid = 0
  max_recv_message_size = 16777216
  max_send_message_size = 16777216

[ttrpc]
  address = ''
  uid = 0
  gid = 0

[debug]
  address = ''
  uid = 0
  gid = 0
  level = ''
  format = ''

[metrics]
  address = ''
  grpc_histogram = false

[plugins]
  [plugins.'io.containerd.cri.v1.images']
    snapshotter = 'overlayfs'
    disable_snapshot_annotations = true
    discard_unpacked_layers = false
    max_concurrent_downloads = 3
    concurrent_layer_fetch_buffer = 0
    image_pull_progress_timeout = '5m0s'
    image_pull_with_sync_fs = false
    stats_collect_period = 10
    use_local_image_pull = false

    [plugins.'io.containerd.cri.v1.images'.pinned_images]
      sandbox = 'registry.k8s.io/pause:3.10'

    [plugins.'io.containerd.cri.v1.images'.registry]
      config_path = ''

    [plugins.'io.containerd.cri.v1.images'.image_decryption]
      key_model = 'node'

  [plugins.'io.containerd.cri.v1.runtime']
    enable_selinux = false
    selinux_category_range = 1024
    max_container_log_line_size = 16384
    disable_apparmor = false
    restrict_oom_score_adj = false
    disable_proc_mount = false
    unset_seccomp_profile = ''
    tolerate_missing_hugetlb_controller = true
    disable_hugetlb_controller = true
    device_ownership_from_security_context = false
    ignore_image_defined_volumes = false
    netns_mounts_under_state_dir = false
    enable_unprivileged_ports = true
    enable_unprivileged_icmp = true
    enable_cdi = true
    cdi_spec_dirs = ['/etc/cdi', '/var/run/cdi']
    drain_exec_sync_io_timeout = '0s'
    ignore_deprecation_warnings = []

    [plugins.'io.containerd.cri.v1.runtime'.containerd]
      default_runtime_name = 'runc'
      ignore_blockio_not_enabled_errors = false
      ignore_rdt_not_enabled_errors = false

      [plugins.'io.containerd.cri.v1.runtime'.containerd.runtimes]
        [plugins.'io.containerd.cri.v1.runtime'.containerd.runtimes.runc]
          runtime_type = 'io.containerd.runc.v2'
          runtime_path = ''
          pod_annotations = []
          container_annotations = []
          privileged_without_host_devices = false
          privileged_without_host_devices_all_devices_allowed = false
          cgroup_writable = false
          base_runtime_spec = ''
          cni_conf_dir = ''
          cni_max_conf_num = 0
          snapshotter = ''
          sandboxer = 'podsandbox'
          io_type = ''

          [plugins.'io.containerd.cri.v1.runtime'.containerd.runtimes.runc.options]
            BinaryName = ''
            CriuImagePath = ''
            CriuWorkPath = ''
            IoGid = 0
            IoUid = 0
            NoNewKeyring = false
            Root = ''
            ShimCgroup = ''
            SystemdCgroup = false

    [plugins.'io.containerd.cri.v1.runtime'.cni]
      bin_dir = ''
      bin_dirs = ['/opt/cni/bin']
      conf_dir = '/etc/cni/net.d'
      max_conf_num = 1
      setup_serially = false
      conf_template = ''
      ip_pref = ''
      use_internal_loopback = false

  [plugins.'io.containerd.differ.v1.erofs']
    mkfs_options = []

  [plugins.'io.containerd.gc.v1.scheduler']
    pause_threshold = 0.02
    deletion_threshold = 0
    mutation_threshold = 100
    schedule_delay = '0s'
    startup_delay = '100ms'

  [plugins.'io.containerd.grpc.v1.cri']
    disable_tcp_service = true
    stream_server_address = '127.0.0.1'
    stream_server_port = '0'
    stream_idle_timeout = '4h0m0s'
    enable_tls_streaming = false

    [plugins.'io.containerd.grpc.v1.cri'.x509_key_pair_streaming]
      tls_cert_file = ''
      tls_key_file = ''

  [plugins.'io.containerd.image-verifier.v1.bindir']
    bin_dir = '/opt/containerd/image-verifier/bin'
    max_verifiers = 10
    per_verifier_timeout = '10s'

  [plugins.'io.containerd.internal.v1.opt']
    path = '/opt/containerd'

  [plugins.'io.containerd.internal.v1.tracing']

  [plugins.'io.containerd.metadata.v1.bolt']
    content_sharing_policy = 'shared'
    no_sync = false

  [plugins.'io.containerd.monitor.container.v1.restart']
    interval = '10s'

  [plugins.'io.containerd.monitor.task.v1.cgroups']
    no_prometheus = false

  [plugins.'io.containerd.nri.v1.nri']
    disable = false
    socket_path = '/var/run/nri/nri.sock'
    plugin_path = '/opt/nri/plugins'
    plugin_config_path = '/etc/nri/conf.d'
    plugin_registration_timeout = '5s'
    plugin_request_timeout = '2s'
    disable_connections = false

  [plugins.'io.containerd.runtime.v2.task']
    platforms = ['linux/amd64']

  [plugins.'io.containerd.service.v1.diff-service']
    default = ['walking']
    sync_fs = false

  [plugins.'io.containerd.service.v1.tasks-service']
    blockio_config_file = ''
    rdt_config_file = ''

  [plugins.'io.containerd.shim.v1.manager']
    env = []

  [plugins.'io.containerd.snapshotter.v1.blockfile']
    root_path = ''
    scratch_file = ''
    fs_type = ''
    mount_options = []
    recreate_scratch = false

  [plugins.'io.containerd.snapshotter.v1.btrfs']
    root_path = ''

  [plugins.'io.containerd.snapshotter.v1.devmapper']
    root_path = ''
    pool_name = ''
    base_image_size = ''
    async_remove = false
    discard_blocks = false
    fs_type = ''
    fs_options = ''

  [plugins.'io.containerd.snapshotter.v1.erofs']
    root_path = ''
    ovl_mount_options = []
    enable_fsverity = false
    set_immutable = false

  [plugins.'io.containerd.snapshotter.v1.native']
    root_path = ''

  [plugins.'io.containerd.snapshotter.v1.overlayfs']
    root_path = ''
    upperdir_label = false
    sync_remove = false
    slow_chown = false
    mount_options = []

  [plugins.'io.containerd.snapshotter.v1.zfs']
    root_path = ''

  [plugins.'io.containerd.tracing.processor.v1.otlp']

  [plugins.'io.containerd.transfer.v1.local']
    max_concurrent_downloads = 3
    concurrent_layer_fetch_buffer = 0
    max_concurrent_uploaded_layers = 3
    check_platform_supported = false
    config_path = ''

[cgroup]
  path = ''

[timeouts]
  'io.containerd.timeout.bolt.open' = '0s'
  'io.containerd.timeout.cri.defercleanup' = '1m0s'
  'io.containerd.timeout.metrics.shimstats' = '2s'
  'io.containerd.timeout.shim.cleanup' = '5s'
  'io.containerd.timeout.shim.load' = '5s'
  'io.containerd.timeout.shim.shutdown' = '3s'
  'io.containerd.timeout.task.state' = '2s'

[stream_processors]
  [stream_processors.'io.containerd.ocicrypt.decoder.v1.tar']
    accepts = ['application/vnd.oci.image.layer.v1.tar+encrypted']
    returns = 'application/vnd.oci.image.layer.v1.tar'
    path = 'ctd-decoder'
    args = ['--decryption-keys-path', '/etc/containerd/ocicrypt/keys']
    env = ['OCICRYPT_KEYPROVIDER_CONFIG=/etc/containerd/ocicrypt/ocicrypt_keyprovider.conf']

  [stream_processors.'io.containerd.ocicrypt.decoder.v1.tar.gzip']
    accepts = ['application/vnd.oci.image.layer.v1.tar+gzip+encrypted']
    returns = 'application/vnd.oci.image.layer.v1.tar+gzip'
    path = 'ctd-decoder'
    args = ['--decryption-keys-path', '/etc/containerd/ocicrypt/keys']
    env = ['OCICRYPT_KEYPROVIDER_CONFIG=/etc/containerd/ocicrypt/ocicrypt_keyprovider.conf']
如果初始swap警告则关闭swap
swapoff -a
集群除以NotReady状态安装flanneld网络插件
kubectl apply -f https://github.com/flannel-io/flannel/releases/latest/download/kube-flannel.yml
默认安装网络插件会报错
# Pod日志报错如下
stat /proc/sys/net/bridge/bridge-nf-call-iptables: no such file or directory
# 原因模块未开启
# 在node节点执行
 modprobe br_netfilter

 lsmod | grep br_netfilter

sudo tee /etc/sysctl.d/k8s.conf <<EOF
net.bridge.bridge-nf-call-iptables = 1
net.bridge.bridge-nf-call-ip6tables = 1
net.ipv4.ip_forward = 1
EOF

sudo sysctl --system

sysctl net.bridge.bridge-nf-call-iptables
sysctl net.ipv4.ip_forward

echo br_netfilter | sudo tee /etc/modules-load.d/br_netfilter.conf
# 在Master节点有kubectl权限执行重启pod
kubectl -n kube-flannel rollout restart daemonset kube-flannel-ds
安装完成flannel后集群处于Ready状态
继续创建Deployment测试参考上文
2025-11-26补充结束

 浙公网安备 33010602011771号