ELK之elasticsearch版本678集群设置
ELK7版本搭建参考:https://www.cnblogs.com/minseo/p/10948632.html
2024-03-12补充 elasticsearch6版本设置如下
node-1
cluster.name: my-es
node.name: prd-es-kibana-01
path.data: /data/es-data
path.logs: /var/log/elasticsearch
network.host: 0.0.0.0
http.port: 9200

#集群个节点IP地址,也可以使用els、els.shuaiguoxia.com等名称,需要各节点能够解析
discovery.zen.ping.unicast.hosts: ["172.16.90.11", "172.16.90.12"]
#集群节点数
discovery.zen.minimum_master_nodes: 2
http.cors.enabled: true
http.cors.allow-origin: "*"
http.cors.allow-headers: Authorization,X-Requested-With,Content-Length,Content-Type
node-2
cluster.name: my-es
node.name: prd-es-kibana-02
path.data: /data/es-data
path.logs: /var/log/elasticsearch
network.host: 0.0.0.0
http.port: 9200

#集群个节点IP地址,也可以使用els、els.shuaiguoxia.com等名称,需要各节点能够解析
discovery.zen.ping.unicast.hosts: ["172.16.90.11", "172.16.90.12"]
#集群节点数
discovery.zen.minimum_master_nodes: 2
http.cors.enabled: true
http.cors.allow-origin: "*"
http.cors.allow-headers: Authorization,X-Requested-With,Content-Length,Content-Type
以下为7版本的设置,和6版本有所不同注意区别
2024-03-12补充完毕
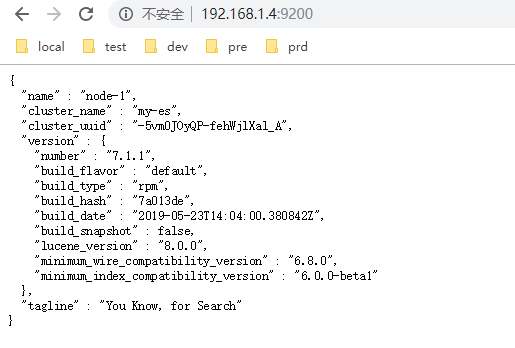
node-1已经安装配置好
配置文件如下
[root@salt-test conf.d]# sed '/#/d' /etc/elasticsearch/elasticsearch.yml
cluster.name: my-es
node.name: node-1
path.data: /data/es-data
path.logs: /var/log/elasticsearch
network.host: 0.0.0.0
http.port: 9200
#discovery.seed_hosts: ["192.168.1.4", "192.168.1.5"]
cluster.initial_master_nodes: ["node-1"]
http.cors.enabled: true
http.cors.allow-origin: "*"
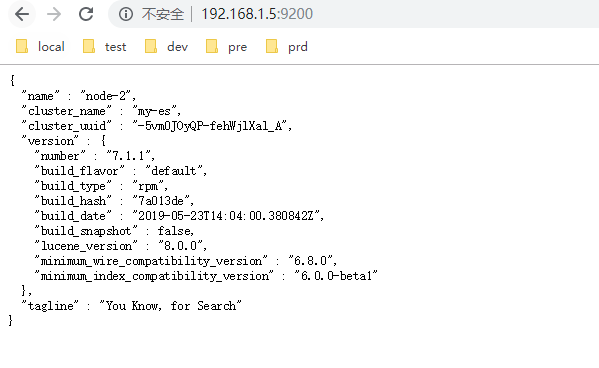
新建主机node-2修改elasticsearch配置文件
/etc/elasticsearch/elasticsearch.yml
#集群名需要和node-1一致
cluster.name: my-es
#node名
node.name: node-2
path.data: /data/es-data
path.logs: /var/log/elasticsearch
network.host: 0.0.0.0
http.port: 9200
#集群中两个节点的IP
discovery.seed_hosts: ["192.168.1.4", "192.168.1.5"]
cluster.initial_master_nodes: ["node-1"]
http.cors.enabled: true
http.cors.allow-origin: "*"
启动elasticsearch
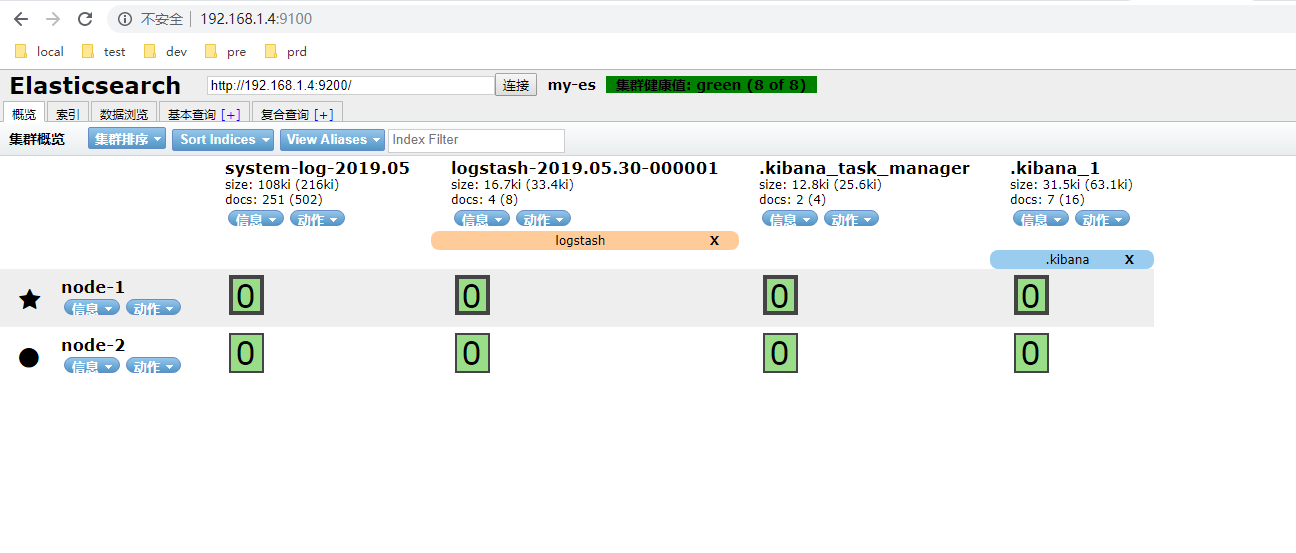
查看节点1和2
数据会自动从节点1同步至节点2
在head查看
2024-02-02补充
elasticsearch8.9.0版本集群设置
下载安装8.9.0版本不详述下面是集群的两个节点的配置文件
node-1
cluster.name: my-es
node.name: node-1
path.data: /var/lib/elasticsearch
path.logs: /var/log/elasticsearch
network.host: 0.0.0.0
http.port: 9200
discovery.seed_hosts: ["192.168.3.59", "192.168.3.60"]
xpack.security.enabled: false
xpack.security.enrollment.enabled: false
xpack.security.http.ssl:
  enabled: true
  keystore.path: certs/http.p12
xpack.security.transport.ssl:
  enabled: true
  verification_mode: certificate
  keystore.path: certs/transport.p12
  truststore.path: certs/transport.p12
cluster.initial_master_nodes: ["CentOS7Es01003059"]
http.host: 0.0.0.0
node-2
cluster.name: my-es
node.name: node-2
path.data: /var/lib/elasticsearch
path.logs: /var/log/elasticsearch
network.host: 0.0.0.0
http.port: 9200
discovery.seed_hosts: ["192.168.3.59", "192.168.3.60"]
xpack.security.enabled: false
xpack.security.enrollment.enabled: false
xpack.security.http.ssl:
  enabled: true
  keystore.path: certs/http.p12
xpack.security.transport.ssl:
  enabled: true
  verification_mode: certificate
  keystore.path: certs/transport.p12
  truststore.path: certs/transport.p12
cluster.initial_master_nodes: ["CentOS7Es01003060"]
http.host: 0.0.0.0
配置文件解析
两个节点配置不一样的地方有两处
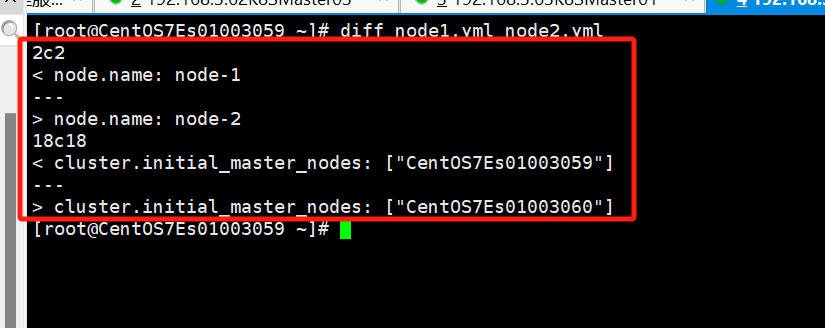
# 集群名,两个节点配置需一致
cluster.name: my-es
# 集群node名两个节点配置不一样
node.name: node-1
# 数据和日志路径,默认撇嘴
path.data: /var/lib/elasticsearch
path.logs: /var/log/elasticsearch
network.host: 0.0.0.0
http.port: 9200
# 集群的节点本次两个节点
discovery.seed_hosts: ["192.168.3.59", "192.168.3.60"]
# 认证默认为true手动设置为false取消认证
xpack.security.enabled: false
xpack.security.enrollment.enabled: false
xpack.security.http.ssl:
  enabled: true
  keystore.path: certs/http.p12
xpack.security.transport.ssl:
  enabled: true
  verification_mode: certificate
  keystore.path: certs/transport.p12
  truststore.path: certs/transport.p12
# 两个节点不一致
cluster.initial_master_nodes: ["CentOS7Es01003059"]
http.host: 0.0.0.0

 浙公网安备 33010602011771号