Redis文档
首页
Redis is an open source (BSD licensed), in-memory data structure store, 可以用作为a tabase, cache and message broker. It supports data structures such as strings, hashes, lists, sets, sorted sets with range queries, bitmaps, hyperloglogs, geospatial indexes with radius queries and streams. Redis has built-in replication, Lua scripting, LRU eviction, transactions and different levels of on-disk persistence, and provides high availability via Redis Sentinel and automatic partitioning with Redis Cluster.
下载
redis官网未提供正式window版本,
当前最新稳定版本:redis-5.0.7.tar.gz
文档
快速入门
- Download and compile Redis to start hacking.
- Use redis-cli to access the server.
- Use Redis from your application.
- 了解Redis如何持久化工作.
- 更正确的安装redis.
- Find out what to read next to understand more about Redis.
安装
源码安装,依赖GCC compiler and libc
wget http://download.redis.io/redis-stable.tar.gz
tar xvzf redis-stable.tar.gz
cd redis-stable
make
此时,如果想测试构建工作,使用make test。After compilation the src directory inside the Redis distribution is populated with the different executables that are part of Redis:
l redis-server is the Redis Server itself.
l redis-sentinel is the Redis Sentinel executable (monitoring and failover).
l redis-cli 命令行工具.
l redis-benchmark 用于检测Redis performances.
l redis-check-aof and redis-check-rdb (redis-check-dump in 3.0 and below) are useful in the rare event of corrupted data files.
复制the Redis server and the command line interface到合适的地方是一个好主意, either manually using the following commands:
l sudo cp src/redis-server /usr/local/bin/
l sudo cp src/redis-cli /usr/local/bin/
或者仅仅使用sudo make install.
下面文档假设 /usr/local/bin is 在你的 PATH 环境变量中,所以 so that you can execute both the binaries without specifying the full path.
启动
$ redis-server
[28550] 01 Aug 19:29:28 # Warning: no config file specified, using the default config. In order to specify a config file use 'redis-server /path/to/redis.conf'
[28550] 01 Aug 19:29:28 * Server started, Redis version 2.2.12
[28550] 01 Aug 19:29:28 * The server is now ready to accept connections on port 6379
... more logs ...
以上启动没有使用任何配置文件,所以所有参数使用内部默认。
可以使用全路径指定一个配置文件,例如: redis-server /etc/redis.conf. 你应该使用 the redis.conf file included in the root directory of the Redis source code distribution 作为一个配置文件模板编写.
检测redis工作
外部程序和redis沟通需要使用一个TCP socket和一个redis 特定协议。此协议在Redis client libraries中的各种开发语言中可以实现。但也提供一个命令行工具redis-cli。
$ redis-cli ping
PONG
使用redis-cli 之后跟着一个命令名和它的arguments,会发送到运行在localhost at port 6379 的redis实例。你可以更改host和port通过redis-cli,使用--help获取更细使用信息。
另一种redis-cli 无参数模式:此程序会启动一个交互模式。
$ redis-cli
redis 127.0.0.1:6379> ping
PONG
redis 127.0.0.1:6379> set mykey somevalue
OK
redis 127.0.0.1:6379> get mykey
"somevalue"
此时可以开始学习the fifteen minutes introduction to Redis data types 了解更多命令。如果你已经了解,可以继续读下面的文章。
Securing Redis
默认Redis binds to all the interfaces and has no authentication at all.
应用程序使用redis
仅仅是命令行是不够的。还需要编写你的自己的应用程序。full list of clients for different languages in this page
如果是使用Ruby开发语言,最好使用the Redis-rb client。你可以使用gem install redis进行安装。
redis持久化
你可以学习how Redis persistence works on this page,但是更重要的是了解快速入门下的默认情况,如果你使用默认配置启动redis, Redis will spontaneously save the dataset only from time to time (for instance after at least five minutes if you have at least 100 changes in your data), so if you want your database to persist and be reloaded after a restart make sure to call the SAVE command manually every time you want to force a data set snapshot. Otherwise make sure to shutdown the database using the SHUTDOWN command:
$ redis-cli shutdown
This way Redis will make sure to save the data on disk before quitting. Reading the persistence page is strongly suggested in order to better understand how Redis persistence works.
更正确的安装redis
强烈建议使用init script。
假设你已经复制redis-server and redis-cli 到/usr/local/bin。以下以Debian or Ubuntu为例.
l 创建一个目录,存储Redis config files and your data
sudo mkdir /etc/redis
sudo mkdir /var/redis
l 复制解压目录下的utils 目录中的初始化脚本到/etc/init.d。我们建议重命名的名字加上端口号
sudo cp utils/redis_init_script /etc/init.d/redis_6379
l 编辑初始化脚本
修改REDISPORT 设置自己想要的端口号.
l 在/etc/redis/创建配置文件
sudo cp redis.conf /etc/redis/6379.conf
l 在/var/redis创建一个目录作为一个数据和redis实例的工作目录
sudo mkdir /var/redis/6379
l 编辑配置文件
- Set daemonize to yes (默认为 no).
- Set the pidfile to /var/run/redis_6379.pid (modify the port if needed).
- Change the port accordingly. In our example it is not needed as the default port is already 6379.
- Set your preferred loglevel.
- Set the logfile to /var/log/redis_6379.log
- Set the dir to /var/redis/6379 (非常重要)
l 最后添加新的初始化脚本到运行级别目录中
sudo update-rc.d redis_6379 defaults
现在可以使用:
sudo /etc/init.d/redis_6379 start
确保所有工作如以下:
- Try pinging your instance with redis-cli.
- Do a test save with redis-cli save and check that the dump file is correctly stored into /var/redis/6379/ (you should find a file called dump.rdb).
- Check that your Redis instance is correctly logging in the log file.
- If it's a new machine where you can try it without problems make sure that after a reboot everything is still working.
记住: 以上我们跳过了很多配置参数如果你想更改, 例如使用 AOF 持久化替换RDB 持久化, or to setup replication, and so forth. Make sure to read the example redis.conf file (that is heavily commented) and the other documentation you can find in this web site for more information.
I Programming with Redis
redis命令
CLUSTER FAILOVER [FORCE|TAKEOVER]
3.0.0开始可用
手动故障转移,安全的,没有数据丢失,工作方式:
- The replica 告诉the master 停止处理来自clients的查询.
- The master 回应to the replica with the current replication offset.
- The replica waits for the replication offset to match on its side, to make sure it processed all the data from the master before it continues.
- The replica开始一个failover, obtains a new configuration epoch from the majority of the masters, and broadcasts the new configuration.
- The old master接收到the configuration update: unblocks its clients and starts replying with redirection messages so that they'll continue the chat with the new master.
This way clients are moved away from the old master to the new master atomically and only when the replica that is turning into the new master has processed all of the replication stream from the old master.
FORCE 选项: manual failover when the master is down
使用 FORCE ,我们仍然需要 the majority of masters to be available in order to authorize the failover and generate a new configuration epoch for the replica that is going to become master.
TAKEOVER 选项: manual failover without cluster consensus
详细实现
CLUSTER FAILOVER, 除非 TAKEOVER 指定, does not execute a failover synchronously, it only schedules a manual failover, bypassing the failure detection stage, 所以要检测故障转移是否发生, CLUSTER NODES or other means should be used in order to verify that the state of the cluster changes after some time the command was sent.
返回值
OK
Cluster info
[root@wiscom04 redis-5.0.7]# bin/redis-cli -a wiscom123!
Warning: Using a password with '-a' or '-u' option on the command line interface may not be safe.
127.0.0.1:6379> cluster info
cluster_state:ok
cluster_slots_assigned:16384
cluster_slots_ok:16384
cluster_slots_pfail:0
cluster_slots_fail:0
cluster_known_nodes:5
cluster_size:4
cluster_current_epoch:8
cluster_my_epoch:1
cluster_stats_messages_ping_sent:3147672
cluster_stats_messages_pong_sent:3052770
cluster_stats_messages_fail_sent:7
cluster_stats_messages_auth-ack_sent:3
cluster_stats_messages_update_sent:1
cluster_stats_messages_sent:6200453
cluster_stats_messages_ping_received:3052766
cluster_stats_messages_pong_received:2988127
cluster_stats_messages_meet_received:4
cluster_stats_messages_fail_received:3
cluster_stats_messages_auth-req_received:4
cluster_stats_messages_received:6040904
- cluster_state: State is ok if the node is able to receive queries. fail if there is at least one hash slot which is unbound (no node associated), in error state (node serving it is flagged with FAIL flag), or if the majority of masters can't be reached by this node.
- cluster_slots_assigned: Number of slots which are associated to some node (not unbound). This number should be 16384 for the node to work properly, which means that each hash slot should be mapped to a node.
- cluster_slots_ok: Number of hash slots mapping to a node not in FAIL or PFAIL state.
- cluster_slots_pfail: Number of hash slots mapping to a node in PFAIL state. Note that those hash slots still work correctly, as long as the PFAIL state is not promoted to FAIL by the failure detection algorithm. PFAIL only means that we are currently not able to talk with the node, but may be just a transient error.
- cluster_slots_fail: Number of hash slots mapping to a node in FAIL state. If this number is not zero the node is not able to serve queries unless cluster-require-full-coverage is set to no in the configuration.
- cluster_known_nodes: The total number of known nodes in the cluster, including nodes in HANDSHAKE state that may not currently be proper members of the cluster.
- cluster_size: The number of master nodes serving at least one hash slot in the cluster.
- cluster_current_epoch: The local Current Epoch variable. This is used in order to create unique increasing version numbers during fail overs.
- cluster_my_epoch: The Config Epoch of the node we are talking with. This is the current configuration version assigned to this node.
- cluster_stats_messages_sent: Number of messages sent via the cluster node-to-node binary bus.
- cluster_stats_messages_received: Number of messages received via the cluster node-to-node binary bus.
More information about the Current Epoch and Config Epoch variables are available in the Redis Cluster specification document.
Cluster nodes

127.0.0.1:6379> cluster nodes
6fafb125c08eb857b241ba653da9f661fb3df44a 172.17.112.120:6379@16379 master - 0 1586574277061 4 connected 0-1364 5461-6826 10923-12287
f82834569a983f8ee06629a6b42913c843182b25 172.17.112.123:6379@16379 myself,master - 0 0 1 connected 1365-5460
2df002471441b2e92d42fa557d8baea6b247e893 172.17.112.121:6379@16379 master,fail - 1584581485206 1584581481196 6 connected
db4bc454da4c206041928be94ca66af48636fc36 172.17.112.122:6379@16379 master - 0 1586574279067 2 connected 6827-10922
fd92c3c2d453553d2c7388b301d6e0511246a4d3 172.17.112.120:6378@16378 master - 0 1586574278063 8 connected 12288-16383
cluster myid
127.0.0.1:6379> cluster myid
"f82834569a983f8ee06629a6b42913c843182b25"
Cluster slots
127.0.0.1:6379> cluster slots
1) 1) (integer) 0
2) (integer) 1364
3) 1) "172.17.112.120"
2) (integer) 6379
3) "6fafb125c08eb857b241ba653da9f661fb3df44a"
2) 1) (integer) 5461
2) (integer) 6826
3) 1) "172.17.112.120"
2) (integer) 6379
3) "6fafb125c08eb857b241ba653da9f661fb3df44a"
3) 1) (integer) 10923
2) (integer) 12287
3) 1) "172.17.112.120"
2) (integer) 6379
3) "6fafb125c08eb857b241ba653da9f661fb3df44a"
4) 1) (integer) 1365
2) (integer) 5460
3) 1) "172.17.112.123"
2) (integer) 6379
3) "f82834569a983f8ee06629a6b42913c843182b25"
5) 1) (integer) 6827
2) (integer) 10922
3) 1) "172.17.112.122"
2) (integer) 6379
3) "db4bc454da4c206041928be94ca66af48636fc36"
6) 1) (integer) 12288
2) (integer) 16383
3) 1) "172.17.112.120"
2) (integer) 6378
3) "fd92c3c2d453553d2c7388b301d6e0511246a4d3"
127.0.0.1:6379>
cluster replicas node-id
127.0.0.1:6379> cluster REPLICAS f82834569a983f8ee06629a6b42913c843182b25
(empty list or set)
cluster slaves node-id
127.0.0.1:6379> cluster slaves f82834569a983f8ee06629a6b42913c843182b25
(empty list or set)
EXISTS key [key ...]
redis> SET key1 "Hello"
"OK"
redis> EXISTS key1
(integer) 1
redis> EXISTS nosuchkey
(integer) 0
redis> SET key2 "World"
"OK"
redis> EXISTS key1 key2 nosuchkey
(integer) 2
窗体顶端
redis>
EXPIRE key seconds
Set a timeout on key. After the timeout has expired, the key will automatically be deleted. A key with an associated timeout is often said to be volatile in Redis terminology.
The timeout will only be cleared by commands that delete or overwrite the contents of the key, including DEL, SET, GETSET and all the *STORE commands. This means that all the operations that conceptually alter the value stored at the key without replacing it with a new one will leave the timeout untouched. For instance, incrementing the value of a key with INCR, pushing a new value into a list with LPUSH, or altering the field value of a hash with HSET are all operations that will leave the timeout untouched.
The timeout can also be cleared, turning the key back into a persistent key, using the PERSIST command.
If a key is renamed with RENAME, the associated time to live is transferred to the new key name.
If a key is overwritten by RENAME, like in the case of an existing key Key_A that is overwritten by a call like RENAME Key_B Key_A, it does not matter if the original Key_A had a timeout associated or not, the new key Key_A will inherit all the characteristics of Key_B.
Note that calling EXPIRE/PEXPIRE with a non-positive timeout or EXPIREAT/PEXPIREAT with a time in the past will result in the key being deleted rather than expired (accordingly, the emitted key event will be del, not expired).
Refreshing expires
It is possible to call EXPIRE using as argument a key that already has an existing expire set. In this case the time to live of a key is updated to the new value. There are many useful applications for this, an example is documented in the Navigation session pattern section below.
Return value
Integer reply, specifically:
1if the timeout was set.0ifkeydoes not exist.
redis> SET mykey "Hello"
"OK"
redis> EXPIRE mykey 10
(integer) 1
redis> TTL mykey
(integer) 10
redis> SET mykey "Hello World"
"OK"
redis> TTL mykey
(integer) -1
窗体顶端
redis>
窗体底端
窗体底端
flushdb
删除db2 这个库
127.0.0.1:6379[3]> select 2
OK
127.0.0.1:6379[2]> flushdb
OK
(4.70s)
300万耗时4.7秒
flushall
删除所有库
info
[root@wiscom04 redis-5.0.7]# bin/redis-cli -a wiscom123!
Warning: Using a password with '-a' or '-u' option on the command line interface may not be safe.
127.0.0.1:6379> info
# Server
redis_version:5.0.7
redis_git_sha1:00000000
redis_git_dirty:0
redis_build_id:510107af963ef9bf
redis_mode:cluster
os:Linux 3.10.0-327.el7.x86_64 x86_64
arch_bits:64
multiplexing_api:epoll
atomicvar_api:atomic-builtin
gcc_version:4.8.5
process_id:5642
run_id:b345db469560ef5c8723e3847d306b0b69a06741
tcp_port:6379
uptime_in_seconds:4493015
uptime_in_days:52
hz:10
configured_hz:10
lru_clock:9515931
executable:/usr/local/wiscom/redis-5.0.7/bin/redis-server
config_file:/usr/local/wiscom/redis-5.0.7/config/6379.conf
# Clients
connected_clients:1
client_recent_max_input_buffer:2
client_recent_max_output_buffer:0
blocked_clients:0
# Memory
used_memory:41847952
used_memory_human:39.91M
used_memory_rss:73719808
used_memory_rss_human:70.30M
used_memory_peak:53802544
used_memory_peak_human:51.31M
used_memory_peak_perc:77.78%
used_memory_overhead:15700230
used_memory_startup:1449792
used_memory_dataset:26147722
used_memory_dataset_perc:64.73%
allocator_allocated:42317536
allocator_active:55881728
allocator_resident:66527232
total_system_memory:134775726080
total_system_memory_human:125.52G
used_memory_lua:37888
used_memory_lua_human:37.00K
used_memory_scripts:0
used_memory_scripts_human:0B
number_of_cached_scripts:0
maxmemory:0
maxmemory_human:0B
maxmemory_policy:noeviction
allocator_frag_ratio:1.32
allocator_frag_bytes:13564192
allocator_rss_ratio:1.19
allocator_rss_bytes:10645504
rss_overhead_ratio:1.11
rss_overhead_bytes:7192576
mem_fragmentation_ratio:1.76
mem_fragmentation_bytes:31914112
mem_not_counted_for_evict:3800
mem_replication_backlog:0
mem_clients_slaves:0
mem_clients_normal:49694
mem_aof_buffer:3800
mem_allocator:jemalloc-5.1.0
active_defrag_running:0
lazyfree_pending_objects:0
# Persistence
loading:0
rdb_changes_since_last_save:0
rdb_bgsave_in_progress:0
rdb_last_save_time:1583905306
rdb_last_bgsave_status:ok
rdb_last_bgsave_time_sec:0
rdb_current_bgsave_time_sec:-1
rdb_last_cow_size:3248128
aof_enabled:1
aof_rewrite_in_progress:0
aof_rewrite_scheduled:0
aof_last_rewrite_time_sec:-1
aof_current_rewrite_time_sec:-1
aof_last_bgrewrite_status:ok
aof_last_write_status:ok
aof_last_cow_size:0
aof_current_size:28043133
aof_base_size:0
aof_pending_rewrite:0
aof_buffer_length:0
aof_rewrite_buffer_length:0
aof_pending_bio_fsync:0
aof_delayed_fsync:0
# Stats
total_connections_received:306
total_commands_processed:384077
instantaneous_ops_per_sec:0
total_net_input_bytes:31392027
total_net_output_bytes:121395780
instantaneous_input_kbps:0.00
instantaneous_output_kbps:0.00
rejected_connections:0
sync_full:0
sync_partial_ok:0
sync_partial_err:0
expired_keys:0
expired_stale_perc:0.00
expired_time_cap_reached_count:0
evicted_keys:0
keyspace_hits:167317
keyspace_misses:13
pubsub_channels:0
pubsub_patterns:0
latest_fork_usec:1474
migrate_cached_sockets:0
slave_expires_tracked_keys:0
active_defrag_hits:0
active_defrag_misses:0
active_defrag_key_hits:0
active_defrag_key_misses:0
# Replication
role:master
connected_slaves:0
master_replid:efe4832ba46bc40a230cb93a98daf728a42ee3d5
master_replid2:0000000000000000000000000000000000000000
master_repl_offset:0
second_repl_offset:-1
repl_backlog_active:0
repl_backlog_size:1048576
repl_backlog_first_byte_offset:0
repl_backlog_histlen:0
# CPU
used_cpu_sys:2391.780399
used_cpu_user:5083.965948
used_cpu_sys_children:0.689562
used_cpu_user_children:6.811559
# Cluster
cluster_enabled:1
# Keyspace
db0:keys=250064,expires=2,avg_ttl=7664617491
INCR
对存储在指定key的数值执行原子的加1操作。
如果指定的key不存在,那么在执行incr操作之前,会先将它的值设定为0。
如果指定的key中存储的值不是字符串类型(fix:)或者存储的字符串类型不能表示为一个整数,
那么执行这个命令时服务器会返回一个错误(eq:(error) ERR value is not an integer or out of range)。
这个操作仅限于64位的有符号整型数据。
注意: 由于redis并没有一个明确的类型来表示整型数据,所以这个操作是一个字符串操作。
执行这个操作的时候,key对应存储的字符串被解析为10进制的64位有符号整型数据。
事实上,Redis 内部采用整数形式(Integer representation)来存储对应的整数值,所以对该类字符串值实际上是用整数保存,也就不存在存储整数的字符串表示(String representation)所带来的额外消耗。
redis> SET mykey "10"
OK
redis> INCR mykey
(integer) 11
redis> GET mykey
"11"
redis>
INCRBY
将key对应的数字加decrement。如果key不存在,操作之前,key就会被置为0。如果key的value类型错误或者是个不能表示成数字的字符串,就返回错误。这个操作最多支持64位有符号的正型数字。
查看命令INCR了解关于增减操作的额外信息。
redis> SET mykey "10"
OK
redis> INCRBY mykey 5
(integer) 15
redis>
ZINCRBY key increment member
HINCRBY key field increment
KEYS
返回所有匹配的
get
redis> GET nonexisting
(nil)
redis> SET mykey "Hello"
"OK"
redis> GET mykey
"Hello"
窗体顶端
redis>
窗体底端
String key="苏11111";
String lkyss=syncCommands.get(key);
如果不存在key,则返回null
主题-Strings
mget
String[] keys=new String[4];
keys[0]="苏0";
keys[1]="苏11111";
keys[2]="苏10";
keys[3]="苏11";
List<KeyValue<String,String>> lkyss=syncCommands.mget(keys);
for(KeyValue<String,String> kkss:lkyss){
if(kkss.hasValue()){
log.info(kkss.getValue());
}else{
log.info("无值");
}
}
不能调用kkss.getValue()
只支持String类型
[KeyValue[苏0, 苏0], KeyValue[苏11111].empty, KeyValue[苏10, 苏10], KeyValue[苏11, 苏11]]
SCAN
SETEX key seconds value
redis> SETEX mykey 10 "Hello"
"OK"
redis> TTL mykey
(integer) 10
redis> GET mykey
"Hello"
窗体顶端
redis>
窗体底端
主题-Transactions
MULTI 开启事务
EXEC 执行事务
主题-Hashes
hgetall
172.18.30.10:6379[2]> hgetall test
1) "aaa"
2) "1"
3) "bbb"
4) "2"
HMSET key field value [field value ...]
Sets the specified fields to their respective values in the hash stored at key. This command overwrites any specified fields already existing in the hash. If key does not exist, a new key holding a hash is created.
As per Redis 4.0.0, HMSET is considered deprecated. 请使用 HSET.
Return value
Examples
redis> HMSET myhash field1 "Hello" field2 "World"
"OK"
redis> HGET myhash field1
"Hello"
redis> HGET myhash field2
"World"
hget
172.18.30.10:6379[2]> hget test aaa
"1"
hincrby
172.18.30.10:6379[2]> hincrby test aaa 4
(integer) 5
172.18.30.10:6379[2]> hget test aaa
"5"
172.18.30.10:6379[2]>
HMSET key field value [field value ...]
redis> HMSET myhash field1 "Hello" field2 "World"
"OK"
redis> HGET myhash field1
"Hello"
redis> HGET myhash field2
"World"
窗体顶端
redis>
窗体底端
SADD key member [member ...]
Add the specified members to the set stored at key. Specified members that are already a member of this set are ignored. If key does not exist, a new set is created before adding the specified members.
An error is returned when the value stored at key is not a set.
Return value
Integer reply: the number of elements that were added to the set, not including all the elements already present into the set.
redis> SADD myset "Hello"
(integer) 1
redis> SADD myset "World"
(integer) 1
redis> SADD myset "World"
(integer) 0
redis> SMEMBERS myset
1) "World"
2) "Hello"
窗体顶端
redis>
窗体底端
SAVE
The SAVE 执行一个synchronous save of the dataset producing a point in time snapshot of all the data inside the Redis instance, in the form of an RDB file.
在生产环境,你可能永远不会调用 SAVE where it will block all the other clients. 使用 BGSAVE 代替. However in case of issues preventing Redis to create the background saving child (for instance errors in the fork(2) system call), the SAVE command can be a good last resort to perform the dump of the latest dataset.
Please refer to the persistence documentation for detailed information.
BGSAVE
Save the DB in background. 立即返回 OK code. Redis forks, the parent 继续服务the clients, the child saves the DB on disk then exits. A client may be able to check if the operation succeeded using the LASTSAVE command.
Please refer to the persistence documentation for detailed information.
LASTSAVE
Return the UNIX TIME of the last DB save executed with success. A client may check if a BGSAVE command succeeded reading the LASTSAVE value, then issuing a BGSAVE command and checking at regular intervals every N seconds if LASTSAVE changed.
127.0.0.1:6379> lastsave
(integer) 1584507492
unix time转换为北京时间:2020-03-18 12:58:12
差不多1分钟一次
RANDOMKEY
Return a random key from the currently selected database.
Bulk string reply: the random key, or nil when the database is empty.
TYPE key
返回key的数据类型:string, list, set, zset, hash and stream.
redis> SET key1 "value"
"OK"
redis> LPUSH key2 "value"
(integer) 1
redis> SADD key3 "value"
(integer) 1
redis> TYPE key1
"string"
redis> TYPE key2
"list"
redis> TYPE key3
"set"
窗体顶端
redis>
窗体底端
使用 pipelining 加速Redis queries
Request/Response protocols and RTT
Redis是一个TCP server,使用client-server模型,这个模型叫做一个request/response protocol。
所以一个请求有以下步骤:
- The client 发送一个查询to the server, and reads from the socket, usually in a blocking way, for the server response.
- The server processes the command and sends the response back to the client.
clients和servers的连接通过一个a networking link。不管网络是否延时,there is a time for the packets to travel from the client to the server, and back from the server to the client to carry the reply.
This time is called RTT (Round Trip Time)。假设,RTT时间是250毫秒,尽管the server每秒能处理100k个请求,我们每秒最多能处理4个请求。
如果the interface 使用a loopback interface, the RTT会更短(我的主机pinging 127.0.0.1的响应时间0,044 milliseconds), 但还是有一个时间
Fortunately there is a way to improve this use case.
Redis Pipelining
A Request/Response server 能处理新的 requests 即使the client didn't already read the old responses. 这样就可以发送 multiple commands to the server 无需等待 the replies at all, and finally read the replies in a single step.
这就叫做pipelining,这项技术已经被广泛使用. For instance many POP3 protocol implementations already supported this feature, dramatically speeding up the process of downloading new emails from the server.
Redis 很早就支持 pipelining,下面是使用 the raw netcat 工具示例:
$ (printf "PING\r\nPING\r\nPING\r\n"; sleep 1) | nc localhost 6379+PONG+PONG+PONGThis time we are not paying the cost of RTT for every call, but just one time for the three commands.
To be very explicit, with pipelining the order of operations of our very first example will be the following:
- Client: INCR X
- Client: INCR X
- Client: INCR X
- Client: INCR X
- Server: 1
- Server: 2
- Server: 3
- Server: 4
IMPORTANT NOTE: 使用管道发送命令时,服务器将被迫回复一个队列答复,占用很多内存.所以最好是合理数量来批次发送, 例如 10k commands, read the replies, and then send another 10k commands again, and so forth. The speed will be nearly the same, but the additional memory used will be at max the amount needed to queue the replies for these 10k commands.
不仅仅是RTT的事
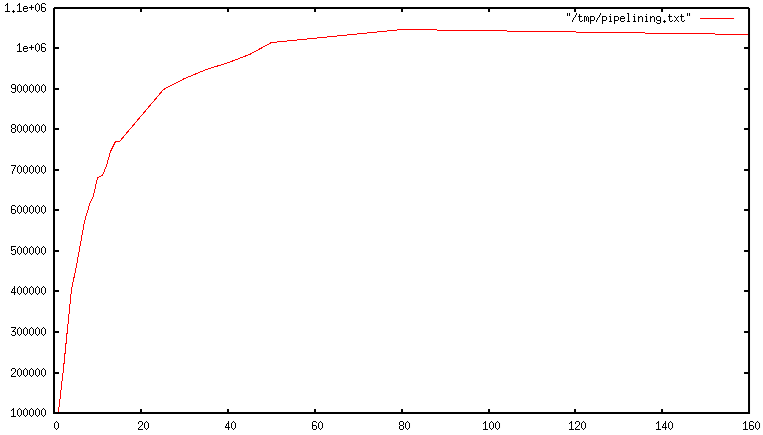
When pipelining is used, many commands are usually read with a single read() system call, and multiple replies are delivered with a single write() system call. 因为这样, the number of total queries performed per second initially increases almost linearly with longer pipelines, and eventually reaches 10 times the baseline obtained not using pipelining, as you can see from the following graph:
真实代码示例
Pipelining VS Scripting
使用Redis scripting (2.6 or greater才有) a number of use cases for pipelining can be addressed more efficiently using scripts that perform a lot of the work needed at the server side. 脚本的一大优势是,它能够以最小的延迟读取和写入数据, making operations like read, compute, write very fast (pipelining can't help in this scenario since the client needs the reply of the read command before it can call the write command).
Sometimes the application may also want to send EVAL or EVALSHA commands in a pipeline. This is entirely possible and Redis explicitly supports it with the SCRIPT LOAD command (it guarantees that EVALSHA can be called without the risk of failing).
Appendix: Why are busy loops slow even on the loopback interface?
Even with all the background covered in this page, 你可能仍然想知道为什么 a Redis benchmark like the following (in pseudo code), 是慢的 就算in the loopback interface中执行, when the server and the client are running in the same physical machine:
FOR-ONE-SECOND: Redis.SET("foo","bar")END After all if both the Redis process and the benchmark are running in the same box, isn't this just messages copied via memory from one place to another without any actual latency and actual networking involved?
The reason is that processes in a system are not always running, actually it is the kernel scheduler that let the process run, so what happens is that, for instance, the benchmark is allowed to run, reads the reply from the Redis server (related to the last command executed), and writes a new command. The command is now in the loopback interface buffer, but in order to be read by the server, the kernel should schedule the server process (currently blocked in a system call) to run, and so forth. So in practical terms the loopback interface still involves network-alike latency, because of how the kernel scheduler works.
Basically a busy loop benchmark is the silliest thing that can be done when metering performances in a networked server. The wise thing is just avoiding benchmarking in this way.
总结
管道 类似于多次执行,一次返回
需要测试下mset和mget 性能对比
Ⅲ 教程&FAQ
Redis数据类型介绍
Redis 不是一个简单的key-value store, 实际上作为 a data structures server, 支持不同类型的values. 这意味着什么呢, 在传统的 key-value stores 你分配string keys to string values, in Redis the value 不仅仅是一个简单的string, 可以是更复杂的data structures. 以下是redis支持的所有数据结构, 会分别在本教程中介绍:
- Binary-safe strings.
- Lists: collections of string elements sorted according to the order of insertion. They are basically linked lists.
- Sets: collections of unique, unsorted string elements.
- Sorted sets, 类似于Sets but where every string element is associated to a floating number value, called score. The elements are always taken sorted by their score, so unlike Sets it is possible to retrieve a range of elements (for example you may ask: give me the top 10, or the bottom 10).
- Hashes, which are maps composed of fields associated with values. 字段和值都是strings. This is very similar to Ruby or Python hashes.
- Bit arrays (or simply bitmaps): it is possible, using special commands, to handle String values like an array of bits: you can set and clear individual bits, count all the bits set to 1, find the first set or unset bit, and so forth.
- HyperLogLogs: this is a probabilistic data structure which is used in order to estimate the cardinality of a set. Don't be scared, it is simpler than it seems... See later in the HyperLogLog section of this tutorial.
- Streams: append-only collections of map-like entries that provide an abstract log data type. They are covered in depth in the Introduction to Redis Streams.
It's not always trivial to grasp how these data types work and what to use in order to solve a given problem from the command reference, so this document is a crash course in Redis data types and their most common patterns.
所有示例都是用 redis-cli utility, a simple but handy command-line utility, to issue commands against the Redis server.
Redis keys
Redis keys are binary safe, this means that you can use any binary sequence as a key, from a string like "foo" to the content of a JPEG file. The empty string is also a valid key.
keys的一些规则:
- 非常长的keys是不好的主意. For instance a key of 1024 bytes is a bad idea not only memory-wise, but also because the lookup of the key in the dataset may require several costly key-comparisons. Even when the task at hand is to match the existence of a large value, hashing it (for example with SHA1) is a better idea, especially from the perspective of memory and bandwidth.
- 非常短的keys通常也不是一个好的主意. There is little point in writing "u1000flw" as a key if you can instead write "user:1000:followers". The latter is more readable and the added space is minor compared to the space used by the key object itself and the value object. While short keys will obviously consume a bit less memory, your job is to find the right balance.
- 尝试使用一个 schema. 例如 "object-type:id" is a good idea, as in "user:1000". Dots or dashes are often used for multi-word fields, as in "comment:1234:reply.to" or "comment:1234:reply-to".
- 最大允许512 MB.
Redis Lists
List is just a sequence of ordered elements: 10,20,1,2,3 is a list. But the properties of a List implemented using an Array are very different from the properties of a List implemented using a Linked List.
Redis lists 实现通过Linked Lists. 意味着即使的一个list中 millions of elements, the operation of adding a new element in the head or in the tail of the list is performed in constant time. 使用the LPUSH 命令添加一个新元素到只有10个元素的头部的速度是一样的和adding an element to the head of list with 10 million elements.
缺点是什么?访问一个元素通过使用 index 是非常快的in lists implemented with an Array (constant time indexed access) and 不快in lists implemented by linked lists (where the operation requires an amount of work proportional to the index of the accessed element).
Redis Lists 使用linked lists实现的原因是对于数据库系统来说,至关重要的特性是:能非常快的在很大的列表上添加元素. 另一个重要因素是,正如你将要看到的, is that Redis Lists can be taken at constant length in constant time.
快速访问大集合中的中间元素非常重要, 有其他不同的数据结构可以使用, 叫做sorted sets. Sorted sets will be covered later in this tutorial.
Redis Lists入门
The LPUSH 命令添加一个新元素到list左边(at the head), while the RPUSH 添加一个新元素到list右边 (at the tail). 最后the LRANGE 命令extracts(提取) ranges of elements from lists:
> rpush mylist A(integer) 1> rpush mylist B(integer) 2> lpush mylist first(integer) 3> lrange mylist 0 -1 提取第一个到最后一个1) "first"2) "A"3) "B"记住 LRANGE 接收两个indexes, 第一个和最后一个元素. 两个都可以是负数, telling Redis to start counting from the end: so -1 最后一个元素, -2 倒数第二个, and so forth.
As you can see RPUSH appended the elements on the right of the list, while the final LPUSH appended the element on the left.
上面的所有命令的参数都可变,方便你一次向list存入多个值。:
> rpush mylist 1 2 3 4 5 "foo bar"(integer) 9> lrange mylist 0 -11) "first"2) "A"3) "B"4) "1"5) "2"6) "3"7) "4"8) "5"9) "foo bar"还有一个重要的命令是pop,它从list中删除元素并同时返回删除的值。可以在左边或右边操作:
> rpush mylist a b c(integer) 3> rpop mylist"c"> rpop mylist"b"> rpop mylist"a"还有一个重要的命令是pop,它从list中删除元素并同时返回删除的值。可以在左边或右边操作:
> rpop mylist(nil)当list没有元素时,Redis 返回了一个NULL.
测试:
[root@wiscom redis-5.0.7]# bin/redis-cli
127.0.0.1:6379> auth wiscom123!
OK
127.0.0.1:6379> rpush test1 a1 a2 a3 b1 b2
(integer) 5
127.0.0.1:6379> rpush test2 c1 c2
(integer) 2
127.0.0.1:6379> lpush test1 c1 c2
(integer) 7
127.0.0.1:6379> lrange test1 0 -1
1) "c2"
2) "c1"
3) "a1"
4) "a2"
5) "a3"
6) "b1"
7) "b2"
127.0.0.1:6379> get test1
(error) WRONGTYPE Operation against a key holding the wrong kind of value
127.0.0.1:6379> randomkey
"test2"
lists常用案例
Lists are useful for a number of tasks, two very representative use cases are the following:
- Remember the latest updates posted by users into a social network.
- Communication between processes, using a consumer-producer pattern where the producer pushes items into a list, and a consumer (usually a worker) consumes those items and executed actions. Redis has special list commands to make this use case both more reliable and efficient.
For example both the popular Ruby libraries resque and sidekiq use Redis lists under the hood in order to implement background jobs.
The popular Twitter social network takes the latest tweets posted by users into Redis lists.
To describe a common use case step by step, imagine your home page shows the latest photos published in a photo sharing social network and you want to speedup access.
- Every time a user posts a new photo, we add its ID into a list with LPUSH.
- When users visit the home page, we use
LRANGE 0 9in order to get the latest 10 posted items.
Capped lists
很多时候我们仅仅是想使用list的the latest items, whatever they are: social network updates, logs, or anything else.
Redis allows us to use lists as a capped collection, only remembering the latest N items and discarding all the oldest items using the LTRIM command.
The LTRIM 类似于 LRANGE, but instead of displaying the specified range of elements it sets this range as the new list value. 所有范围之外的元素会被移除.
An example will make it more clear:
> rpush mylist 1 2 3 4 5(integer) 5> ltrim mylist 0 2OK> lrange mylist 0 -11) "1"2) "2"3) "3"The above LTRIM command tells Redis to take just list elements from index 0 to 2, everything else will be discarded. This allows for a very simple but useful pattern: doing a List push operation + a List trim operation together in order to add a new element and discard elements exceeding a limit:
LPUSH mylist <some element>LTRIM mylist 0 999The above combination adds a new element and takes only the 1000 newest elements into the list. With LRANGE you can access the top items without any need to remember very old data.
Note: while LRANGE is technically an O(N) command, accessing small ranges towards the head or the tail of the list is a constant time operation.
Blocking operations on lists
Lists have a special feature that make them suitable to implement queues, and in general as a building block for inter process communication systems: blocking operations.
想象使用一个进程push items 到一个list, and use a different process in order to actually do some kind of work with those items. 这实际上是producer / consumer 架构, 可以通过以下方式实现:
- To push items into the list, producers call LPUSH.
- To extract / process items from the list, consumers call RPOP.
但是有时候list是空的 and there is nothing to process, so RPOP 仅仅返回NULL. 这种情况下 a consumer 被强制等待一段时间并再次RPOP尝试. 这叫做polling, 这不是一个好的主意因为有以下缺点:
- Forces Redis and clients to process useless commands (all the requests when the list is empty will get no actual work done, they'll just return NULL).
- Adds a delay to the processing of items, since after a worker receives a NULL, it waits some time. To make the delay smaller, we could wait less between calls to RPOP, with the effect of amplifying problem number 1, i.e. more useless calls to Redis.
So Redis implements commands called BRPOP and BLPOP which are versions of RPOP and LPOP able to block if the list is empty: they'll return to the caller only when a new element is added to the list, or when a user-specified timeout is reached.
This is an example of a BRPOP call we could use in the worker:
> brpop tasks 51) "tasks"2) "do_something"It means: "wait for elements in the list tasks, but return if after 5 seconds no element is available".
Note that you can use 0 as timeout to wait for elements forever, and you can also specify multiple lists and not just one, in order to wait on multiple lists at the same time, and get notified when the first list receives an element.
A few things to note about BRPOP:
- Clients are served in an ordered way: the first client that blocked waiting for a list, is served first when an element is pushed by some other client, and so forth.
- The return value is different compared to RPOP: it is a two-element array since it also includes the name of the key, because BRPOP and BLPOP are able to block waiting for elements from multiple lists.
- If the timeout is reached, NULL is returned.
There are more things you should know about lists and blocking ops. We suggest that you read more on the following:
- It is possible to build safer queues or rotating queues using RPOPLPUSH.
- There is also a blocking variant of the command, called BRPOPLPUSH.
keys自动创建和删除
So far in our examples we never had to create empty lists before pushing elements, or removing empty lists when they no longer have elements inside. It is Redis' responsibility to delete keys when lists are left empty, or to create an empty list if the key does not exist and we are trying to add elements to it, for example, with LPUSH.
This is not specific to lists, it applies to all the Redis data types composed of multiple elements -- Streams, Sets, Sorted Sets and Hashes.
Basically we can summarize the behavior with three rules:
- When we add an element to an aggregate data type, if the target key does not exist, an empty aggregate data type is created before adding the element.
- When we remove elements from an aggregate data type, if the value remains empty, the key is automatically destroyed. The Stream data type is the only exception to this rule.
- Calling a read-only command such as LLEN (which returns the length of the list), or a write command removing elements, with an empty key, always produces the same result as if the key is holding an empty aggregate type of the type the command expects to find.
Examples of rule 1:
> del mylist(integer) 1> lpush mylist 1 2 3(integer) 3However we can't perform operations against the wrong type if the key exists:
> set foo barOK> lpush foo 1 2 3(error) WRONGTYPE Operation against a key holding the wrong kind of value> type foostringExample of rule 2:
> lpush mylist 1 2 3(integer) 3> exists mylist(integer) 1> lpop mylist"3"> lpop mylist"2"> lpop mylist"1"> exists mylist(integer) 0The key no longer exists after all the elements are popped.
Example of rule 3:
> del mylist(integer) 0> llen mylist(integer) 0> lpop mylist(nil)
Redis Hashes
Redis hashes look exactly how one might expect a "hash" to look, with field-value pairs:
> hmset user:1000 username antirez birthyear 1977 verified 1OK> hget user:1000 username"antirez"> hget user:1000 birthyear"1977"> hgetall user:10001) "username"2) "antirez"3) "birthyear"4) "1977"5) "verified"6) "1"While hashes are handy to represent objects, actually the number of fields you can put inside a hash has no practical limits (other than available memory), so you can use hashes in many different ways inside your application.
The command HMSET sets multiple fields of the hash, while HGET retrieves a single field. HMGET is similar to HGET but returns an array of values:
> hmget user:1000 username birthyear no-such-field1) "antirez"2) "1977"3) (nil)There are commands that are able to perform operations on individual fields as well, like HINCRBY:
> hincrby user:1000 birthyear 10(integer) 1987> hincrby user:1000 birthyear 10(integer) 1997You can find the full list of hash commands in the documentation.
It is worth noting that small hashes (i.e., a few elements with small values) are encoded in special way in memory that make them very memory efficient.
Redis Sets
Redis Sets 是无序的collections of strings. The SADD 添加一个新元素. 对 set 也可做一些其他的操作,比如测试一个给定的元素是否存在,对不同 set 取交集,并集或差,等等。.
> sadd myset 1 2 3(integer) 3> smembers myset1. 32. 13. 2现在我已经把三个元素加到我的 set 中,并告诉 Redis 返回所有的元素。可以看到,它们没有被排序 —— Redis 在每次调用时可能按照任意顺序返回元素,因为对于元素的顺序并没有规定。
Redis 有检测成员的指令。一个特定的元素是否存在:
> sismember myset 3(integer) 1> sismember myset 30(integer) 0"3"是此set的的成员, while "30" is not.
Sets are good for expressing relations between objects. For instance we can easily use sets in order to implement tags.
A simple way to model this problem is to have a set for every object we want to tag. The set contains the IDs of the tags associated with the object.
假设我们想要给新闻打上标签。 假设新闻 ID 1000 被打上了 1,2,5 和 77 四个标签,我们可以使用一个 set 把 tag ID 和新闻条目关联起来:
> sadd news:1000:tags 1 2 5 77(integer) 4但是,有时候我可能也会需要相反的关系:所有被打上相同标签的新闻列表:
> sadd tag:1:news 1000(integer) 1> sadd tag:2:news 1000(integer) 1> sadd tag:5:news 1000(integer) 1> sadd tag:77:news 1000(integer) 1获取一个对象的所有 tag 是很方便的:
> smembers news:1000:tags1. 52. 13. 774. 2Note: in the example we assume you have another data structure, for example a Redis hash, which maps tag IDs to tag names.
There are other non trivial operations that are still easy to implement using the right Redis commands. For instance we may want a list of all the objects with the tags 1, 2, 10, and 27 together. We can do this using the SINTER command, which performs the intersection between different sets. We can use:
> sinter tag:1:news tag:2:news tag:10:news tag:27:news... results here ...In addition to intersection you can also perform unions, difference, extract a random element, and so forth.
The command to extract an element is called SPOP, and is handy to model certain problems. For example in order to implement a web-based poker game, you may want to represent your deck with a set. Imagine we use a one-char prefix for (C)lubs, (D)iamonds, (H)earts, (S)pades:
> sadd deck C1 C2 C3 C4 C5 C6 C7 C8 C9 C10 CJ CQ CK D1 D2 D3 D4 D5 D6 D7 D8 D9 D10 DJ DQ DK H1 H2 H3 H4 H5 H6 H7 H8 H9 H10 HJ HQ HK S1 S2 S3 S4 S5 S6 S7 S8 S9 S10 SJ SQ SK (integer) 52Now we want to provide each player with 5 cards. The SPOP command removes a random element, returning it to the client, so it is the perfect operation in this case.
However if we call it against our deck directly, in the next play of the game we'll need to populate the deck of cards again, which may not be ideal. So to start, we can make a copy of the set stored in the deck key into the game:1:deck key.
This is accomplished using SUNIONSTORE, which normally performs the union between multiple sets, and stores the result into another set. However, since the union of a single set is itself, I can copy my deck with:
> sunionstore game:1:deck deck(integer) 52Now I'm ready to provide the first player with five cards:
> spop game:1:deck"C6"> spop game:1:deck"CQ"> spop game:1:deck"D1"> spop game:1:deck"CJ"> spop game:1:deck"SJ"One pair of jacks, not great...
This is a good time to introduce the set command that provides the number of elements inside a set. This is often called the cardinality of a set in the context of set theory, so the Redis command is called SCARD.
> scard game:1:deck(integer) 47The math works: 52 - 5 = 47.
When you need to just get random elements without removing them from the set, there is the SRANDMEMBER command suitable for the task. It also features the ability to return both repeating and non-repeating elements.
测试:
127.0.0.1:6379> select 5
OK
127.0.0.1:6379[5]> sadd test1 1 2 3
(integer) 3
127.0.0.1:6379[5]> smember test1
(error) ERR unknown command `smember`, with args beginning with: `test1`,
127.0.0.1:6379[5]> smembers test1
1) "1"
2) "2"
3) "3"
127.0.0.1:6379[5]>
Redis Sorted sets
Sorted sets are a data type which is similar to a mix between a Set and a Hash. Like sets, sorted sets are composed of unique, non-repeating string elements, so in some sense a sorted set is a set as well.
However while elements inside sets are not ordered, every element in a sorted set is associated with a floating point value, called the score (this is why the type is also similar to a hash, since every element is mapped to a value).
Moreover, elements in a sorted sets are taken in order (so they are not ordered on request, order is a peculiarity of the data structure used to represent sorted sets). They are ordered according to the following rule:
- If A and B are two elements with a different score, then A > B if A.score is > B.score.
- If A and B have exactly the same score, then A > B if the A string is lexicographically greater than the B string. A and B strings can't be equal since sorted sets only have unique elements.
Let's start with a simple example, adding a few selected hackers names as sorted set elements, with their year of birth as "score".
> zadd hackers 1940 "Alan Kay"(integer) 1> zadd hackers 1957 "Sophie Wilson"(integer) 1> zadd hackers 1953 "Richard Stallman"(integer) 1> zadd hackers 1949 "Anita Borg"(integer) 1> zadd hackers 1965 "Yukihiro Matsumoto"(integer) 1> zadd hackers 1914 "Hedy Lamarr"(integer) 1> zadd hackers 1916 "Claude Shannon"(integer) 1> zadd hackers 1969 "Linus Torvalds"(integer) 1> zadd hackers 1912 "Alan Turing"(integer) 1As you can see ZADD is similar to SADD, but takes one additional argument (placed before the element to be added) which is the score. ZADD is also variadic, so you are free to specify multiple score-value pairs, even if this is not used in the example above.
With sorted sets it is trivial to return a list of hackers sorted by their birth year because actually they are already sorted.
Implementation note: Sorted sets are implemented via a dual-ported data structure containing both a skip list and a hash table, so every time we add an element Redis performs an O(log(N)) operation. That's good, but when we ask for sorted elements Redis does not have to do any work at all, it's already all sorted:
> zrange hackers 0 -11) "Alan Turing"2) "Hedy Lamarr"3) "Claude Shannon"4) "Alan Kay"5) "Anita Borg"6) "Richard Stallman"7) "Sophie Wilson"8) "Yukihiro Matsumoto"9) "Linus Torvalds"Note: 0 and -1 means from element index 0 to the last element (-1 works here just as it does in the case of the LRANGE command).
What if I want to order them the opposite way, youngest to oldest? Use ZREVRANGE instead of ZRANGE:
> zrevrange hackers 0 -11) "Linus Torvalds"2) "Yukihiro Matsumoto"3) "Sophie Wilson"4) "Richard Stallman"5) "Anita Borg"6) "Alan Kay"7) "Claude Shannon"8) "Hedy Lamarr"9) "Alan Turing"It is possible to return scores as well, using the WITHSCORES argument:
> zrange hackers 0 -1 withscores1) "Alan Turing"2) "1912"3) "Hedy Lamarr"4) "1914"5) "Claude Shannon"6) "1916"7) "Alan Kay"8) "1940"9) "Anita Borg"10) "1949"11) "Richard Stallman"12) "1953"13) "Sophie Wilson"14) "1957"15) "Yukihiro Matsumoto"16) "1965"17) "Linus Torvalds"18) "1969"Operating on ranges
Sorted sets are more powerful than this. They can operate on ranges. Let's get all the individuals that were born up to 1950 inclusive. We use the ZRANGEBYSCORE command to do it:
> zrangebyscore hackers -inf 19501) "Alan Turing"2) "Hedy Lamarr"3) "Claude Shannon"4) "Alan Kay"5) "Anita Borg"We asked Redis to return all the elements with a score between negative infinity and 1950 (both extremes are included).
It's also possible to remove ranges of elements. Let's remove all the hackers born between 1940 and 1960 from the sorted set:
> zremrangebyscore hackers 1940 1960(integer) 4ZREMRANGEBYSCORE is perhaps not the best command name, but it can be very useful, and returns the number of removed elements.
Another extremely useful operation defined for sorted set elements is the get-rank operation. It is possible to ask what is the position of an element in the set of the ordered elements.
> zrank hackers "Anita Borg"(integer) 4The ZREVRANK command is also available in order to get the rank, considering the elements sorted a descending way.
Lexicographical scores
With recent versions of Redis 2.8, a new feature was introduced that allows getting ranges lexicographically, assuming elements in a sorted set are all inserted with the same identical score (elements are compared with the C memcmp function, so it is guaranteed that there is no collation, and every Redis instance will reply with the same output).
The main commands to operate with lexicographical ranges are ZRANGEBYLEX, ZREVRANGEBYLEX, ZREMRANGEBYLEX and ZLEXCOUNT.
For example, let's add again our list of famous hackers, but this time use a score of zero for all the elements:
> zadd hackers 0 "Alan Kay" 0 "Sophie Wilson" 0 "Richard Stallman" 0 "Anita Borg" 0 "Yukihiro Matsumoto" 0 "Hedy Lamarr" 0 "Claude Shannon" 0 "Linus Torvalds" 0 "Alan Turing"Because of the sorted sets ordering rules, they are already sorted lexicographically:
> zrange hackers 0 -11) "Alan Kay"2) "Alan Turing"3) "Anita Borg"4) "Claude Shannon"5) "Hedy Lamarr"6) "Linus Torvalds"7) "Richard Stallman"8) "Sophie Wilson"9) "Yukihiro Matsumoto"Using ZRANGEBYLEX we can ask for lexicographical ranges:
> zrangebylex hackers [B [P1) "Claude Shannon"2) "Hedy Lamarr"3) "Linus Torvalds"Ranges can be inclusive or exclusive (depending on the first character), also string infinite and minus infinite are specified respectively with the + and - strings. See the documentation for more information.
This feature is important because it allows us to use sorted sets as a generic index. For example, if you want to index elements by a 128-bit unsigned integer argument, all you need to do is to add elements into a sorted set with the same score (for example 0) but with an 16 byte prefix consisting of the 128 bit number in big endian. Since numbers in big endian, when ordered lexicographically (in raw bytes order) are actually ordered numerically as well, you can ask for ranges in the 128 bit space, and get the element's value discarding the prefix.
If you want to see the feature in the context of a more serious demo, check the Redis autocomplete demo.
Updating the score: leader boards
Just a final note about sorted sets before switching to the next topic. Sorted sets' scores can be updated at any time. Just calling ZADD against an element already included in the sorted set will update its score (and position) with O(log(N)) time complexity. As such, sorted sets are suitable when there are tons of updates.
Because of this characteristic a common use case is leader boards. The typical application is a Facebook game where you combine the ability to take users sorted by their high score, plus the get-rank operation, in order to show the top-N users, and the user rank in the leader board (e.g., "you are the #4932 best score here").
Bitmaps
Bitmaps不是实际的数据类型, but a set of bit-oriented operations defined on the String type. Since strings are binary safe blobs and their maximum length is 512 MB, they are suitable to set up to 232 different bits.
Bit operations are divided into two groups: constant-time single bit operations, like setting a bit to 1 or 0, or getting its value, and operations on groups of bits, for example counting the number of set bits in a given range of bits (e.g., population counting).
One of the biggest advantages of bitmaps is that they often provide extreme space savings when storing information. For example in a system where different users are represented by incremental user IDs, it is possible to remember a single bit information (for example, knowing whether a user wants to receive a newsletter) of 4 billion of users using just 512 MB of memory.
Bits are set and retrieved using the SETBIT and GETBIT commands:
> setbit key 10 1(integer) 1> getbit key 10(integer) 1> getbit key 11(integer) 0The SETBIT command takes as its first argument the bit number, and as its second argument the value to set the bit to, which is 1 or 0. The command automatically enlarges the string if the addressed bit is outside the current string length.
GETBIT just returns the value of the bit at the specified index. Out of range bits (addressing a bit that is outside the length of the string stored into the target key) are always considered to be zero.
There are three commands operating on group of bits:
- BITOP performs bit-wise operations between different strings. The provided operations are AND, OR, XOR and NOT.
- BITCOUNT performs population counting, reporting the number of bits set to 1.
- BITPOS finds the first bit having the specified value of 0 or 1.
Both BITPOS and BITCOUNT are able to operate with byte ranges of the string, instead of running for the whole length of the string. The following is a trivial example of BITCOUNT call:
> setbit key 0 1(integer) 0> setbit key 100 1(integer) 0> bitcount key(integer) 2Common use cases for bitmaps are:
- Real time analytics of all kinds.
- Storing space efficient but high performance boolean information associated with object IDs.
For example imagine you want to know the longest streak of daily visits of your web site users. You start counting days starting from zero, that is the day you made your web site public, and set a bit with SETBIT every time the user visits the web site. As a bit index you simply take the current unix time, subtract the initial offset, and divide by the number of seconds in a day (normally, 3600*24).
This way for each user you have a small string containing the visit information for each day. With BITCOUNT it is possible to easily get the number of days a given user visited the web site, while with a few BITPOS calls, or simply fetching and analyzing the bitmap client-side, it is possible to easily compute the longest streak.
Bitmaps are trivial to split into multiple keys, for example for the sake of sharding the data set and because in general it is better to avoid working with huge keys. To split a bitmap across different keys instead of setting all the bits into a key, a trivial strategy is just to store M bits per key and obtain the key name with bit-number/M and the Nth bit to address inside the key with bit-number MOD M.
HyperLogLogs
A HyperLogLog is a probabilistic data structure used in order to count unique things (technically this is referred to estimating the cardinality of a set). Usually counting unique items requires using an amount of memory proportional to the number of items you want to count, because you need to remember the elements you have already seen in the past in order to avoid counting them multiple times. However there is a set of algorithms that trade memory for precision: you end with an estimated measure with a standard error, which in the case of the Redis implementation is less than 1%. The magic of this algorithm is that you no longer need to use an amount of memory proportional to the number of items counted, and instead can use a constant amount of memory! 12k bytes in the worst case, or a lot less if your HyperLogLog (We'll just call them HLL from now) has seen very few elements.
HLLs in Redis, while technically a different data structure, are encoded as a Redis string, so you can call GET to serialize a HLL, and SET to deserialize it back to the server.
Conceptually the HLL API is like using Sets to do the same task. You would SADD every observed element into a set, and would use SCARD to check the number of elements inside the set, which are unique since SADD will not re-add an existing element.
While you don't really add items into an HLL, because the data structure only contains a state that does not include actual elements, the API is the same:
- Every time you see a new element, you add it to the count with PFADD.
- Every time you want to retrieve the current approximation of the unique elements added with PFADD so far, you use the PFCOUNT.
·> pfadd hll a b c d
·(integer) 1
·> pfcount hll
·(integer) 4
An example of use case for this data structure is counting unique queries performed by users in a search form every day.
Redis is also able to perform the union of HLLs, please check the full documentation for more information.
其他显著功能
There are other important things in the Redis API that can't be explored in the context of this document, but are worth your attention:
- It is possible to iterate the key space of a large collection incrementally.
- It is possible to run Lua scripts server side to improve latency and bandwidth.
- Redis is also a Pub-Sub server.
学习更多
This tutorial is in no way complete and has covered just the basics of the API. Read the command reference to discover a lot more.
Thanks for reading, and have fun hacking with Redis!
Ⅳ 管理
redis-cli
$ redis-cli incr mycounter(integer) 7$ redis-cli incr mycounter > /tmp/output.txt$ cat /tmp/output.txt8
$ redis-cli -h redis15.localnet.org -p 6390 pingPONG
$ redis-cli -a myUnguessablePazzzzzword123 pingPONG
$ redis-cli -u redis://p%40ssw0rd@redis-16379.hosted.com:16379/0 pingPONG
[root@wiscom04 redis-5.0.7]# bin/redis-cli -p 6379 -h 172.17.112.123
172.17.112.123:6379> auth wiscom123!
OK
[root@wiscom04 redis-5.0.7]# bin/redis-cli -p 6379 -h 172.17.112.123 -a wiscom123!
Warning: Using a password with '-a' or '-u' option on the command line interface may not be safe.
172.17.112.123:6379>
持久化
更深层次了解,阅读Redis persistence demystified.
redis提供以下范围的持久化:
- The RDB persistence 在指定间隔对你的dataset执行point-in-time snapshots.
- The AOF persistence 记录the server接收的每个写操作, 在重启时会重新执行, reconstructing the original dataset. Commands are logged using the same format as the Redis protocol itself, in an append-only fashion. Redis is able to rewrite the log in the background when it gets too big.
- 如果你想完全禁用持久化, 数据仅在server运行的时候存在.
- 同一个实例可以结合AOF and RDB. 记住, 这种情况下, 当Redis 重启,the AOF file 会被用于 reconstruct the original dataset 因为它的数据更完整.
RDB 优点
- RDB is a very compact single-file point-in-time representation of your Redis data. RDB files 用于backups是非常好的. For instance you may want to archive your RDB files every hour for the latest 24 hours, and to save an RDB snapshot every day for 30 days. This allows you to easily restore different versions of the data set in case of disasters.
- RDB对于 disaster recovery是非常好的, being a single compact file that can be transferred to far data centers, or onto Amazon S3 (possibly encrypted).
- RDB maximizes Redis performances since the only work the Redis parent process needs to do in order to persist is forking a child that will do all the rest. The parent instance will never perform disk I/O or alike.
- 数据集大的情况下,RDB启动更快与 AOF.
RDB 缺点
- RDB 并不是非常好如果想要最少数据丢失(for example after a power outage). You can configure different save points where an RDB is produced (for instance after at least five minutes and 100 writes against the data set, but you can have multiple save points). However you'll usually create an RDB snapshot every five minutes or more, so in case of Redis stopping working without a correct shutdown for any reason you should be prepared to lose the latest minutes of data.
- RDB needs to fork() often in order to persist on disk using a child process. Fork() can be time consuming if the dataset is big, and may result in Redis to stop serving clients for some millisecond or even for one second if the dataset is very big and the CPU performance not great. AOF also needs to fork() but you can tune how often you want to rewrite your logs without any trade-off on durability.
AOF 有点
- 使用AOF Redis is much more durable: you can have different fsync policies: no fsync at all, fsync every second, fsync at every query. With the default policy of fsync every second write performances are still great (fsync is performed using a background thread and the main thread will try hard to perform writes when no fsync is in progress.) but you can only lose one second worth of writes.
- The AOF log 是一个append only log, so there are no seeks, nor corruption problems if there is a power outage. Even if the log ends with an half-written command for some reason (disk full or other reasons) the redis-check-aof tool is able to fix it easily.
- Redis 自动重写如果此文件太大 the AOF. The rewrite is completely safe as while Redis continues appending to the old file, a completely new one is produced with the minimal set of operations needed to create the current data set, and once this second file is ready Redis switches the two and starts appending to the new one.
- AOF contains a log of all the operations one after the other in an easy to understand and parse format. You can even easily export an AOF file. 如果不小心执行了 FLUSHALL 命令, 如果 the log 没有被重写,你可以停止the server, 删除最后一条命令,重启server来恢复数据.
AOF 缺点
- AOF files 通常比RDB files 更大.
- AOF can be slower than RDB depending on the exact fsync policy. In general with fsync set to every second performance is still very high, and with fsync disabled it should be exactly as fast as RDB even under high load. Still RDB is able to provide more guarantees about the maximum latency even in the case of an huge write load.
- 特殊命令有一些bugs(for instance there was one involving blocking commands like BRPOPLPUSH) causing the AOF produced to not reproduce exactly the same dataset on reloading. These bugs are rare and we have tests in the test suite creating random complex datasets automatically and reloading them to check everything is fine. However, these kind of bugs are almost impossible with RDB persistence. To make this point more clear: the Redis AOF works by incrementally updating an existing state, like MySQL or MongoDB does, while the RDB snapshotting creates everything from scratch again and again, that is conceptually more robust. However - 1) It should be noted that every time the AOF is rewritten by Redis it is recreated from scratch starting from the actual data contained in the data set, making resistance to bugs stronger compared to an always appending AOF file (or one rewritten reading the old AOF instead of reading the data in memory). 2) We have never had a single report from users about an AOF corruption that was detected in the real world.
选择哪种
如果你允许数据丢失,仅选用RDB
很多用户仅选用AOF,我们是不建议的,因为RDB快照可用于备份、快速启动且AOF还有一些bug.
Note: 因为以上提到的种种原因, 未来我们可能会将 AOF 和 RDB 整合成单个持久化模型。 (这是一个长期计划。)
接下来的几个小节将介绍 RDB 和 AOF 的更多细节。
Snapshotting
默认,redis保存snapshots of the dataset在磁盘上,在一个二进制文件中,叫做dump.rdb.你可以配置 Redis to have it save the dataset every N seconds 如果此数据集至少有M changes, 或者手动调用the SAVE or BGSAVE 命令.
save 60 1000redis自动每个60秒dump the datase到磁盘上如果有1000个keys change.
这种策略称为 snapshotting。
当redis dump 数据集到磁盘会发生哪些工作呢:
- Redis forks. 我们现在有一个子和父进程.
- 子进程开始write the dataset to a temporary RDB file.
- 当子进程写完到the new RDB file,新文件会替换老文件.
This method allows Redis to benefit from copy-on-write semantics.
Append-only file
快照部署完整持久化,还有完整持久化方案。
The append-only file就是完整持久化方案,从redis 1.1开始支持。
在配置文件中启用AOF:
appendonly yes现在开始,redis接收到的每个change datase的命令都会追加到the AOF ,当redis重启,它会重演the AOF。
Log rewriting
the AOF会变动越来越大随着写操作的执行。例如,你对一条数据执行100次插入,AOF就会有100条记录。然而数据集中只有最后一条,那么AOF中其余 99 条记录实际上都是多余的。
为了处理这种情况, Redis 支持一种有趣的特性: 可以在不打断服务客户端的情况下, 在后台对 AOF 文件进行重建(rebuild)。当你发出一个BGREWRITEAOF命令, Redis 将生成一个新的 AOF 文件, 这个文件包含重建当前内存中数据集所需的最少命令。Redis 2.2 需要自己手动执行 BGREWRITEAOF 命令; Redis 2.4 则可以自动触发 AOF 重写, 具体信息请查看 2.4 的示例配置文件。
the append only file文件如何持久化
how many times Redis will fsync data on disk。有三个选项
- appendfsync always: fsync 每次有新命令就追加到the AOF. 非常慢,单很安全.
- appendfsync everysec: 每秒fsync一次. 非常快 (in 2.4 和snapshotting一样快), and you can lose 1 second of data if there is a disaster.
- appendfsync no: 从不fsync, 将数据交给操作系统.非常快但不安全方法. 通常 Linux will flush data every 30 seconds with this configuration, but it's up to the kernel exact tuning.
默认的策略是fsync every second. The always policy 是实际中是非常慢的,但it supports group commit, so if there are multiple parallel writes Redis will try to perform a single fsync operation.
如果AOF 发生truncated 中断
正在写入the AOF file,但是redis 崩溃或the AOF file所在磁盘满了。如果以上发生,数据还是保持了一致性(发生故障时间点),如果采用默认的一秒钟刷新一次,那么只老了一秒钟。但是the AOF 文件中的最后一行命令可能被truncated。最新主版本的redis都能自动丢弃此文件中的最后一个非完好的命令。这种情况下,server会发出以下日志:
* Reading RDB preamble from AOF file...* Reading the remaining AOF tail...# !!! Warning: short read while loading the AOF file !!!# !!! Truncating the AOF at offset 439 !!!# AOF loaded anyway because aof-load-truncated is enabled
你可以更改默认配置,强制redis停止,如果发生以上故障。默认是继续,无视最后一个不完整命令。
老版本redis不会恢复,需要执行以下步骤:
- Make a backup copy of your AOF file.
- Fix the original file using the redis-check-aof tool that ships with Redis:
$ redis-check-aof --fix
- Optionally use diff -u to check what is the difference between two files.
- Restart the server with the fixed file.
如果AOF 发生corrupted损坏
如果the AOF 文件不仅发生中断,还发生损坏,事情变动更复杂。
redis在重启会发生终止,且发出:
* Reading the remaining AOF tail...# Bad file format reading the append only file: make a backup of your AOF file, then use ./redis-check-aof --fix <filename>
如何工作
Log rewriting uses the same copy-on-write trick already in use for snapshotting. This is how it works:
- Redis forks, 我们现在有一个子和父进程.
- 开始wiring the new AOF in a temporary file.
- The parent accumulates(积累) all the new changes in an in-memory buffer (同时it writes the new changes in the old append-only file, so if the rewriting fails, we are safe).
- 当子进程完成rewriting the file, the parent获取一个信号, and appends the in-memory buffer at the end of the file generated by the child.
- Profit! Now Redis atomically renames the old file into the new one, and starts appending new data into the new file.
如果正在使用dump.rdb snapshots,可以开关AOF吗
Redis 2.0 and Redis 2.2步骤不一样,
Redis >= 2.2
- Make a backup of your latest dump.rdb file.
- Transfer this backup into a safe place.
- Issue the following two commands:
- redis-cli config set appendonly yes
- redis-cli config set save ""
- Make sure that your database contains the same number of keys it contained.
- Make sure that writes are appended to the append only file correctly.
第一个CONFIG 命令启用the Append Only File. In order to do so Redis will block to generate the initial dump, then will open the file for writing, and will start appending all the next write queries.
The second CONFIG command is used to turn off snapshotting persistence. This is optional, if you wish you can take both the persistence methods enabled.
重要: remember to edit your redis.conf to turn on the AOF, otherwise when you restart the server the configuration changes will be lost and the server will start again with the old configuration.
AOF and RDB 相互影响
Redis >= 2.4 确保避免出发一个AOF rewrite 当一个RDB snapshotting operation is already in progress, or allowing a BGSAVE while the AOF rewrite is in progress. This prevents two Redis background processes from doing heavy disk I/O at the same time.
When snapshotting is in progress and the user explicitly requests a log rewrite operation using BGREWRITEAOF the server will reply with an OK status code telling the user the operation is scheduled, and the rewrite will start once the snapshotting is completed.
In the case both AOF and RDB persistence are enabled and Redis restarts the AOF file will be used to reconstruct the original dataset since it is guaranteed to be the most complete.
备份 Redis data
开始此章节之前, 确保已经阅读: Make Sure to Backup Your Database. Disks break, instances in the cloud disappear, and so forth: no backups means huge risk of data disappearing into /dev/null.
Redis is very data backup friendly since you can copy RDB files while the database is running: the RDB is never modified once produced, and while it gets produced it uses a temporary name and is renamed into its final destination atomically using rename(2) only when the new snapshot is complete.
This means that copying the RDB file is completely safe while the server is running. This is what we suggest:
- Create a cron job in your server creating hourly snapshots of the RDB file in one directory, and daily snapshots in a different directory.
- Every time the cron script runs, make sure to call the find command to make sure too old snapshots are deleted: for instance you can take hourly snapshots for the latest 48 hours, and daily snapshots for one or two months. Make sure to name the snapshots with data and time information.
- At least one time every day make sure to transfer an RDB snapshot outside your data center or at least outside the physical machine running your Redis instance.
If you run a Redis instance with only AOF persistence enabled, you can still copy the AOF in order to create backups. The file may lack the final part but Redis will be still able to load it (see the previous sections about truncated AOF files).
Disaster recovery
Disaster recovery in the context of Redis is basically the same story as backups, plus the ability to transfer those backups in many different external data centers. This way data is secured even in the case of some catastrophic event affecting the main data center where Redis is running and producing its snapshots.
Since many Redis users are in the startup scene and thus don't have plenty of money to spend we'll review the most interesting disaster recovery techniques that don't have too high costs.
- Amazon S3 and other similar services are a good way for implementing your disaster recovery system. Simply transfer your daily or hourly RDB snapshot to S3 in an encrypted form. You can encrypt your data using
gpg -c(in symmetric encryption mode). Make sure to store your password in many different safe places (for instance give a copy to the most important people of your organization). It is recommended to use multiple storage services for improved data safety. - Transfer your snapshots using SCP (part of SSH) to far servers. This is a fairly simple and safe route: get a small VPS in a place that is very far from you, install ssh there, and generate an ssh client key without passphrase, then add it in the
authorized_keysfile of your small VPS. You are ready to transfer backups in an automated fashion. Get at least two VPS in two different providers for best results.
It is important to understand that this system can easily fail if not implemented in the right way. At least make absolutely sure that after the transfer is completed you are able to verify the file size (that should match the one of the file you copied) and possibly the SHA1 digest if you are using a VPS.
You also need some kind of independent alert system if the transfer of fresh backups is not working for some reason.
Redis 管理
Redis 构建提示
- 建议部署在 Linux operating system. Redis is also tested heavily on OS X, and tested from time to time on FreeBSD and OpenBSD systems. Linux 做了主要测试,且大部分产品部署在Linux上.
- 确保设置the Linux kernel overcommit memory setting to 1. 添加
vm.overcommit_memory = 1to/etc/sysctl.conf然后重启或运行sysctl vm.overcommit_memory=1使设置立即生效. - 确保禁用 Linux kernel feature transparent huge pages, 极大的负面影响 memory usage and latency. 这可以用下面的命令来完成:
echo never > /sys/kernel/mm/transparent_hugepage/enabled. - 确保to setup some swap in your system (假设swap和 memory一样大). If Linux does not have swap and your Redis instance accidentally consumes too much memory, either Redis will crash for out of memory or the Linux kernel OOM killer will kill the Redis process. When swapping is enabled Redis will work in a bad way, but you'll likely notice the latency spikes and do something before it's too late.
- 精确设置
maxmemoryoption limit in your instance in order to make sure that the instance will report errors instead of failing when the system memory limit is near to be reached. Note that maxmemory should be set calculating the overhead that Redis has, other than data, and the fragmentation overhead. 所以假设你有 10 GB of free memory, set it to 8 or 9. - 如果你使用 Redis 用于写繁重的应用, while saving an RDB file on disk or rewriting the AOF log Redis may use up to 2 times the memory normally used. The additional memory used is proportional to the number of memory pages modified by writes during the saving process, so it is often proportional to the number of keys (or aggregate types items) touched during this time. Make sure to size your memory accordingly.
- 使用
daemonize nowhen running under daemontools. - Make sure to setup some non trivial replication backlog, which must be set in proportion to the amount of memory Redis is using. In a 20 GB instance it does not make sense to have just 1 MB of backlog. The backlog will allow replicas to resynchronize with the master instance much easily.
- 尽管你禁用持久化, Redis需要执行RDB saves如果你使用replication, 除非你使用 the new diskless replication feature. If you have no disk usage on the master, make sure to enable diskless replication.
- 如果你使用replication, make sure that either your master has persistence enabled, or that it does not automatically restarts on crashes: replicas will try to be an exact copy of the master, so if a master restarts with an empty data set, replicas will be wiped as well.
- 默认 Redis 不需要 any authentication and listens to all the network interfaces. This is a big security issue if you leave Redis exposed on the internet or other places where attackers can reach it. See for example this attack to see how dangerous it can be. Please check our security page and the quick start for information about how to secure Redis.
- LATENCY DOCTOR and MEMORY DOCTOR 是你的朋友.
升级和重启a Redis instance without downtime
Redis is designed to be a very long running process in your server. For instance many configuration options can be modified without any kind of restart using the CONFIG SET command.
Starting from Redis 2.2 it is even possible to switch from AOF to RDB snapshots persistence or the other way around without restarting Redis. Check the output of the CONFIG GET * command for more information.
However from time to time a restart is mandatory, for instance in order to upgrade the Redis process to a newer version, or when you need to modify some configuration parameter that is currently not supported by the CONFIG command.
The following steps provide a very commonly used way in order to avoid any downtime.
- Setup your new Redis instance as a slave for your current Redis instance. In order to do so you need a different server, or a server that has enough RAM to keep two instances of Redis running at the same time.
- If you use a single server, make sure that the slave is started in a different port than the master instance, otherwise the slave will not be able to start at all.
- Wait for the replication initial synchronization to complete (check the slave log file).
- Make sure using INFO that there are the same number of keys in the master and in the slave. Check with redis-cli that the slave is working as you wish and is replying to your commands.
- Allow writes to the slave using CONFIG SET slave-read-only no
- Configure all your clients in order to use the new instance (that is, the slave). Note that you may want to use the CLIENT PAUSE command in order to make sure that no client can write to the old master during the switch.
- Once you are sure that the master is no longer receiving any query (you can check this with the MONITOR command), elect the slave to master using the SLAVEOF NO ONE command, and shut down your master.
If you are using Redis Sentinel or Redis Cluster, the simplest way in order to upgrade to newer versions, is to upgrade a slave after the other, then perform a manual fail-over in order to promote one of the upgraded replicas as master, and finally promote the last slave.
Note however that Redis Cluster 4.0 is not compatible with Redis Cluster 3.2 at cluster bus protocol level, so a mass restart is needed in this case. However Redis 5 cluster bus is backward compatible with Redis 4.
Redis 安全
Redis Signals Handling
redis cluster-tutorial
一个温和介绍和构建教程,提供setup a cluster, test, and operate it
要求版本 3.0及以上
Redis Cluster
redis 安装运行提供一种方式,数据automatically sharded across multiple Redis nodes(节点间数据自动分片)。
redis也提供some degree of availability during partitions(分区上一定层度的可用性),这在实际应用中有作用,操作能够继续即使一些节点发生故障或通信失败。
在实际应用中,你想从集群中获取什么能力:
l The ability to automatically split your dataset among multiple nodes.
l The ability to continue operations when a subset of the nodes are experiencing failures or are unable to communicate with the rest of the cluster.
Redis Cluster TCP ports
每个集群节点需要2个TCP connections open.一个常规的TCP端口用于服务clients,例如6379,plus the port obtained by adding 10000 to the data port, so 16379 in the example。
第二个端口用于 the cluster bus, that is a node-to-node communication channel using a binary protocol. The Cluster bus 用于节点故障检测, 配置更新, 故障转移认证 and so forth. Clients不要尝试连接此通信端口。防火墙确保这两个端口打开.
The command port and cluster bus port offset 是固定的且总是 10000.
Note that for a Redis Cluster to work properly you need, for each node:
- The normal client communication port (通常是6379) used to communicate with clients to be open to all the clients that need to reach the cluster, plus all the other cluster nodes (that use the client port for keys migrations).
- The cluster bus port (the client port + 10000) must be reachable from all the other cluster nodes.
The cluster bus 使用一个不同的, binary protocol, for node to node data exchange, 节省节点间带宽和处理时间.
Redis Cluster data sharding
Redis Cluster 没有使用consistent hashing, 引入了 hash slot(哈希槽)概念.
一共16384 hash slots in Redis Cluster, 计算一个key属于哪个hash slot, 我们简单地take the CRC16 of the key modulo 16384.
每个节点负责一部分the hash slots, 假设有三个节点:
l Node A contains hash slots from 0 to 5500.
l Node B contains hash slots from 5501 to 11000.
l Node C contains hash slots from 11001 to 16383.
这使得集群很容易地添加和移除节点. 例如,如果我想添加节点 D,我需要从节点 A, B, C 移除一些hash slot到 D.同理,如果我想移除节点 A,只需要移除A上的hash slots到 to B and C. 当节点 A will be empty 就可以从集群中移除了.
由于从一个节点移动hash slots到另一个节点无需停止 操作, 添加和删除nodes, 或更改节点持有hash slots的百分比, does not require any downtime.
Redis Cluster支持multiple key operations 只要涉及到的all the keys都在一个单一command execution (or whole transaction, or Lua script execution) 都会属于相同的hash slot.用户可以强制 multiple keys 属于the same hash slot 通过使用一个使用hash tags.
Hash tags 在 the Redis Cluster specification中有文档, but the gist is that if there is a substring between {} brackets in a key, only what is inside the string is hashed, so for example this{foo}key and another{foo}key are guaranteed to be in the same hash slot, and can be used together in a command with multiple keys as arguments.
Redis Cluster 主-从模式
In order to remain available when a subset of master nodes are failing or are not able to communicate with the majority of nodes, Redis Cluster uses a master-slave model where every hash slot has from 1 (the master itself) to N replicas (N-1 additional slaves nodes).
In our example cluster with nodes A, B, C, if node B fails the cluster is not able to continue, since we no longer have a way to serve hash slots in the range 5501-11000.
However when the cluster is created (or at a later time) we add a slave node to every master, so that the final cluster is composed of A, B, C that are masters nodes, and A1, B1, C1 that are slaves nodes, the system is able to continue if node B fails.
Node B1 replicates B, and B fails, the cluster will promote node B1 as the new master and will continue to operate correctly.
However note that if nodes B and B1 fail at the same time Redis Cluster is not able to continue to operate.
Redis Cluster 一致性保证
Redis Cluster不能强一致性保证. 在实际应用中,这意味着在一定条件下有可能 Redis Cluster will lose writes that were acknowledged by the system to the client.
丢失writes第一个原始是 asynchronous replication. 意味着写期间会发生:
- 你的客户端 writes to the master B.
- The master B 告诉客户端写入成功.
- The master B propagates (传播)the write to its slaves B1, B2 and B3.
正如你看到的, B 不会等待 an acknowledgement from B1, B2, B3 before replying to the client, since this would be a prohibitive latency penalty for Redis, so if your client writes something, B acknowledges the write, but crashes before being able to send the write to its slaves, one of the slaves (没有接收到the write) can be promoted to master, losing the write forever.
This is very similar to what happens with most databases that are configured to flush data to disk every second, so it is a scenario you are already able to reason about because of past experiences with traditional database systems not involving distributed systems. 你可以提高一致性通过强制the database to flush data on disk 在客户端接收响应之前, 但是这通常会导致成非常低性能. That would be the equivalent of synchronous replication in the case of Redis Cluster.
基本上在性能和一致性上有一个权衡.
Redis Cluster 支持synchronous writes当绝对需要时,通过 the WAIT 命令实现, 这样可以防止数据丢的更少, 但是请记住 Redis Cluster 没有实现强一致性尽管当synchronous replication被使用: it is always possible under more complex failure scenarios that a slave that was not able to receive the write is elected as master.
还有一个 Redis Cluster will lose writes的场景, that happens during a network partition where a client is isolated with a minority of instances including at least a master.
假设集群有六个节点:A, B, C, A1, B1, C1, with 3 masters and 3 slaves. 还有一个a client,叫做 Z1.
一个网络分区发生后, it is possible that in one side of the partition we have A, C, A1, B1, C1, and in the other side we have B and Z1.
Z1 is still able to write to B, that will accept its writes. If the partition heals in a very short time, the cluster will continue normally. However if the partition lasts enough time for B1 to be promoted to master in the majority side of the partition, the writes that Z1 is sending to B will be lost.
Note that there is a maximum window to the amount of writes Z1 will be able to send to B: if enough time has elapsed for the majority side of the partition to elect a slave as master, every master node in the minority side stops accepting writes.
这个重要时间叫做 node timeout.
After node timeout has elapsed, a master node is considered to be failing, and can be replaced by one of its replicas. Similarly after node timeout has elapsed without a master node to be able to sense the majority of the other master nodes, it enters an error state and stops accepting writes
Redis Cluster 配置参数
介绍下 redis.conf 文件中集群配置参数. Some will be obvious, others will be more clear as you continue reading.
- cluster-enabled <yes/no>: 如果为yes, 启用 Redis Cluster 支持in a specific Redis instance. 否则 the instance 启动作为一个stand alone instance as usual.
- cluster-config-file <filename>: 值得注意的 the name 是可选的, 该配置文件不是用户编辑的, but the file where a Redis Cluster node automatically persists the cluster configuration (the state, basically) 每次集群发生变化, in order to be able to re-read it at startup. 该文件内容为 the other nodes in the cluster, their state, persistent variables, and so forth. Often this file is rewritten and flushed on disk as a result of some message reception.
- cluster-node-timeout <milliseconds>: The maximum amount of time a Redis Cluster node can be unavailable, without it being considered as failing. 如果a master node 超过该指定时间, 会故障转移到slaves. 在Redis Cluster中,这个参数还控制其他事情. 值得注意的是, 无法在指定时间内到达the majority of master 的nodes将会停止接收queries.
- cluster-slave-validity-factor <factor>: 如果设置为 zero, a slave总是会尝试去failover a master, regardless of the amount of time the link between the master and the slave remained disconnected.如果值是一个positive(正值), 最大断开连接时间= cluster-node-timeout* cluster-slave-validity-factor, 如果此节点是一个 a slave, 它不会尝试去启动一个故障转移如果the master link在指定时间内断开. 例如 如果the node timeout 设置为5 秒, 且 the validity factor设置为10, a slave disconnected from the master for more than 50 seconds will not try to failover its master. Note that any value different than zero may result in Redis Cluster to be unavailable after a master failure if there is no slave able to failover it. In that case the cluster will return back available only when the original master rejoins the cluster.
- cluster-migration-barrier <count>: Minimum number of slaves a master will remain connected with, for another slave to migrate to a master which is no longer covered by any slave. See the appropriate section about replica migration in this tutorial for more information.
- cluster-require-full-coverage <yes/no>: 如果设置成yes, 默认, the cluster stops accepting writes if some percentage of the key space is not covered by any node. If the option is set to no, the cluster will still serve queries even if only requests about a subset of keys can be processed.
- cluster-allow-reads-when-down <yes/no>: If this is set to no, as it is by default, a node in a Redis Cluster will stop serving all traffic when when the cluster is marked as fail, either when a node can't reach a quorum of masters or full coverage is not met. This prevents reading potentially inconsistent data from a node that is unaware of changes in the cluster. This option can be set to yes to allow reads from a node during the fail state, which is useful for applications that want to prioritize read availability but still want to prevent inconsistent writes. It can also be used for when using Redis Cluster with only one or two shards, as it allows the nodes to continue serving writes when a master fails but automatic failover is impossible.
cluster-node-timeout 类似与zookeeper的tickTime
cluster-slave-validity-factor 类似zookeeper的syncLimit
创建和使用一个Redis Cluster
如果想尽快构建一个集群并运行,直接阅读Creating a Redis Cluster using the create-cluster script章节
最小集群配置文件:
port 7000
cluster-enabled yes
cluster-config-file nodes.conf
cluster-node-timeout 5000
appendonly yes
cluster-enabled 启用集群
每个实例包含一个配置文件,默认为nodes.conf,用户不能编辑。
集群至少需要3个节点,对于第一个测试,强烈建议搭建6节点,3个masters,3个salves
mkdir cluster-test
cd cluster-test
mkdir 7000 7001 7002 7003 7004 7005
7000-7005每个目录创建一个redis.conf文件,内容为上面的最小集群配置内容,但是需要更改合适的端口。
现在,复制你的redis-server 可执行文件到cluster-test,打开6个终端:
例如:
cd 7000
../redis-server ./redis.conf
日志大概如下,因为刚开始没有nodes.conf文件,所以每个节点会分配给自己一个新的ID。
[82462] 26 Nov 11:56:55.329 * No cluster configuration found, I'm 97a3a64667477371c4479320d683e4c8db5858b1
ID用于作为集群中节点的唯一标识。每个节点会记住其他节点的IDs,而不是IP和端口。ip和端口可能会更改,但是节点的ID不会被更改。我们可以称这个标识符为Node ID。
创建此集群
现在我们运行了多个实例,我们需要创建我们的集群通过给节点编辑有帮助的配置。
如果你使用的是Redis 5,可以使用redis-cli,该工具可以create new clusters, check or reshard on existing cluster ,等等。
对于Redis 3 or 4,有一个老的工具redis-trib.rb,你可以在源码解压目录下src看到。你需要安装 redis gem 才可以用redis-trib。
gem install redis
redis-cli --cluster create 127.0.0.1:7000 127.0.0.1:7001 \
127.0.0.1:7002 127.0.0.1:7003 127.0.0.1:7004 127.0.0.1:7005 \
--cluster-replicas 1
./redis-trib.rb create --replicas 1 127.0.0.1:7000 127.0.0.1:7001 \
127.0.0.1:7002 127.0.0.1:7003 127.0.0.1:7004 127.0.0.1:7005
之后不在使用redis-trib工具
这里的命令是create,创建新的集群,--cluster-replicas 1标识我们创建的每个master需要一个salve
显然,我们的要求的唯一的设置是创建一个集群3个master和3个salve。
Redis-cli会弹出一个配置提示,接受提示的配置输入yes. The cluster will be configured and joined, 意味着, instances will be bootstrapped into talking with each other. 最后,所有都成功,会有如下消息:
[OK] All 16384 slots covered
意味着每个可用的16384 slots至少有一个master。
resharding the cluster
Resharding基本意思是 to move hash slots from a set of nodes to another set of nodes。
开始一个resharding:
redis-cli --cluster reshard 127.0.0.1:7000
你只需要指定一个节点,工具会自动找到其他节点。
redis-cli是当前管理工具唯一支持resharding,你不能告诉说仅仅move 5%。所以它启动的第一个问题:
How many slots do you want to move (from 1 to 16384)?
我们可以尝试reshard 1000 hash slots。
redis-cli需要指定接收这些the hash slots的节点。我需要使用第一个master node,即127.0.0.1:7000 ,但是我需要该实例的ID。
$ redis-cli -p 7000 cluster nodes | grep myself
97a3a64667477371c4479320d683e4c8db5858b1 :0 myself,master - 0 0 0 connected 0-5460
现在确认我的目标节点是97a3a64667477371c4479320d683e4c8db5858b1。
现在你会得到一个这样的问题:what nodes you want to take those keys。
the resharding结束后,检测集群健康:
redis-cli --cluster check 127.0.0.1:7000
脚本化一个resharding操作
测试故障转移
保持客户端程序正在运行
手动故障转移
如果需要对一个节点进行升级,暂时需要将master手动切换到它的从节点。
需要在它的从节点上执行CLUSTER FAILOVER,从节点日志:
# Manual failover user request accepted.
# Received replication offset for paused master manual failover: 347540
# All master replication stream processed, manual failover can start.
# Start of election delayed for 0 milliseconds (rank #0, offset 347540).
# Starting a failover election for epoch 7545.
# Failover election won: I'm the new master.
Basically clients connected to the master we are failing over are stopped. At the same time the master sends its replication offset to the slave, that waits to reach the offset on its side. When the replication offset is reached, the failover starts, and the old master is informed about the configuration switch. When the clients are unblocked on the old master, they are redirected to the new master.
添加一个新节点
添加一个新的master:
redis-cli --cluster add-node 127.0.0.1:7006 127.0.0.1:7000
127.0.0.1:7006 是新节点
127.0.0.1:7000 随便一个已存在的集群节点
此命令很简单,内部其实是只发送CLUSTER MEET消息到此节点,并检测集群状态。
检测节点是否加入集群中:
redis 127.0.0.1:7006> cluster nodes
3e3a6cb0d9a9a87168e266b0a0b24026c0aae3f0 127.0.0.1:7001 master - 0 1385543178575 0 connected 5960-10921
3fc783611028b1707fd65345e763befb36454d73 127.0.0.1:7004 slave 3e3a6cb0d9a9a87168e266b0a0b24026c0aae3f0 0 1385543179583 0 connected
f093c80dde814da99c5cf72a7dd01590792b783b :0 myself,master - 0 0 0 connected
2938205e12de373867bf38f1ca29d31d0ddb3e46 127.0.0.1:7002 slave 3c3a0c74aae0b56170ccb03a76b60cfe7dc1912e 0 1385543178072 3 connected
a211e242fc6b22a9427fed61285e85892fa04e08 127.0.0.1:7003 slave 97a3a64667477371c4479320d683e4c8db5858b1 0 1385543178575 0 connected
97a3a64667477371c4479320d683e4c8db5858b1 127.0.0.1:7000 master - 0 1385543179080 0 connected 0-5959 10922-11422
3c3a0c74aae0b56170ccb03a76b60cfe7dc1912e 127.0.0.1:7005 master - 0 1385543177568 3 connected 11423-16383
此时该节点已经能够接收客户端请求并和集群通信。但是它不同于其他master:
- 没有数据,因为没有分配hash slots
- 因为没有hash slots,所以无法参与election选举过程-从节点变成主节点
现在可以resharding数据到此空节点了。
添加一个新节点作为a replica
有两种方式,一种是:
redis-cli --cluster add-node 127.0.0.1:7006 127.0.0.1:7000 --cluster-slave
以上命令没有明确指定127.0.0.1:7006作为哪个master的从节点,会随机选择一个。
下面是指定哪个作为master。
redis-cli --cluster add-node 127.0.0.1:7006 127.0.0.1:7000 --cluster-slave --cluster-master-id 3c3a0c74aae0b56170ccb03a76b60cfe7dc1912e
还有一种更手动的方式,添加一个新的节点作为an empty master。然后使用CLUSTER REPLICATE 将他作为指定master的副本。
例如,想要对127.0.0.1:7005节点添加一个replica,它的hash slots范围是11423-16383,节点id 3c3a0c74aae0b56170ccb03a76b60cfe7dc1912e。要做的就是:
连接到新节点,然后使用以下命令:
redis 127.0.0.1:7006> cluster replicate 3c3a0c74aae0b56170ccb03a76b60cfe7dc1912e
$ redis-cli -p 7000 cluster nodes | grep slave | grep 3c3a0c74aae0b56170ccb03a76b60cfe7dc1912e
f093c80dde814da99c5cf72a7dd01590792b783b 127.0.0.1:7006 slave 3c3a0c74aae0b56170ccb03a76b60cfe7dc1912e 0 1385543617702 3 connected
2938205e12de373867bf38f1ca29d31d0ddb3e46
127.0.0.1:7002 slave 3c3a0c74aae0b56170ccb03a76b60cfe7dc1912e 0 1385543617198 3 connected
现在3c3a0c。。节点有两个salves了。7002和新的7006.
移除一个节点
删除一个a slave node:
redis-cli --cluster del-node 127.0.0.1:7000 `<node-id>`
删除一个master node 也是相同命令,但是,如果这个master 不是空的,那么需要reshard data到其他master。
还有一种方式是,使用手动故障转移到它得slaves,slave变成新得master之后就能够删除这个master了,
[root@wiscom04 redis-5.0.7]# bin/redis-cli -a wiscom123! cluster nodes
Warning: Using a password with '-a' or '-u' option on the command line interface may not be safe.
2df002471441b2e92d42fa557d8baea6b247e893 172.17.112.121:6379@16379 master - 0 1582159897938 3 connected 10923-16383
f82834569a983f8ee06629a6b42913c843182b25 172.17.112.123:6379@16379 myself,master - 0 0 1 connected 0-5460
db4bc454da4c206041928be94ca66af48636fc36 172.17.112.122:6379@16379 master - 0 1582159896935 2 connected 5461-10922
[root@wiscom04 redis-5.0.7]# bin/redis-cli --cluster del-node 172.17.112.123:6379 db4bc454da4c206041928be94ca66af48636fc36 -a wiscom123!
Warning: Using a password with '-a' or '-u' option on the command line interface may not be safe.
>>> Removing node db4bc454da4c206041928be94ca66af48636fc36 from cluster 172.17.112.123:6379
[ERR] Node 172.17.112.122:6379 is not empty! Reshard data away and try again.
Replicas migration
升级节点
Migrating to Redis Cluster
Redis Cluster Specification
如果需要更严谨部署,需要阅读此文档
实验
安装单节点
系统设置
禁用transparent_hugepage
[root@wiscom04 ~]# cat /sys/kernel/mm/transparent_hugepage/enabled
[always] madvise never
[root@wiscom04 ~]# echo never > /sys/kernel/mm/transparent_hugepage/enabled
[root@wiscom04 ~]# cat /sys/kernel/mm/transparent_hugepage/enabled
always madvise [never]
vm.overcommit_memory=1
编辑/etc/sysctl.conf,设置
vm.overcommit_memory = 1
[root@wiscom04 ~]# vim /etc/sysctl.conf
[root@wiscom04 ~]# sysctl -p 立即生效
上传
[root@wiscom04 software]# cd /software/
[root@wiscom04 software]# ll
总用量 172024
-rw-r--r--. 1 root root 174163338 7月 17 2019 jdk-8u151-linux-x64.rpm
-rw-r--r-- 1 root root 1984203 2月 11 10:48 redis-5.0.7.tar.gz
解压
[root@wiscom04 software]# tar xvzf redis-5.0.7.tar.gz
[root@wiscom04 software]# ll
总用量 172028
-rw-r--r--. 1 root root 174163338 7月 17 2019 jdk-8u151-linux-x64.rpm
drwxrwxr-x 6 root root 4096 11月 20 01:05 redis-5.0.7
-rw-r--r-- 1 root root 1984203 2月 11 10:48 redis-5.0.7.tar.gz
[root@wiscom04 software]# cd redis-5.0.7/
[root@wiscom04 redis-5.0.7]# ll
总用量 276
-rw-rw-r-- 1 root root 115100 11月 20 01:05 00-RELEASENOTES
-rw-rw-r-- 1 root root 53 11月 20 01:05 BUGS
-rw-rw-r-- 1 root root 2381 11月 20 01:05 CONTRIBUTING
-rw-rw-r-- 1 root root 1487 11月 20 01:05 COPYING
drwxrwxr-x 6 root root 149 11月 20 01:05 deps
-rw-rw-r-- 1 root root 11 11月 20 01:05 INSTALL
-rw-rw-r-- 1 root root 151 11月 20 01:05 Makefile
-rw-rw-r-- 1 root root 6888 11月 20 01:05 MANIFESTO
-rw-rw-r-- 1 root root 20555 11月 20 01:05 README.md
-rw-rw-r-- 1 root root 61797 11月 20 01:05 redis.conf
-rwxrwxr-x 1 root root 275 11月 20 01:05 runtest
-rwxrwxr-x 1 root root 280 11月 20 01:05 runtest-cluster
-rwxrwxr-x 1 root root 373 11月 20 01:05 runtest-moduleapi
-rwxrwxr-x 1 root root 281 11月 20 01:05 runtest-sentinel
-rw-rw-r-- 1 root root 9710 11月 20 01:05 sentinel.conf
drwxrwxr-x 3 root root 4096 11月 20 01:05 src
drwxrwxr-x 11 root root 4096 11月 20 01:05 tests
README.md是一个快速部署文档:
What is Redis?
--------------
Redis is often referred as a *data structures* server. What this means is that Redis provides access to mutable data structures via a set of commands, which are sent using a *server-client* model with TCP sockets and a simple protocol. So different processes can query and modify the same data structures in a shared way.
Data structures implemented into Redis have a few special properties:
* Redis cares to store them on disk, even if they are always served and modified into the server memory. This means that Redis is fast, but that is also non-volatile.
* Implementation of data structures stress on memory efficiency, so data structures inside Redis will likely use less memory compared to the same data structure modeled using an high level programming language.
* Redis offers a number of features that are natural to find in a database, like replication, tunable levels of durability, cluster, high availability.
Another good example is to think of Redis as a more complex version of memcached, where the operations are not just SETs and GETs, but operations to work with complex data types like Lists, Sets, ordered data structures, and so forth.
If you want to know more, this is a list of selected starting points:
* Introduction to Redis data types. http://redis.io/topics/data-types-intro
* Try Redis directly inside your browser. http://try.redis.io
* The full list of Redis commands. http://redis.io/commands
* There is much more inside the Redis official documentation. http://redis.io/documentation
Building Redis
--------------
Redis can be compiled and used on Linux, OSX, OpenBSD, NetBSD, FreeBSD.
We support big endian and little endian architectures, and both 32 bit
and 64 bit systems.
It may compile on Solaris derived systems (for instance SmartOS) but our
support for this platform is *best effort* and Redis is not guaranteed to
work as well as in Linux, OSX, and \*BSD there.
It is as simple as:
% make
You can run a 32 bit Redis binary using:
% make 32bit
…….
编译
[root@wiscom04 redis-5.0.7]# make
…………………….
CC localtime.o
CC lolwut.o
CC lolwut5.o
LINK redis-server
INSTALL redis-sentinel
CC redis-cli.o
LINK redis-cli
CC redis-benchmark.o
LINK redis-benchmark
INSTALL redis-check-rdb
INSTALL redis-check-aof
Hint: It's a good idea to run 'make test' ;)
make[1]: 离开目录“/software/redis-5.0.7/src”
编译检测
[root@wiscom04 redis-5.0.7]# make test
…
29 seconds - integration/replication-4
27 seconds - integration/psync2
26 seconds - unit/maxmemory
36 seconds - unit/memefficiency
56 seconds - unit/obuf-limits
55 seconds - unit/hyperloglog
95 seconds - unit/type/list-3
115 seconds - integration/replication-psync
167 seconds - unit/aofrw
188 seconds - integration/replication
\o/ All tests passed without errors!
Cleanup: may take some time... OK
make[1]: 离开目录“/software/redis-5.0.7/src”
可能遇到的问题
[root@kafka1 redis-5.0.7]# make test
cd src && make test
make[1]: Entering directory `/zxx_software/redis-5.0.7/src'
CC Makefile.dep
make[1]: Leaving directory `/zxx_software/redis-5.0.7/src'
make[1]: Entering directory `/zxx_software/redis-5.0.7/src'
You need tcl 8.5 or newer in order to run the Redis test
make[1]: *** [test] Error 1
make[1]: Leaving directory `/zxx_software/redis-5.0.7/src'
make: *** [test] Error 2
[root@kafka1 redis-5.0.7]# cat /etc/redhat-release
Red Hat Enterprise Linux Server release 7.2 (Maipo)
redis依赖gcc和libc
yum -y install gcc-4.8.5
[root@wiscom software]# rpm -qa | grep gcc
gcc-4.8.5-4.el7.x86_64
libgcc-4.8.5-4.el7.x86_64
[root@wiscom redis-5.0.7]# make
cd src && make all
make[1]: 进入目录“/software/redis-5.0.7/src”
CC adlist.o
In file included from adlist.c:34:0:
zmalloc.h:50:31: 致命错误:jemalloc/jemalloc.h:没有那个文件或目录
#include <jemalloc/jemalloc.h>
安装后执行还是报错,更改分配库
make MALLOC=libc 编译正常
执行make test的时候还报错,需要tcl 8.5或更高版本。
yum y install tcl
安装后make clean 清除之前的make产生的文件。重新使用make直接编译成功。
总结
需要安装 gcc tcl
清除make文件
[root@wiscom redis-5.0.7]# make clean
cd src && make clean
make[1]: 进入目录“/software/redis-5.0.7/src”
rm -rf redis-server redis-sentinel redis-cli redis-benchmark redis-check-rdb redis-check-aof *.o *.gcda *.gcno *.gcov redis.info lcov-html Makefile.dep dict-benchmark
make[1]: 离开目录“/software/redis-5.0.7/src”
安装指定目录
[root@wiscom04 redis-5.0.7]# make install PREFIX=/usr/local/wiscom/redis-5.0.7 目录会自动创建
cd src && make install
make[1]: 进入目录“/software/redis-5.0.7/src”
Hint: It's a good idea to run 'make test' ;)
INSTALL install
INSTALL install
INSTALL install
INSTALL install
INSTALL install
make[1]: 离开目录“/software/redis-5.0.7/src”
[root@wiscom04 redis-5.0.7]# cd /usr/local/wiscom/redis-5.0.7/
[root@wiscom04 redis-5.0.7]# ll
总用量 0
drwxr-xr-x 2 root root 156 2月 11 12:03 bin
[root@wiscom04 redis-5.0.7]# cd bin/
[root@wiscom04 bin]# ll
总用量 32768
-rwxr-xr-x 1 root root 4365727 2月 11 12:03 redis-benchmark
-rwxr-xr-x 1 root root 8124830 2月 11 12:03 redis-check-aof
-rwxr-xr-x 1 root root 8124830 2月 11 12:03 redis-check-rdb
-rwxr-xr-x 1 root root 4806919 2月 11 12:03 redis-cli
lrwxrwxrwx 1 root root 12 2月 11 12:03 redis-sentinel -> redis-server
-rwxr-xr-x 1 root root 8124830 2月 11 12:03 redis-server
卸载已安装的程序
[root@wiscom04 redis-5.0.7]# make uninstall
cd src && make uninstall
make[1]: 进入目录“/software/redis-5.0.7/src”
rm -f /usr/local/bin/{redis-server,redis-benchmark,redis-cli,redis-check-rdb,redis-check-aof,redis-sentinel}
make[1]: 离开目录“/software/redis-5.0.7/src”
可以看出,默认是安装在/usr/local/bin/
[root@wiscom04 redis-5.0.7]# make uninstall PREFIX=/usr/local/wiscom/redis-5.0.7
cd src && make uninstall
make[1]: 进入目录“/software/redis-5.0.7/src”
rm -f /usr/local/wiscom/redis-5.0.7/bin/{redis-server,redis-benchmark,redis-cli,redis-check-rdb,redis-check-aof,redis-sentinel}
make[1]: 离开目录“/software/redis-5.0.7/src”
卸载后,/usr/local/wiscom/redis-5.0.7/bin还存在
启动-可以不启动
root@wiscom04 redis-5.0.7]# bin/redis-server
28043:C 11 Feb 2020 12:09:47.279 # oO0OoO0OoO0Oo Redis is starting oO0OoO0OoO0Oo
28043:C 11 Feb 2020 12:09:47.279 # Redis version=5.0.7, bits=64, commit=00000000, modified=0, pid=28043, just started
28043:C 11 Feb 2020 12:09:47.279 # Warning: no config file specified, using the default config. In order to specify a config file use bin/redis-server /path/to/redis.conf
28043:M 11 Feb 2020 12:09:47.280 * Increased maximum number of open files to 10032 (it was originally set to 1024).
_._
_.-``__ ''-._
_.-`` `. `_. ''-._ Redis 5.0.7 (00000000/0) 64 bit
.-`` .-```. ```\/ _.,_ ''-._
( ' , .-` | `, ) Running in standalone mode
|`-._`-...-` __...-.``-._|'` _.-'| Port: 6379
| `-._ `._ / _.-' | PID: 28043
`-._ `-._ `-./ _.-' _.-'
|`-._`-._ `-.__.-' _.-'_.-'|
| `-._`-._ _.-'_.-' | http://redis.io
`-._ `-._`-.__.-'_.-' _.-'
|`-._`-._ `-.__.-' _.-'_.-'|
| `-._`-._ _.-'_.-' |
`-._ `-._`-.__.-'_.-' _.-'
`-._ `-.__.-' _.-'
`-._ _.-'
`-.__.-'
28043:M 11 Feb 2020 12:09:47.281 # WARNING: The TCP backlog setting of 511 cannot be enforced because /proc/sys/net/core/somaxconn is set to the lower value of 128.
28043:M 11 Feb 2020 12:09:47.281 # Server initialized
28043:M 11 Feb 2020 12:09:47.281 # WARNING you have Transparent Huge Pages (THP) support enabled in your kernel. This will create latency and memory usage issues with Redis. To fix this issue run the command 'echo never > /sys/kernel/mm/transparent_hugepage/enabled' as root, and add it to your /etc/rc.local in order to retain the setting after a reboot. Redis must be restarted after THP is disabled.
28043:M 11 Feb 2020 12:09:47.282 * Ready to accept connections
以上有三个警告
直接ctrl+C 关闭
启动后会根据默认配置,在安装目录下创建dump.rdb 数据文件,删除此数据文件.
创建配置目录和数据目录
[root@wiscom04 redis-5.0.7]# mkdir /usr/local/wiscom/redis-5.0.7/config
[root@wiscom04 redis-5.0.7]# mkdir /data/redis
创建配置文件
[root@wiscom04 utils]# cp /software/redis-5.0.7/redis.conf /usr/local/wiscom/redis-5.0.7/config/6379.conf
设置服务
复制初始化脚本到启动目录:
[root@wiscom04 utils]# cp /software/redis-5.0.7/utils/redis_init_script /etc/rc.d/init.d/redis
编辑启动脚本
REDISPORT=6379
EXEC=/usr/local/wiscom/redis-5.0.7/bin/redis-server
CLIEXEC=/usr/local/wiscom/redis-5.0.7/bin/redis-cli
PIDFILE=/var/run/redis_${REDISPORT}.pid
CONF="/usr/local/wiscom/redis-5.0.7/config/${REDISPORT}.conf"
将redis注册成服务
[root@wiscom04 utils]# chkconfig --add redis
创建数据和redis实例工作目录
[root@wiscom04 utils]# mkdir /data/redis/6379
创建日志目录
此目录也要手动创建
[root@wiscom04 init.d]# mkdir /data/redis/log
编辑配置
daemonize no
logfile ""
dir ./
改成:
daemonize yes
logfile "/data/redis/log/redis_6379.log"
dir /data/redis/6379
启动
[root@wiscom04 init.d]# systemctl start redis
[root@wiscom04 init.d]# systemctl status redis
● redis.service - LSB: Redis data structure server
Loaded: loaded (/etc/rc.d/init.d/redis)
Active: active (running) since 二 2020-02-11 13:13:48 CST; 10s ago
Docs: man:systemd-sysv-generator(8)
Process: 29703 ExecStart=/etc/rc.d/init.d/redis start (code=exited, status=0/SUCCESS)
CGroup: /system.slice/redis.service
└─29706 /usr/local/wiscom/redis-5.0.7/bin/redis-server 127.0.0.1:6379
2月 11 13:13:48 wiscom04 systemd[1]: Starting LSB: Redis data structure server...
2月 11 13:13:48 wiscom04 redis[29703]: Starting Redis server...
2月 11 13:13:48 wiscom04 systemd[1]: Started LSB: Redis data structure server.
[root@wiscom04 redis]# ll
总用量 0
drwxr-xr-x 2 root root 29 2月 11 13:15 6379
drwxr-xr-x 2 root root 35 2月 11 13:13 log
[root@wiscom04 redis]# cd 6379/
[root@wiscom04 6379]# ll
总用量 4
-rw-r--r-- 1 root root 92 2月 11 13:15 dump.rdb
设置开机自启
redis 为非本地服务,不能使用以下设置
systemctl enable redis
需要使用chkconfig redis on 设置完成后监测:chkconfig –list | grep redis
验证
[root@wiscom04 redis-5.0.7]# bin/redis-cli
127.0.0.1:6379> ping
PONG
127.0.0.1:6379>
远程连接
如果需要远程连接到redis,需要设置
bind 127.0.0.1 改成:
bind 0.0.0.0
允许所有主机连接,设置完重启后,端口即可telnet.
修改密码:
# requirepass foobared 改成
requirepass wiscom123!
如果不需要认证:
protected-mode yes改成:
protected-mode no
远程使用密码登录:
[root@wiscom04 redis-5.0.7]# bin/redis-cli -h 172.17.112.123 -p 6379
172.17.112.123:6379> auth wiscom123!
OK
172.17.112.123:6379> info keyspace
# Keyspace
db2:keys=42684,expires=0,avg_ttl=0
初始化脚本编辑
systemctl stop redis发现并没有停止redis,仔细检查初始化脚本发现:
[root@wiscom04 init.d]# cat redis
#!/bin/sh
#
# Simple Redis init.d script conceived to work on Linux systems
# as it does use of the /proc filesystem.
### BEGIN INIT INFO
# Provides: redis_6379
# Default-Start: 2 3 4 5
# Default-Stop: 0 1 6
# Short-Description: Redis data structure server
# Description: Redis data structure server. See https://redis.io
### END INIT INFO
REDISPORT=6379
EXEC=/usr/local/wiscom/redis-5.0.7/bin/redis-server
CLIEXEC=/usr/local/wiscom/redis-5.0.7/bin/redis-cli
PIDFILE=/var/run/redis_${REDISPORT}.pid
CONF="/usr/local/wiscom/redis-5.0.7/config/${REDISPORT}.conf"
case "$1" in
start)
if [ -f $PIDFILE ]
then
echo "$PIDFILE exists, process is already running or crashed"
else
echo "Starting Redis server..."
$EXEC $CONF
fi
;;
stop)
if [ ! -f $PIDFILE ]
then
echo "$PIDFILE does not exist, process is not running"
else
PID=$(cat $PIDFILE)
echo "Stopping ..."
$CLIEXEC -p $REDISPORT shutdown
while [ -x /proc/${PID} ]
do
echo "Waiting for Redis to shutdown ..."
sleep 1
done
echo "Redis stopped"
fi
;;
*)
echo "Please use start or stop as first argument"
;;
esac
测试发现,
[root@wiscom04 init.d]# /usr/local/wiscom/redis-5.0.7/bin/redis-cli -p 6379 -a wiscom123! shutdown
Warning: Using a password with '-a' or '-u' option on the command line interface may not be safe.
需要认证密码
$CLIEXEC -p $REDISPORT shutdown 改成
$CLIEXEC -p $REDISPORT -a wiscom123! shutdown
编辑完成后,需要重新加载下:systemctl daemon-reload
[root@wiscom04 ~]# systemctl status redis
● redis.service - LSB: Redis data structure server
Loaded: loaded (/etc/rc.d/init.d/redis)
Active: active (running) since 二 2020-02-18 16:41:19 CST; 16h ago
Docs: man:systemd-sysv-generator(8)
Process: 55431 ExecStop=/etc/rc.d/init.d/redis stop (code=exited, status=0/SUCCESS)
Process: 55532 ExecStart=/etc/rc.d/init.d/redis start (code=exited, status=0/SUCCESS)
CGroup: /system.slice/redis.service
└─55535 /usr/local/wiscom/redis-5.0.7/bin/redis-server 0.0.0.0:6379
2月 18 16:41:19 wiscom04 systemd[1]: Starting LSB: Redis data structure server...
2月 18 16:41:19 wiscom04 redis[55532]: Starting Redis server...
2月 18 16:41:19 wiscom04 systemd[1]: Started LSB: Redis data structure server.
2月 18 16:43:11 wiscom04 systemd[1]: Started LSB: Redis data structure server.
Warning: redis.service changed on disk. Run 'systemctl daemon-reload' to reload units.
[root@wiscom04 ~]# systemctl daemon-reload
[root@wiscom04 ~]# systemctl status redis
● redis.service - LSB: Redis data structure server
Loaded: loaded (/etc/rc.d/init.d/redis)
Active: active (running) since 二 2020-02-18 16:41:19 CST; 16h ago
Docs: man:systemd-sysv-generator(8)
CGroup: /system.slice/redis.service
└─55535 /usr/local/wiscom/redis-5.0.7/bin/redis-server 0.0.0.0:6379
2月 18 16:41:19 wiscom04 systemd[1]: Starting LSB: Redis data structure server...
2月 18 16:41:19 wiscom04 redis[55532]: Starting Redis server...
2月 18 16:41:19 wiscom04 systemd[1]: Started LSB: Redis data structure server.
2月 18 16:43:11 wiscom04 systemd[1]: Started LSB: Redis data structure server.
[root@wiscom04 ~]# ps -ef | grep redis
root 55535 1 0 2月18 ? 00:00:58 /usr/local/wiscom/redis-5.0.7/bin/redis-server 0.0.0.0:6379
root 76730 75386 0 09:39 pts/1 00:00:00 grep --color=auto redis
[root@wiscom04 ~]# systemctl stop redis
[root@wiscom04 ~]# systemctl status redis
● redis.service - LSB: Redis data structure server
Loaded: loaded (/etc/rc.d/init.d/redis)
Active: inactive (dead) since 三 2020-02-19 09:39:40 CST; 3s ago
Docs: man:systemd-sysv-generator(8)
Process: 76736 ExecStop=/etc/rc.d/init.d/redis stop (code=exited, status=0/SUCCESS)
2月 18 16:41:19 wiscom04 systemd[1]: Starting LSB: Redis data structure server...
2月 18 16:41:19 wiscom04 redis[55532]: Starting Redis server...
2月 18 16:41:19 wiscom04 systemd[1]: Started LSB: Redis data structure server.
2月 18 16:43:11 wiscom04 systemd[1]: Started LSB: Redis data structure server.
2月 19 09:39:39 wiscom04 systemd[1]: Stopping LSB: Redis data structure server...
2月 19 09:39:39 wiscom04 redis[76736]: Stopping ...
2月 19 09:39:39 wiscom04 redis[76736]: Warning: Using a password with '-a' or '-u' option on the command line interface may not be safe.
2月 19 09:39:39 wiscom04 redis[76736]: Waiting for Redis to shutdown ...
2月 19 09:39:40 wiscom04 redis[76736]: Redis stopped
2月 19 09:39:40 wiscom04 systemd[1]: Stopped LSB: Redis data structure server.
[root@wiscom04 ~]# ps -ef | grep redis
root 76843 75386 0 09:39 pts/1 00:00:00 grep --color=auto redis
[root@wiscom04 ~]# systemctl start redis
[root@wiscom04 ~]# systemctl status redis
● redis.service - LSB: Redis data structure server
Loaded: loaded (/etc/rc.d/init.d/redis)
Active: active (running) since 三 2020-02-19 09:42:04 CST; 3s ago
Docs: man:systemd-sysv-generator(8)
Process: 76736 ExecStop=/etc/rc.d/init.d/redis stop (code=exited, status=0/SUCCESS)
Process: 76969 ExecStart=/etc/rc.d/init.d/redis start (code=exited, status=0/SUCCESS)
CGroup: /system.slice/redis.service
└─76972 /usr/local/wiscom/redis-5.0.7/bin/redis-server 0.0.0.0:6379
2月 19 09:42:04 wiscom04 systemd[1]: Starting LSB: Redis data structure server...
2月 19 09:42:04 wiscom04 redis[76969]: Starting Redis server...
2月 19 09:42:04 wiscom04 systemd[1]: Started LSB: Redis data structure server.
[root@wiscom04 ~]# ps -ef | grep redis
root 76972 1 0 09:42 ? 00:00:00 /usr/local/wiscom/redis-5.0.7/bin/redis-server 0.0.0.0:6379
root 77069 75386 0 09:42 pts/1 00:00:00 grep --color=auto redis
实验-卸载默认安装的redis
l 停止redis服务
systemctl stop redis
ps -ef | grep redis
[root@wiscom04 bin]# systemctl status redis
● redis.service - SYSV: Redis is a persistent key-value database
Loaded: loaded (/etc/rc.d/init.d/redis)
Active: active (running) since 二 2020-02-04 11:01:53 CST; 1 weeks 0 days ago
Docs: man:systemd-sysv-generator(8)
Process: 1654 ExecStart=/etc/rc.d/init.d/redis start (code=exited, status=0/SUCCESS)
CGroup: /system.slice/redis.service
└─2208 /usr/local/bin/redis-server 0.0.0.0:6379
2月 04 11:01:53 wiscom04 systemd[1]: Starting SYSV: Redis is a persistent key-value database...
2月 04 11:01:53 wiscom04 redis[1654]: Starting Redis server...
2月 04 11:01:53 wiscom04 redis[1654]: 1656:C 04 Feb 11:01:53.460 # oO0OoO0OoO0Oo Redis is starting oO0OoO0OoO0Oo
2月 04 11:01:53 wiscom04 redis[1654]: 1656:C 04 Feb 11:01:53.460 # Redis version=4.0.1, bits=64, commit=00000000, modified=0, pid=1656, just started
2月 04 11:01:53 wiscom04 redis[1654]: 1656:C 04 Feb 11:01:53.460 # Configuration loaded
2月 04 11:01:53 wiscom04 systemd[1]: Started SYSV: Redis is a persistent key-value database.
l 删除redis安装文件
[root@wiscom04 redis-4.0.1]# cd /usr/local/bin/
[root@wiscom04 bin]# ll
总用量 21768
-rwxr-xr-x. 1 gpadmin gpadmin 2450926 9月 16 14:19 redis-benchmark
-rwxr-xr-x. 1 gpadmin gpadmin 5740846 9月 16 14:19 redis-check-aof
-rwxr-xr-x. 1 gpadmin gpadmin 5740846 9月 16 14:19 redis-check-rdb
-rwxr-xr-x. 1 gpadmin gpadmin 2605216 9月 16 14:19 redis-cli
lrwxrwxrwx. 1 gpadmin gpadmin 12 9月 16 14:19 redis-sentinel -> redis-server
-rwxr-xr-x. 1 gpadmin gpadmin 5740846 9月 16 14:19 redis-server
l 删除redis服务脚本 rm -ef /etc/rc.d/init.d/redis
l 删除解压目录
[root@wiscom04 bin]# cd /usr/local/wiscom/
[root@wiscom04 wiscom]# ll
总用量 12
drwxr-xr-x. 7 gpadmin gpadmin 4096 7月 17 2019 kafka_2.11-2.0.0
drwxrwxr-x. 6 gpadmin gpadmin 4096 2月 11 11:17 redis-4.0.1
安装集群
继续之前的步骤
172.17.112.123 已经安装了单节点
现在计划部署三节点集群
172.17.112.122
172.17.112.121
重启所有服务器
系统参数设置完成后,需要重启下
复制到其他节点
复制安装包:
[root@wiscom04 wiscom]# scp -r redis-5.0.7/ 172.17.112.122:/usr/local/wiscom/
[root@wiscom04 wiscom]# scp -r redis-5.0.7/ 172.17.112.121:/usr/local/wiscom/
初始化脚本复制:
scp /etc/rc.d/init.d/redis 172.17.112.122:/etc/rc.d/init.d/
scp /etc/rc.d/init.d/redis 172.17.112.121:/etc/rc.d/init.d/
创建数据目录和日志
mkdir -p /data/redis/6379
mkdir -p /data/redis/log
编辑配置
[root@wiscom04 config]# grep -Ev "^$|^[#;]" 6379.conf 所有配置内容
bind 0.0.0.0
protected-mode yes
port 6379
tcp-backlog 511
timeout 0
tcp-keepalive 300
daemonize yes
supervised no
pidfile /var/run/redis_6379.pid
loglevel notice
logfile "/data/redis/log/redis_6379.log"
databases 16
always-show-logo yes
save 900 1
save 300 10
save 60 10000
stop-writes-on-bgsave-error yes
rdbcompression yes
rdbchecksum yes
dbfilename dump.rdb
dir /data/redis/6379
replica-serve-stale-data yes
replica-read-only yes
repl-diskless-sync no
repl-diskless-sync-delay 5
repl-disable-tcp-nodelay no
replica-priority 100
requirepass wiscom123!
lazyfree-lazy-eviction no
lazyfree-lazy-expire no
lazyfree-lazy-server-del no
replica-lazy-flush no
appendonly yes
appendfilename "appendonly.aof"
appendfsync everysec
no-appendfsync-on-rewrite no
auto-aof-rewrite-percentage 100
auto-aof-rewrite-min-size 64mb
aof-load-truncated yes
aof-use-rdb-preamble yes
lua-time-limit 5000
cluster-enabled yes
cluster-config-file nodes-6379.conf
cluster-node-timeout 15000
slowlog-log-slower-than 10000
slowlog-max-len 128
latency-monitor-threshold 0
notify-keyspace-events ""
hash-max-ziplist-entries 512
hash-max-ziplist-value 64
list-max-ziplist-size -2
list-compress-depth 0
set-max-intset-entries 512
zset-max-ziplist-entries 128
zset-max-ziplist-value 64
hll-sparse-max-bytes 3000
stream-node-max-bytes 4096
stream-node-max-entries 100
activerehashing yes
client-output-buffer-limit normal 0 0 0
client-output-buffer-limit replica 256mb 64mb 60
client-output-buffer-limit pubsub 32mb 8mb 60
hz 10
dynamic-hz yes
aof-rewrite-incremental-fsync yes
rdb-save-incremental-fsync yes
复制配置文件到其他节点
scp 6379.conf 172.17.112.122:/usr/local/wiscom/redis-5.0.7/config/
scp 6379.conf 172.17.112.121:/usr/local/wiscom/redis-5.0.7/config/
添加服务
[root@wiscom02 ~]# chkconfig --add redis
[root@wiscom02 ~]# chkconfig --list redis
注意:该输出结果只显示 SysV 服务,并不包含原生 systemd 服务。SysV 配置数据可能被原生 systemd 配置覆盖。
如果您想列出 systemd 服务,请执行 'systemctl list-unit-files'。
欲查看对特定 target 启用的服务请执行
'systemctl list-dependencies [target]'。
redis 0:关 1:关 2:开 3:开 4:开 5:开 6:关
启动实例
[root@wiscom04 config]# systemctl start redis
[root@wiscom04 config]# ps -ef | grep redis
root 5642 1 0 11:00 ? 00:00:00 /usr/local/wiscom/redis-5.0.7/bin/redis-server 0.0.0.0:6379 [cluster]
root 5858 3769 0 11:01 pts/0 00:00:00 grep --color=auto redis
[root@wiscom03 data]# chkconfig --add redis
[root@wiscom03 data]# systemctl start redis
[root@wiscom03 data]# ps -ef | grep redis
root 8036 1 0 11:03 ? 00:00:00 /usr/local/wiscom/redis-5.0.7/bin/redis-server 0.0.0.0:6379 [cluster]
root 8140 3924 0 11:04 pts/0 00:00:00 grep --color=auto redis
[root@wiscom02 ~]# systemctl start redis
[root@wiscom02 ~]# ps -ef | grep redis
root 8123 1 0 19:34 ? 00:00:00 /usr/local/wiscom/redis-5.0.7/bin/redis-server 0.0.0.0:6379 [cluster]
root 8218 3984 0 19:35 pts/0 00:00:00 grep --color=auto redis
创建无从节点集群
[root@wiscom04 redis-5.0.7]# bin/redis-cli --cluster create 172.17.112.123:6379 172.17.112.122:6379 172.17.112.121:6379 --cluster-replicas 0
[ERR] Node 172.17.112.123:6379 NOAUTH Authentication required.
[root@wiscom04 redis-5.0.7]# bin/redis-cli -a wiscom123! --cluster create 172.17.112.123:6379 172.17.112.122:6379 172.17.112.121:6379 --cluster-replicas 0
Warning: Using a password with '-a' or '-u' option on the command line interface may not be safe.
>>> Performing hash slots allocation on 3 nodes...
Master[0] -> Slots 0 - 5460
Master[1] -> Slots 5461 - 10922
Master[2] -> Slots 10923 - 16383
M: f82834569a983f8ee06629a6b42913c843182b25 172.17.112.123:6379
slots:[0-5460] (5461 slots) master
M: db4bc454da4c206041928be94ca66af48636fc36 172.17.112.122:6379
slots:[5461-10922] (5462 slots) master
M: 2df002471441b2e92d42fa557d8baea6b247e893 172.17.112.121:6379
slots:[10923-16383] (5461 slots) master
Can I set the above configuration? (type 'yes' to accept): yes
>>> Nodes configuration updated
>>> Assign a different config epoch to each node
>>> Sending CLUSTER MEET messages to join the cluster
Waiting for the cluster to join
.
>>> Performing Cluster Check (using node 172.17.112.123:6379)
M: f82834569a983f8ee06629a6b42913c843182b25 172.17.112.123:6379
slots:[0-5460] (5461 slots) master
M: 2df002471441b2e92d42fa557d8baea6b247e893 172.17.112.121:6379
slots:[10923-16383] (5461 slots) master
M: db4bc454da4c206041928be94ca66af48636fc36 172.17.112.122:6379
slots:[5461-10922] (5462 slots) master
[OK] All nodes agree about slots configuration.
>>> Check for open slots...
>>> Check slots coverage...
[OK] All 16384 slots covered.
[root@wiscom04 redis-5.0.7]#
检查集群
[root@wiscom04 redis-5.0.7]# bin/redis-cli
127.0.0.1:6379> cluster nodes
NOAUTH Authentication required.
127.0.0.1:6379> auth wiscom123!
OK
127.0.0.1:6379> cluster nodes
2df002471441b2e92d42fa557d8baea6b247e893 172.17.112.121:6379@16379 master - 0 1582081735031 3 connected 10923-16383
f82834569a983f8ee06629a6b42913c843182b25 172.17.112.123:6379@16379 myself,master - 0 0 1 connected 0-5460
db4bc454da4c206041928be94ca66af48636fc36 172.17.112.122:6379@16379 master - 0 1582081734029 2 connected 5461-10922
127.0.0.1:6379> exit
[root@wiscom04 redis-5.0.7]# bin/redis-cli -a wiscom123!
Warning: Using a password with '-a' or '-u' option on the command line interface may not be safe.
127.0.0.1:6379> cluster info
cluster_state:ok
cluster_slots_assigned:16384
cluster_slots_ok:16384
cluster_slots_pfail:0
cluster_slots_fail:0
cluster_known_nodes:3
cluster_size:3
cluster_current_epoch:3
cluster_my_epoch:1
cluster_stats_messages_ping_sent:450
cluster_stats_messages_pong_sent:497
cluster_stats_messages_sent:947
cluster_stats_messages_ping_received:495
cluster_stats_messages_pong_received:450
cluster_stats_messages_meet_received:2
cluster_stats_messages_received:947
127.0.0.1:6379> select 2
(error) ERR SELECT is not allowed in cluster mode
127.0.0.1:6379> dbsize
(integer) 0
127.0.0.1:6379> info keyspace
# Keyspace
info查看redis信息
[root@wiscom04 redis-5.0.7]# bin/redis-cli -a wiscom123!
Warning: Using a password with '-a' or '-u' option on the command line interface may not be safe.
127.0.0.1:6379> info
# Server
redis_version:5.0.7
redis_git_sha1:00000000
redis_git_dirty:0
redis_build_id:510107af963ef9bf
redis_mode:cluster
os:Linux 3.10.0-327.el7.x86_64 x86_64
arch_bits:64
multiplexing_api:epoll
atomicvar_api:atomic-builtin
gcc_version:4.8.5
process_id:5642
run_id:b345db469560ef5c8723e3847d306b0b69a06741
tcp_port:6379
uptime_in_seconds:1037
uptime_in_days:0
hz:10
configured_hz:10
lru_clock:5023953
executable:/usr/local/wiscom/redis-5.0.7/bin/redis-server
config_file:/usr/local/wiscom/redis-5.0.7/config/6379.conf
# Clients
connected_clients:1
client_recent_max_input_buffer:2
client_recent_max_output_buffer:0
blocked_clients:0
# Memory
used_memory:1539152
used_memory_human:1.47M
used_memory_rss:14675968
used_memory_rss_human:14.00M
used_memory_peak:1539152
used_memory_peak_human:1.47M
used_memory_peak_perc:100.01%
used_memory_overhead:1499486
used_memory_startup:1449792
used_memory_dataset:39666
used_memory_dataset_perc:44.39%
allocator_allocated:1954152
allocator_active:2269184
allocator_resident:13619200
total_system_memory:134775726080
total_system_memory_human:125.52G
used_memory_lua:37888
used_memory_lua_human:37.00K
used_memory_scripts:0
used_memory_scripts_human:0B
number_of_cached_scripts:0
maxmemory:0
maxmemory_human:0B
maxmemory_policy:noeviction
allocator_frag_ratio:1.16
allocator_frag_bytes:315032
allocator_rss_ratio:6.00
allocator_rss_bytes:11350016
rss_overhead_ratio:1.08
rss_overhead_bytes:1056768
mem_fragmentation_ratio:9.80
mem_fragmentation_bytes:13179072
mem_not_counted_for_evict:0
mem_replication_backlog:0
mem_clients_slaves:0
mem_clients_normal:49694
mem_aof_buffer:0
mem_allocator:jemalloc-5.1.0
active_defrag_running:0
lazyfree_pending_objects:0
# Persistence
loading:0
rdb_changes_since_last_save:0
rdb_bgsave_in_progress:0
rdb_last_save_time:1582081220
rdb_last_bgsave_status:ok
rdb_last_bgsave_time_sec:-1
rdb_current_bgsave_time_sec:-1
rdb_last_cow_size:0
aof_enabled:1
aof_rewrite_in_progress:0
aof_rewrite_scheduled:0
aof_last_rewrite_time_sec:-1
aof_current_rewrite_time_sec:-1
aof_last_bgrewrite_status:ok
aof_last_write_status:ok
aof_last_cow_size:0
aof_current_size:0
aof_base_size:0
aof_pending_rewrite:0
aof_buffer_length:0
aof_rewrite_buffer_length:0
aof_pending_bio_fsync:0
aof_delayed_fsync:0
# Stats
total_connections_received:5
total_commands_processed:19
instantaneous_ops_per_sec:0
total_net_input_bytes:54076
total_net_output_bytes:36054
instantaneous_input_kbps:0.00
instantaneous_output_kbps:0.00
rejected_connections:0
sync_full:0
sync_partial_ok:0
sync_partial_err:0
expired_keys:0
expired_stale_perc:0.00
expired_time_cap_reached_count:0
evicted_keys:0
keyspace_hits:0
keyspace_misses:0
pubsub_channels:0
pubsub_patterns:0
latest_fork_usec:0
migrate_cached_sockets:0
slave_expires_tracked_keys:0
active_defrag_hits:0
active_defrag_misses:0
active_defrag_key_hits:0
active_defrag_key_misses:0
# Replication
role:master
connected_slaves:0
master_replid:efe4832ba46bc40a230cb93a98daf728a42ee3d5
master_replid2:0000000000000000000000000000000000000000
master_repl_offset:0
second_repl_offset:-1
repl_backlog_active:0
repl_backlog_size:1048576
repl_backlog_first_byte_offset:0
repl_backlog_histlen:0
# CPU
used_cpu_sys:0.523417
used_cpu_user:0.658683
used_cpu_sys_children:0.000000
used_cpu_user_children:0.000000
# Cluster
cluster_enabled:1
# Keyspace
127.0.0.1:6379>
查看数据和日志目录
-rw-r--r-- 1 root root 26672405 2月 19 15:37 appendonly.aof
-rw-r--r-- 1 root root 18299125 2月 19 15:42 dump.rdb
-rw-r--r-- 1 root root 373 2月 19 11:04 nodes-6379.conf
插入一百万数据
发现:
172.17.112.123
db0:keys=333384,expires=0,avg_ttl=0
aof_current_size:25966879
used_memory_human:51.29M
172.17.112.122
db0:keys=333241,expires=0,avg_ttl=0
aof_current_size:25955824
used_memory_human:51.27M
172.17.112.121
used_memory_human:51.29M
db0:keys=333375,expires=0,avg_ttl=0
aof_current_size:25966256
used_memory_rss_human:63.19M 向申请内存
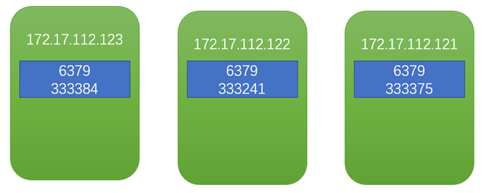
集群添加一个新的master
系统设置
[root@wiscom01 ~]# echo never > /sys/kernel/mm/transparent_hugepage/enabled
[root@wiscom01 ~]# vim /etc/sysctl.conf
[root@wiscom01 ~]# sysctl -p
vm.max_map_count = 262144
kernel.shmmni = 4096
kernel.shmall = 4000000000
kernel.sem = 250 512000 100 2048
kernel.sysrq = 1
kernel.core_uses_pid = 1
kernel.msgmnb = 65536
kernel.msgmax = 65536
kernel.msgmni = 2048
net.ipv4.tcp_syncookies = 1
net.ipv4.ip_forward = 0
net.ipv4.tcp_tw_recycle = 1
net.ipv4.tcp_max_syn_backlog = 4096
sysctl: cannot stat /proc/sys/net/ipv4/conf/defalut/arp_filter: 没有那个文件或目录
net.ipv4.ip_local_port_range = 1025 65535
net.core.netdev_max_backlog = 10000
net.core.rmem_max = 2097152
net.core.wmem_max = 2097152
vm.overcommit_memory = 1
复制安装目录
scp -r redis-5.0.7/ 172.17.112.120:/usr/local/wiscom/
复制初始化脚本
scp /etc/rc.d/init.d/redis 172.17.112.120:/etc/rc.d/init.d/
添加服务
[root@wiscom01 ~]# chkconfig --add redis
[root@wiscom01 ~]# chkconfig --list redis
注意:该输出结果只显示 SysV 服务,并不包含原生 systemd 服务。SysV 配置数据可能被原生 systemd 配置覆盖。
如果您想列出 systemd 服务,请执行 'systemctl list-unit-files'。
欲查看对特定 target 启用的服务请执行
'systemctl list-dependencies [target]'。
redis 0:关 1:关 2:开 3:开 4:开 5:开 6:关
创建数据和日志目录
mkdir -p /data/redis/6379
mkdir -p /data/redis/log
注意:如果之前的安装目录中包含数据目录,那么需要删除数据目录下的所有文件
启动实例
[root@wiscom01 ~]# systemctl start redis
[root@wiscom01 ~]# ps -ef | grep redis
root 144972 1 0 09:49 ? 00:00:00 /usr/local/wiscom/redis-5.0.7/bin/redis-server 0.0.0.0:6379 [cluster]
root 144977 144712 0 09:49 pts/2 00:00:00 grep --color=auto redis
添加到集群
[root@wiscom01 redis-5.0.7]# bin/redis-cli --cluster add-node 172.17.112.120:6379 172.17.112.123:6379 -a wiscom123!
Warning: Using a password with '-a' or '-u' option on the command line interface may not be safe.
>>> Adding node 172.17.112.120:6379 to cluster 172.17.112.123:6379
>>> Performing Cluster Check (using node 172.17.112.123:6379)
M: f82834569a983f8ee06629a6b42913c843182b25 172.17.112.123:6379
slots:[0-5460] (5461 slots) master
M: 2df002471441b2e92d42fa557d8baea6b247e893 172.17.112.121:6379
slots:[10923-16383] (5461 slots) master
M: db4bc454da4c206041928be94ca66af48636fc36 172.17.112.122:6379
slots:[5461-10922] (5462 slots) master
[OK] All nodes agree about slots configuration.
>>> Check for open slots...
>>> Check slots coverage...
[OK] All 16384 slots covered.
>>> Send CLUSTER MEET to node 172.17.112.120:6379 to make it join the cluster.
[OK] New node added correctly.
[root@wiscom01 redis-5.0.7]#
检测
[root@wiscom01 redis-5.0.7]# bin/redis-cli -a wiscom123! cluster nodes
Warning: Using a password with '-a' or '-u' option on the command line interface may not be safe.
f82834569a983f8ee06629a6b42913c843182b25 172.17.112.123:6379@16379 master - 0 1582163691965 1 connected 0-5460
db4bc454da4c206041928be94ca66af48636fc36 172.17.112.122:6379@16379 master - 0 1582163692966 2 connected 5461-10922
2df002471441b2e92d42fa557d8baea6b247e893 172.17.112.121:6379@16379 master - 0 1582163690962 3 connected 10923-16383
6fafb125c08eb857b241ba653da9f661fb3df44a 172.17.112.120:6379@16379 myself,master - 0 1582162792000 0 connected
可以发现172.17.112.120:6379已经加入到集群,但是没有分配hash slots。
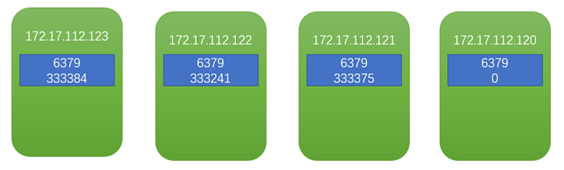
resharding
根据上面的检测,新节点没有hash slots,客户端数据是不会写入到此节点的。
[root@wiscom01 redis-5.0.7]# bin/redis-cli --cluster reshard 172.17.112.123:6379 -a wiscom123!
Warning: Using a password with '-a' or '-u' option on the command line interface may not be safe.
>>> Performing Cluster Check (using node 172.17.112.123:6379)
M: f82834569a983f8ee06629a6b42913c843182b25 172.17.112.123:6379
slots:[0-5460] (5461 slots) master
M: 6fafb125c08eb857b241ba653da9f661fb3df44a 172.17.112.120:6379
slots: (0 slots) master
M: 2df002471441b2e92d42fa557d8baea6b247e893 172.17.112.121:6379
slots:[10923-16383] (5461 slots) master
M: db4bc454da4c206041928be94ca66af48636fc36 172.17.112.122:6379
slots:[5461-10922] (5462 slots) master
[OK] All nodes agree about slots configuration.
>>> Check for open slots...
>>> Check slots coverage...
[OK] All 16384 slots covered.
How many slots do you want to move (from 1 to 16384)? 4096 需要分配的hash slots总数
What is the receiving node ID? 6fafb125c08eb857b241ba653da9f661fb3df44a 接收节点
Please enter all the source node IDs.
Type 'all' to use all the nodes as source nodes for the hash slots.
Type 'done' once you entered all the source nodes IDs.
Source node #1:all 源hash slots来自所有节点
…..
Moving slot 12283 from 2df002471441b2e92d42fa557d8baea6b247e893
Moving slot 12284 from 2df002471441b2e92d42fa557d8baea6b247e893
Moving slot 12285 from 2df002471441b2e92d42fa557d8baea6b247e893
Moving slot 12286 from 2df002471441b2e92d42fa557d8baea6b247e893
Moving slot 12287 from 2df002471441b2e92d42fa557d8baea6b247e893
Do you want to proceed with the proposed reshard plan (yes/no)? yes
….
Moving slot 12282 from 172.17.112.121:6379 to 172.17.112.120:6379: ................................................................
Moving slot 12283 from 172.17.112.121:6379 to 172.17.112.120:6379: ........................................................
Moving slot 12284 from 172.17.112.121:6379 to 172.17.112.120:6379: .....................................................................
Moving slot 12285 from 172.17.112.121:6379 to 172.17.112.120:6379: ..........................................................
Moving slot 12286 from 172.17.112.121:6379 to 172.17.112.120:6379: .......................................................................
Moving slot 12287 from 172.17.112.121:6379 to 172.17.112.120:6379: ........................................................
[root@wiscom01 redis-5.0.7]#
检查集群
[root@wiscom01 redis-5.0.7]# bin/redis-cli -a wiscom123! --cluster check 172.17.112.120:6379
Warning: Using a password with '-a' or '-u' option on the command line interface may not be safe.
172.17.112.120:6379 (6fafb125...) -> 250116 keys | 4096 slots | 0 slaves.
172.17.112.123:6379 (f8283456...) -> 250006 keys | 4096 slots | 0 slaves.
172.17.112.122:6379 (db4bc454...) -> 249877 keys | 4096 slots | 0 slaves.
172.17.112.121:6379 (2df00247...) -> 250001 keys | 4096 slots | 0 slaves.
[OK] 1000000 keys in 4 masters.
61.04 keys per slot on average.
>>> Performing Cluster Check (using node 172.17.112.120:6379)
M: 6fafb125c08eb857b241ba653da9f661fb3df44a 172.17.112.120:6379
slots:[0-1364],[5461-6826],[10923-12287] (4096 slots) master
M: f82834569a983f8ee06629a6b42913c843182b25 172.17.112.123:6379
slots:[1365-5460] (4096 slots) master
M: db4bc454da4c206041928be94ca66af48636fc36 172.17.112.122:6379
slots:[6827-10922] (4096 slots) master
M: 2df002471441b2e92d42fa557d8baea6b247e893 172.17.112.121:6379
slots:[12288-16383] (4096 slots) master
[OK] All nodes agree about slots configuration.
>>> Check for open slots...
>>> Check slots coverage...
[OK] All 16384 slots covered.
[root@wiscom01 redis-5.0.7]#
可以看到原先三节点集群共100万keys,reharding之后,keys重新分配。
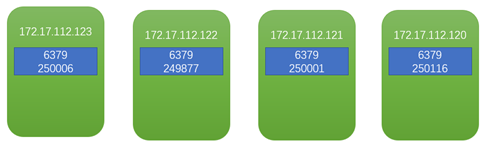
添加一个salve节点
在172.17.112.120创建一个slave,他的master为172.17.112.121上的6379
如果172.17.112.121因服务器故障,数据也是完整的
创建配置文件
在172.17.112.120上操作:
[root@wiscom01 redis-5.0.7]# ls
bin config
[root@wiscom01 redis-5.0.7]# cd config/
[root@wiscom01 config]# ll
总用量 64
-rw-r--r-- 1 root root 61925 2月 20 09:41 6379.conf
[root@wiscom01 config]# cp 6379.conf 6378.conf
创建数据目录
[root@wiscom01 config]# mkdir /data/redis/6378
编辑配置
vim 6378.conf
更改以下设置
port 6378
pidfile /var/run/redis_6378.pid
logfile "/data/redis/log/redis_6378.log"
dir /data/redis/6378
cluster-config-file nodes-6378.conf
创建初始化文件
[root@wiscom01 config]# cp /etc/rc.d/init.d/redis /etc/rc.d/init.d/redis-6378
编辑初始化文件
[root@wiscom01 config]# vim /etc/rc.d/init.d/redis-6378
更改以下设置
REDISPORT=6378
添加服务
[root@wiscom01 config]# chkconfig --add redis-6378
[root@wiscom01 config]# chkconfig --list redis-6378
注意:该输出结果只显示 SysV 服务,并不包含原生 systemd 服务。SysV 配置数据可能被原生 systemd 配置覆盖。
如果您想列出 systemd 服务,请执行 'systemctl list-unit-files'。
欲查看对特定 target 启用的服务请执行
'systemctl list-dependencies [target]'。
redis-6378 0:关 1:关 2:开 3:开 4:开 5:开 6:关
启动实例
[root@wiscom01 config]# systemctl start redis-6378
[root@wiscom01 config]# ps -ef | grep redis
root 144972 1 0 09:49 ? 00:00:07 /usr/local/wiscom/redis-5.0.7/bin/redis-server 0.0.0.0:6379 [cluster]
root 147417 1 0 10:48 ? 00:00:00 /usr/local/wiscom/redis-5.0.7/bin/redis-server 0.0.0.0:6378 [cluster]
root 147422 144712 0 10:48 pts/2 00:00:00 grep --color=auto redis
[root@wiscom01 config]#
[root@wiscom01 redis-5.0.7]# bin/redis-cli -a wiscom123! cluster nodes
Warning: Using a password with '-a' or '-u' option on the command line interface may not be safe.
f82834569a983f8ee06629a6b42913c843182b25 172.17.112.123:6379@16379 master - 0 1582167265836 1 connected 1365-5460
db4bc454da4c206041928be94ca66af48636fc36 172.17.112.122:6379@16379 master - 0 1582167266839 2 connected 6827-10922
2df002471441b2e92d42fa557d8baea6b247e893 172.17.112.121:6379@16379 master - 0 1582167264833 3 connected 12288-16383
6fafb125c08eb857b241ba653da9f661fb3df44a 172.17.112.120:6379@16379 myself,master - 0 1582166368000 4 connected 0-1364 5461-6826 10923-12287
设置为从节点
[root@wiscom01 redis-5.0.7]# bin/redis-cli --cluster add-node 172.17.112.120:6378 172.17.112.120:6379 --cluster-slave --cluster-master-id 2df002471441b2e92d42fa557d8baea6b247e893 -a wiscom123!
Warning: Using a password with '-a' or '-u' option on the command line interface may not be safe.
>>> Adding node 172.17.112.120:6378 to cluster 172.17.112.120:6379
>>> Performing Cluster Check (using node 172.17.112.120:6379)
M: 6fafb125c08eb857b241ba653da9f661fb3df44a 172.17.112.120:6379
slots:[0-1364],[5461-6826],[10923-12287] (4096 slots) master
M: f82834569a983f8ee06629a6b42913c843182b25 172.17.112.123:6379
slots:[1365-5460] (4096 slots) master
M: db4bc454da4c206041928be94ca66af48636fc36 172.17.112.122:6379
slots:[6827-10922] (4096 slots) master
M: 2df002471441b2e92d42fa557d8baea6b247e893 172.17.112.121:6379
slots:[12288-16383] (4096 slots) master
[OK] All nodes agree about slots configuration.
>>> Check for open slots...
>>> Check slots coverage...
[OK] All 16384 slots covered.
>>> Send CLUSTER MEET to node 172.17.112.120:6378 to make it join the cluster.
Waiting for the cluster to join
.
>>> Configure node as replica of 172.17.112.121:6379.
[OK] New node added correctly.
[root@wiscom01 redis-5.0.7]#
检测
[root@wiscom01 redis-5.0.7]# bin/redis-cli -a wiscom123! --cluster check 172.17.112.120:6379
Warning: Using a password with '-a' or '-u' option on the command line interface may not be safe.
172.17.112.120:6379 (6fafb125...) -> 250116 keys | 4096 slots | 0 slaves.
172.17.112.122:6379 (db4bc454...) -> 249877 keys | 4096 slots | 0 slaves.
172.17.112.123:6379 (f8283456...) -> 250006 keys | 4096 slots | 0 slaves.
172.17.112.121:6379 (2df00247...) -> 250001 keys | 4096 slots | 1 slaves.
[OK] 1000000 keys in 4 masters.
61.04 keys per slot on average.
>>> Performing Cluster Check (using node 172.17.112.120:6379)
M: 6fafb125c08eb857b241ba653da9f661fb3df44a 172.17.112.120:6379
slots:[0-1364],[5461-6826],[10923-12287] (4096 slots) master
M: db4bc454da4c206041928be94ca66af48636fc36 172.17.112.122:6379
slots:[6827-10922] (4096 slots) master
S: fd92c3c2d453553d2c7388b301d6e0511246a4d3 172.17.112.120:6378
slots: (0 slots) slave
replicates 2df002471441b2e92d42fa557d8baea6b247e893
M: f82834569a983f8ee06629a6b42913c843182b25 172.17.112.123:6379
slots:[1365-5460] (4096 slots) master
M: 2df002471441b2e92d42fa557d8baea6b247e893 172.17.112.121:6379
slots:[12288-16383] (4096 slots) master
1 additional replica(s)
[OK] All nodes agree about slots configuration.
>>> Check for open slots...
>>> Check slots coverage...
[OK] All 16384 slots covered.
[root@wiscom01 redis-5.0.7]# bin/redis-cli -a wiscom123! cluster nodes
Warning: Using a password with '-a' or '-u' option on the command line interface may not be safe.
db4bc454da4c206041928be94ca66af48636fc36 172.17.112.122:6379@16379 master - 0 1582167509311 2 connected 6827-10922
fd92c3c2d453553d2c7388b301d6e0511246a4d3 172.17.112.120:6378@16378 slave 2df002471441b2e92d42fa557d8baea6b247e893 0 1582167508308 3 connected
f82834569a983f8ee06629a6b42913c843182b25 172.17.112.123:6379@16379 master - 0 1582167507000 1 connected 1365-5460
2df002471441b2e92d42fa557d8baea6b247e893 172.17.112.121:6379@16379 master - 0 1582167507306 3 connected 12288-16383
6fafb125c08eb857b241ba653da9f661fb3df44a 172.17.112.120:6379@16379 myself,master - 0 1582167503000 4 connected 0-1364 5461-6826 10923-12287
[root@wiscom01 redis-5.0.7]# bin/redis-cli -a wiscom123! -p 6378
Warning: Using a password with '-a' or '-u' option on the command line interface may not be safe.
127.0.0.1:6378> info memory
# Memory
used_memory:1563832
used_memory_human:1.49M
used_memory_rss:4620288
used_memory_rss_human:4.41M
used_memory_peak:1563832
used_memory_peak_human:1.49M
used_memory_peak_perc:100.00%
used_memory_overhead:1499486
used_memory_startup:1449792
used_memory_dataset:64346
used_memory_dataset_perc:56.42%
allocator_allocated:1986312
allocator_active:2334720
allocator_resident:10547200
total_system_memory:134775721984
total_system_memory_human:125.52G
used_memory_lua:37888
used_memory_lua_human:37.00K
used_memory_scripts:0
used_memory_scripts_human:0B
number_of_cached_scripts:0
maxmemory:0
maxmemory_human:0B
maxmemory_policy:noeviction
allocator_frag_ratio:1.18
allocator_frag_bytes:348408
allocator_rss_ratio:4.52
allocator_rss_bytes:8212480
rss_overhead_ratio:0.44
rss_overhead_bytes:-5926912
mem_fragmentation_ratio:3.03
mem_fragmentation_bytes:3097480
mem_not_counted_for_evict:0
mem_replication_backlog:0
mem_clients_slaves:0
mem_clients_normal:49694
mem_aof_buffer:0
mem_allocator:jemalloc-5.1.0
active_defrag_running:0
lazyfree_pending_objects:0
127.0.0.1:6378>
从节点没有数据。
插入200条数据,从节点还是没有数据
[root@wiscom01 redis-5.0.7]# bin/redis-cli -a wiscom123! --cluster check 172.17.112.120:6379
Warning: Using a password with '-a' or '-u' option on the command line interface may not be safe.
172.17.112.120:6379 (6fafb125...) -> 250169 keys | 4096 slots | 0 slaves.
172.17.112.122:6379 (db4bc454...) -> 249925 keys | 4096 slots | 0 slaves.
172.17.112.123:6379 (f8283456...) -> 250055 keys | 4096 slots | 0 slaves.
172.17.112.121:6379 (2df00247...) -> 250051 keys | 4096 slots | 1 slaves.
[OK] 1000200 keys in 4 masters.
61.05 keys per slot on average.
>>> Performing Cluster Check (using node 172.17.112.120:6379)
M: 6fafb125c08eb857b241ba653da9f661fb3df44a 172.17.112.120:6379
slots:[0-1364],[5461-6826],[10923-12287] (4096 slots) master
M: db4bc454da4c206041928be94ca66af48636fc36 172.17.112.122:6379
slots:[6827-10922] (4096 slots) master
S: fd92c3c2d453553d2c7388b301d6e0511246a4d3 172.17.112.120:6378
slots: (0 slots) slave
replicates 2df002471441b2e92d42fa557d8baea6b247e893
M: f82834569a983f8ee06629a6b42913c843182b25 172.17.112.123:6379
slots:[1365-5460] (4096 slots) master
M: 2df002471441b2e92d42fa557d8baea6b247e893 172.17.112.121:6379
slots:[12288-16383] (4096 slots) master
1 additional replica(s)
[OK] All nodes agree about slots configuration.
>>> Check for open slots...
>>> Check slots coverage...
[OK] All 16384 slots covered.
[root@wiscom01 redis-5.0.7]#
数据未同步解决
查看日志:
[root@wiscom01 log]# cat redis_6378.log
147417:S 20 Feb 2020 11:54:27.799 * Connecting to MASTER 172.17.112.121:6379
147417:S 20 Feb 2020 11:54:27.799 * MASTER <-> REPLICA sync started
147417:S 20 Feb 2020 11:54:27.800 * Non blocking connect for SYNC fired the event.
147417:S 20 Feb 2020 11:54:27.800 * Master replied to PING, replication can continue...
147417:S 20 Feb 2020 11:54:27.800 * (Non critical) Master does not understand REPLCONF listening-port: -NOAUTH Authentication required.
147417:S 20 Feb 2020 11:54:27.800 * (Non critical) Master does not understand REPLCONF capa: -NOAUTH Authentication required.
147417:S 20 Feb 2020 11:54:27.800 * Partial resynchronization not possible (no cached master)
147417:S 20 Feb 2020 11:54:27.800 # Unexpected reply to PSYNC from master: -NOAUTH Authentication required.
147417:S 20 Feb 2020 11:54:27.800 * Retrying with SYNC...
147417:S 20 Feb 2020 11:54:27.800 # MASTER aborted replication with an error: NOAUTH Authentication required.
查看配置中的REPLICATION 模块
# If the master is password protected (using the "requirepass" configuration
# directive below) it is possible to tell the replica to authenticate before
# starting the replication synchronization process, otherwise the master will
# refuse the replica request.
#
# masterauth <master-password>
masterauth wiscom123!
重启实例
[root@wiscom01 log]# systemctl stop redis-6378
[root@wiscom01 log]# ps -ef | grep redis
root 144972 1 0 09:49 ? 00:00:11 /usr/local/wiscom/redis-5.0.7/bin/redis-server 0.0.0.0:6379 [cluster]
root 150319 144712 0 11:55 pts/2 00:00:00 grep --color=auto redis
[root@wiscom01 log]# systemctl start redis-6378
[root@wiscom01 log]# ps -ef | grep redis
root 144972 1 0 09:49 ? 00:00:11 /usr/local/wiscom/redis-5.0.7/bin/redis-server 0.0.0.0:6379 [cluster]
root 150327 1 16 11:55 ? 00:00:00 /usr/local/wiscom/redis-5.0.7/bin/redis-server 0.0.0.0:6378 [cluster]
root 150333 144712 0 11:55 pts/2 00:00:00 grep --color=auto redis
再次查看日志
150327:S 20 Feb 2020 11:55:53.925 # Cluster state changed: ok
150327:S 20 Feb 2020 11:55:54.928 * Connecting to MASTER 172.17.112.121:6379
150327:S 20 Feb 2020 11:55:54.928 * MASTER <-> REPLICA sync started
150327:S 20 Feb 2020 11:55:54.928 * Non blocking connect for SYNC fired the event.
150327:S 20 Feb 2020 11:55:54.928 * Master replied to PING, replication can continue...
150327:S 20 Feb 2020 11:55:54.928 * Trying a partial resynchronization (request 0a0ef44c5bcf46dd12a2b258dcf829ccfa2b1519:1).
150327:S 20 Feb 2020 11:55:54.930 * Full resync from master: df1d99334ec731e128775579e49df292a36fda8e:0
150327:S 20 Feb 2020 11:55:54.930 * Discarding previously cached master state.
150327:S 20 Feb 2020 11:55:55.233 * MASTER <-> REPLICA sync: receiving 13725257 bytes from master
150327:S 20 Feb 2020 11:55:55.350 * MASTER <-> REPLICA sync: Flushing old data
150327:S 20 Feb 2020 11:55:55.350 * MASTER <-> REPLICA sync: Loading DB in memory
150327:S 20 Feb 2020 11:55:55.658 * MASTER <-> REPLICA sync: Finished with success
150327:S 20 Feb 2020 11:55:55.658 * Background append only file rewriting started by pid 150331
150327:S 20 Feb 2020 11:55:55.952 * AOF rewrite child asks to stop sending diffs.
150331:C 20 Feb 2020 11:55:55.952 * Parent agreed to stop sending diffs. Finalizing AOF...
150331:C 20 Feb 2020 11:55:55.952 * Concatenating 0.00 MB of AOF diff received from parent.
150331:C 20 Feb 2020 11:55:55.952 * SYNC append only file rewrite performed
150331:C 20 Feb 2020 11:55:55.953 * AOF rewrite: 0 MB of memory used by copy-on-write
150327:S 20 Feb 2020 11:55:55.959 * Background AOF rewrite terminated with success
150327:S 20 Feb 2020 11:55:55.959 * Residual parent diff successfully flushed to the rewritten AOF (0.00 MB)
150327:S 20 Feb 2020 11:55:55.959 * Background AOF rewrite finished successfully
查看数据是否同步
[root@wiscom01 redis-5.0.7]# bin/redis-cli -a wiscom123! --cluster check 172.17.112.120:6379
Warning: Using a password with '-a' or '-u' option on the command line interface may not be safe.
172.17.112.120:6379 (6fafb125...) -> 250170 keys | 4096 slots | 0 slaves.
172.17.112.122:6379 (db4bc454...) -> 249926 keys | 4096 slots | 0 slaves.
172.17.112.123:6379 (f8283456...) -> 250056 keys | 4096 slots | 0 slaves.
172.17.112.121:6379 (2df00247...) -> 250051 keys | 4096 slots | 1 slaves.
[OK] 1000203 keys in 4 masters.
61.05 keys per slot on average.
>>> Performing Cluster Check (using node 172.17.112.120:6379)
M: 6fafb125c08eb857b241ba653da9f661fb3df44a 172.17.112.120:6379
slots:[0-1364],[5461-6826],[10923-12287] (4096 slots) master
M: db4bc454da4c206041928be94ca66af48636fc36 172.17.112.122:6379
slots:[6827-10922] (4096 slots) master
S: fd92c3c2d453553d2c7388b301d6e0511246a4d3 172.17.112.120:6378
slots: (0 slots) slave 此时slots还是0
replicates 2df002471441b2e92d42fa557d8baea6b247e893
M: f82834569a983f8ee06629a6b42913c843182b25 172.17.112.123:6379
slots:[1365-5460] (4096 slots) master
M: 2df002471441b2e92d42fa557d8baea6b247e893 172.17.112.121:6379
slots:[12288-16383] (4096 slots) master
1 additional replica(s)
[OK] All nodes agree about slots configuration.
>>> Check for open slots...
>>> Check slots coverage...
[OK] All 16384 slots covered.
[root@wiscom01 redis-5.0.7]# bin/redis-cli -a wiscom123! -h 172.17.112.120 -p 6378
Warning: Using a password with '-a' or '-u' option on the command line interface may not be safe.
172.17.112.120:6378> dbsize
(integer) 250051
172.17.112.120:6378>
数据一致
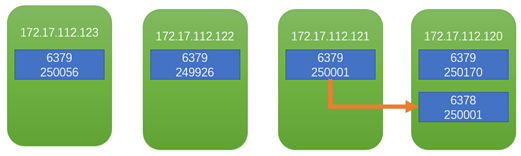
测试故障转移
保持程序正在运行
[root@wiscom01 redis-5.0.7]# bin/redis-cli -a wiscom123! --cluster check 172.17.112.120:6379
Warning: Using a password with '-a' or '-u' option on the command line interface may not be safe.
172.17.112.120:6379 (6fafb125...) -> 250169 keys | 4096 slots | 0 slaves.
172.17.112.122:6379 (db4bc454...) -> 249925 keys | 4096 slots | 0 slaves.
172.17.112.123:6379 (f8283456...) -> 250055 keys | 4096 slots | 0 slaves.
172.17.112.121:6379 (2df00247...) -> 250051 keys | 4096 slots | 1 slaves.
[OK] 1000200 keys in 4 masters.
61.05 keys per slot on average.
>>> Performing Cluster Check (using node 172.17.112.120:6379)
M: 6fafb125c08eb857b241ba653da9f661fb3df44a 172.17.112.120:6379
slots:[0-1364],[5461-6826],[10923-12287] (4096 slots) master
M: db4bc454da4c206041928be94ca66af48636fc36 172.17.112.122:6379
slots:[6827-10922] (4096 slots) master
S: fd92c3c2d453553d2c7388b301d6e0511246a4d3 172.17.112.120:6378
slots: (0 slots) slave
replicates 2df002471441b2e92d42fa557d8baea6b247e893
M: f82834569a983f8ee06629a6b42913c843182b25 172.17.112.123:6379
slots:[1365-5460] (4096 slots) master
M: 2df002471441b2e92d42fa557d8baea6b247e893 172.17.112.121:6379
slots:[12288-16383] (4096 slots) master
1 additional replica(s)
[OK] All nodes agree about slots configuration.
>>> Check for open slots...
>>> Check slots coverage...
[OK] All 16384 slots covered.
[root@wiscom01 redis-5.0.7]#
在172.17.112.121上操作:
[root@wiscom02 redis-5.0.7]# bin/redis-cli -p 6379
127.0.0.1:6379> auth wiscom123!
OK
127.0.0.1:6379> debug segfault
Could not connect to Redis at 127.0.0.1:6379: Connection refused
(0.71s)
not connected> exit
[root@wiscom02 redis-5.0.7]# bin/redis-cli -p 6379
Could not connect to Redis at 127.0.0.1:6379: Connection refused
not connected>
此时客户端程序自动关闭,且抛异常
Caused by: io.netty.channel.AbstractChannel$AnnotatedConnectException: Connection refused: no further information: /172.17.112.121:6379
Caused by: java.net.ConnectException: Connection refused: no further information
at sun.nio.ch.SocketChannelImpl.checkConnect(Native Method)
at sun.nio.ch.SocketChannelImpl.finishConnect(SocketChannelImpl.java:717)
at io.netty.channel.socket.nio.NioSocketChannel.doFinishConnect(NioSocketChannel.java:330)
at io.netty.channel.nio.AbstractNioChannel$AbstractNioUnsafe.finishConnect(AbstractNioChannel.java:334)
at io.netty.channel.nio.NioEventLoop.processSelectedKey(NioEventLoop.java:688)
at io.netty.channel.nio.NioEventLoop.processSelectedKeysOptimized(NioEventLoop.java:635)
at io.netty.channel.nio.NioEventLoop.processSelectedKeys(NioEventLoop.java:552)
at io.netty.channel.nio.NioEventLoop.run(NioEventLoop.java:514)
at io.netty.util.concurrent.SingleThreadEventExecutor$6.run(SingleThreadEventExecutor.java:1050)
at io.netty.util.internal.ThreadExecutorMap$2.run(ThreadExecutorMap.java:74)
at io.netty.util.concurrent.FastThreadLocalRunnable.run(FastThreadLocalRunnable.java:30)
at java.lang.Thread.run(Thread.java:748)
[root@wiscom01 redis-5.0.7]# bin/redis-cli -a wiscom123! --cluster check 172.17.112.120:6379
Warning: Using a password with '-a' or '-u' option on the command line interface may not be safe.
Could not connect to Redis at 172.17.112.121:6379: Connection refused
*** WARNING: 172.17.112.120:6378 claims to be slave of unknown node ID 2df002471441b2e92d42fa557d8baea6b247e893.
172.17.112.120:6379 (6fafb125...) -> 250170 keys | 4096 slots | 0 slaves.
172.17.112.122:6379 (db4bc454...) -> 249926 keys | 4096 slots | 0 slaves.
172.17.112.123:6379 (f8283456...) -> 250056 keys | 4096 slots | 0 slaves.
[OK] 750152 keys in 3 masters.
45.79 keys per slot on average.
>>> Performing Cluster Check (using node 172.17.112.120:6379)
M: 6fafb125c08eb857b241ba653da9f661fb3df44a 172.17.112.120:6379
slots:[0-1364],[5461-6826],[10923-12287] (4096 slots) master
M: db4bc454da4c206041928be94ca66af48636fc36 172.17.112.122:6379
slots:[6827-10922] (4096 slots) master
S: fd92c3c2d453553d2c7388b301d6e0511246a4d3 172.17.112.120:6378
slots: (0 slots) slave
replicates 2df002471441b2e92d42fa557d8baea6b247e893
M: f82834569a983f8ee06629a6b42913c843182b25 172.17.112.123:6379
slots:[1365-5460] (4096 slots) master
[OK] All nodes agree about slots configuration.
>>> Check for open slots...
>>> Check slots coverage...
[ERR] Not all 16384 slots are covered by nodes.
客户端程序再次启动,获取连接,报错
2020-02-20 11:34:39.229 WARN io.lettuce.core.cluster.topology.ClusterTopologyRefresh 284 lambda$getConnections$0 - Unable to connect to [172.17.112.121:6379]: Connection refused: no further information: /172.17.112.121:6379
Exception in thread "main" io.lettuce.core.RedisCommandExecutionException: CLUSTERDOWN The cluster is down
at io.lettuce.core.ExceptionFactory.createExecutionException(ExceptionFactory.java:135)
at io.lettuce.core.LettuceFutures.awaitOrCancel(LettuceFutures.java:122)
at io.lettuce.core.cluster.ClusterFutureSyncInvocationHandler.handleInvocation(ClusterFutureSyncInvocationHandler.java:123)
at io.lettuce.core.internal.AbstractInvocationHandler.invoke(AbstractInvocationHandler.java:80)
at com.sun.proxy.$Proxy23.set(Unknown Source)
at com.wiscom.mytest.Application.main(Application.java:119)
此时redis服务状态还是运行,但是redis进程已经关闭
[root@wiscom02 log]# systemctl status redis
● redis.service - LSB: Redis data structure server
Loaded: loaded (/etc/rc.d/init.d/redis)
Active: active (exited) since 三 2020-02-19 19:34:53 CST; 24h ago
Docs: man:systemd-sysv-generator(8)
Process: 8119 ExecStart=/etc/rc.d/init.d/redis start (code=exited, status=0/SUCCESS)
2月 19 19:34:53 wiscom02 systemd[1]: Starting LSB: Redis data structure server...
2月 19 19:34:53 wiscom02 redis[8119]: Starting Redis server...
2月 19 19:34:53 wiscom02 systemd[1]: Started LSB: Redis data structure server.
2月 20 19:52:10 wiscom02 systemd[1]: Started LSB: Redis data structure server.
2月 20 19:53:57 wiscom02 systemd[1]: Started LSB: Redis data structure server.
需要手动关闭,在启动
[root@wiscom02 log]# systemctl stop redis
[root@wiscom02 log]# systemctl status redis
● redis.service - LSB: Redis data structure server
Loaded: loaded (/etc/rc.d/init.d/redis)
Active: inactive (dead) since 四 2020-02-20 19:54:45 CST; 2s ago
Docs: man:systemd-sysv-generator(8)
Process: 97144 ExecStop=/etc/rc.d/init.d/redis stop (code=exited, status=0/SUCCESS)
Process: 8119 ExecStart=/etc/rc.d/init.d/redis start (code=exited, status=0/SUCCESS)
2月 19 19:34:53 wiscom02 systemd[1]: Starting LSB: Redis data structure server...
2月 19 19:34:53 wiscom02 redis[8119]: Starting Redis server...
2月 19 19:34:53 wiscom02 systemd[1]: Started LSB: Redis data structure server.
2月 20 19:52:10 wiscom02 systemd[1]: Started LSB: Redis data structure server.
2月 20 19:53:57 wiscom02 systemd[1]: Started LSB: Redis data structure server.
2月 20 19:54:45 wiscom02 systemd[1]: Stopping LSB: Redis data structure server...
2月 20 19:54:45 wiscom02 redis[97144]: /var/run/redis_6379.pid does not exist, process is not running
2月 20 19:54:45 wiscom02 systemd[1]: Stopped LSB: Redis data structure server.
[root@wiscom02 log]# systemctl start redis
[root@wiscom02 log]# systemctl status redis
● redis.service - LSB: Redis data structure server
Loaded: loaded (/etc/rc.d/init.d/redis)
Active: active (running) since 四 2020-02-20 19:54:55 CST; 2s ago
Docs: man:systemd-sysv-generator(8)
Process: 97144 ExecStop=/etc/rc.d/init.d/redis stop (code=exited, status=0/SUCCESS)
Process: 97244 ExecStart=/etc/rc.d/init.d/redis start (code=exited, status=0/SUCCESS)
CGroup: /system.slice/redis.service
└─97248 /usr/local/wiscom/redis-5.0.7/bin/redis-server 0.0.0.0:6379 [cluster]
2月 20 19:54:55 wiscom02 systemd[1]: Starting LSB: Redis data structure server...
2月 20 19:54:55 wiscom02 redis[97244]: Starting Redis server...
2月 20 19:54:55 wiscom02 systemd[1]: Started LSB: Redis data structure server.
启动之后,集群恢复正常
[root@wiscom01 redis-5.0.7]# bin/redis-cli -a wiscom123! --cluster check 172.17.112.120:6379
Warning: Using a password with '-a' or '-u' option on the command line interface may not be safe.
172.17.112.120:6379 (6fafb125...) -> 250170 keys | 4096 slots | 0 slaves.
172.17.112.122:6379 (db4bc454...) -> 249926 keys | 4096 slots | 0 slaves.
172.17.112.123:6379 (f8283456...) -> 250056 keys | 4096 slots | 0 slaves.
172.17.112.121:6379 (2df00247...) -> 250051 keys | 4096 slots | 1 slaves.
[OK] 1000203 keys in 4 masters.
61.05 keys per slot on average.
>>> Performing Cluster Check (using node 172.17.112.120:6379)
M: 6fafb125c08eb857b241ba653da9f661fb3df44a 172.17.112.120:6379
slots:[0-1364],[5461-6826],[10923-12287] (4096 slots) master
M: db4bc454da4c206041928be94ca66af48636fc36 172.17.112.122:6379
slots:[6827-10922] (4096 slots) master
S: fd92c3c2d453553d2c7388b301d6e0511246a4d3 172.17.112.120:6378
slots: (0 slots) slave
replicates 2df002471441b2e92d42fa557d8baea6b247e893
M: f82834569a983f8ee06629a6b42913c843182b25 172.17.112.123:6379
slots:[1365-5460] (4096 slots) master
M: 2df002471441b2e92d42fa557d8baea6b247e893 172.17.112.121:6379
slots:[12288-16383] (4096 slots) master
1 additional replica(s)
[OK] All nodes agree about slots configuration.
>>> Check for open slots...
>>> Check slots coverage...
[OK] All 16384 slots covered.
[root@wiscom01 redis-5.0.7]#
手动故障转移
[root@wiscom01 redis-5.0.7]# bin/redis-cli -a wiscom123! -h 172.17.112.120 -p 6378
Warning: Using a password with '-a' or '-u' option on the command line interface may not be safe.
172.17.112.120:6378> dbsize
(integer) 250051
172.17.112.120:6378>
172.17.112.120:6378> cluster failover
OK
172.17.112.120:6378> exit
[root@wiscom01 redis-5.0.7]# bin/redis-cli -a wiscom123! --cluster check 172.17.112.120:6379
Warning: Using a password with '-a' or '-u' option on the command line interface may not be safe.
172.17.112.120:6379 (6fafb125...) -> 250170 keys | 4096 slots | 0 slaves.
172.17.112.122:6379 (db4bc454...) -> 249926 keys | 4096 slots | 0 slaves.
172.17.112.120:6378 (fd92c3c2...) -> 250051 keys | 4096 slots | 1 slaves.
172.17.112.123:6379 (f8283456...) -> 250056 keys | 4096 slots | 0 slaves.
[OK] 1000203 keys in 4 masters.
61.05 keys per slot on average.
>>> Performing Cluster Check (using node 172.17.112.120:6379)
M: 6fafb125c08eb857b241ba653da9f661fb3df44a 172.17.112.120:6379
slots:[0-1364],[5461-6826],[10923-12287] (4096 slots) master
M: db4bc454da4c206041928be94ca66af48636fc36 172.17.112.122:6379
slots:[6827-10922] (4096 slots) master
M: fd92c3c2d453553d2c7388b301d6e0511246a4d3 172.17.112.120:6378
slots:[12288-16383] (4096 slots) master
1 additional replica(s)
M: f82834569a983f8ee06629a6b42913c843182b25 172.17.112.123:6379
slots:[1365-5460] (4096 slots) master
S: 2df002471441b2e92d42fa557d8baea6b247e893 172.17.112.121:6379
slots: (0 slots) slave
replicates fd92c3c2d453553d2c7388b301d6e0511246a4d3
[OK] All nodes agree about slots configuration.
>>> Check for open slots...
>>> Check slots coverage...
[OK] All 16384 slots covered.
[root@wiscom01 redis-5.0.7]#
故障转移后,角色发生互换
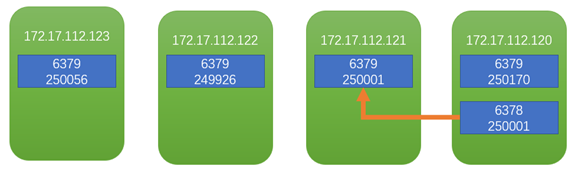
切换回去
在172.17.112.121:6379上执行
[root@wiscom02 redis-5.0.7]# bin/redis-cli -a wiscom123! -h 172.17.112.121 -p 6379
Warning: Using a password with '-a' or '-u' option on the command line interface may not be safe.
172.17.112.121:6379> cluster failover
OK
172.17.112.121:6379> exit
测试发现并没有切换回去
97248:S 20 Feb 2020 22:42:02.604 * Connecting to MASTER 172.17.112.120:6378
97248:S 20 Feb 2020 22:42:02.604 * MASTER <-> REPLICA sync started
97248:S 20 Feb 2020 22:42:02.604 * Non blocking connect for SYNC fired the event.
97248:S 20 Feb 2020 22:42:02.604 * Master replied to PING, replication can continue...
97248:S 20 Feb 2020 22:42:02.604 * (Non critical) Master does not understand REPLCONF listening-port: -NOAUTH Authentication required.
97248:S 20 Feb 2020 22:42:02.604 * (Non critical) Master does not understand REPLCONF capa: -NOAUTH Authentication required.
97248:S 20 Feb 2020 22:42:02.604 * Partial resynchronization not possible (no cached master)
97248:S 20 Feb 2020 22:42:02.605 # Unexpected reply to PSYNC from master: -NOAUTH Authentication required.
97248:S 20 Feb 2020 22:42:02.605 * Retrying with SYNC...
97248:S 20 Feb 2020 22:42:02.605 # MASTER aborted replication with an error: NOAUTH Authentication required.
[root@wiscom02 redis-5.0.7]# systemctl stop redis
[root@wiscom02 redis-5.0.7]# vim config/6379.conf
masterauth wiscom123!
[root@wiscom02 redis-5.0.7]# systemctl start redis
107628:S 20 Feb 2020 22:43:21.984 # Cluster state changed: ok
107628:S 20 Feb 2020 22:43:22.986 * Connecting to MASTER 172.17.112.120:6378
107628:S 20 Feb 2020 22:43:22.986 * MASTER <-> REPLICA sync started
107628:S 20 Feb 2020 22:43:22.986 * Non blocking connect for SYNC fired the event.
107628:S 20 Feb 2020 22:43:22.987 * Master replied to PING, replication can continue...
107628:S 20 Feb 2020 22:43:22.987 * Trying a partial resynchronization (request ef1f9c6bcad852fdcfe0d7a02b4e8fe70072a509:1).
107628:S 20 Feb 2020 22:43:22.988 * Full resync from master: c2e45d4f7259d38b976c11420d273336e956253c:11872
107628:S 20 Feb 2020 22:43:22.988 * Discarding previously cached master state.
107628:S 20 Feb 2020 22:43:23.308 * MASTER <-> REPLICA sync: receiving 13725258 bytes from master
107628:S 20 Feb 2020 22:43:23.427 * MASTER <-> REPLICA sync: Flushing old data
107628:S 20 Feb 2020 22:43:23.589 * MASTER <-> REPLICA sync: Loading DB in memory
107628:S 20 Feb 2020 22:43:23.928 * MASTER <-> REPLICA sync: Finished with success
107628:S 20 Feb 2020 22:43:23.929 * Background append only file rewriting started by pid 107723
107628:S 20 Feb 2020 22:43:24.245 * AOF rewrite child asks to stop sending diffs.
107723:C 20 Feb 2020 22:43:24.245 * Parent agreed to stop sending diffs. Finalizing AOF...
107723:C 20 Feb 2020 22:43:24.246 * Concatenating 0.00 MB of AOF diff received from parent.
107723:C 20 Feb 2020 22:43:24.246 * SYNC append only file rewrite performed
107723:C 20 Feb 2020 22:43:24.246 * AOF rewrite: 8 MB of memory used by copy-on-write
107628:S 20 Feb 2020 22:43:24.332 * Background AOF rewrite terminated with success
107628:S 20 Feb 2020 22:43:24.332 * Residual parent diff successfully flushed to the rewritten AOF (0.00 MB)
107628:S 20 Feb 2020 22:43:24.332 * Background AOF rewrite finished successfully
再次执行故障切换
[root@wiscom02 redis-5.0.7]# bin/redis-cli -a wiscom123! -h 172.17.112.121 -p 6379
Warning: Using a password with '-a' or '-u' option on the command line interface may not be safe.
172.17.112.121:6379> cluster failover
OK
107628:S 20 Feb 2020 22:44:48.502 # Manual failover user request accepted.
107628:S 20 Feb 2020 22:44:48.593 # Received replication offset for paused master manual failover: 11998
107628:S 20 Feb 2020 22:44:48.621 # All master replication stream processed, manual failover can start.
107628:S 20 Feb 2020 22:44:48.621 # Start of election delayed for 0 milliseconds (rank #0, offset 11998).
107628:S 20 Feb 2020 22:44:48.621 # Starting a failover election for epoch 6.
107628:S 20 Feb 2020 22:44:48.664 # Currently unable to failover: Waiting for votes, but majority still not reached.
107628:S 20 Feb 2020 22:44:48.674 # Failover election won: I'm the new master.
107628:S 20 Feb 2020 22:44:48.674 # configEpoch set to 6 after successful failover
107628:M 20 Feb 2020 22:44:48.674 # Setting secondary replication ID to c2e45d4f7259d38b976c11420d273336e956253c, valid up to offset: 11999. New replication ID is dbbd90c32f2d08b8ac2d64e744e2d6b75f81651f
107628:M 20 Feb 2020 22:44:48.674 # Connection with master lost.
107628:M 20 Feb 2020 22:44:48.674 * Caching the disconnected master state.
107628:M 20 Feb 2020 22:44:48.674 * Discarding previously cached master state.
107628:M 20 Feb 2020 22:44:49.195 * Replica 172.17.112.120:6378 asks for synchronization
107628:M 20 Feb 2020 22:44:49.195 * Partial resynchronization request from 172.17.112.120:6378 accepted. Sending 0 bytes of backlog starting from offset 11999.
[root@wiscom02 redis-5.0.
[root@wiscom01 redis-5.0.7]# bin/redis-cli -a wiscom123! --cluster check 172.17.112.120:6379
Warning: Using a password with '-a' or '-u' option on the command line interface may not be safe.
172.17.112.120:6379 (6fafb125...) -> 250170 keys | 4096 slots | 0 slaves.
172.17.112.122:6379 (db4bc454...) -> 249926 keys | 4096 slots | 0 slaves.
172.17.112.123:6379 (f8283456...) -> 250056 keys | 4096 slots | 0 slaves.
172.17.112.121:6379 (2df00247...) -> 250051 keys | 4096 slots | 1 slaves.
[OK] 1000203 keys in 4 masters.
61.05 keys per slot on average.
>>> Performing Cluster Check (using node 172.17.112.120:6379)
M: 6fafb125c08eb857b241ba653da9f661fb3df44a 172.17.112.120:6379
slots:[0-1364],[5461-6826],[10923-12287] (4096 slots) master
M: db4bc454da4c206041928be94ca66af48636fc36 172.17.112.122:6379
slots:[6827-10922] (4096 slots) master
S: fd92c3c2d453553d2c7388b301d6e0511246a4d3 172.17.112.120:6378
slots: (0 slots) slave
replicates 2df002471441b2e92d42fa557d8baea6b247e893
M: f82834569a983f8ee06629a6b42913c843182b25 172.17.112.123:6379
slots:[1365-5460] (4096 slots) master
M: 2df002471441b2e92d42fa557d8baea6b247e893 172.17.112.121:6379
slots:[12288-16383] (4096 slots) master
1 additional replica(s)
[OK] All nodes agree about slots configuration.
>>> Check for open slots...
>>> Check slots coverage...
[OK] All 16384 slots covered.

命令行工具
连接
[root@wiscom04 redis-5.0.7]# bin/redis-cli -h 172.17.112.123 -p 6379
输入密码
172.17.112.123:6379> auth wiscom123!
OK
或者 $redis-cli -h 127.0.0.1 -p 6379 -a "mypass"
AUTH password 验证密码是否正确
ECHO message 打印字符串
PING 查看服务是否运行
QUIT 关闭当前连接
SELECT index 切换到指定的数据库
key操作
172.17.112.123:6379> info keyspace 获取key的总数
# Keyspace
db2:keys=42684,expires=0,avg_ttl=0
172.17.112.123:6379> select 2
OK
172.17.112.123:6379> flushall 清空所有database中的key
OK
172.17.112.123:6379> info keyspace
# Keyspace
172.17.112.123:6379> select 1 切换到database 1中.
OK
172.17.112.123:6379[1]> set aa aa 设置单个key为aa,aa的value 为aa
OK
172.17.112.123:6379[1]> set bb bb
OK
172.17.112.123:6379[1]> info keyspace
# Keyspace
db1:keys=2,expires=0,avg_ttl=0
172.17.112.123:6379[1]> keys * 获取所有key
1) "aa"
2) "bb"
172.17.112.123:6379[1]> get aa 获取单个key的值
"aa"
172.17.112.123:6379[1]> del aa 删除key为aa的键
(integer) 1
172.17.112.123:6379[1]> get aa 返回空
(nil)
172.17.112.123:6379[1]> exists aa 检测是否存在
(integer) 0
172.17.112.123:6379[1]> exists bb
(integer) 1
EXPIREAT key timestamp 设置key多久后过期
PEXPIRE key milliseconds 设置 key 的过期时间以毫秒计
PEXPIREAT key milliseconds-timestamp
KEYS pattern 查找所有符合给定模式( pattern)的 key
MOVE key db 将当前数据库的 key 移动到给定的数据库 db 当中。
PERSIST key 移除 key 的过期时间,key 将持久保持。
PTTL key 以毫秒为单位返回 key 的剩余的过期时间。
172.17.112.123:6379[1]> pttl bb
(integer) -1
TTL key 以秒为单位,返回给定 key 的剩余生存时间(TTL, time to live)。
172.17.112.123:6379[1]> ttl bb
(integer) -1
RANDOMKEY 从当前数据库中随机返回一个 key 。
RENAME key newkey 修改 key 的名称
RENAMENX key newkey 仅当 newkey 不存在时,将 key 改名为 newkey 。
TYPE key 返回 key 所储存的值的类型。
172.17.112.123:6379[1]> expire bb 10 设置10秒过期
(integer) 1
172.17.112.123:6379[1]> ttl bb
(integer) 8
172.17.112.123:6379[1]> ttl bb
(integer) 5
172.17.112.123:6379[1]> ttl bb 如果没有key的话,返回-2
(integer) -2
172.17.112.123:6379[1]> get bb
(nil)
mget 获取多个key的值
172.17.112.123:6379[1]> set a1 11
OK
172.17.112.123:6379[1]> set a2 22
OK
172.17.112.123:6379[1]> set a3 33
OK
172.17.112.123:6379[1]> mget a1 a2 a3 一次获取多个key
1) "11"
2) "22"
3) "33"
append 追加key的值
172.17.112.123:6379[1]> append a4 44
(integer) 2
172.17.112.123:6379[1]> get a4
"44"
172.17.112.123:6379[1]> append a4 41
(integer) 4
172.17.112.123:6379[1]> append a4 42
(integer) 6
172.17.112.123:6379[1]> append a4 43
(integer) 8
172.17.112.123:6379[1]> get a4
"44414243"
172.17.112.123:6379[1]>
如果key不存在,类似于set 功能
setnx 类似set,但不覆盖
172.17.112.123:6379[1]> setnx a5 55
(integer) 1
172.17.112.123:6379[1]> get a5
"55"
172.17.112.123:6379[1]> setnx a5 不会覆盖
(error) ERR wrong number of arguments for 'setnx' command
172.17.112.123:6379[1]>
切换数据库
172.17.112.123:6379> select 0 默认使用database 0,所以提示中没有[0]
OK
172.17.112.123:6379> select 1 切换到database 1中.
OK
172.17.112.123:6379[1]> select 2
OK
172.17.112.123:6379[2]> info keyspace
# Keyspace
db2:keys=1000000,expires=0,avg_ttl=0
172.17.112.123:6379[2]>
dbsize
清空所有key
info查看redis信息
[root@wiscom04 redis-5.0.7]# bin/redis-cli -a wiscom123!
Warning: Using a password with '-a' or '-u' option on the command line interface may not be safe.
127.0.0.1:6379> info
# Server
redis_version:5.0.7
redis_git_sha1:00000000
redis_git_dirty:0
redis_build_id:510107af963ef9bf
redis_mode:cluster
os:Linux 3.10.0-327.el7.x86_64 x86_64
arch_bits:64
multiplexing_api:epoll
atomicvar_api:atomic-builtin
gcc_version:4.8.5
process_id:5642
run_id:b345db469560ef5c8723e3847d306b0b69a06741
tcp_port:6379
uptime_in_seconds:1037
uptime_in_days:0
hz:10
configured_hz:10
lru_clock:5023953
executable:/usr/local/wiscom/redis-5.0.7/bin/redis-server
config_file:/usr/local/wiscom/redis-5.0.7/config/6379.conf
# Clients
connected_clients:1
client_recent_max_input_buffer:2
client_recent_max_output_buffer:0
blocked_clients:0
# Memory
used_memory:1539152
used_memory_human:1.47M
used_memory_rss:14675968
used_memory_rss_human:14.00M
used_memory_peak:1539152
used_memory_peak_human:1.47M
used_memory_peak_perc:100.01%
used_memory_overhead:1499486
used_memory_startup:1449792
used_memory_dataset:39666
used_memory_dataset_perc:44.39%
allocator_allocated:1954152
allocator_active:2269184
allocator_resident:13619200
total_system_memory:134775726080
total_system_memory_human:125.52G
used_memory_lua:37888
used_memory_lua_human:37.00K
used_memory_scripts:0
used_memory_scripts_human:0B
number_of_cached_scripts:0
maxmemory:0
maxmemory_human:0B
maxmemory_policy:noeviction
allocator_frag_ratio:1.16
allocator_frag_bytes:315032
allocator_rss_ratio:6.00
allocator_rss_bytes:11350016
rss_overhead_ratio:1.08
rss_overhead_bytes:1056768
mem_fragmentation_ratio:9.80
mem_fragmentation_bytes:13179072
mem_not_counted_for_evict:0
mem_replication_backlog:0
mem_clients_slaves:0
mem_clients_normal:49694
mem_aof_buffer:0
mem_allocator:jemalloc-5.1.0
active_defrag_running:0
lazyfree_pending_objects:0
# Persistence
loading:0
rdb_changes_since_last_save:0
rdb_bgsave_in_progress:0
rdb_last_save_time:1582081220
rdb_last_bgsave_status:ok
rdb_last_bgsave_time_sec:-1
rdb_current_bgsave_time_sec:-1
rdb_last_cow_size:0
aof_enabled:1
aof_rewrite_in_progress:0
aof_rewrite_scheduled:0
aof_last_rewrite_time_sec:-1
aof_current_rewrite_time_sec:-1
aof_last_bgrewrite_status:ok
aof_last_write_status:ok
aof_last_cow_size:0
aof_current_size:0
aof_base_size:0
aof_pending_rewrite:0
aof_buffer_length:0
aof_rewrite_buffer_length:0
aof_pending_bio_fsync:0
aof_delayed_fsync:0
# Stats
total_connections_received:5
total_commands_processed:19
instantaneous_ops_per_sec:0
total_net_input_bytes:54076
total_net_output_bytes:36054
instantaneous_input_kbps:0.00
instantaneous_output_kbps:0.00
rejected_connections:0
sync_full:0
sync_partial_ok:0
sync_partial_err:0
expired_keys:0
expired_stale_perc:0.00
expired_time_cap_reached_count:0
evicted_keys:0
keyspace_hits:0
keyspace_misses:0
pubsub_channels:0
pubsub_patterns:0
latest_fork_usec:0
migrate_cached_sockets:0
slave_expires_tracked_keys:0
active_defrag_hits:0
active_defrag_misses:0
active_defrag_key_hits:0
active_defrag_key_misses:0
# Replication
role:master
connected_slaves:0
master_replid:efe4832ba46bc40a230cb93a98daf728a42ee3d5
master_replid2:0000000000000000000000000000000000000000
master_repl_offset:0
second_repl_offset:-1
repl_backlog_active:0
repl_backlog_size:1048576
repl_backlog_first_byte_offset:0
repl_backlog_histlen:0
# CPU
used_cpu_sys:0.523417
used_cpu_user:0.658683
used_cpu_sys_children:0.000000
used_cpu_user_children:0.000000
# Cluster
cluster_enabled:1
# Keyspace
127.0.0.1:6379>
Clients for Java
地址:https://redis.io/clients/#java
lettuce
Advanced Redis client for thread-safe sync, async, and reactive usage. Supports Cluster, Sentinel, Pipelining, and codecs.
开源地址:https://github.com/lettuce-io/lettuce-core
文档和javadoc: https://lettuce.io/docs/
入门
maven
<dependency>
<groupId>io.lettuce</groupId>
<artifactId>lettuce-core</artifactId>
<version>5.2.1.RELEASE</version>
</dependency>
依赖
代码
importio.lettuce.core.*;
RedisClient redisClient = RedisClient.create("redis://password@localhost:6379/0");
StatefulRedisConnection<String, String> connection = redisClient.connect();
RedisCommands<String, String> syncCommands = connection.sync();
syncCommands.set("key", "Hello, Redis!");
connection.close();
redisClient.shutdown();
Do you want to see working examples?
l Connecting to a ElastiCache Master
l Connecting to ElastiCache with Master/Replica
l Connecting to Azure Redis Cluster
连接
连接到 a Redis Standalone, Sentinel, or Cluster需要指定连接详情. 统一格式是 RedisURI. You can provide the database, password and timeouts within the RedisURI. You have following possibilities to create a RedisURI:
1、使用URI
RedisURI.create("redis://localhost/");
2、使用Builder
RedisURI.Builder.redis("localhost", 6379).auth("password").database(1).build();
3、Set directly the values in RedisURI
new RedisURI("localhost", 6379, 60, TimeUnit.SECONDS);
URI语法
Redis Standalone
redis :// [: password@] host [: port] [/ database][? [timeout=timeout[d|h|m|s|ms|us|ns]] [&_database=database_]]
Redis Standalone (SSL)
rediss :// [: password@] host [: port] [/ database][? [timeout=timeout[d|h|m|s|ms|us|ns]] [&_database=database_]]
Redis Standalone (Unix Domain Sockets)
redis-socket :// path [?[timeout=timeout[d|h|m|s|ms|us|ns]][&_database=database_]]
Redis Sentinel
redis-sentinel :// [: password@] host1[: port1] [, host2[: port2]] [, hostN[: portN]] [/ database][?[timeout=timeout[d|h|m|s|ms|us|ns]] [&_sentinelMasterId=sentinelMasterId_] [&_database=database_]]
Schemes
- redis Redis Standalone
- rediss Redis Standalone SSL
- redis-socket Redis Standalone Unix Domain Socket
- redis-sentinel Redis Sentinel
Timeout units
- d Days
- h Hours
- m Minutes
- s Seconds
- ms Milliseconds
- us Microseconds
- ns Nanoseconds
RedisURI 支持 Redis Standalone, Redis Sentinel and Redis Cluster with plain, SSL, TLS and unix domain socket connections.
基本使用
RedisClient client = RedisClient.create("redis://localhost"); 创建一个RedisClient实例
StatefulRedisConnection<String, String> connection = client.connect(); 打开一个Standalone连接
RedisCommands<String, String> commands = connection.sync(); 获取同步执行命令API
String value = commands.get("foo"); get命令获取key foo
...
connection.close(); 通常在应用最后关闭. Connections被设计为long-lived.
client.shutdown(); 关闭客户端,释放threads and resources
Redis connections are designed to be long-lived and thread-safe, and if the connection is lost will reconnect until close() is called. Pending commands that have not timed out will be (re)sent after successful reconnection.
All connections inherit a default timeout from their RedisClient and
and will throw a RedisException when non-blocking commands fail to
return a result before the timeout expires. The timeout defaults to 60 seconds
and may be changed in the RedisClient or for each connection. Synchronous
methods will throw a RedisCommandExecutionException in case Redis
responds with an error. Asynchronous connections do not throw exceptions when
Redis responds with an error.
高级使用
配置client resources
Client resources are configuration settings for the client related to performance, concurrency, and events. A vast part of Client resources consists of thread pools (EventLoopGroups and a EventExecutorGroup) which build the infrastructure for the connection workers. 一般情况下,重复使用 instances of ClientResources across multiple clients是一个好主意.
Client resources are stateful and need to be shut down if they are supplied from outside the client.
创建Client resources
Client resources必须是固定的。可以使用以下两种模式创建instances:
l The create() factory method
ClientResources res = DefaultClientResources.create();
这种方式适合大部分需求。
l Resources builder
ClientResources res = DefaultClientResources.builder().ioThreadPoolSize(4)
.computationThreadPoolSize(4)
.build()使用和重复使用ClientResources
A RedisClient and RedisClusterClient 可以无需传递 ClientResources 就可以创建. The resources are exclusive(独占的) to the client and are managed itself by the client. When calling shutdown() of the client instance ClientResources are shut down.
RedisClient client = RedisClient.create();...client.shutdown();
如果你需要 multiple instances of a client or you want to provide existing thread infrastructure, 可以使用一个共享的 ClientResources instance. The shared Client resources can be passed upon client creation:
ClientResources res = DefaultClientResources.create();RedisClient client = RedisClient.create(res);RedisClusterClient clusterClient = RedisClusterClient.create(res, seedUris);...client.shutdown();clusterClient.shutdown();res.shutdown();Shared ClientResources 用于不会被此client关闭. Same applies for shared EventLoopGroupProviders that are an abstraction to provide EventLoopGroups.
Why Runtime.getRuntime().availableProcessors() * 3?
Netty requires different EventLoopGroups for NIO (TCP) and for EPoll (Unix Domain Socket) connections. One additional EventExecutorGroup is used to perform computation tasks. EventLoopGroups are started lazily to allocate Threads on-demand.
Shutdown
Every client instance requires a call to shutdown() to clear used resources. Clients with dedicated ClientResources (i.e. no ClientResources passed within the constructor/create-method) will shut down ClientResources on their own.
Client instances with using shared ClientResources (i.e. ClientResources passed using the constructor/create-method) won’t shut down the ClientResources on their own. The ClientResources instance needs to be shut down once it’s not used anymore.
Configuration settings
基础配置选项:
|
Name |
Method |
Default |
|
I/O Thread Pool Size |
|
|
|
The number of threads in the I/O thread pools. The number defaults to the number of available processors that the runtime returns (which, as a well-known fact, sometimes does not represent the actual number of processors). 每个线程表示internal event loop where all I/O tasks are run. The number does not reflect the actual number of I/O threads because the client requires different thread pools for Network (NIO) and Unix Domain Socket (EPoll) connections. The minimum I/O threads are |
||
|
Computation Thread Pool Size |
|
|
|
The number of threads in the computation thread pool. The number defaults to the number of available processors that the runtime returns (which, as a well-known fact, sometimes does not represent the actual number of processors). Every thread represents an internal event loop where all computation tasks are run. The minimum computation threads are |
||
高级settings
client选项
Client options 是一层不变的. Connections 继承the current options at the moment the connection is created. 更改选项不会影响已存在的连接.
client.setOptions(ClientOptions.builder().autoReconnect(false)
.pingBeforeActivateConnection(true)
.build());
SSL Connections
Native Transports
Netty提供两种特定平台的JNI传输:
Unix Domain Sockets
Streaming API
Events
Before 3.4/4.1
lettuce可以通知用户以下特定事件:
- Connected
- Disconnected
- Exceptions in the connection handler pipeline
Pipelining and command flushing
Connection Pooling
Lettuce connections 被设计成 thread-safe so one connection can be shared amongst multiple threads and Lettuce connections auto-reconnection 默认. 大部分情况连接池是不必要的,但对于有些情况是有帮助的. Lettuce 提供 generic connection pooling 支持.
连接池是否必要
Lettuce是线程安全的,满足大部分情况. 所有 Redis 用户的操作使用单线程执行. 使用多个连接不会影响一个应用的性能. The use of blocking operations usually goes hand in hand with worker threads that get their dedicated connection. The use of Redis Transactions is the typical use case for dynamic connection pooling as the number of threads requiring a dedicated connection tends to be dynamic. That said, the requirement for dynamic connection pooling is limited. Connection pooling always comes with a cost of complexity and maintenance.
Execution Models
Lettuce 为pooling提供两种执行模式:
- Synchronous/Blocking via Apache Commons Pool 2
- Asynchronous/Non-Blocking via a Lettuce-specific pool 实现(since version 5.1)
Synchronous Connection Pooling
前提条件
Lettuce依赖Apache’s common-pool2(至少2.2)
<dependency>
<groupId>org.apache.commons</groupId>
<artifactId>commons-pool2</artifactId>
<version>2.4.3</version>
</dependency>
使用
Lettuce provides generic connection pool support. It requires a connection Supplier that is used to create connections of any supported type (Redis Standalone, Pub/Sub, Sentinel, Master/Replica, Redis Cluster). ConnectionPoolSupport will create a GenericObjectPool or SoftReferenceObjectPool, depending on your needs. The pool can allocate either wrapped or direct connections.
- Wrapped instances will return the connection back to the pool when called StatefulConnection.close().
- Regular connections need to be returned to the pool with GenericObjectPool.returnObject(…).
RedisClient client = RedisClient.create(RedisURI.create(host, port)); GenericObjectPool<StatefulRedisConnection<String,String>> pool = ConnectionPoolSupport
.createGenericObjectPool(() -> client.connect(),newGenericObjectPoolConfig());
// executing work
try(StatefulRedisConnection<String,String> connection = pool.borrowObject()) {
RedisCommands<String,String> commands = connection.sync();
commands.multi();commands.set("key","value");
commands.set("key2","value2");
commands.exec();} // terminating
pool.close();client.shutdown();
Asynchronous Connection Pooling
测试-单节点
RedisURI redisUri = RedisURI.Builder.redis("172.17.112.123")
.withPassword("wiscom123!")
.withDatabase(2)
.withPort(6379)
.build();
RedisClient client = RedisClient.create(redisUri);
StatefulRedisConnection<String, String> connection = client.connect();
RedisCommands<String, String> syncCommands = connection.sync();
for(int i=0;i<1000000;i++){
syncCommands.set("苏"+i, "苏"+i);
}
connection.close();
client.shutdown();
不指定数据库,默认使用数据库0
172.17.112.123:6379> info keyspace
# Keyspace
db2:keys=45705,expires=0,avg_ttl=0
172.17.112.123:6379>
RedisURI redisUri = RedisURI.Builder.redis("172.17.112.123")
.withPassword("wiscom123!")
.withDatabase(2)
.withPort(6379)
.build();
RedisClient client = RedisClient.create(redisUri);
StatefulRedisConnection<String, String> connection = client.connect();
RedisCommands<String, String> syncCommands = connection.sync();
long start=System.currentTimeMillis();
// for(int i=0;i<1000000;i++){
// syncCommands.set("苏"+i, "苏"+i);
// }
log.info(syncCommands.get("苏500"));
long end=System.currentTimeMillis();
log.info(end-start);
connection.close();
client.shutdown();
在公司局域网测试测试发现,100万条数据,使用get方法,耗时13-15毫秒
在本机测试:
100万单条耗时3-5毫秒
1000万单条耗时3-5毫秒
获取对象时间耗时:
2020-03-16 13:04:57.922 INFO com.wiscom.mytest.RedisTest 41 test - 1584335095864
2020-03-16 13:04:57.922 INFO com.wiscom.mytest.RedisTest 42 test - 1584335096047
2020-03-16 13:04:57.922 INFO com.wiscom.mytest.RedisTest 43 test - 1584335097558
2020-03-16 13:04:57.922 INFO com.wiscom.mytest.RedisTest 44 test - 1584335097558
2020-03-16 13:04:57.923 INFO com.wiscom.mytest.RedisTest 45 test - 1584335097922
获取RedisClient耗时:183毫秒
获取StatefulRedisConnection耗时:1511毫秒
获取RedisCommands耗时:0毫秒
插入100条数据,耗时:364毫秒
测试-集群
172.17.112.121-123 三节点集群
RedisURI redisUri = RedisURI.Builder.redis("172.17.112.123").withPassword("wiscom123!").build();
RedisClusterClient clusterClient = RedisClusterClient.create(redisUri);
StatefulRedisClusterConnection<String, String> connection = clusterClient.connect();
RedisAdvancedClusterCommands<String, String> syncCommands = connection.sync();
for(int i=0;i<1000000;i++){
syncCommands.set("苏"+i, "20191125091947,228,6767,2,-1,-1,1,0,-1,-1,0");
}
connection.close();
clusterClient.shutdown();
使用一个RedisURI连接到集群。
127.0.0.1:6379> info
# Server
redis_version:5.0.7
redis_git_sha1:00000000
redis_git_dirty:0
redis_build_id:510107af963ef9bf
redis_mode:cluster
os:Linux 3.10.0-327.el7.x86_64 x86_64
arch_bits:64
multiplexing_api:epoll
atomicvar_api:atomic-builtin
gcc_version:4.8.5
process_id:5642
run_id:b345db469560ef5c8723e3847d306b0b69a06741
tcp_port:6379
uptime_in_seconds:13067
uptime_in_days:0
hz:10
configured_hz:10
lru_clock:5035983
executable:/usr/local/wiscom/redis-5.0.7/bin/redis-server
config_file:/usr/local/wiscom/redis-5.0.7/config/6379.conf
# Clients
connected_clients:1
client_recent_max_input_buffer:2
client_recent_max_output_buffer:0
blocked_clients:0
# Memory
used_memory:53782872
used_memory_human:51.29M
used_memory_rss:65806336
used_memory_rss_human:62.76M
used_memory_peak:53793792
used_memory_peak_human:51.30M
used_memory_peak_perc:99.98%
used_memory_overhead:19032950
used_memory_startup:1449792
used_memory_dataset:34749922
used_memory_dataset_perc:66.40%
allocator_allocated:53849560
allocator_active:54259712
allocator_resident:60137472
total_system_memory:134775726080
total_system_memory_human:125.52G
used_memory_lua:37888
used_memory_lua_human:37.00K
used_memory_scripts:0
used_memory_scripts_human:0B
number_of_cached_scripts:0
maxmemory:0
maxmemory_human:0B
maxmemory_policy:noeviction
allocator_frag_ratio:1.01
allocator_frag_bytes:410152
allocator_rss_ratio:1.11
allocator_rss_bytes:5877760
rss_overhead_ratio:1.09
rss_overhead_bytes:5668864
mem_fragmentation_ratio:1.22
mem_fragmentation_bytes:12065720
mem_not_counted_for_evict:3800
mem_replication_backlog:0
mem_clients_slaves:0
mem_clients_normal:49694
mem_aof_buffer:3800
mem_allocator:jemalloc-5.1.0
active_defrag_running:0
lazyfree_pending_objects:0
# Persistence
loading:0
rdb_changes_since_last_save:0
rdb_bgsave_in_progress:0
rdb_last_save_time:1582094139
rdb_last_bgsave_status:ok
rdb_last_bgsave_time_sec:0
rdb_current_bgsave_time_sec:-1
rdb_last_cow_size:7258112
aof_enabled:1
aof_rewrite_in_progress:0
aof_rewrite_scheduled:0
aof_last_rewrite_time_sec:-1
aof_current_rewrite_time_sec:-1
aof_last_bgrewrite_status:ok
aof_last_write_status:ok
aof_last_cow_size:0
aof_current_size:25966879
aof_base_size:0
aof_pending_rewrite:0
aof_buffer_length:0
aof_rewrite_buffer_length:0
aof_pending_bio_fsync:0
aof_delayed_fsync:0
# Stats
total_connections_received:7
total_commands_processed:333426
instantaneous_ops_per_sec:0
total_net_input_bytes:26021438
total_net_output_bytes:1712907
instantaneous_input_kbps:0.00
instantaneous_output_kbps:0.00
rejected_connections:0
sync_full:0
sync_partial_ok:0
sync_partial_err:0
expired_keys:0
expired_stale_perc:0.00
expired_time_cap_reached_count:0
evicted_keys:0
keyspace_hits:0
keyspace_misses:0
pubsub_channels:0
pubsub_patterns:0
latest_fork_usec:1582
migrate_cached_sockets:0
slave_expires_tracked_keys:0
active_defrag_hits:0
active_defrag_misses:0
active_defrag_key_hits:0
active_defrag_key_misses:0
# Replication
role:master
connected_slaves:0
master_replid:efe4832ba46bc40a230cb93a98daf728a42ee3d5
master_replid2:0000000000000000000000000000000000000000
master_repl_offset:0
second_repl_offset:-1
repl_backlog_active:0
repl_backlog_size:1048576
repl_backlog_first_byte_offset:0
repl_backlog_histlen:0
# CPU
used_cpu_sys:21.092295
used_cpu_user:18.854226
used_cpu_sys_children:0.219631
used_cpu_user_children:1.796885
# Cluster
cluster_enabled:1
# Keyspace
db0:keys=333384,expires=0,avg_ttl=0
127.0.0.1:6379>
发现:
172.17.112.123
db0:keys=333384,expires=0,avg_ttl=0
aof_current_size:25966879
used_memory_human:51.29M
172.17.112.122
db0:keys=333241,expires=0,avg_ttl=0
aof_current_size:25955824
used_memory_human:51.27M
172.17.112.121
used_memory_human:51.29M
db0:keys=333375,expires=0,avg_ttl=0
aof_current_size:25966256
used_memory_rss_human:63.19M 向申请内存
集群刚开始内存为1.47M,aof_current_size为0
可以估算出:
100万数据消耗内存:149.46M
aof文件:74.26M
集群mget读取测试
RedisURI redisUri = RedisURI.Builder.redis("172.17.112.123").withPassword("wiscom123!").build();
RedisClusterClient clusterClient = RedisClusterClient.create(redisUri);
StatefulRedisClusterConnection<String, String> connection = clusterClient.connect();
RedisAdvancedClusterCommands<String, String> syncCommands = connection.sync();
long start=System.currentTimeMillis();
List<String> keys=new ArrayList<>();
for(int i=0;i<100;i++){
keys.add("苏"+i);
}
keys.add("苏A");
keys.add("苏B");
for(int i=100000;i<100100;i++){
keys.add("苏"+i);
}
List<KeyValue<String,String>> lky= syncCommands.mget(keys.toArray(new String[keys.size()]));
long end=System.currentTimeMillis();
log.info(end-start);
for(KeyValue<String,String> ky:lky){
log.info(ky.getKey());
}
200条数据耗时36毫秒
顺序返回每条数据。
2020-02-19 16:47:05.881 INFO com.wiscom.mytest.Application 114 main - 苏99
2020-02-19 16:47:05.881 INFO com.wiscom.mytest.Application 114 main - 苏A
2020-02-19 16:47:05.882 INFO com.wiscom.mytest.Application 114 main - 苏B
2020-02-19 16:47:05.882 INFO com.wiscom.mytest.Application 114 main - 苏100000
…..
如果从获取client开始,那么耗时1920毫秒
测试-连接池
RedisURI redisUri = RedisURI.Builder.redis("172.18.30.10")
.withPassword("wiscom123!")
.withDatabase(2)
.withPort(6379)
.build();
long start1=System.currentTimeMillis();
RedisClient client = RedisClient.create(redisUri);
long start2=System.currentTimeMillis();
GenericObjectPoolConfig genericObjectPoolConfig=new GenericObjectPoolConfig();
genericObjectPoolConfig.setMaxIdle(5);
genericObjectPoolConfig.setMaxTotal(10);
GenericObjectPool<StatefulRedisClusterConnection<String, Object>> pool = ConnectionPoolSupport.
createGenericObjectPool(()->client.connect(), genericObjectPoolConfig);
long start3=System.currentTimeMillis();
long start4=0l;
try (StatefulRedisClusterConnection<String, Object> connection = pool.borrowObject()) {
start4=System.currentTimeMillis();
RedisAdvancedClusterAsyncCommands<String, Object> syncCommands= connection.async();
Map<String,Object> test=new HashMap<>();
test.put("aaa", 1);
test.put("bbb", "2");
syncCommands.hmset("test", test);
}catch(Exception ex){
log.error(ex.getMessage());
ex.printStackTrace();
}
抛异常:
java.lang.ClassCastException: io.lettuce.core.support.$Proxy23 cannot be cast to io.lettuce.core.cluster.api.StatefulRedisClusterConnection
测试-管道
RedisURI redisUri = RedisURI.Builder.redis("32.29.165.186")
.withPassword("wiscom123!")
.withDatabase(3)
.withPort(6379)
.build();
RedisClient client = RedisClient.create(redisUri);
StatefulRedisConnection<String, String> connection = client.connect();
RedisAsyncCommands<String, String> commands = connection.async();
long start4=System.currentTimeMillis();
commands.setAutoFlushCommands(false);
List<RedisFuture<?>> futures = new ArrayList<>();
for (int i = 100; i < 300; i++) {
futures.add(commands.get("苏"+i));
}
commands.flushCommands();
RedisFuture[] rf=new RedisFuture[futures.size()];
boolean result = LettuceFutures.awaitAll(5, TimeUnit.SECONDS,futures.toArray(rf));
log.info(result);
for(int i=0;i<futures.size();i++){
log.info(rf[i].toString());
}
long start5=System.currentTimeMillis();
log.info(start5-start4);
connection.close();
client.shutdown();
100万,耗时46秒(江宁无线网络情况下),打印结果多次测试性能在60左右之间
2020-04-09 12:39:22.399 INFO com.wiscom.mytest.RedisTest 98 testpipe - AsyncCommand [type=GET, output=ValueOutput [output=苏A298, error='null'], commandType=io.lettuce.core.protocol.Command]
2020-04-09 12:39:22.399 INFO com.wiscom.mytest.RedisTest 98 testpipe - AsyncCommand [type=GET, output=ValueOutput [output=苏A299, error='null'], commandType=io.lettuce.core.protocol.Command]
log.info(rf[i].get().toString());
结果:
2020-04-09 12:51:13.720 INFO com.wiscom.mytest.RedisTest 105 testpipe - 苏A297
2020-04-09 12:51:13.720 INFO com.wiscom.mytest.RedisTest 105 testpipe - 苏A298
2020-04-09 12:51:13.720 INFO com.wiscom.mytest.RedisTest 105 testpipe - 苏A299
与mget比较:
RedisURI redisUri = RedisURI.Builder.redis("32.29.165.186")
.withPassword("wiscom123!")
.withDatabase(3)
.withPort(6379)
.build();
RedisClient client = RedisClient.create(redisUri);
StatefulRedisConnection<String, String> connection = client.connect();
RedisCommands<String, String> syncCommands = connection.sync();
long start4=System.currentTimeMillis();
List<String> keys=new ArrayList<>();
for(int i=0;i<100;i++){
keys.add("苏"+i);
}
// keys.add("苏A");
// keys.add("苏B");
for(int i=100000;i<100100;i++){
keys.add("苏"+i);
}
List<KeyValue<String,String>> lky= syncCommands.mget(keys.toArray(new String[keys.size()]));
long start5=System.currentTimeMillis();
log.info(start5-start4);
connection.close();
client.shutdown();
平均耗时20-30毫秒,如果加上打印耗时在42左右:
for(KeyValue<String,String> kv:lky){
log.info(kv.getValue());
}
hgetall
RedisURI redisUri = RedisURI.Builder.redis("32.29.165.186")
.withPassword("wiscom123!")
.withDatabase(2)
.withPort(6379)
.build();
RedisClient client = RedisClient.create(redisUri);
StatefulRedisConnection<String, String> connection = client.connect();
RedisAsyncCommands<String, String> commands = connection.async();
long start4=System.currentTimeMillis();
commands.setAutoFlushCommands(false);
List<RedisFuture<?>> futures = new ArrayList<>();
futures.add(commands.hgetall("苏1"));
futures.add(commands.hgetall("苏5"));
futures.add(commands.hgetall("苏3"));
futures.add(commands.hgetall("苏6"));
commands.flushCommands();
RedisFuture[] rf=new RedisFuture[futures.size()];
boolean result = LettuceFutures.awaitAll(5, TimeUnit.SECONDS,futures.toArray(rf));
log.info(result);
for(int i=0;i<futures.size();i++){
try {
if(rf[i].get()==null){
log.info(rf[i].toString());
}else{
log.info(rf[i].get().toString());
}
} catch (InterruptedException ex) {
Logger.getLogger(RedisTest.class.getName()).log(Level.SEVERE, null, ex);
} catch (ExecutionException ex) {
Logger.getLogger(RedisTest.class.getName()).log(Level.SEVERE, null, ex);
}
}
long start5=System.currentTimeMillis();
log.info(start5-start4);
connection.close();
client.shutdown();
打印结果:
2020-04-09 13:55:10.324 INFO com.wiscom.mytest.RedisTest 117 testpipe - {name=苏A1}
2020-04-09 13:55:10.324 INFO com.wiscom.mytest.RedisTest 117 testpipe - {}
2020-04-09 13:55:10.324 INFO com.wiscom.mytest.RedisTest 117 testpipe - {name=苏A3}
2020-04-09 13:55:10.324 INFO com.wiscom.mytest.RedisTest 117 testpipe - {}
if(rf[i].get()==null){
log.info(rf[i].toString());
}else{
Map map=(Map) rf[i].get();
log.info(map.get("name"));
}
打印结果:
2020-04-09 15:19:21.647 INFO com.wiscom.mytest.RedisTest 119 testpipe - 苏A1
2020-04-09 15:19:21.647 INFO com.wiscom.mytest.RedisTest 119 testpipe - null
2020-04-09 15:19:21.647 INFO com.wiscom.mytest.RedisTest 119 testpipe - 苏A3
2020-04-09 15:19:21.647 INFO com.wiscom.mytest.RedisTest 119 testpipe – null
测试发现,不管key存不存在,rf[i].get()一直不为null,map是一个空对象{}。
Javadoc
RedisClient
A scalable and thread-safe Redis client 支持synchronous, asynchronous and reactive execution models. 多个线程可能共享一个 connection if they avoid blocking and transactional operations such as BLPOP and MULTI/EXEC.
RedisClient can be used with:
- Redis Standalone
- Redis Pub/Sub
- Redis Sentinel, Sentinel connections
- Redis Sentinel, Master connections
Redis Cluster 通过 RedisClusterClient. Master/Slave connections through MasterSlave provide connections to Redis Master/Slave setups which run either in a static Master/Slave setup or are managed by Redis Sentinel.
RedisClient 是昂贵的资源. It holds a set of netty's EventLoopGroup's that use multiple threads. 尽可能重复使用此instance或者再多个client instances 间共享一个ClientResources instance.
StatefulRedisConnection
Interface StatefulRedisConnection<K,V>
- Type Parameters:
K - Key type.
V - Value type.
All Superinterfaces:
AsyncCloseable, AutoCloseable, StatefulConnection<K,V>
All Known Subinterfaces:
StatefulRedisClusterPubSubConnection<K,V>, StatefulRedisMasterReplicaConnection<K,V>, StatefulRedisMasterSlaveConnection<K,V>, StatefulRedisPubSubConnection<K,V>
public interface StatefulRedisConnection<K,V>
extends StatefulConnection<K,V>
A thread-safe connection to a redis server. Multiple threads may share one StatefulRedisConnection. A ConnectionWatchdog monitors each connection and reconnects automatically until StatefulConnection.close() is called. All pending commands will be (re)sent after successful reconnection.
ConnectionPoolSupport
public abstract class ConnectionPoolSupport
extends Object
Connection pool support for GenericObjectPool and SoftReferenceObjectPool. Connection pool creation requires a Supplier that creates Redis connections. The pool can allocate either wrapped or direct connections.
- Wrapped instances will return the connection back to the pool when called
StatefulConnection.close(). - Regular connections need to be returned to the pool with
GenericObjectPool.returnObject(Object)
Lettuce connections are designed to be thread-safe so one connection can be shared amongst multiple threads and Lettuce connections auto-reconnect by default. Connection pooling with Lettuce can be required when you're invoking Redis operations in multiple threads and you use
- blocking commands such as
BLPOP. - transactions
BLPOP. command batching.
Transactions and command batching affect connection state. Blocking commands won't propagate queued commands to Redis until the blocking command is completed.
示例
// application initialization
RedisClusterClient clusterClient = RedisClusterClient.create(RedisURI.create(host, port));
GenericObjectPool<StatefulRedisClusterConnection<String, String>> pool = ConnectionPoolSupport.createGenericObjectPool(
() -> clusterClient.connect(), new GenericObjectPoolConfig());
// executing work
try (StatefulRedisClusterConnection<String, String> connection = pool.borrowObject()) {
// perform some work
}
// terminating
pool.close();
clusterClient.shutdown();
Since:
4.3
Jedis-用于监控
非常小,非常容易使用,且完全兼容2.8.x, 3.x.x and above*.
支持以下命令:
- Sorting
- Connection handling
- Commands operating on any kind of values
- Commands operating on string values
- Commands operating on hashes
- Commands operating on lists
- Commands operating on sets
- Commands operating on sorted sets
- Transactions
- Pipelining
- Publish/Subscribe
- Persistence control commands
- Remote server control commands
- Connection pooling
- Sharding (MD5, MurmurHash)
- Key-tags for sharding
- Sharding with pipelining
- Scripting with pipelining
- Redis Cluster
<dependency>
<groupId>redis.clients</groupId>
<artifactId>jedis</artifactId>
<version>3.2.0</version>
<type>jar</type>
<scope>compile</scope>
</dependency>
依赖
Jedis jedis = new Jedis("localhost");
jedis.set("foo", "bar");
String value = jedis.get("foo");
开发文档: wiki. There are lots of cool things you should know, including information about connection pooling. https://github.com/xetorthio/jedis/wiki
javadoc: http://xetorthio.github.io/jedis/
Redis cluster specification is implemented
Set<HostAndPort> jedisClusterNodes = new HashSet<HostAndPort>();
//Jedis Cluster will attempt to discover cluster nodes automatically
jedisClusterNodes.add(new HostAndPort("127.0.0.1", 7379));
JedisCluster jc = new JedisCluster(jedisClusterNodes);
jc.set("foo", "bar");
String value = jc.get("foo");
Javadoc
Jedis
|
Jedis |
|
Jedis |
|
Jedis |
故障
Jedis jedis = new Jedis(redisNodeBean.getHost_ip(),RedisCommon.getPort(map.get("component")+""));
jedis.auth("wiscom123!");
List<String> slaves=jedis.clusterSlaves(myid.toString());
redis.clients.jedis.exceptions.JedisDataException: ERR Unknown node b345db469560ef5c8723e3847d306b0b69a06741
RedisClient GUI工具
https://github.com/caoxinyu/RedisClient
现场安装


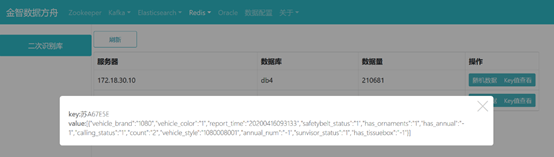
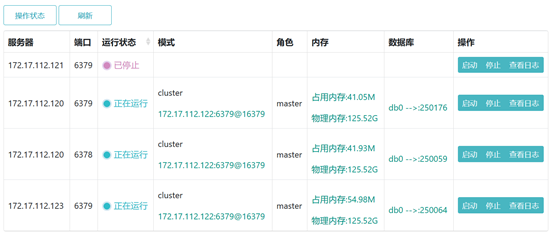


 浙公网安备 33010602011771号