SSM整合环境搭建(Axios异步请求)
SSM整合环境搭建(Axios异步请求——前后端分离)以员工管理为例
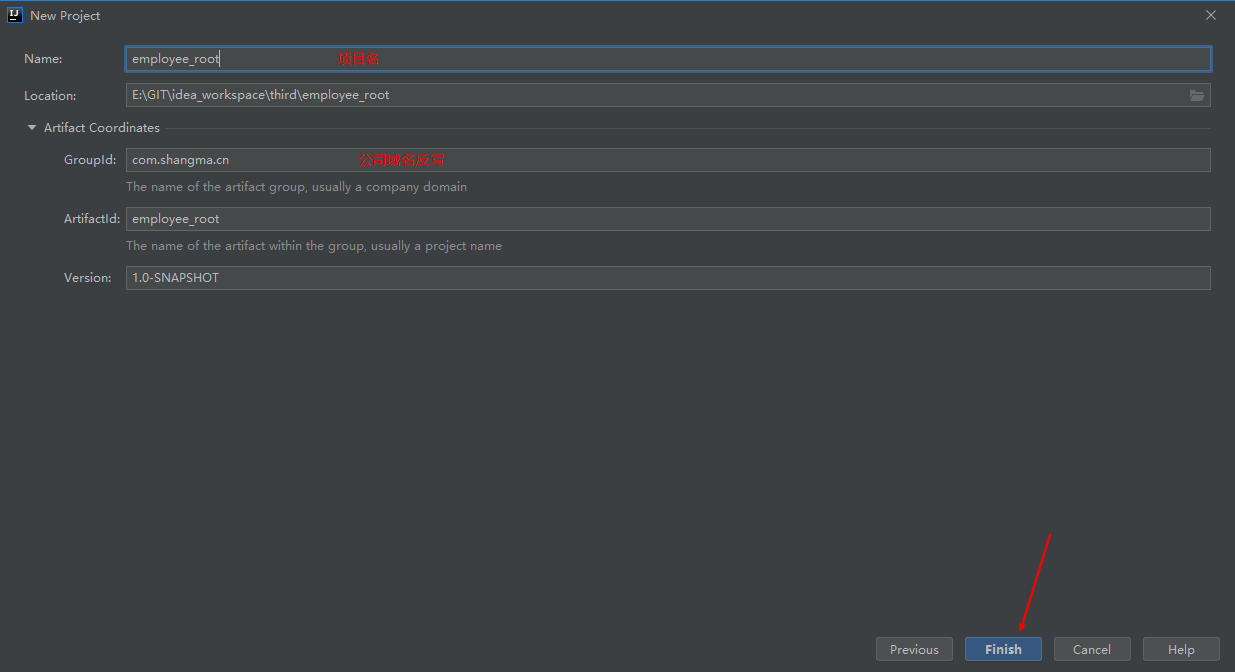
一、maven聚合工程的搭建
1、创建父工程

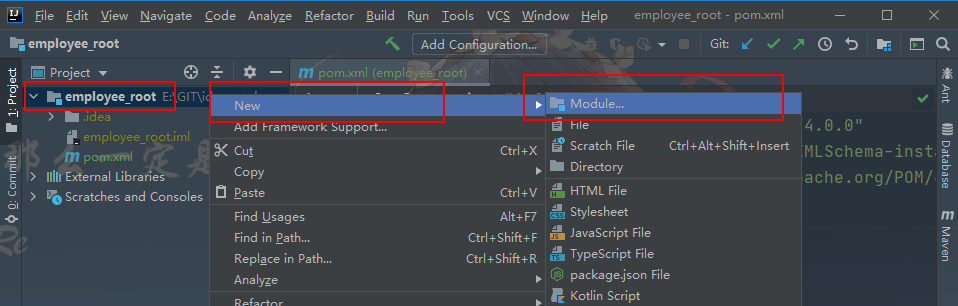
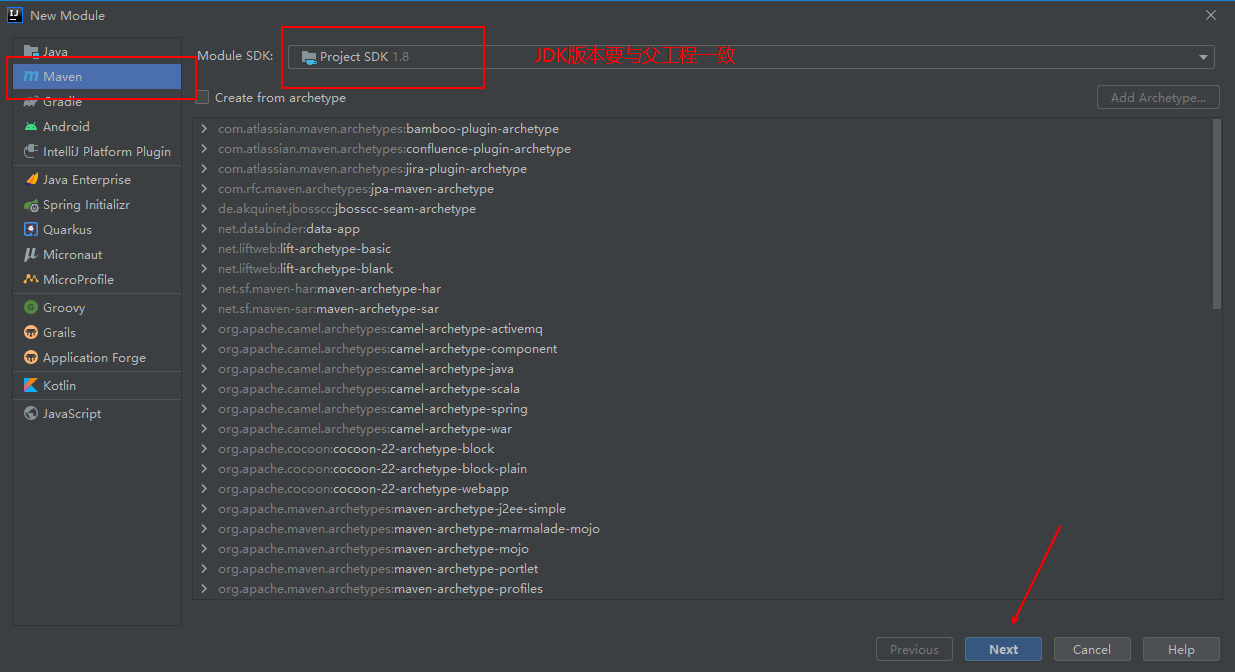
2、删除父工程中的src文件夹,右键工程名,新建子工程
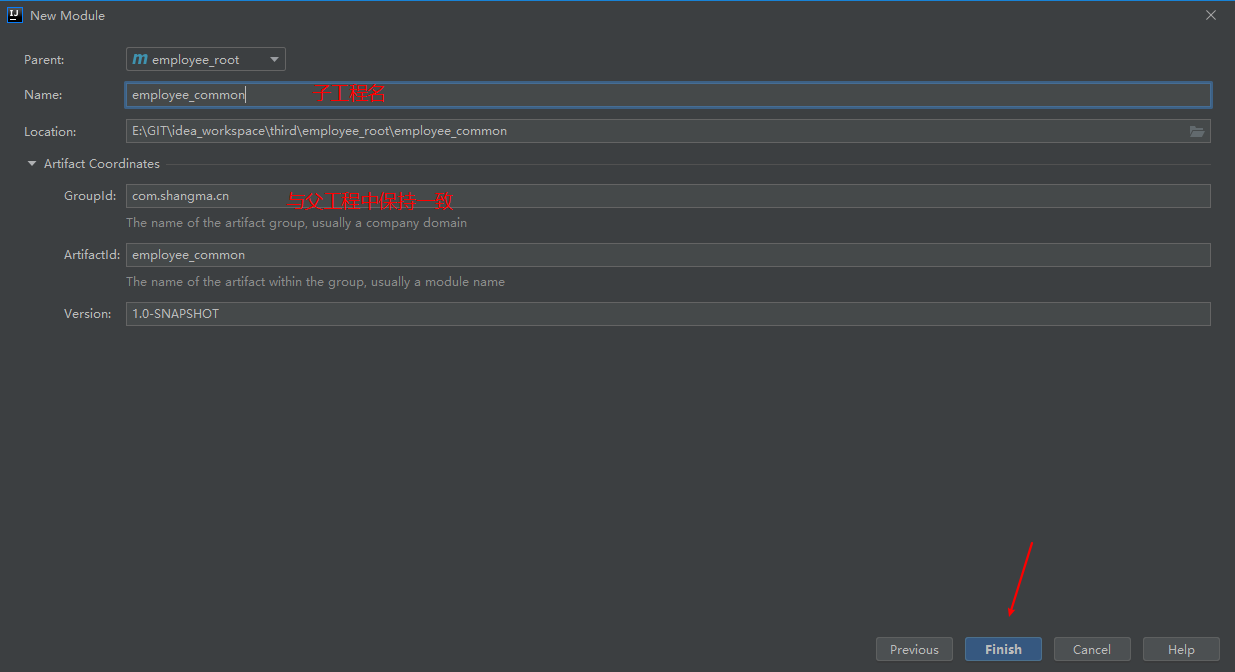
重复上述步骤创建其他子工程,如若出现pom.xml 变灰 出现删除线,请参考BUG- IDEA Maven pom.xml 变灰 出现删除线
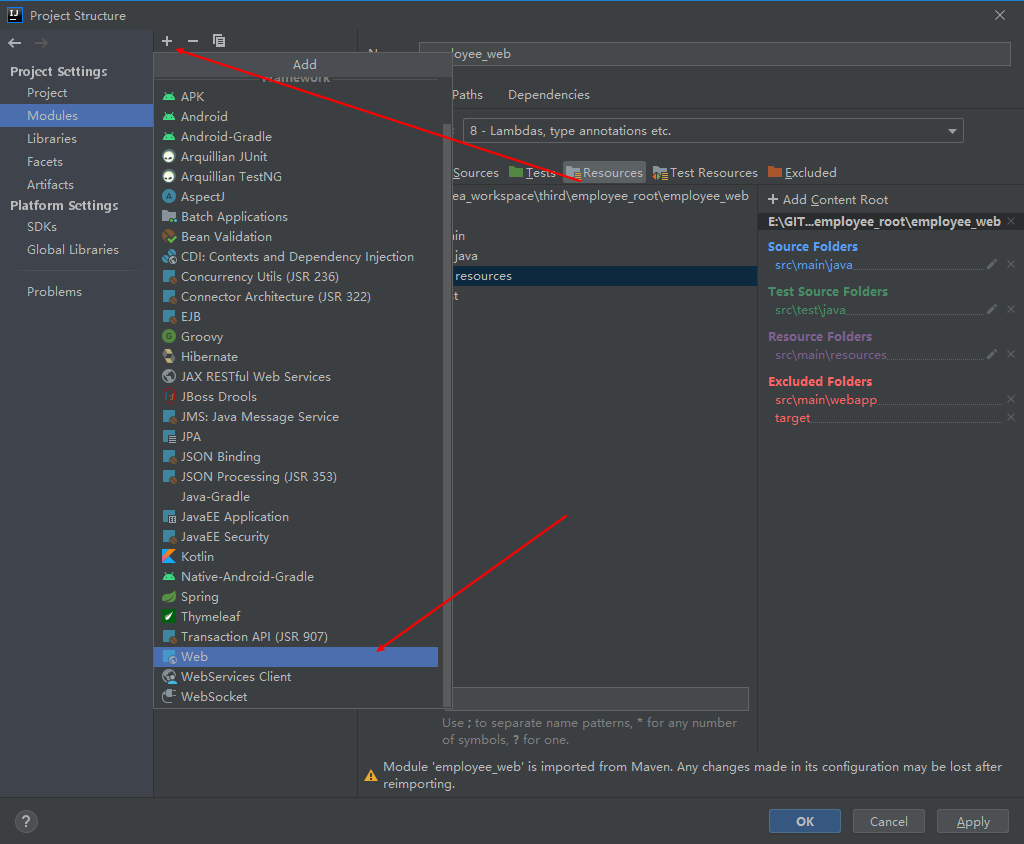
3、修改子工程employee_web,将其变成web工程
3.1、选择employee_web添加web
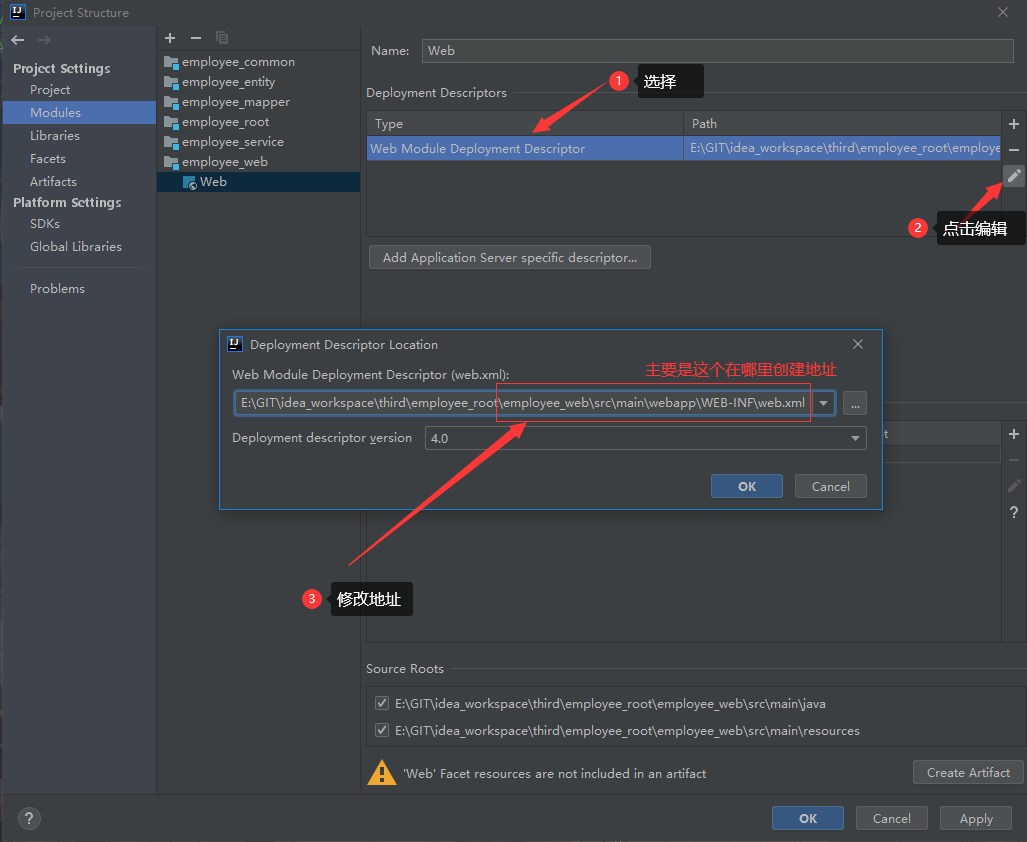
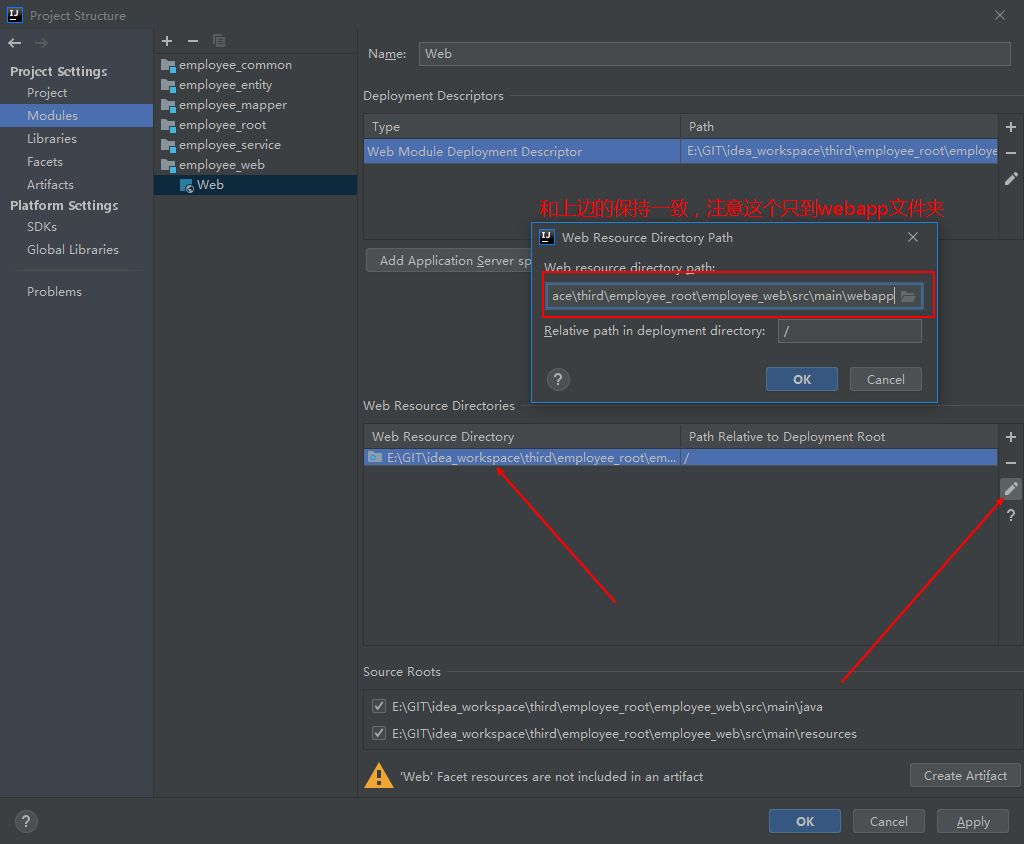
修改成功后如图

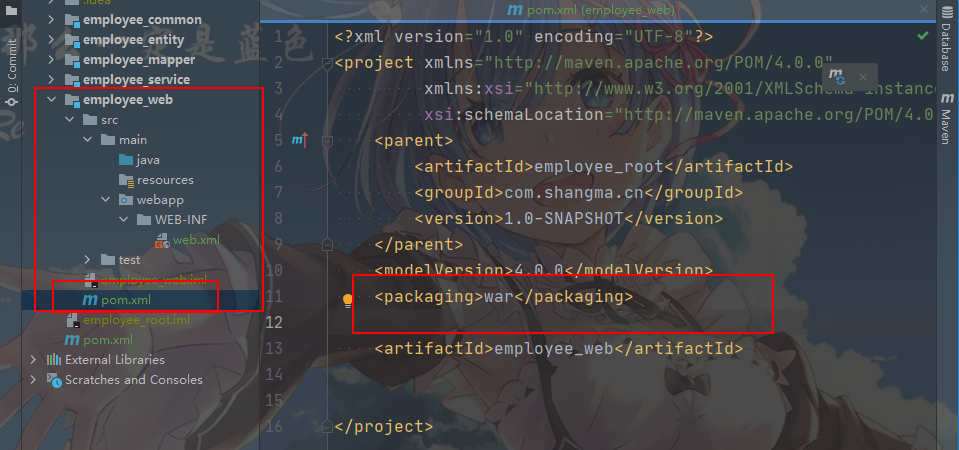
3.2、更改打包方式为war
二、maven的父工程做版本管理
给相应的子工程添加依赖,以employee_common的pom.xml为例


<?xml version="1.0" encoding="UTF-8"?>
<project xmlns="http://maven.apache.org/POM/4.0.0"
         xmlns:xsi="http://www.w3.org/2001/XMLSchema-instance"
         xsi:schemaLocation="http://maven.apache.org/POM/4.0.0 http://maven.apache.org/xsd/maven-4.0.0.xsd">
    <parent>
        <artifactId>employee-parent</artifactId>
        <groupId>com.shangma.cn</groupId>
        <version>1.0-SNAPSHOT</version>
    </parent>
    <modelVersion>4.0.0</modelVersion>

    <artifactId>employee_common</artifactId>
    <dependencies>
        <dependency>
            <groupId>org.projectlombok</groupId>
            <artifactId>lombok</artifactId>
        </dependency>
        <dependency>
            <groupId>com.aliyun</groupId>
            <artifactId>dysmsapi20170525</artifactId>
        </dependency>
        <dependency>
            <groupId>log4j</groupId>
            <artifactId>log4j</artifactId>
            <scope>provided</scope>
        </dependency>
        <dependency>
            <groupId>com.aliyun.oss</groupId>
            <artifactId>aliyun-sdk-oss</artifactId>
        </dependency>
        <dependency>
            <groupId>com.fasterxml.jackson.core</groupId>
            <artifactId>jackson-databind</artifactId>
            <scope>provided</scope>
        </dependency>
        <dependency>
            <groupId>org.springframework</groupId>
            <artifactId>spring-webmvc</artifactId>
            <scope>provided</scope>
        </dependency>

    </dependencies>

</project>
添加依赖时,使用父工程管理依赖的版本
<?xml version="1.0" encoding="UTF-8"?>
<project xmlns="http://maven.apache.org/POM/4.0.0"
         xmlns:xsi="http://www.w3.org/2001/XMLSchema-instance"
         xsi:schemaLocation="http://maven.apache.org/POM/4.0.0 http://maven.apache.org/xsd/maven-4.0.0.xsd">
    <modelVersion>4.0.0</modelVersion>

    <groupId>com.shangma.cn</groupId>
    <artifactId>employee_root</artifactId>
    <packaging>pom</packaging>
    <version>1.0-SNAPSHOT</version>
    <modules>
        <module>employee_common</module>
        <module>employee_entity</module>
        <module>employee_mapper</module>
        <module>employee_service</module>
        <module>employee_web</module>
    </modules>
    <properties>
        <lombok-version>1.18.12</lombok-version>
        <mybatis-version>3.5.4</mybatis-version>
        <mysql-version>5.1.47</mysql-version>
        <druid-version>1.1.22</druid-version>
        <spring-version>5.1.9.RELEASE</spring-version>
        <mybatis-spring-version>2.0.3</mybatis-spring-version>
        <log4j-version>1.2.17</log4j-version>
        <aspectjweaver-version>1.9.5</aspectjweaver-version>
        <jackson-databind-version>2.10.2</jackson-databind-version>
        <dysmsapi20170525-version>2.0.4</dysmsapi20170525-version>
        <spring-data-redis-version>2.1.3.RELEASE</spring-data-redis-version>
        <jedis-version>2.9.1</jedis-version>
        <slf4j-simple-version>1.7.30</slf4j-simple-version>
        <pagehelper-version>5.1.10</pagehelper-version>
        <aliyun-sdk-oss-version>3.10.2</aliyun-sdk-oss-version>
    </properties>
<!--    版本控制-->
    <dependencyManagement>
        <dependencies>
            <dependency>
                <groupId>org.projectlombok</groupId>
                <artifactId>lombok</artifactId>
                <version>${lombok-version}</version>
            </dependency>
            <dependency>
                <groupId>org.mybatis</groupId>
                <artifactId>mybatis</artifactId>
                <version>${mybatis-version}</version>
            </dependency>
            <dependency>
                <groupId>mysql</groupId>
                <artifactId>mysql-connector-java</artifactId>
                <version>${mysql-version}</version>
            </dependency>
            <dependency>
                <groupId>com.alibaba</groupId>
                <artifactId>druid</artifactId>
                <version>${druid-version}</version>
            </dependency>
            <dependency>
                <groupId>org.springframework</groupId>
                <artifactId>spring-jdbc</artifactId>
                <version>${spring-version}</version>
            </dependency>
            <dependency>
                <groupId>org.mybatis</groupId>
                <artifactId>mybatis-spring</artifactId>
                <version>${mybatis-spring-version}</version>
            </dependency>
            <dependency>
                <groupId>log4j</groupId>
                <artifactId>log4j</artifactId>
                <version>${log4j-version}</version>
            </dependency>
            <dependency>
                <groupId>org.springframework</groupId>
                <artifactId>spring-context</artifactId>
                <version>${spring-version}</version>
            </dependency>
            <dependency>
                <groupId>org.aspectj</groupId>
                <artifactId>aspectjweaver</artifactId>
                <version>${aspectjweaver-version}</version>
            </dependency>
            <dependency>
                <groupId>org.springframework</groupId>
                <artifactId>spring-aop</artifactId>
                <version>${spring-version}</version>
            </dependency>
            <dependency>
                <groupId>org.springframework</groupId>
                <artifactId>spring-webmvc</artifactId>
                <version>${spring-version}</version>
            </dependency>
            <dependency>
                <groupId>com.fasterxml.jackson.core</groupId>
                <artifactId>jackson-databind</artifactId>
                <version>${jackson-databind-version}</version>
            </dependency>
            <dependency>
                <groupId>com.aliyun</groupId>
                <artifactId>dysmsapi20170525</artifactId>
                <version>${dysmsapi20170525-version}</version>
            </dependency>
            <dependency>
                <groupId>org.springframework.data</groupId>
                <artifactId>spring-data-redis</artifactId>
                <version>${spring-data-redis-version}</version>
            </dependency>
            <dependency>
                <groupId>redis.clients</groupId>
                <artifactId>jedis</artifactId>
                <version>${jedis-version}</version>
            </dependency>
            <dependency>
                <groupId>org.slf4j</groupId>
                <artifactId>slf4j-simple</artifactId>
                <version>${slf4j-simple-version}</version>
            </dependency>
            <dependency>
                <groupId>com.github.pagehelper</groupId>
                <artifactId>pagehelper</artifactId>
                <version>${pagehelper-version}</version>
            </dependency>
            <dependency>
                <groupId>com.aliyun.oss</groupId>
                <artifactId>aliyun-sdk-oss</artifactId>
                <version>${aliyun-sdk-oss-version}</version>
            </dependency>
        </dependencies>
    </dependencyManagement>
</project>
三、maven的配置类加注解的方式进行SSM整合
在Mapper层和Service层配置Spring,在web层配置Spring MVC和web.xml
1、MpperConfig类(spring)
1.1、加载外部配置文件(没写)
1.2、配置数据源
1.3、配置SQLSessionFactoryBean
1.4、配置MapperScanConfiguar
package com.shangma.cn.config;

import com.alibaba.druid.pool.DruidDataSource;
import com.github.pagehelper.PageInterceptor;
import org.apache.ibatis.logging.log4j.Log4jImpl;
import org.mybatis.spring.SqlSessionFactoryBean;
import org.mybatis.spring.mapper.MapperScannerConfigurer;
import org.springframework.context.annotation.Bean;
import org.springframework.context.annotation.Configuration;

@Configuration
public class MapperConfig {


    /**
     * 配置数据源
     * @return
     */
    @Bean
    public DruidDataSource dataSource(){
        DruidDataSource dataSource =new DruidDataSource();
        dataSource.setDriverClassName("com.mysql.jdbc.Driver");
        dataSource.setUrl("jdbc:mysql://localhost:3306/mavenssm");
        dataSource.setUsername("root");
        dataSource.setPassword("root");
        return dataSource;
    }

    /**
     * 配置SQLSessionFactory,加载mybatis配置文件
     * @return
     */
    @Bean
    public SqlSessionFactoryBean sessionFactory(){
        SqlSessionFactoryBean sessionFactory=new SqlSessionFactoryBean();
        sessionFactory.setDataSource(dataSource());

        return sessionFactory;
    }

    /**
     * 配置mapper扫描
     * @return
     */
    @Bean
    public MapperScannerConfigurer mapperScannerConfigurer(){
        MapperScannerConfigurer mapperScannerConfigurer = new MapperScannerConfigurer();
        mapperScannerConfigurer.setBasePackage("com.shangma.cn.mapper");
        return mapperScannerConfigurer;
    }

}
2、ServiceConfig类(spring)
2.1、配置包扫描
2.2、配置事务管理器
2.3、配置事务驱动
package com.shangma.cn.config;

import com.alibaba.druid.pool.DruidDataSource;
import org.springframework.beans.factory.annotation.Autowired;
import org.springframework.context.annotation.Bean;
import org.springframework.context.annotation.ComponentScan;
import org.springframework.context.annotation.Configuration;
import org.springframework.jdbc.datasource.DataSourceTransactionManager;
import org.springframework.transaction.annotation.EnableTransactionManagement;
import org.springframework.web.cors.CorsConfiguration;
import org.springframework.web.cors.CorsConfigurationSource;
import org.springframework.web.cors.UrlBasedCorsConfigurationSource;
import org.springframework.web.filter.CorsFilter;

/**
 * @author: JAVASM
 * @className: ServiceConfig
 * @description:
 * @date: 2021/6/14 13:03
 * @version: 0.1
 * @since: jdk1.8
 */
@Configuration
@ComponentScan(basePackages = {"com.shangma.cn.service"})//包扫描
@EnableTransactionManagement//开启事务注解驱动
public class ServiceConfig {

    @Autowired
    private DruidDataSource dataSource;

    /**
     * 事务管理器
     * @return
     */
    @Bean
    public DataSourceTransactionManager transactionManager(){
        DataSourceTransactionManager transactionManager = new DataSourceTransactionManager();
        transactionManager.setDataSource(dataSource);
        return transactionManager;
    }

}
3、WebConfig类(spring mvc)
3.1、配置包扫描
3.2、配置mvc的注解驱动
package com.shangma.cn.config;

import com.shangma.cn.interceptor.LoginInterceptor;
import org.springframework.context.annotation.Bean;
import org.springframework.context.annotation.ComponentScan;
import org.springframework.context.annotation.Configuration;
import org.springframework.data.redis.connection.RedisConnectionFactory;
import org.springframework.data.redis.connection.jedis.JedisConnectionFactory;
import org.springframework.data.redis.core.RedisTemplate;
import org.springframework.data.redis.core.StringRedisTemplate;
import org.springframework.web.servlet.config.annotation.CorsRegistry;
import org.springframework.web.servlet.config.annotation.EnableWebMvc;
import org.springframework.web.servlet.config.annotation.InterceptorRegistry;
import org.springframework.web.servlet.config.annotation.WebMvcConfigurer;
import redis.clients.jedis.JedisPoolConfig;

/**
 * @author: JAVASM
 * @className: WebConfig
 * @description:
 * @date: 2021/6/14 13:04
 * @version: 0.1
 * @since: jdk1.8
 */
@ComponentScan(basePackages = {"com.shangma.cn.controller", "com.shangma.cn.exception"})
@EnableWebMvc//开启MVC注解驱动
@Configuration//加入容器
public class WebConfig implements WebMvcConfigurer {


}
4、MyWebApplnitalizer类(web.xml)
4.1、加载spring的配置类
4.2、加载spring mvc的配置类
4.3、设置开启文件上传
4.4、设置Filter解决乱码问题(没写)
package com.shangma.cn;

import com.shangma.cn.config.MapperConfig;
import com.shangma.cn.config.ServiceConfig;
import com.shangma.cn.config.WebConfig;
import org.springframework.context.annotation.ComponentScan;
import org.springframework.web.context.WebApplicationContext;
import org.springframework.web.filter.DelegatingFilterProxy;
import org.springframework.web.servlet.support.AbstractAnnotationConfigDispatcherServletInitializer;
import org.springframework.web.servlet.support.AbstractDispatcherServletInitializer;

import javax.servlet.Filter;
import javax.servlet.MultipartConfigElement;
import javax.servlet.ServletRegistration;

/**
 * @author: JAVASM
 * @className: MyWebAppInitializer
 * @description:
 * @date: 2021/6/14 19:16
 * @version: 0.1
 * @since: jdk1.8
 */
public class MyWebAppInitializer extends AbstractAnnotationConfigDispatcherServletInitializer {
    /**
     * 加载父容器的配置类
     * @return
     */
    @Override
    protected Class<?>[] getRootConfigClasses() {
        return new Class[]{MapperConfig.class, ServiceConfig.class};
    }

    /**
     * 加载子容器的配置类
     * @return
     */
    @Override
    protected Class<?>[] getServletConfigClasses() {
        return new Class[]{WebConfig.class};
    }

    /**
     * 表示设置DispatcherServlet路径
     * @return
     */
    @Override
    protected String[] getServletMappings() {
        return new String[]{"/"};
    }

    /**
     * 文件上传
     * @param registration
     */
    @Override
    protected void customizeRegistration(ServletRegistration.Dynamic registration) {
        registration.setMultipartConfig(new MultipartConfigElement(""));
    }


}
四、逆向工程生成和mybatis的日志打印
使用逆向工程,能够一键生成entity层和mapper层的代码,CV大法到相应的位置
因为使用的是配置类的方式进行SSM的整合,所以没有了配置文件,因此在配置SQLSessionFactoryBean时并没有对mybatis的日志打印进行设置
配置文件在配置类中都有对应的写法,导入log4j的配置文件,修改后的MpperConfig类如下:
package com.shangma.cn.config;

import com.alibaba.druid.pool.DruidDataSource;
import com.github.pagehelper.PageInterceptor;
import org.apache.ibatis.logging.log4j.Log4jImpl;
import org.mybatis.spring.SqlSessionFactoryBean;
import org.mybatis.spring.mapper.MapperScannerConfigurer;
import org.springframework.context.annotation.Bean;
import org.springframework.context.annotation.Configuration;

/**
 * @author: JAVASM
 * @className: MapperConfig
 * @description:
 * @date: 2021/6/14 13:02
 * @version: 0.1
 * @since: jdk1.8
 */
@Configuration
public class MapperConfig {

    /**
     * 配置数据源
     * @return
     */
    @Bean
    public DruidDataSource dataSource(){
        DruidDataSource dataSource =new DruidDataSource();
        dataSource.setDriverClassName("com.mysql.jdbc.Driver");
        dataSource.setUrl("jdbc:mysql://localhost:3306/mavenssm");
        dataSource.setUsername("root");
        dataSource.setPassword("root");
        return dataSource;
    }

    /**
     * 配置SQLSessionFactory,加载mybatis配置文件
     * @return
     */
    @Bean
    public SqlSessionFactoryBean sessionFactory(){
        SqlSessionFactoryBean sessionFactory=new SqlSessionFactoryBean();
        sessionFactory.setDataSource(dataSource());
        //设置mybatis的日志
        org.apache.ibatis.session.Configuration configuration = new org.apache.ibatis.session.Configuration();
        configuration.setLogImpl(Log4jImpl.class);
        sessionFactory.setConfiguration(configuration);

        return sessionFactory;
    }

    /**
     * 配置mapper扫描
     * @return
     */
    @Bean
    public MapperScannerConfigurer mapperScannerConfigurer(){
        MapperScannerConfigurer mapperScannerConfigurer = new MapperScannerConfigurer();
        mapperScannerConfigurer.setBasePackage("com.shangma.cn.mapper");
        return mapperScannerConfigurer;
    }

}
五、发送手机验证码
package com.shangma.cn.controller;

import com.shangma.cn.common.AxiosResult;
import com.shangma.cn.common.AxiosStatus;
import com.shangma.cn.entity.Employee;
import com.shangma.cn.exception.MyLoginException;
import com.shangma.cn.factory.AsyncFactory;
import com.shangma.cn.pool.AsyncManager;
import com.shangma.cn.service.EmployeeService;
import com.shangma.cn.utils.RandomCodeUtil;
import com.shangma.cn.utils.SmsUtil;
import com.shangma.cn.utils.UploadUtil;
import org.springframework.beans.factory.annotation.Autowired;
import org.springframework.data.redis.core.StringRedisTemplate;
import org.springframework.util.StringUtils;
import org.springframework.web.bind.annotation.*;

import javax.servlet.http.HttpSession;
import javax.servlet.http.Part;
import java.io.IOException;
import java.util.Map;
import java.util.concurrent.TimeUnit;

/**
 * @author: JAVASM
 * @className: CommonController
 * @description:
 * @date: 2021/6/14 19:15
 * @version: 0.1
 * @since: jdk1.8
 */
@RestController
@RequestMapping("common")
public class CommonController {

    @Autowired
    private EmployeeService employeeService;

    @RequestMapping("getCode/{phone}")
    public String getCode(@PathVariable String phone){
        System.out.println(phone);
        Employee employee = employeeService.findByPhone(phone);
        System.out.println(employee);
        if (employee==null) {
            return "NOT_Employee";
        }
        //生成验证码
        String code = RandomCodeUtil.munCode();
        //发送短信,单独的Java不能实现发送手机验证码
        //所以需要依赖于第三方的SDK,本案例使用的是阿里云所提供的服务
                SmsUtil.sendSms(phone,code);
        return "success";
    }
}
六、使用异步线程池发送手机验证码
发送短信是一个很耗时间的操作,非常容易造成线程的阻塞,所以我们可以把发送这个操作发到子线程中,并且发送验证码这个操作过程复杂
需要 一定的代码量,而且耦合度高、使用的次数多,所以我们可以使用工厂模式降低代码的重复和解耦。
还有就是返回给前端的值,一般都会返回json形式的字符串,并且在前端用于条件判断的多是数字(状态码),因此,我们先设置好返回值类,定义好返回值(枚举类)
定义状态码
View Code定义返回值类
package com.shangma.cn.common;

import com.fasterxml.jackson.annotation.JsonInclude;
import lombok.Data;

@Data
public class AxiosResult<T> {

    private int status;
    private String message;
    private T data;

    /**
     * 私有化构造函数
     */
    private AxiosResult() {

    }

    /**
     * 返回状态码不带数据
     * @param <T>
     * @return
     */
    public static <T> AxiosResult<T> success() {
        return setData(AxiosStatus.OK, null);
    }

    /**
     * 返回状态码带数据
     * @param t
     * @param <T>
     * @return
     */
    public static <T> AxiosResult<T> success(T t) {
        return setData(AxiosStatus.OK, t);
    }

    /**
     * 返回别的类型的状态码不带数据
     * @param axiosStatus
     * @param <T>
     * @return
     */
    public static <T> AxiosResult<T> success(AxiosStatus axiosStatus) {
        return setData(axiosStatus, null);
    }

    /**
     * 返回别的类型的状态码带数据
     * @param axiosStatus
     * @param t
     * @param <T>
     * @return
     */
    public static <T> AxiosResult<T> success(AxiosStatus axiosStatus, T t) {
        return setData(axiosStatus, t);
    }

    public static <T> AxiosResult<T> error() {
        return setData(AxiosStatus.ERROR, null);
    }

    public static <T> AxiosResult<T> error(AxiosStatus axiosStatus) {
        return setData(axiosStatus, null);
    }

    public static <T> AxiosResult<T> error(AxiosStatus axiosStatus, T t) {
        return setData(axiosStatus, t);
    }

    public static <T> AxiosResult<T> setData(AxiosStatus axiosStatus, T t) {
        AxiosResult<T> tAxiosResult = new AxiosResult<>();
        tAxiosResult.setStatus(axiosStatus.getStatus());
        tAxiosResult.setMessage(axiosStatus.getMessage());
        tAxiosResult.setData(t);
        return tAxiosResult;
    }
}
线程池
package com.shangma.cn.pool;

import java.util.concurrent.ScheduledThreadPoolExecutor;
import java.util.concurrent.TimeUnit;

/**
 * 使用单例模式设计异步线程池
 */
public class AsyncManager {

    private static ScheduledThreadPoolExecutor scheduledThreadPoolExecutor;

    private static AsyncManager asyncManager;

    private AsyncManager (){
        scheduledThreadPoolExecutor = new ScheduledThreadPoolExecutor(50);
    }

    /**
     * 创建单例对象
     * @return
     */
    public static AsyncManager getInstance(){
        if (asyncManager==null) {
            return new AsyncManager();
        }
        return asyncManager;
    }


    /**
     * 使用线程池执行内容
     * 这种执行没有延迟时间
     *
     * @param runnable
     */
    public void execute(Runnable runnable) {
        scheduledThreadPoolExecutor.execute(runnable);
    }

    /**
     * 使用线程执行代码
     * schedule方法可以延迟一段时间后再去执行Runnable中的代码
     * @param runnable 要执行的代码
     * @param seconds 延迟的时间
     */
    public void schedule(Runnable runnable,long seconds){
        scheduledThreadPoolExecutor.schedule(runnable,seconds, TimeUnit.SECONDS);
    }

    /**
     * 关闭线程池
     */
    public void release(){
        scheduledThreadPoolExecutor.shutdownNow();
    }
}
工厂类
package com.shangma.cn.factory;

import com.aliyun.dysmsapi20170525.Client;
import com.aliyun.dysmsapi20170525.models.SendSmsRequest;
import com.aliyun.teaopenapi.models.Config;
import com.shangma.cn.utils.SmsUtil;
import lombok.extern.log4j.Log4j;

import java.io.IOException;
import java.util.Properties;

/**
 * 异步工厂(使用工厂模式完成功能)
 * 1、发送手机验证码
 */
@Log4j
public class AsyncFactory {

    private static Properties properties;

    static {
        //加载配置文件
        try {
            properties = new Properties();
            properties.load(SmsUtil.class.getClassLoader().getResourceAsStream("aliyun.properties"));
        } catch (IOException e) {
            e.printStackTrace();
        }
    }

    /**
     *
     * @param phone
     * @param code
     * @return
     */
    public static Runnable sendPhoneCode(String phone, String code){
        Config config = new Config()
                // 您的AccessKey ID
                .setAccessKeyId(properties.getProperty("aliyun.accessKeyId"))
                // 您的AccessKey Secret
                .setAccessKeySecret(properties.getProperty("aliyun.accessKeySecret"));
        // 访问的域名
        config.endpoint = properties.getProperty("aliyun.endpoint");
        try {
            Client client = new Client(config);
            SendSmsRequest sendSmsRequest = new SendSmsRequest()
                    .setPhoneNumbers(phone)
                    .setSignName(properties.getProperty("aliyun.signName"))
                    .setTemplateCode(properties.getProperty("aliyun.templateCode"))
                    .setTemplateParam("{\"code\":" + code + "}");
            // 复制代码运行请自行打印 API 的返回值
            Runnable runnable = ()->{
                //当前线程名
                System.out.println("当前线程为:"+Thread.currentThread().getName());
                try {
                    client.sendSms(sendSmsRequest);
                } catch (Exception e) {
                    e.printStackTrace();
                }
            };
            return runnable;
        } catch (Exception e) {
            log.error(phone + "+手机验证码发送失败:" + e.getMessage());
            e.printStackTrace();
        }
        return ()->{};
    }

}
修改后的发送手机验证码
    @RequestMapping("getCode/{phone}")
    public AxiosResult<Void> getCode(@PathVariable String phone){
        System.out.println(phone);
        Employee employee = employeeService.findByPhone(phone);
        System.out.println(employee);
        if (employee==null) {
            return AxiosResult.error();
        }
        //生成验证码
        String code = String.valueOf((int) (Math.random() * (999999 - 100000 + 1) + 100000));
        //发送短信,放入子线程中
        AsyncManager.getInstance().schedule(AsyncFactory.sendPhoneCode(phone,code),2L);
        return AxiosResult.success();
    }
七、SpringDataRedis的使用
在进行登录验证的时候,我们不仅需要从前端传递过来的验证码,还需要我们自己生成的验证码进行对照,对于验证码我们不可能永久保存,若是放到MySQL中,不仅是存取麻烦,还有对数据库的大量操作会造成数据库的崩溃,这时就需要用到对临时数据的存储Redis数据库。
在spring mvc中对Redis的操作有两种,使用RedisTemplate操作Redis和使用StringRedisTemplate操作Redis,这两种无论是哪一种都需要Redis工厂的支持。
在WebConfig类中配置
package com.shangma.cn.config;

import com.shangma.cn.interceptor.LoginInterceptor;
import org.springframework.context.annotation.Bean;
import org.springframework.context.annotation.ComponentScan;
import org.springframework.context.annotation.Configuration;
import org.springframework.data.redis.connection.RedisConnectionFactory;
import org.springframework.data.redis.connection.jedis.JedisConnectionFactory;
import org.springframework.data.redis.core.RedisTemplate;
import org.springframework.data.redis.core.StringRedisTemplate;
import org.springframework.web.servlet.config.annotation.CorsRegistry;
import org.springframework.web.servlet.config.annotation.EnableWebMvc;
import org.springframework.web.servlet.config.annotation.InterceptorRegistry;
import org.springframework.web.servlet.config.annotation.WebMvcConfigurer;
import redis.clients.jedis.JedisPoolConfig;


@ComponentScan(basePackages = {"com.shangma.cn.controller", "com.shangma.cn.exception"})
@EnableWebMvc//开启MVC注解驱动
@Configuration//加入容器
public class WebConfig implements WebMvcConfigurer {

    /**
     * Redis工厂
     * 如果是本机,可以什么都不配置
     * @return
     */
    @Bean
    public RedisConnectionFactory redisConnectionFactory() {
        JedisConnectionFactory jedisConnectionFactory = new JedisConnectionFactory();
        return jedisConnectionFactory;
    }

    /**
     * 使用RedisTemplate操作Redis
     * @return
     */
//    @Bean
//    public RedisTemplate redisTemplate(){
//        RedisTemplate redisTemplate = new RedisTemplate();
//        redisTemplate.setConnectionFactory(redisConnectionFactory());
//        return redisTemplate;
//    }

    /**
     * 使用StringRedisTemplate操作Redis
     * @return
     */
    @Bean
    public StringRedisTemplate stringRedisTemplate() {
        StringRedisTemplate stringRedisTemplate = new StringRedisTemplate();
        stringRedisTemplate.setConnectionFactory(redisConnectionFactory());
        return stringRedisTemplate;
    }

}
登录验证
//在发送验证码方法中添加
//在生成验证码之后
//生成验证码,存入Redis,设置2分钟自动销毁
   stringRedisTemplate.opsForValue().set(phone,code,2, TimeUnit.MINUTES);

    /**
     * 登录验证
     * @param map
     * @param session
     * @return
     */
    @RequestMapping("doLogin")
    public AxiosResult<Void> doLogin(@RequestBody Map<String,String>map, HttpSession session){
        System.out.println(map);
        String phone = map.get("phone");
        String code = map.get("code");
        String s = stringRedisTemplate.opsForValue().get(phone);
        if (s.equals(code)) {
            Employee employee = employeeService.findByPhone(phone);
            //将登陆信息放入session
            session.setAttribute("user",employee);
            //清除
            stringRedisTemplate.delete(phone);
            System.out.println(AxiosResult.success().getData());
            return AxiosResult.success();
        }
         return AxiosResult.error();
    }
八、Redis的连接池
在WebConfig类中配制
package com.shangma.cn.config;

import com.shangma.cn.interceptor.LoginInterceptor;
import org.springframework.context.annotation.Bean;
import org.springframework.context.annotation.ComponentScan;
import org.springframework.context.annotation.Configuration;
import org.springframework.data.redis.connection.RedisConnectionFactory;
import org.springframework.data.redis.connection.jedis.JedisConnectionFactory;
import org.springframework.data.redis.core.RedisTemplate;
import org.springframework.data.redis.core.StringRedisTemplate;
import org.springframework.web.servlet.config.annotation.CorsRegistry;
import org.springframework.web.servlet.config.annotation.EnableWebMvc;
import org.springframework.web.servlet.config.annotation.InterceptorRegistry;
import org.springframework.web.servlet.config.annotation.WebMvcConfigurer;
import redis.clients.jedis.JedisPoolConfig;

/**
 * @author: JAVASM
 * @className: WebConfig
 * @description:
 * @date: 2021/6/14 13:04
 * @version: 0.1
 * @since: jdk1.8
 */
@ComponentScan(basePackages = {"com.shangma.cn.controller", "com.shangma.cn.exception"})
@EnableWebMvc//开启MVC注解驱动
@Configuration//加入容器
public class WebConfig implements WebMvcConfigurer {

    /**
     * jedis线程池
     * @return
     */
    @Bean
    public JedisPoolConfig jedisPoolConfig(){
        JedisPoolConfig jedisPoolConfig = new JedisPoolConfig();
        jedisPoolConfig.setMaxTotal(50);
        jedisPoolConfig.setMaxIdle(50);
        return jedisPoolConfig;
    }

    /**
     * Redis工厂
     * 如果是本机,可以什么都不配置
     * @return
     */
    @Bean
    public RedisConnectionFactory redisConnectionFactory() {
        JedisConnectionFactory jedisConnectionFactory = new JedisConnectionFactory(jedisPoolConfig());
        return jedisConnectionFactory;
    }

    /**
     * 使用RedisTemplate操作Redis
     * @return
     */
//    @Bean
//    public RedisTemplate redisTemplate(){
//        RedisTemplate redisTemplate = new RedisTemplate();
//        redisTemplate.setConnectionFactory(redisConnectionFactory());
//        return redisTemplate;
//    }

    /**
     * 使用StringRedisTemplate操作Redis
     * @return
     */
    @Bean
    public StringRedisTemplate stringRedisTemplate() {
        StringRedisTemplate stringRedisTemplate = new StringRedisTemplate();
        stringRedisTemplate.setConnectionFactory(redisConnectionFactory());
        return stringRedisTemplate;
    }


}
九、使用异常处理的方式来解决不满足条件的问题
异常可以阻止程序的执行,我们通过自定异常,在捕捉处理这个异常,就能达到解决不满足条件时程序的执行问题
定义异常
package com.shangma.cn.exception;

import com.shangma.cn.common.AxiosStatus;
import lombok.AllArgsConstructor;
import lombok.Data;

@Data
@AllArgsConstructor
public class MyLoginException extends RuntimeException{

    private AxiosStatus axiosStatus;

}
捕捉处理异常
package com.shangma.cn.exception;

import com.shangma.cn.common.AxiosResult;
import org.springframework.web.bind.annotation.ExceptionHandler;
import org.springframework.web.bind.annotation.RestControllerAdvice;


@RestControllerAdvice
public class MyHandler {

    @ExceptionHandler(MyLoginException.class)
    public AxiosResult<Void> myHandler(MyLoginException e){
        return AxiosResult.error(e.getAxiosStatus());
    }
}
完整版的登录
package com.shangma.cn.controller;

import com.shangma.cn.common.AxiosResult;
import com.shangma.cn.common.AxiosStatus;
import com.shangma.cn.entity.Employee;
import com.shangma.cn.exception.MyLoginException;
import com.shangma.cn.factory.AsyncFactory;
import com.shangma.cn.pool.AsyncManager;
import com.shangma.cn.service.EmployeeService;
import com.shangma.cn.utils.RandomCodeUtil;
import com.shangma.cn.utils.SmsUtil;
import com.shangma.cn.utils.UploadUtil;
import org.springframework.beans.factory.annotation.Autowired;
import org.springframework.data.redis.core.StringRedisTemplate;
import org.springframework.util.StringUtils;
import org.springframework.web.bind.annotation.*;

import javax.servlet.http.HttpSession;
import javax.servlet.http.Part;
import java.io.IOException;
import java.util.Map;
import java.util.concurrent.TimeUnit;

/**
 * @author: JAVASM
 * @className: CommonController
 * @description:
 * @date: 2021/6/14 19:15
 * @version: 0.1
 * @since: jdk1.8
 */
@RestController
@RequestMapping("common")
public class CommonController {

    @Autowired
    private EmployeeService employeeService;

    @Autowired
    private StringRedisTemplate stringRedisTemplate;

    /**
     * 发送验证码
     * @param phone
     * @return
     */
    @RequestMapping("getCode/{phone}")
    public AxiosResult<Void> getCode(@PathVariable String phone){
        System.out.println(phone);
        Employee employee = employeeService.findByPhone(phone);
        System.out.println(employee);
        if (employee==null) {
            throw new MyLoginException(AxiosStatus.PHONE_NOT_FOUND);
        }
        //生成验证码,存入Redis,设置2分钟自动销毁
        String code = RandomCodeUtil.munCode();
        stringRedisTemplate.opsForValue().set(phone,code,2, TimeUnit.MINUTES);
        //发送短信,放入子线程中
        AsyncManager.getInstance().schedule(AsyncFactory.sendPhoneCode(phone,code),2L);
        return AxiosResult.success();
    }

    /**
     * 登录验证
     * @param map
     * @param session
     * @return
     */
    @RequestMapping("doLogin")
    public AxiosResult<Void> doLogin(@RequestBody Map<String,String>map, HttpSession session){
        System.out.println(map);
        String phone = map.get("phone");
        String code = map.get("code");
        String s = stringRedisTemplate.opsForValue().get(phone);
        if (s.equals(code)) {
            Employee employee = employeeService.findByPhone(phone);
            //将登陆信息放入session
            session.setAttribute("user",employee);
            //清除
            stringRedisTemplate.delete(phone);
            System.out.println(AxiosResult.success().getData());
            return AxiosResult.success();
        }
        throw new MyLoginException(AxiosStatus.CODE_CHECK_ERROR);
    }
}
十、手动打印日志
在项目发布后没有控制台让我们查看BUG,此时我们就需要记录程序的报错信息
一般我们使用log4j来记录错误信息
先导入lombok的jar,在需要记录日志的类上加上@Log4j就可以直接使用了
例如
                try {
                    client.sendSms(sendSmsRequest);
                } catch (Exception e) {
                    e.printStackTrace();
                    log.error(phone + "+手机验证码发送失败:" + e.getMessage());
                }
十一、跨域问题的解决以及登录拦截的实现
十二、分页查询以及日期时区问题的解决
前端部分页面
                    <div class="box-body">
                        <table id="example2" class="table table-bordered table-hover">
                            <thead>
                            <tr>
                                <th><input type="checkbox" @change="chooseAll"/>全选</th>
                                <th>id</th>
                                <th>头像</th>
                                <th>姓名</th>
                                <th>手机号</th>
                                <th>工资</th>
                                <th>地址</th>
                                <th>入职时间</th>
                                <th>操作</th>
                            </tr>
                            </thead>
                            <tbody ref="table_Body">
                            <tr v-for="(item,index) in tableData" :key="index">
                                <td><input type="checkbox" class="check_td"
                                           @click="chooseDeleteItem(item.employeeId,$event)"></td>
                                <td class="id_td">{{item.employeeId}}</td>
                                <td><img :src="item.employeeAvatar" width="35px" height="35px"></td>
                                <td>{{item.employeeName}}</td>
                                <td>{{item.employeePhone}}</td>
                                <td>{{item.employeeSalary}}</td>
                                <td>{{item.employeeAddress}}</td>
                                <td>{{item.employeeTime}}</td>
                                <td>
                                    <button class="btn btn-sm  btn-info" @click="findById(item.employeeId)"
                                            data-toggle="modal" data-target="#editDialog">
                                        编辑
                                    </button>
                                    <button class="btn btn-sm  btn-warning" @click="doDeleteBtn(item.employeeId)"
                                            data-toggle="modal" data-target="#delModal">
                                        删除
                                    </button>
                                </td>
                            </tr>
                            </tbody>

                        </table>
                    </div>
前端部分JS代码
let vue = new Vue({
    el: "#app",
    data: {
        tableData: [],
        currentPage: 1,
        pageSize: 5,
        total: 0,
        imgUrl: '',
        formData: {},
        deleteIds: []
    },
    created() {
        this.findPage();
    },
    methods: {
        //查询全部
        findAll() {
            myaxios.get(`employee/findAll`).then(response => {
                let {data} = response;
                this.tableData = data;
            })
        },
        //分页查询
        findPage() {
            myaxios.get(`employee/findPage?currentPage=${this.currentPage}&pageSize=${this.pageSize}`).then(response => {
                let {total, list} = response;
                this.total = total;
                this.tableData = list;
            })
        },
        //分页回掉函数
        pageChange(page) {
            this.currentPage = page;
            var elementsByClassName = this.$refs.table_Body.getElementsByClassName("check_td");
            for (let i = 0; i < elementsByClassName.length; i++) {
                elementsByClassName[i].checked=false;
            }
            this.findPage();
        }
}
后台
Service层
    @Override
    public List<Employee> findAll() {
        List<Employee> employees = employeeMapper.selectByExample(null);
        return employees;
    }

    @Override
    public PageBean<Employee> findPage() {
        List<Employee> employees = employeeMapper.selectByExample(null);
        PageInfo<Employee> pageInfo = new PageInfo<>(employees);
        return PageBean.init(pageInfo.getTotal(),employees);
    }
Controller层
    /**
     * 查询全部
     *
     * @return
     */
    @GetMapping("findAll")
    public AxiosResult<List<Employee>> findAll() {
        List<Employee> all = employeeService.findAll();
        return AxiosResult.success(all);
    }

    /**
     * 分页查询
     *
     * @param currentPage 当前页
     * @param pageSize    每一页大小
     * @return
     */
    @GetMapping("findPage")
    public AxiosResult<PageBean<Employee>> findPage(int currentPage, int pageSize) {
        //开启分页
        PageHelper.startPage(currentPage, pageSize);
        PageBean<Employee> all = employeeService.findPage();
        return AxiosResult.success(all);
    }
这里我们查询后,会发现时间会和数据库中的不同,这是因为数据库的DateTime类型没有时区(time zone)信息,因此,存入的是本地时间,并且丢掉了时区信息。如果你把数据库服务器的时区改了,或者把应用服务器的时区改了,读出来的日期和时间就是错误的。所以这里我们要上设置时区,
在实体类相应的时间属性上加上注解
@JsonFormat(pattern = "yyyy-MM-dd",timezone = "CMT+8")
因为是maven工程,在依赖了相关Jackson的jar后,会自动帮我们依赖
十三、文件上传——使用阿里云对象存储
前端部分JS代码
        //选择图片上传
        chooseAvatar(e) {
            let file = e.target.files[0];
            let formData = new FormData();
            formData.append("avatar", file);
            myaxios.post("common/upload/", formData, {headers: {"Content-Type": "multipart/form-data"}})
                .then(response => {
                    // console.log(response)
                    this.imgUrl = response;
                    this.formData.employeeAvatar = response;
                })
        }
工具类(需要依赖阿里云相关jar)
package com.shangma.cn.utils;

import com.aliyun.oss.OSS;
import com.aliyun.oss.OSSClientBuilder;

import java.io.IOException;
import java.io.InputStream;
import java.util.Properties;

/**
 * @author: JAVASM
 * @className: UploadUtil
 * @description:
 * @date: 2021/6/15 21:34
 * @version: 0.1
 * @since: jdk1.8
 */
public class UploadUtil {

    private static Properties properties;

    static {
        //加载配置文件
        try {
            properties = new Properties();
            properties.load(SmsUtil.class.getClassLoader().getResourceAsStream("aliyun-oss.properties"));
        } catch (IOException e) {
            e.printStackTrace();
        }
    }

    /**
     * 文件上传
     * @param fileName 文件名
     * @param in 流
     * @return
     */
    public static String upload(String fileName, InputStream in) {
        String endpoint = properties.getProperty("aliyun-oss.endpoint");
        String accessKeyId = properties.getProperty("aliyun-oss.accessKeyId");
        String accessKeySecret = properties.getProperty("aliyun-oss.accessKeySecret");
        OSS ossClient = new OSSClientBuilder().build(endpoint, accessKeyId, accessKeySecret);
        //第一参数: 表示bucket名称
        //第二个参数: 文件名称 携带后缀
        ossClient.putObject(properties.getProperty("aliyun-oss.bucketName"), fileName, in);
        ossClient.shutdown();
        String url = properties.getProperty("aliyun-oss.imgUrl") + fileName;
        return url;
    }
}
Controller层
    /**
     * 上传文件
     * @param avatar
     * @return
     * @throws IOException
     */
    @RequestMapping("upload")
    public AxiosResult<String> upload(@RequestPart Part avatar) throws IOException {
        //重命名
        // TODO: 2021/6/15 不能上传文件
        System.out.println(avatar);
        String fileName = System.nanoTime() + "." + StringUtils.getFilenameExtension(avatar.getSubmittedFileName());
        String url = UploadUtil.upload(fileName, avatar.getInputStream());
        return AxiosResult.success(url);
    }
十四、添加员工信息
前端页面
<div class="box-header"> <div class="form-group form-inline"> <div class="btn-group"> <button type="button" class="btn btn-danger" title="新建" @click="formData={},imgUrl=''" data-toggle="modal" data-target="#editDialog">新建 </button> <button type="button" class="btn btn-success" data-toggle="modal" data-target="#delModal">批量删除 </button> <button type="button" class="btn btn-primary">导入</button> <button type="button" class="btn btn-info">导出</button> </div> </div> </div> 模态框 <!--新建 编辑弹框--> <div class="modal fade" id="editDialog"> <div class="modal-dialog modal-lg edit-dialog"> <div class="modal-content"> <div class="modal-header"> <h4 class="modal-title">员工操作</h4> <button type="button" class="close" data-dismiss="modal" aria-label="Close"> <span aria-hidden="true">×</span> </button> </div> <div class="modal-body"> <div class="card-body"> <div class="form-group row"> <label class="col-sm-2 col-form-label">员工姓名:</label> <div class="col-sm-10"> <input type="text" v-model="formData.employeeName" class="form-control" placeholder="请输入员工姓名"> </div> </div> <div class=" form-group row"> <label class="col-sm-2 col-form-label">员工手机:</label> <div class="col-sm-10"> <input type="text" v-model="formData.employeePhone" class="form-control" placeholder="请输入员工手机"/> </div> </div> <div class=" form-group row"> <label class="col-sm-2 col-form-label">员工工资:</label> <div class="col-sm-10"> <input type="text" v-model="formData.employeeSalary" class="form-control" placeholder="请输入员工工资"/> </div> </div> <div class=" form-group row"> <label class="col-sm-2 col-form-label">员工地址:</label> <div class="col-sm-10"> <input type="text" v-model="formData.employeeAddress" class="form-control" placeholder="请输入员工地址"/> </div> </div> <div class=" form-group row"> <label class="col-sm-2 col-form-label">入职时间:</label> <div class="col-sm-10"> <input id="date" v-model="formData.employeeTime" type="date" class="form-control"/> </div> </div> <div class=" form-group row"> <label class="col-sm-2 col-form-label">员工头像</label> <div class="col-sm-10"> <label class="btn btn-primary"> <input type="file" @change="chooseAvatar" style="display:none;" id="avater"> 上传图片 </label> <img :src="imgUrl" alt="" width="100px" height="100px" style="border: 1px solid #ccc; margin-left: 100px"> </div> </div> </div> </div> <div class="modal-footer "> <button type="button" class="btn btn-default" data-dismiss="modal">取消</button> <button type="button" class="btn btn-success" @click="addOrEdit" data-dismiss="modal">确定</button> </div> </div> </div> </div>
前端JS
        //添加或修改确认按钮
        addOrEdit() {

            if (this.formData.employeeId) {
                //修改
            } else {
                //添加
                //如果没有图片,添加默认图片
                this.formData.employeePassword='123456';
                if (this.formData.employeeAvatar) {
                    myaxios.post(`employee/addEmployee/`, this.formData)
                        .then(response => {
                            this.findPage();
                        });
                } else {
                    this.formData.employeeAvatar = 'https://shangmasanshiqi.oss-cn-beijing.aliyuncs.com/282285958269457.gif';
                    myaxios.post(`employee/addEmployee/`, this.formData)
                        .then(response => {
                            this.findPage();
                        });
                }
            }
        }
Service
    @Override
    public void addEmployee(Employee employee) {
        employeeMapper.insert(employee);
    }
Controller
    /**
     * 添加
     * @param employee
     * @return
     */
    @PostMapping("addEmployee")
    public AxiosResult<Void> addEmployee(@RequestBody Employee employee) {
        employeeService.addEmployee(employee);
        return AxiosResult.success();
    }
十五、改造前端Axios以及解决返回值的问题
自定义Axios,可以解决重复写基本路径、设置是否携带cookie,设置请求时间,设置拦截器(请求之前拦截,返回值响应拦截),
let myaxios = axios.create({
    //设置基础路径
    baseURL:'http://localhost:8080/',
    //设置携带cookie
    withCredentials:true,
    //设置请求时间
    timeout:5000
});

// 请求之前拦截
myaxios.interceptors.request.use(function (config) {
    // config.baseURL='http://localhost:8080/';
    return config;
}, function (error) {
    return Promise.reject(error);
});

// 响应拦截器
myaxios.interceptors.response.use(function (response) {
    console.log(response);
    let{status,massage,data}=response.data;
    if (status==2000){
        //console.log(data)
        return data;
    }
    if (status==4004){
        alert("登录过期,请重新登录")
        location.replace("./login.html");
    }
    else {
        console.log(massage);
        //阻止代码向下执行
        return Promise.reject(false);
    }
}, function (error) {
    return Promise.reject(error);
});
当我们给前端返回数据的时候,data有可能是null,这就有可能在前端产生错误,因此,我们需要在返回数据时进行一次判断,返回不为空的值
我们在返回值进行json序列化的时候,只序列化有数据的,在返回值类AxiosResult上加@JsonInclude(JsonInclude.Include.NON_NULL)就可以进行过滤。
十六、修改员工信息
前端页面同查询和添加
前端JS
        //添加或修改确认按钮
        addOrEdit() {

            if (this.formData.employeeId) {
                //修改
                myaxios.put(`employee/updateEmployee/`, this.formData).then(() => {
                    this.findPage();
                })
            } else {
                //添加
                //如果没有图片,添加默认图片
                this.formData.employeePassword='123456';
                if (this.formData.employeeAvatar) {
                    myaxios.post(`employee/addEmployee/`, this.formData)
                        .then(response => {
                            this.findPage();
                        });
                } else {
                    this.formData.employeeAvatar = 'https://shangmasanshiqi.oss-cn-beijing.aliyuncs.com/282285958269457.gif';
                    myaxios.post(`employee/addEmployee/`, this.formData)
                        .then(response => {
                            this.findPage();
                        });
                }
            }
        },
        //修改按钮点击事件
        findById(id) {
            myaxios.get(`employee/findById/${id}`).then(response => {
                this.formData = response;
                //没有图片添加默认图片,
                if (response.employeeAvatar) {
                    this.imgUrl = response.employeeAvatar;
                } else {
                    this.imgUrl = 'https://shangmasanshiqi.oss-cn-beijing.aliyuncs.com/282285958269457.gif';
                    this.formData.employeeAvatar = 'https://shangmasanshiqi.oss-cn-beijing.aliyuncs.com/282285958269457.gif';
                }
            })
        }
Service
    @Override
    public Employee findById(Integer id) {
        Employee employee = employeeMapper.selectByPrimaryKey(id);
        return employee;
    }

    @Override
    public void update(Employee employee) {
        employeeMapper.updateByPrimaryKey(employee);
    }
Controller
    /**
     * 根据id查询信息
     * @param id
     * @return
     */
    @GetMapping("findById/{id}")
    public AxiosResult<Employee> findById(@PathVariable Integer id) {
        Employee employee = employeeService.findById(id);
        return AxiosResult.success(employee);
    }

    /**
     * 修改
     * @param employee
     * @return
     */
    @RequestMapping("updateEmployee")
    public AxiosResult<Void> updateEmployee(@RequestBody Employee employee){
        employeeService.update(employee);
        return AxiosResult.success();
    }
十七、删除和批量删除员工信息
前端页面同修改,多了一个模态框
<!--删除弹框--> <div class="modal fade" id="delModal"> <div class="modal-dialog"> <div class="modal-content"> <div class="modal-header"> <h4 class="modal-title">温馨提示</h4> <button type="button" class="close" data-dismiss="modal" aria-label="Close"> <span aria-hidden="true">×</span> </button> </div> <div class="modal-body"> 你确定要删除吗? </div> <div class="modal-footer "> <button type="button" class="btn btn-default" data-dismiss="modal">取消</button> <button type="button" @click="delBtn" class="btn btn-success delSure" data-dismiss="modal">确定 </button> </div> </div> </div> </div>
前端JS
        //获取删除元素
        chooseDeleteItem(id, e) {
            if (e.target.checked) {
                this.deleteIds.push(id);
            } else {
                this.deleteIds.splice(this.deleteIds.findIndex(item => item == id, 1))
            }
        },
        //点击删除按钮
        doDeleteBtn(id) {
            //获取checkbox的值
            var elementsByClassName = this.$refs.table_Body.getElementsByClassName("check_td");
            for (let i = 0; i < elementsByClassName.length; i++) {
                elementsByClassName[i].checked=false;
            }
            this.deleteIds=[];
            this.deleteIds.push(id);
        },
        //删除确认按钮
        delBtn(){
            myaxios.delete(`employee/deleteByIds/${this.deleteIds}`).then(()=>{
                console.log(this.tableData.length)
                if (this.tableData.length==1){
                    if (this.currentPage>1){
                        this.currentPage=this.currentPage-1
                    }
                }
                this.findPage()
            })
        },
        //全选
        chooseAll(e){
            if (e.target.checked) {
                var elementsByClassName = this.$refs.table_Body.getElementsByClassName("check_td");
                for (let i = 0; i < elementsByClassName.length; i++) {
                    elementsByClassName[i].checked=true;
                }
                //清空数组
                this.deleteIds=[];
                //添加到数组
                var elementsByClassName1 = this.$refs.table_Body.getElementsByClassName("id_td");
                for (let i = 0; i < elementsByClassName1.length; i++) {
                    this.deleteIds.push(elementsByClassName1[i].outerText);
                }
                console.log(this.deleteIds)
            } else {
                var elementsByClassName = this.$refs.table_Body.getElementsByClassName("check_td");
                for (let i = 0; i < elementsByClassName.length; i++) {
                    elementsByClassName[i].checked=false;
                }
                //清空数组
                this.deleteIds=[];
            }
        }
Service
    @Override
    public void deleteByIds(List<Integer> ids) {
        EmployeeExample employeeExample = new EmployeeExample();
        EmployeeExample.Criteria criteria = employeeExample.createCriteria();
        criteria.andEmployeeIdIn(ids);
        employeeMapper.deleteByExample(employeeExample);
    }
Controller
    @DeleteMapping("deleteByIds/{ids}")
    public AxiosResult<Void> deleteByIds(@PathVariable List<Integer> ids){
        employeeService.deleteByIds(ids);
        return AxiosResult.success();
    }
十八、Excel的导出和导入
引入依赖
<dependency>
<groupId>org.apache.poi</groupId>
<artifactId>poi-ooxml</artifactId>
<version>3.17</version>
</dependency>
导出前端代码
<a type="button"href="http://localhost:8080/common/writeExcel" class="btn btn-info">导出</a>
导出后台代码
    @GetMapping("writeExcel")
    public ResponseEntity<byte []> writeExcel (HttpSession session) throws Exception {
        //1、拿到数据
        List<Employee> list = employeeService.findAll();
        //2、创建workBook
        Workbook workbook = new XSSFWorkbook();
        //3、创建sheet(员工信息sheet)
        Sheet sheet = workbook.createSheet("员工信息表");

        //7、设置一些样式(可选)
        //修改列宽
        sheet.setColumnWidth(3,22*256);
        sheet.setColumnWidth(4,22*256);
        sheet.setColumnWidth(7,60*256);

        //设置单元格样式
        CellStyle cellStyle = workbook.createCellStyle();
        //垂直居中
        cellStyle.setVerticalAlignment(VerticalAlignment.CENTER);
        //水平居中
        cellStyle.setAlignment(HorizontalAlignment.CENTER);
        //字体cellStyle.setFont();

        //4、创建行(数据集合的长度)

        //创建标题行
        Row titleRow = sheet.createRow(0);
        List<String> titles = Arrays.asList("员工ID", "员工名称", "员工地址", "员工手机", "入职时间", "员工密码", "员工工资", "员工头像地址");
        for (int i = 0; i < titles.size(); i++) {
            Cell cell =titleRow.createCell(i);
            cell.setCellValue(titles.get(i));
            cell.setCellStyle(cellStyle);
        }


        //创建内容行
        for (int i = 0; i < list.size(); i++) {
            Employee employee = list.get(i);
            Row row = sheet.createRow(i+1);

            //5、创建每一行中的单元格(一个属性一个单元格)
            Cell idCell = row.createCell(0);
            Cell nameCell = row.createCell(1);
            Cell addressCell = row.createCell(2);
            Cell phoneCell = row.createCell(3);
            Cell timeCell = row.createCell(4);
            Cell passwordCell = row.createCell(5);
            Cell salaryCell = row.createCell(6);
            Cell avatarCell = row.createCell(7);

            //6、填充单元格中的文字
            idCell.setCellValue(employee.getEmployeeId());
            nameCell.setCellValue(employee.getEmployeeName());
            addressCell.setCellValue(employee.getEmployeeAddress());
            phoneCell.setCellValue(employee.getEmployeePhone());
            timeCell.setCellValue(sdf.format(employee.getEmployeeTime()));
            passwordCell.setCellValue(employee.getEmployeePassword());
            salaryCell.setCellValue(employee.getEmployeeSalary());
            avatarCell.setCellValue(employee.getEmployeeAvatar());

        }
//        //8、写到本地
//        FileOutputStream out =new FileOutputStream("E:\\employee.xlsx");
//        workbook.write(out);
//
//        //就近原则关闭资源
//        out.close();
//        workbook.close();


        //在浏览器下载
        ByteArrayOutputStream stream = new ByteArrayOutputStream();
        workbook.write(stream);

        HttpHeaders httpHeaders = new HttpHeaders();
        httpHeaders.setContentDispositionFormData("attachment", URLEncoder.encode("员工信息表.xlsx","utf-8"));
        byte [] bytes = stream.toByteArray();
        ResponseEntity<byte []> responseEntity = new ResponseEntity<byte[]>(bytes,httpHeaders, HttpStatus.OK);

        stream.close();
        workbook.close();
        return responseEntity;

    }
导入前端页面
<label class="btn btn-primary">
        <input type="file" @change="importExcel" style="display:none;">
        导入
</label>
导入前端JS代码
        //导入文件
        importExcel(){
            let file = e.target.files[0];
            let formData = new FormData();
            formData.append("excel", file);
            myaxios.post("common/importExcel/", formData, {headers: {"Content-Type": "multipart/form-data"}})
                .then(response => {
                    this.findPage();
                })
        }
导入后台代码
    @PostMapping("importExcel")
    public AxiosResult<Void> importExcel(@RequestPart Part part) throws IOException, ParseException {
        //1、把上传的文件变成一个workBook
        Workbook workbook = new XSSFWorkbook(part.getInputStream());
        //2、获取第一页
        Sheet sheetAt = workbook.getSheetAt(0);
        //3、获取页中的每一行(每一行都是一个Employee对象)
        //获取最后一行的索引
        int lastRowNum = sheetAt.getLastRowNum();
        for (int i = 1; i < lastRowNum; i++) {
            Row row = sheetAt.getRow(i);
            //获取单元格
            Cell idCell = row.getCell(0);
            Cell nameCell = row.getCell(1);
            Cell addressCell = row.getCell(2);
            Cell phoneCell = row.getCell(3);
            Cell timeCell = row.getCell(4);
            Cell passwordCell = row.getCell(5);
            Cell salaryCell = row.getCell(6);
            Cell avatarCell = row.getCell(7);

            Integer id = (int) idCell.getNumericCellValue();
            String name = nameCell.getStringCellValue();
            String address = addressCell.getStringCellValue();
            String phone = phoneCell.getStringCellValue();
            Date time = sdf.parse(timeCell.getStringCellValue());
            String password = passwordCell.getStringCellValue();
            Double salary = salaryCell.getNumericCellValue();
            String avatar = avatarCell.getStringCellValue();

            //4、每一个单元格都是这个对象的属性值(给属性赋值)
            Employee employee = new Employee(id,name,address,phone,time,password,salary,avatar);
            //5、把对象插入到数据库
            employeeService.addEmployee(employee);

        }
        //6、释放资源

        return AxiosResult.success();
    }

 浙公网安备 33010602011771号