

Sentinel与OpenFeign 服务熔断那些事
 Sentinel与OpenFeign 服务熔断那些事
点赞再看,养成习惯,微信搜索【牧小农】关注我获取更多资讯,风里雨里,小农等你,很高兴能够成为你的朋友。
项目源码地址:公众号回复 sentinel,即可免费获取源码
在上一篇中,我们讲解了 Sentinel 限流详解,其中详细讲解了各个规则下的限流是如何操作,有兴趣的小伙伴可以了解一下,有不少小伙伴在后台留言说,想了解一下 sentinel中如何使用@SentinelResource和openFeign来进行服务熔断和降级的操作,大家知道小农对于小伙伴的要求,那都是尽量满足,今天我们就来好好说一下,@SentinelResource和openFeign
SentinelResource
在上一节中,我们也使用到过这个注解,我们需要了解的是其中两个属性:
- value: 资源名称,必填且唯一。
@SentinelResource(value = "test/get")
- entryType:非必填,entry类型,标记流量的方向,指明是出口流量,还是入口流量;取值 IN/OUT ,默认是OUT。
@SentinelResource(value = "test/get",entryType = EntryType.IN)
-
blockHandler: 处理异常(BlockException)的函数名称,不必填,使用时注意两点:
- 函数访问的方法需要为public。
- 返回类型和入参需要和作用在原方法上一致且需要额外加一个(
BlockException)类型的参数。
-
blockHandlerClass: 非必填,存放blockHandler的类。对应的处理函数必须static修饰,否则无法解析,必须是public,返回类型与原方法一致,参数类型需要和原方法相匹配,并在最后加上
BlockException类型的参数 -
fallback: 非必填,用于在抛出异常的时候提供fallback处理逻辑。fallback函数可以针对所有类型的异常(除了execptionsToIgnore 里面排除掉的异常类型)进行处理
-
exceptionsToIgnore:非必填,指定排除掉哪些异常。排除的异常不会计入异常统计,也不会进入fallback逻辑,而是原样抛出

默认限流
今天我们就针对于上面的几个点详细的展开介绍,在实际应用中我们如何进行操作。我们先来编写一个新的控制器类型,这里我们使用cloud-alibaba-sentinel-8006项目进行操作,对应源码已经放在开头位置,需要请自取。
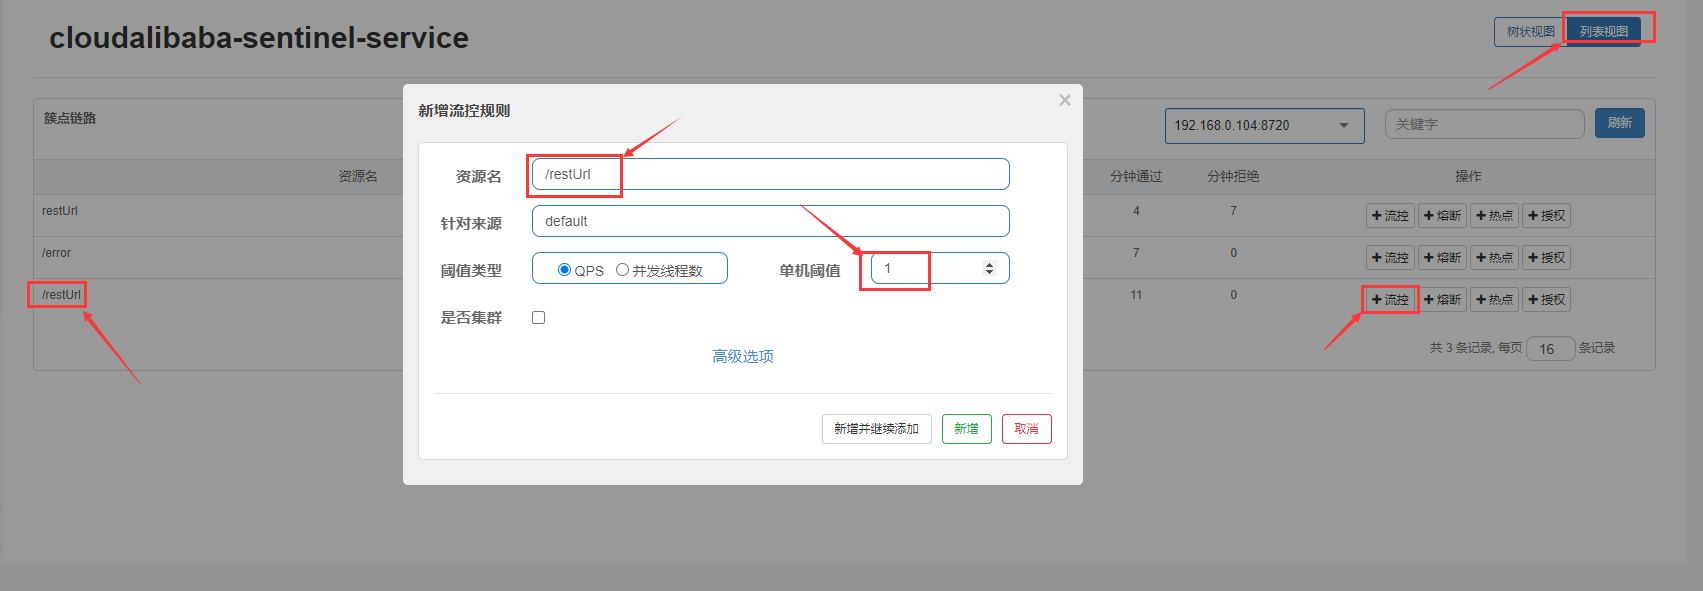
@SentinelResource 既可以配置资源名称也可以配置URL,当我们配置了blockHandler属性时,如果达到阈值时,会调用对应的方法提示限流信息,如果没有配置blockHandler属性,系统会走默认的限流信息(Blocked by Sentinel (flow limiting))
首先我们使用默认的@SentinelResource注解,系统会针对对应的地址调用默认的异常处理方法。
    @GetMapping("/restUrl")
    @SentinelResource(value = "restUrl")
    public String restUrl(){
        return " restUrl";
    }
注意:我们重启项目之后,要先访问,才能去设置对应的限流规则
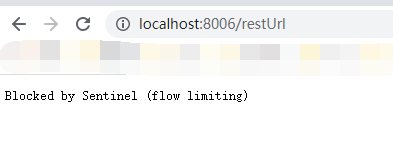
先访问http://localhost:8006/restUrl,在添加流控规则
此时如果没有自己定义限流处理方法,会走系统默认的
blockHandler
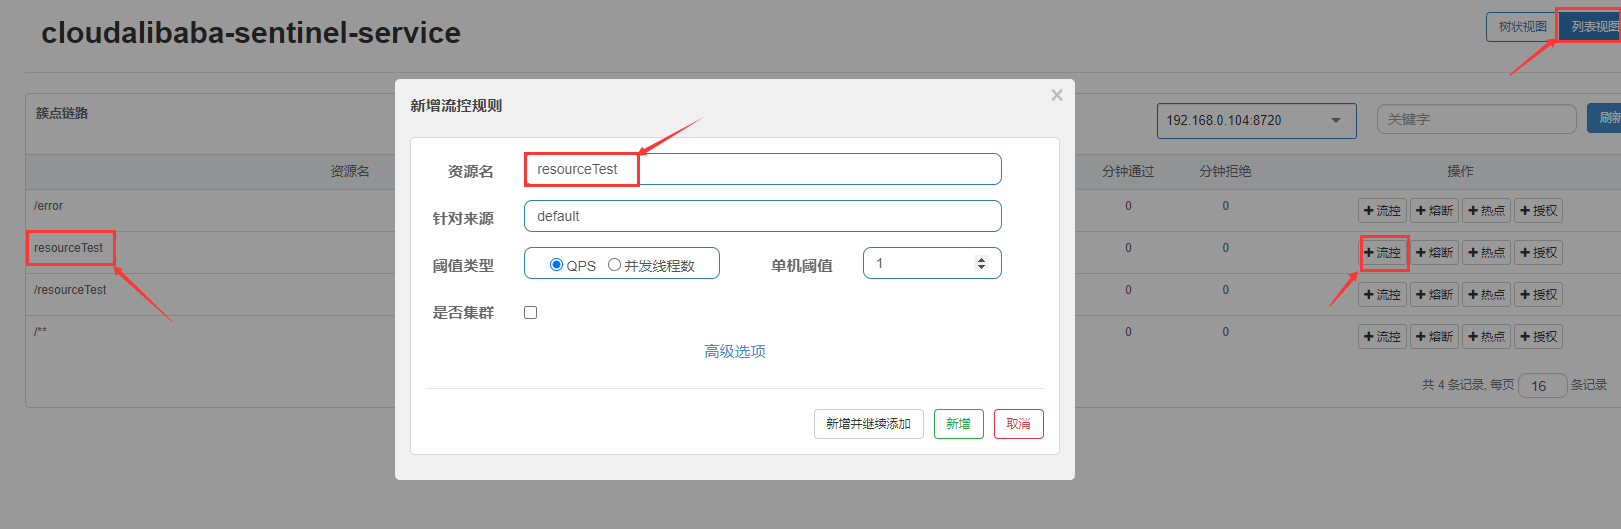
使用@SentinelResource注解同时使用blockHandler属性
@GetMapping("resourceTest")
@SentinelResource(value = "resourceTest",blockHandler = "handler_resource")
public String resourceTest(){
return "resourceTest";
}
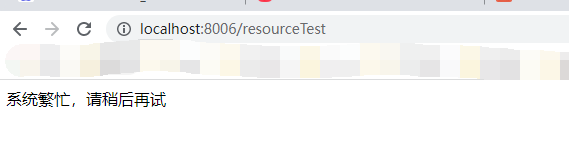
public String handler_resource(BlockException exception){
return "系统繁忙,请稍后再试";
}
先访问http://localhost:8006/resourceTest,在添加流控规则
再去快速的去访问http://localhost:8006/resourceTest 就会出现我们在代码中配置的限流异常处理信息,如下图所示:
上面就展示了我们使用blockHandler属性时,出现的我们自己设置的异常提示,但是当我们使用上面两种方案的时候,会出现一些问题,如果我们的业务逻辑比较复杂,熔断的业务场景比较多,上面的显然不能够满足我们的应用,而且这种自定义方法是和我们的业务代码耦合在一起的,在实际开发中,会显得不够优雅,每个业务方法对添加一个对应的限流处理方法,会让代码显得臃肿,而且无法实现统一处理。在这里我们就需要提到我们另外一个属性—blockHandlerClass
blockHandlerClass
此属性中设置的方法必需为 static 函数,否则无法解析。首先我们需要创建一个类用于专门处理自定义限流处理逻辑,这里记住,方法一定要是静态,否则无法解析,如下所示:
import com.alibaba.csp.sentinel.slots.block.BlockException;

/**
 * Sentinel限流自定义逻辑
 */
public class SentinelExptioinHandler {
    public static String handlerMethodError(BlockException exception){
        return "handlerMethodError:服务异常,请稍后重试!";
    }
    public static String handlerMethodNetwork(BlockException exception){
        return "handlerMethodNetwork:网络错误,连接超时,请稍后重试!";
    }
}
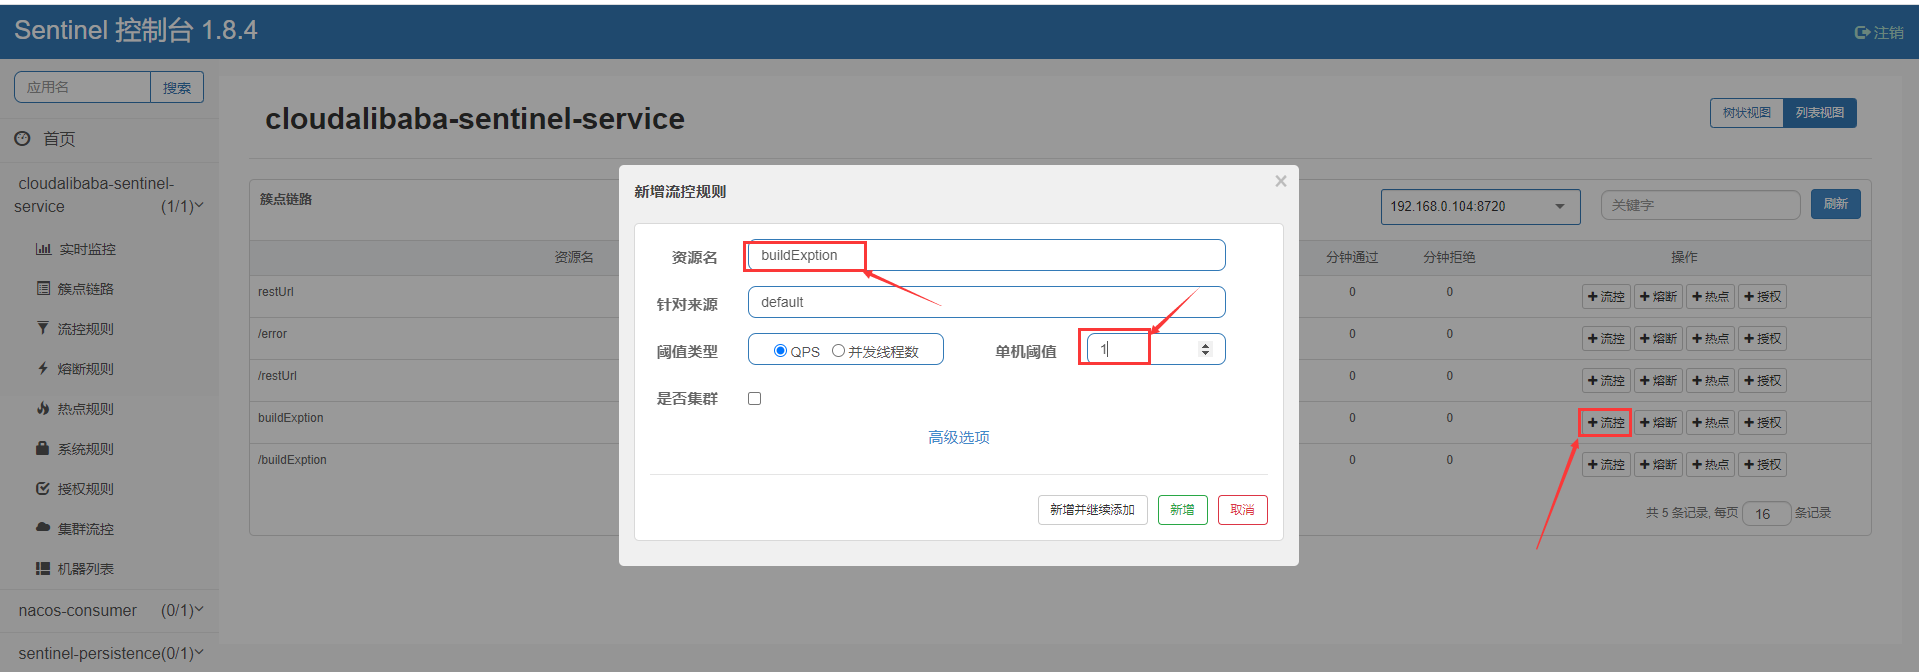
同时我们添加一个可访问的接口方法,设置@SentinelResource注解和blockHandlerClass属性对应的类型和这个类型中对应的处理方法。
    /**
     * 此方法用到了自定义限流处理类型CustomerBlockHandler
     * 中的handlerException1方法来处理限流逻辑。
     */
    @GetMapping("/buildExption")
    @SentinelResource(value = "buildExption",
            blockHandlerClass = SentinelExptioinHandler.class,blockHandler = "handlerMethodError")
    public String buildExption(){
        return "hello buildExption";
    }
然后我们先访问http://localhost:8006/buildExption后,来给它添加限流规则。
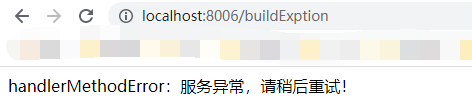
我们再次访问http://localhost:8006/buildExption后,这个时候我们来看一下如果超过阈值之后使用的处理方法是否是我们的SentinelExptioinHandler.handlerMethodError(),当我们频繁的访问地址,就会看到出现了我们在异常处理类中设置的方法。
如果我们想要体现,网络异常的操作,我们只需要替换blockHandler中的handlerMethodError改为handlerMethodNetwork,重启项目后,重复上面的步骤,再来看一下,就会出现下面的提示:

服务熔断
在微服务中,由于业务的拆分,一般会出现请求链路过程的情况,当一个用户发起一个请求,通常需要几个微服务才能完成,在高并发的场景下,这种服务之间的依赖对系统的稳定性影响比较大,如果其中一个环节出现网络延迟或者请求超时等问题会导致其他服务的不可用并形成阻塞,从而导致雪崩,服务熔断就是用来解决这种情况,当一个服务提供在无法提供正常服务时,为了放在雪崩的方式,会将当前接口和外部隔离,触发熔断,在熔断时间内,请求都会返回失败,直到服务提供正常,才会结束熔断。简单来说,服务熔断就是应对微服务雪崩的一种链路保护机制
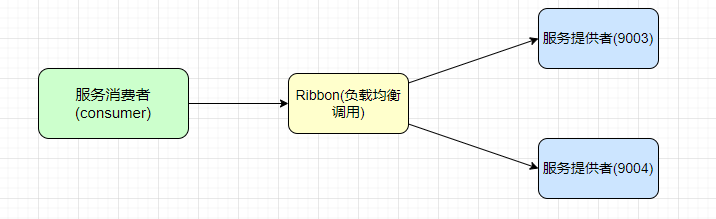
为了模拟实际的应用场景,我们需要整合Ribbon+openFeign,来搭建真实的应用场景。首先我们需要利用Ribbon进行负载均衡的调用,我们先来创建消费者(cloud-alibab-consumer-8083)和两个服务提供者(cloud-alibaba-provider-9003/9004)
我们先来搭建服务提供者
服务提供者
pom文件
<dependency>
    <groupId>org.springframework.boot</groupId>
    <artifactId>spring-boot-starter-web</artifactId>
</dependency>

<dependency>
    <groupId>org.springframework.boot</groupId>
    <artifactId>spring-boot-starter-test</artifactId>
    <scope>test</scope>
</dependency>
<dependency>
    <groupId>com.alibaba.cloud</groupId>
    <artifactId>spring-cloud-starter-alibaba-nacos-discovery</artifactId>
</dependency>
<dependency>
    <groupId>com.muxiaonong</groupId>
    <artifactId>cloud-alibaba-commons</artifactId>
    <version>0.0.1-SNAPSHOT</version>
</dependency>
yml文件
server:
  port: 9003

spring:
  application:
    name: nacos-provider
  cloud:
    nacos:
      discovery:
        server-addr: localhost:8848 #配置Nacos地址

management:
  endpoints:
    web:
      exposure:
        include: '*'
主启动类添加@EnableDiscoveryClient注解
@SpringBootApplication
@EnableDiscoveryClient
public class CloudAlibabaProvider9003Application {

    public static void main(String[] args) {
        SpringApplication.run(CloudAlibabaProvider9003Application.class, args);
    }
}
添加商品信息请求类
@RestController
public class GoodsController {
@Value("${server.port}")
private String serverPort;
//模仿数据库存储数据
public static HashMap<Long,String> hashMap = new HashMap<>();
static {
hashMap.put(1l,"面膜");
hashMap.put(2l,"哈密瓜");
hashMap.put(3l,"方便面");
}
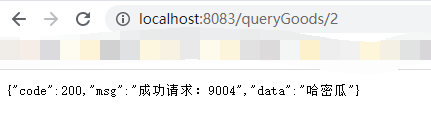
@GetMapping("queryGoods/{id}")
public Response<String> queryGoods(@PathVariable("id") Long id){
Response<String> response = new Response(200,"成功请求:"+serverPort,hashMap.get(id));
return response;
}
}
到这里服务提供者就搭建完成了
注意:另外一个服务提供者一样,只需要端口不一样即可,在这里就不做重复性的演示
服务消费者
pom
 <dependency>
    <groupId>org.springframework.boot</groupId>
    <artifactId>spring-boot-starter-web</artifactId>
</dependency>
<dependency>
    <groupId>com.alibaba.cloud</groupId>
    <artifactId>spring-cloud-starter-alibaba-nacos-discovery</artifactId>
</dependency>
<dependency>
    <groupId>org.springframework.boot</groupId>
    <artifactId>spring-boot-starter-actuator</artifactId>
</dependency>
<dependency>
    <groupId>org.springframework.boot</groupId>
    <artifactId>spring-boot-devtools</artifactId>
    <scope>runtime</scope>
    <optional>true</optional>
</dependency>
<dependency>
    <groupId>com.muxiaonong</groupId>
    <artifactId>cloud-alibaba-commons</artifactId>
    <version>0.0.1-SNAPSHOT</version>
</dependency>
<dependency>
    <groupId>com.alibaba.cloud</groupId>
    <artifactId>spring-cloud-starter-alibaba-sentinel</artifactId>
</dependency>
<dependency>
    <groupId>org.springframework.cloud</groupId>
    <artifactId>spring-cloud-starter-openfeign</artifactId>
    <version>2.2.6.RELEASE</version>
</dependency>
yml文件
server:
  port: 8083
spring:
  application:
    name: nacos-consumer
  cloud:
    nacos:
      discovery:
        server-addr: localhost:8848
    sentinel:
      transport:
        #配置Sentinel dashboard地址
        dashboard: localhost:8080
        #默认8719端口,假如被占用会自动从8719开始依次+1扫描,直至找到未被占用的端口
        port: 8719

#消费者将要去访问的微服务名称(注册成功进nacos的微服务提供者)
service-url:
  nacos-user-service: http://nacos-provider
主启动类添加@EnableDiscoveryClient
@SpringBootApplication
@EnableDiscoveryClient
public class CloudAlibabConsumer8083Application {

    public static void main(String[] args) {
        SpringApplication.run(CloudAlibabConsumer8083Application.class, args);
    }

}
访问类
/**
 * @program: spring-cloud-alibaba
 * @ClassName DemoController
 * @description:
 * @author: 牧小农
 * @create: 2022-06-04 23:10
 * @Version 1.0
 **/
@RestController
public class DemoController {

    @Autowired
    private RestTemplate restTemplate;


    /**
     * 消费者去访问具体服务,这种写法可以实现
     * 配置文件和代码的分离
     */
    @Value("${service-url.nacos-user-service}")
    private String serverURL;

    @GetMapping("/consumer/goods/{id}")
        public Response<String> fallback(@PathVariable Long id){
        //通过Ribbon发起远程访问,访问9003/9004
        if(id <= 3) {
            Response<String> result = restTemplate.getForObject(serverURL + "/queryGoods/" + id, Response.class);
            return result;
        }else {
            throw new NullPointerException("未查询到对应的数据");
        }
    }

}
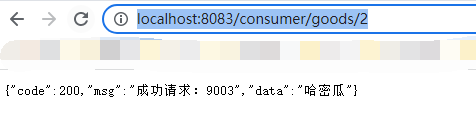
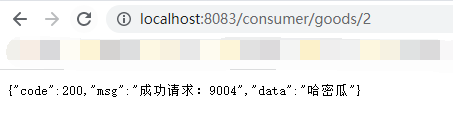
我们先启动9003/9004,在启动8083,然后访问http://localhost:8083/consumer/goods/2,就可以看到在浏览器中,如果9003/9004相互切换,说明我们搭建成功。
fallback
SentinelResource的fallback属性,是一个可选项,主要用于抛出异常的时候提供处理逻辑,该函数可以针对所有的异常类型(除了exceptionsToIgnore排除的异常类型,等下会讲解)进行处理,对于fallback的函数签名和位置要求:
- 返回值需和原函数返回在一致
- 方法参数列表需要和原函数一致,可以额外多一个Throwbale类型的参数用来接收对应的异常
- fallback 函数默认需要和原方法在同一个类中,如果希望使用其他类的函数,则可以指定
fallbackClass为对应的类的Class对象,注意对应的函数必需为 static 函数,否则无法解析
案例:
    @Autowired
    private RestTemplate restTemplate;

    @GetMapping("/consumer/goods/{id}")
    //如果不设置这个注解和fallback参数,异常会原样弹出
    //如果设置SentinelResource注解的fallback属性,会按照设置的方法处理Java异常
    @SentinelResource(value = "falllback",fallback = "fallbackHandler")//被标注的异常将会被 原样抛出
    public Response<String> fallback(@PathVariable Long id){
        //通过Ribbon发起远程访问,访问9003/9004
        if(id <= 3) {
            Response<String> result = restTemplate.getForObject(serverURL + "/queryGoods/" + id, Response.class);
            return result;
        }else {
            throw new NullPointerException("未查询到对应的数据");
        }
    }

    //保证方法签名基本保持一致,但是要添加异常类型参数
    public Response<String> fallbackHandler(Long id,Throwable e){
        Response<String> result = new Response<>(500,"出现未知商品id","商品不存在");
        return result;
    }
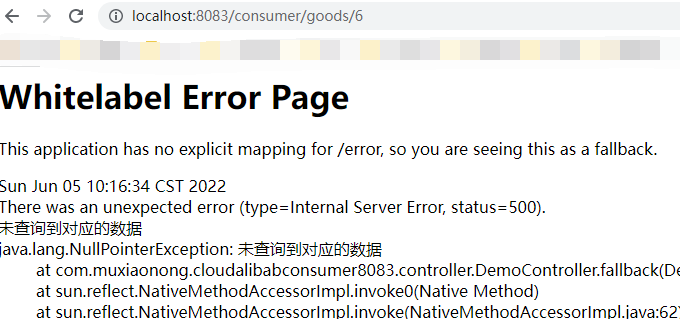
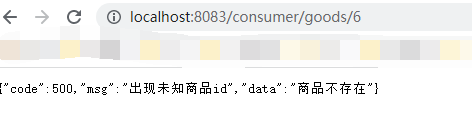
在这里如果我们去访问id超过3的数字的时候请求时(http://localhost:8083/consumer/goods/6 ),如果我们没有设置fallback属性,会弹出NullPointerException的错误
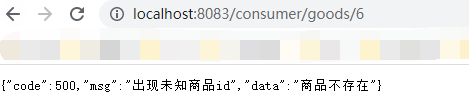
现在当我们去访问设置了 fallback属性的时http://localhost:8083/consumer/goods/6 会出现我们设置的参数。
fallback属性和blockHandler有点类似,也可以设置fallbackClass属性,用来指定对应类型,来处理对应的异常类型,但是方法也是需要为静态方法,否则无法解析。
那么既然fallback属性和blockHandler都能进行限流,那么他们有什么不同,哪一个的优先级更高?首先我们要知道blockHandler属性 是针对于Sentinel异常,blockHandler 对应处理 BlockException 的函数名称,而fallback属性针对于Java异常,如果我们同时设置blockHandler和fallback,会执行哪个方法呢?我们来看一下
 @GetMapping("/consumer/goods/{id}")
    //如果不设置这个注解和fallback参数,异常会原样弹出
    //如果设置SentinelResource注解的fallback属性,会按照设置的方法处理Java异常
    @SentinelResource(value = "falllback",fallback = "fallbackHandler",blockHandler = "blockHandler")
    public Response<String> fallback(@PathVariable Long id){
        //通过Ribbon发起远程访问,访问9003/9004
        if(id <= 3) {
            Response<String> result = restTemplate.getForObject(serverURL + "/queryGoods/" + id, Response.class);
            return result;
        }else {
            throw new NullPointerException("未查询到对应的数据");
        }
    }

    //保证方法签名基本保持一致,但是要添加异常类型参数
    public Response<String> fallbackHandler(Long id,Throwable e){
        Response<String> result = new Response<>(500,"出现未知商品id","商品不存在");
        return result;
    }

    //处理Sentinel限流
    public Response<String> blockHandler(Long id, BlockException e){
        Response<String> result = new Response<>(501,"sentinel限流操作","blockHandler 限流");
        return result;
    }
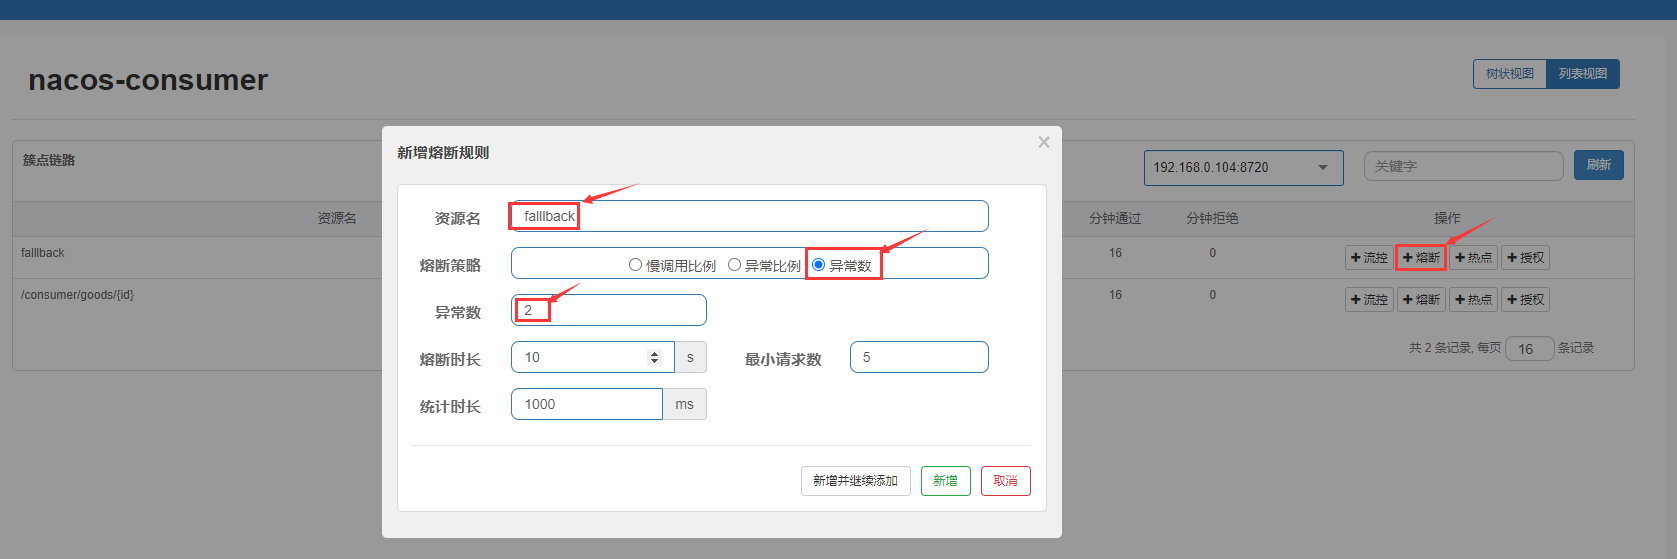
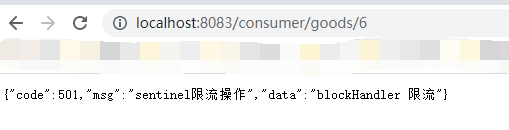
添加熔断规则,在一秒内最小请求次数为5,如果异常超过2个时,触发熔断规则。
这个时候我们再来访问http://localhost:8083/consumer/goods/6时,没有触发熔断之前出现异常,由fallback进行处理
当我们快速点击,触发熔断规则时,这是时候则由blockHandler进行处理。
当我们介绍上面的操作后,我们再给大家介绍关于sentinel的另外一个属性 exceptionsToIgnore
exceptionsToIgnore
用于指定哪些异常被排除,不会计入异常统计中,也不会进入 fallback属性处理的方法,会原样抛出
    @GetMapping("/consumer/goods/{id}")
    //添加SentinelResource注解的fallback属性,同时设置方法来解决Java异常
    @SentinelResource(value = "falllback",fallback = "fallbackHandler",blockHandler = "blockHandler",
            exceptionsToIgnore = {NullPointerException.class})//被标注的异常将会被 原样抛出
    public Response<String> fallback(@PathVariable Long id){
        //通过Ribbon发起远程访问,访问9003/9004
        if(id <= 3) {
            Response<String> result = restTemplate.getForObject(serverURL + "/queryGoods/" + id, Response.class);
            return result;
        }else {
            throw new NullPointerException("未查询到对应的数据");
        }
    }
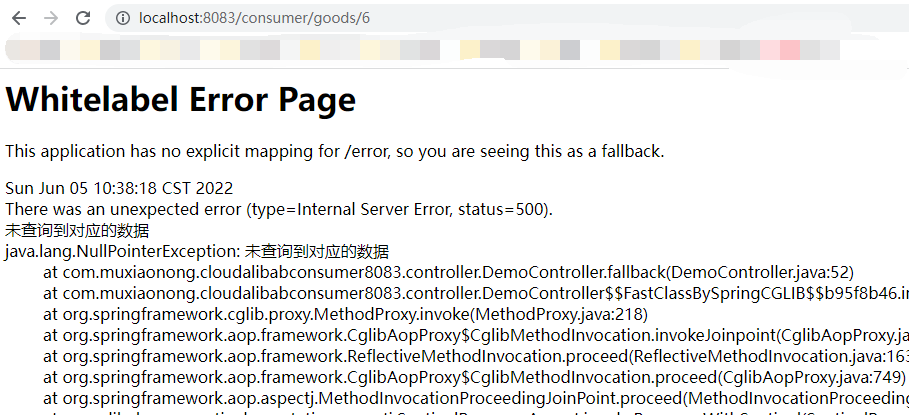
启动项目,当我们再去访问http://localhost:8083/consumer/goods/6的时候,出现原有异常。
在这一节中,我们主要讲解了sentinel服务熔断的这些事,包括@SentinelResource注解的使用方式和场景,以及ribbon实现负载均衡的使用,服务熔断场景我们主要讲解两个,一个是ribbon实现的,一个是openFeign实现。下面我们就来了解一下基于openFeign如何实现负载均衡和服务熔断。
openFeign
OpenFeign是一种声明式、模板化的HTTP客户端。在Spring Cloud中使用OpenFeign,可以做到使用HTTP请求访问远程服务,就像调用本地方法一样的,开发者完全感知不到这是在调用远程方法,更感知不到在访问HTTP请求,用法其实就是编写一个接口,在接口上添加注解即可。
可以简单理解它是借鉴Ribbon的基础之上,封装的一套服务接口+注解的方式的远程调用器。由它来帮助我们定义和实现依赖服务接口的定义,只需创建一个接口并使用注解的方式进行配置。进一步简化我们的操作。
演示项目为:cloud-alibaba-openFeign-8009,调用服务为9003/9004,源码在开头,需要请自取
pom
<dependency>
    <groupId>org.springframework.cloud</groupId>
    <artifactId>spring-cloud-starter-openfeign</artifactId>
    <version>2.2.6.RELEASE</version>
</dependency>
yml配置
server:
  port: 8009
spring:
  application:
    name: nacos-consumer-openFeign
  cloud:
    nacos:
      discovery:
        server-addr: localhost:8848

management:
  endpoints:
    web:
      exposure:
        include: '*'
启动类添加 @EnableFeignClients
@SpringBootApplication
@EnableDiscoveryClient
@EnableFeignClients
public class CloudAlibabaOpenFeign8009Application {

	public static void main(String[] args) {
		SpringApplication.run(CloudAlibabaOpenFeign8009Application.class, args);
	}

}
@FeignClient
@Service
@FeignClient("nacos-provider")
public interface GoodsFeign {

    @GetMapping("queryGoods/{id}")
    public Response<String> queryGoods(@PathVariable("id") Long id);
}
请求控制类
@RestController
public class FeignController {

    @Autowired
    private GoodsFeign goodsFeign;

    @GetMapping("query/{id}")
    public Response<String> query(@PathVariable("id") Long id){
        return goodsFeign.queryGoods(id);
    }
}
我们一次启动,9003/9004,以及我们的消费者服务cloud-alibaba-openFeign-8009,当我们的服务都启动成功后,访问http://localhost:8009/query/1,如果看到我们的端口切换展示就表示成功了
OpenFeign设置超时时间
OpenFeign 默认的超时时间为一秒钟,如果服务端业务超过这个时间,则会报错,为了避免这样的情况,我们可以设置feign客户端的超时控制。我们先来看一下如果我们设置一个延时任务openFeign会提示怎么样的信息。我们需要在服务提供者(9003/9004)那里设置一个阻塞三秒的请求。
    @GetMapping("/readTimeOut")
    public String readTimeOut() {
        try {
            System.out.println(serverPort+"网络连接超时,延迟响应");
            TimeUnit.SECONDS.sleep(2);
        } catch (InterruptedException e) {
            e.printStackTrace();
        }
        return serverPort;
    }
然后通过feign进行调用
   @GetMapping("/readTimeOut")
    public String readTimeOut();
   @GetMapping("/query/readTimeOut")
    public String readTimeOut() {
        String str = goodsFeign.readTimeOut();
        return str;
    }
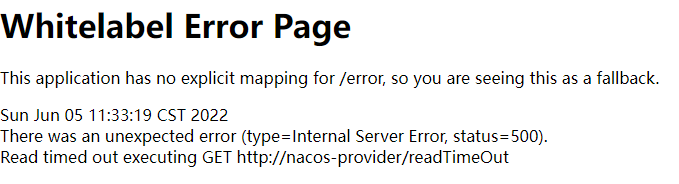
这个时候当我们去访问http://localhost:8009/query/readTimeOut时,客户端会提示报错,提示我们连接超时
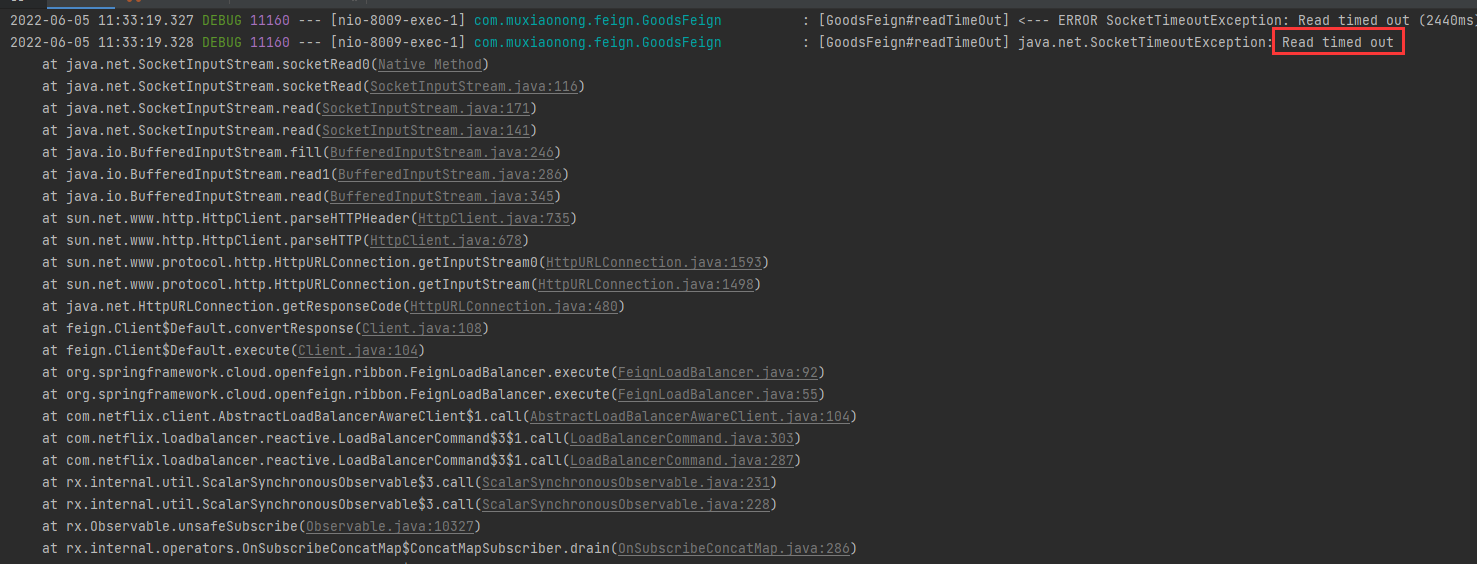
这个时候我们可以设置feign的超时时间进行控制,由于OpenFeign 底层是ribbon 。所以超时控制由ribbon来控制。在yml文件中配置,只需要在8009中的yml添加这样一段代码即可。
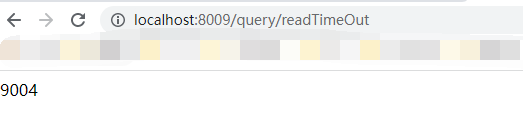
ribbon: #设置feign客户端超时时间(默认支持ribbon)
  ReadTimeout: 5000 #建立连接所用的时间,适用于网络状况正常的情况下,两端连接所用的时间
  ConnectTimeout: 5000  #建立连接后从服务器读取到可用资源所用的时间
当我们重新启动项目后,再来访问我们当前接口,成功返回正确信息
说起OpenFeign,我们不得不提它的一个很小,但是很实用的一个日志功能。我们可以通过配置调整日志级别,这样有利于我们从feign中了解请求和响应的细节,对接口的调用情况进行监控。
OpenFeign 日志级别分类四种
- NONE :默认的,不显示任何日志;
- BASIC :仅记录请求方法、URL、响应状态码及执行时间;
- HEADERS :除了 BASIC 中定义的信息之外,还有请求和响应的头信息;
- FULL(推荐使用) :除了 HEADERS 中定义的信息之外,还有请求和响应的正文及元数据。
我们在启动类中通过@Bean注解注入日志功能即可
@Bean
	Logger.Level feignLoggerLevel(){
		//开启全日志
		return Logger.Level.FULL;
	}
yml中添加日志开启功能
logging:
  level:
    # openfeign日志以什么级别监控哪个接口
    com.muxiaonong.feign.GoodsFeign: debug
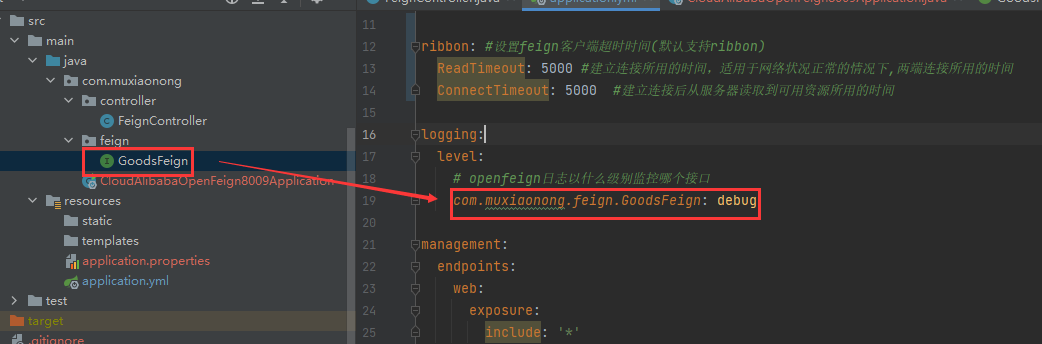
这样我们就可以在请求调用以后看到日志的详细信息了

我们已经了解了openFeign的基本使用,那么我们要如何将Sentinel和OpenFeign进行整合呢,下面我们就来带大家通过Sentinel来进行整合OpenFegin
yml中添加Sentinel对OpenFeign的支持
# 激活Sentinel对OpenFeign的支持
feign:
  sentinel:
    enabled: true
在feign中添加对fallback的支持
@Service
@FeignClient(value = "nacos-provider",fallback = GoodsServiceImpl.class)
public interface GoodsFeign {

    @GetMapping("queryGoods/{id}")
    public Response<String> queryGoods(@PathVariable("id") Long id);

    @GetMapping("/readTimeOut")
    public String readTimeOut();
}
@Component
public class GoodsServiceImpl implements GoodsFeign {

    @Override
    public Response<String> queryGoods(Long id) {
        return new Response<>(501,"服务降级处理返回信息",null);
    }


    @Override
    public String readTimeOut() {
        return null;
    }
}
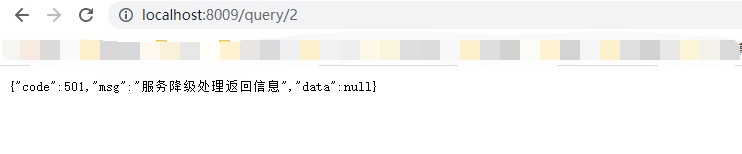
这个时候我们来请求http://localhost:8009/query/1,时是正常的,但是当我们关闭服务提供者(9003/9004)时,就出触发服务降级操作,提示下面信息
总结
熔断由服务不可用引起,降级由业务实际情况和系统资源负载设置等关系引起,不管是对于熔断还是降级都是从系统稳定性出发,保证系统的最大可用。
到这里,我们今天的内容就讲完了,有疑问或者想要交流的小伙伴记得在下方留言,小农看见了会第一时间回复大家。如果觉得文中内容对你有帮助,记得点赞关注,您的支持是我创作的最大动力!
我是牧小农,怕什么真理无穷,进一步有进一步的欢喜,大家加油!

 浙公网安备 33010602011771号