

OpenCVSharp:使用 MOG算法来从视频流中分离前景和背景
前言
今天来学习Samples中的第二个例子:使用 MOG(Mixture of Gaussians,高斯混合模型)算法来从视频流中分离前景和背景。
示例中的代码很短:
  public override void RunTest()
  {
      using var capture = new VideoCapture(MoviePath.Bach);
      using var mog = BackgroundSubtractorMOG.Create();
      using var windowSrc = new Window("src");
      using var windowDst = new Window("dst");

      using var frame = new Mat();
      using var fg = new Mat();
      while (true)
      {
          capture.Read(frame);
          if (frame.Empty())
              break;
          mog.Apply(frame, fg, 0.01);

          windowSrc.Image = frame;
          windowDst.Image = fg;
          Cv2.WaitKey(50);
      }
  }
先从示例代码开始学习,然后再使用WPF做一个界面。
效果:
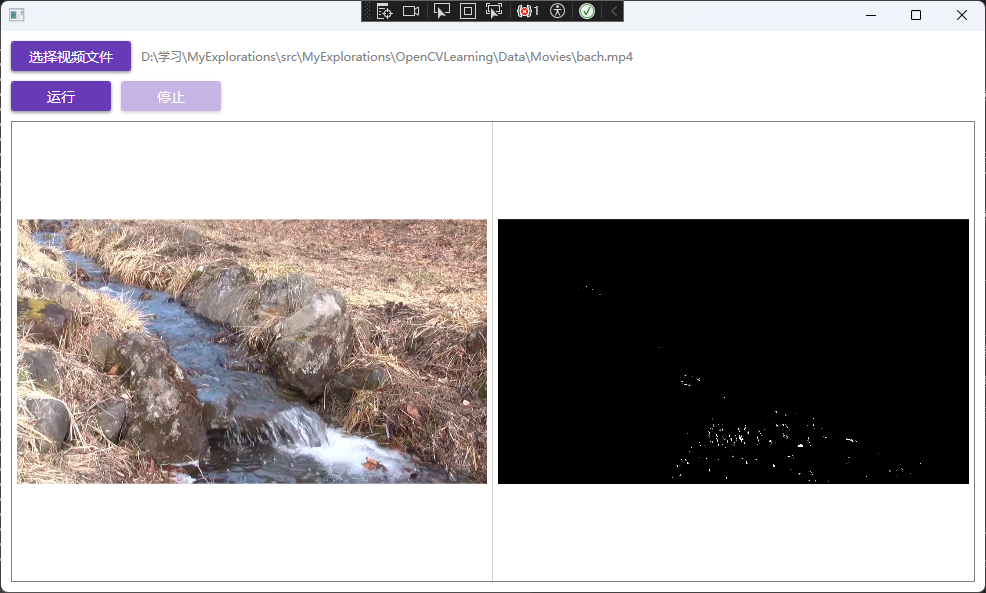
就这张效果图你可能不清楚在干嘛,但是一看动态的效果图你大概就懂分离前景和背景是什么意思了。
开始学习
using var capture = new VideoCapture(MoviePath.Bach);
创建了一个VideoCapture对象,这个是什么呢?
VideoCapture 是OpenCVSharp中用于视频捕获和读取的核心类,它提供了从多种视频源(包括摄像头、视频文件、网络流等)获取图像帧的统一接口。该类是计算机视觉应用中视频处理的基础组件,支持实时视频流处理和离线视频文件分析。
using var mog = BackgroundSubtractorMOG.Create();
BackgroundSubtractorMOG 是 OpenCV 中的一个背景减法算法,用于:
从视频流中分离前景和背景
检测运动物体
基于高斯混合模型(Mixture of Gaussians)进行背景建模
mog.Apply(frame, fg, 0.01); // 对每一帧应用背景减法
其中:
frame 是输入的视频帧
fg 是输出的前景掩码
0.01 是学习率参数
BackgroundSubtractorMOG又是什么呢?
BackgroundSubtractorMOG 是 OpenCvSharp 中实现基于高斯混合模型(Gaussian Mixture-based)的背景/前景分割算法的类。该类继承自 BackgroundSubtractor 抽象类,用于从视频序列中分离前景和背景对象。
高斯混合模型是一种无监督的聚类算法,它假设所有数据点都是由若干个不同的、符合高斯分布(正态分布)的模型“混合”生成的。它的目标就是找出这些高斯分布的最佳参数。刚入门学习,先当一名合格的掉包侠,知道这些算法在哪些场景下可以用到就行了,基本上都已经封装好了。
 /// <summary>
 /// Creates mixture-of-gaussian background subtractor
 /// </summary>
 /// <param name="history">Length of the history.</param>
 /// <param name="nMixtures">Number of Gaussian mixtures.</param>
 /// <param name="backgroundRatio">Background ratio.</param>
 /// <param name="noiseSigma">Noise strength (standard deviation of the brightness or each color channel). 0 means some automatic value.</param>
 /// <returns></returns>
 public static BackgroundSubtractorMOG Create(
     int history = 200, int nMixtures = 5, double backgroundRatio = 0.7, double noiseSigma = 0)
 {
     NativeMethods.HandleException(
         NativeMethods.bgsegm_createBackgroundSubtractorMOG(
             history, nMixtures, backgroundRatio, noiseSigma, out var ptr));
     return new BackgroundSubtractorMOG(ptr);
 }
Creat方法中提供了一组参数的默认值。
参数说明:
history: 历史帧长度,默认为 200 帧,较长的历史可以提供更稳定的背景模型,但会增加计算成本和内存使用。
nMixtures: 高斯混合数量,默认为 5,更多的混合成分可以更好地建模复杂背景,但会增加计算复杂度。
backgroundRatio: 背景比例,默认为 0.7,该值决定了哪些高斯成分被视为背景的一部分。
noiseSigma: 噪声强度(亮度或每个颜色通道的标准差),0 表示自动值,用于处理图像中的噪声,值越大对噪声的容忍度越高。
 /// <summary>
 /// the update operator that takes the next video frame and returns the current foreground mask as 8-bit binary image.
 /// </summary>
 /// <param name="image"></param>
 /// <param name="fgmask"></param>
 /// <param name="learningRate"></param>
 public virtual void Apply(InputArray image, OutputArray fgmask, double learningRate = -1)
 {
     if (image is null)
         throw new ArgumentNullException(nameof(image));
     if (fgmask is null)
         throw new ArgumentNullException(nameof(fgmask));
     image.ThrowIfDisposed();
     fgmask.ThrowIfNotReady();

     NativeMethods.HandleException(
         NativeMethods.video_BackgroundSubtractor_apply(ptr, image.CvPtr, fgmask.CvPtr, learningRate));

     fgmask.Fix();
     GC.KeepAlive(this);
     GC.KeepAlive(image);
     GC.KeepAlive(fgmask);
 }
Apply方法更新背景模型并返回前景掩码。
参数:
image: 输入的视频帧
fgmask: 输出的前景掩码(8位二进制图像)
learningRate: 学习率,-1 表示使用自动学习率
这个例子中只用到了返回前景图像,我们应该也能猜得到肯定也能返回背景图像。
 /// <summary>
 /// computes a background image
 /// </summary>
 /// <param name="backgroundImage"></param>
 public virtual void GetBackgroundImage(OutputArray backgroundImage)
 {
     if (backgroundImage is null)
         throw new ArgumentNullException(nameof(backgroundImage));
     backgroundImage.ThrowIfNotReady();

     NativeMethods.HandleException(
         NativeMethods.video_BackgroundSubtractor_getBackgroundImage(ptr, backgroundImage.CvPtr));
     GC.KeepAlive(this);
     GC.KeepAlive(backgroundImage);
     backgroundImage.Fix();
 }
功能: 计算并返回当前背景图像
参数:
backgroundImage: 输出的背景图像
做一个WPF应用
现在我们已经学习了基本用法,现在正好学习一下WPF,用WPF做一个简单应用。
根据这个示例做一个WPF应用可能需要注意的地方。
首先我们要注意的是图像的显示问题,在示例应用中是直接用Mat显示的,在WPF中显示图像一般用BitmapImage,那么这里就涉及到一个转换的问题,可以安装一下OpenCvSharp4.Extensions这个库,作者已经提供了一些转换方法。
 private BitmapImage MatToBitmapImage(Mat mat)
 {
     // 将Mat转换为Bitmap
     var bitmap = mat.ToBitmap();

     // 将Bitmap转换为BitmapImage
     var bitmapImage = new BitmapImage();
     using (var stream = new System.IO.MemoryStream())
     {
         bitmap.Save(stream, System.Drawing.Imaging.ImageFormat.Bmp);
         stream.Position = 0;
         bitmapImage.BeginInit();
         bitmapImage.StreamSource = stream;
         bitmapImage.CacheOption = BitmapCacheOption.OnLoad;
         bitmapImage.EndInit();
         bitmapImage.Freeze();
     }

     return bitmapImage;
 }
我们还注意到示例应用是一个死循环,没有办法停止,我们可以增加一个CancellationTokenSource来进行控制。
private CancellationTokenSource _cancellationTokenSource;

private async Task RunAsync()
{
    IsProcessing = true;
    HasProcessedImage = true;
    _cancellationTokenSource = new CancellationTokenSource();

    await Task.Run(() =>
    {
        using var capture = new VideoCapture(VideoPath);
        using var mog = BackgroundSubtractorMOG.Create();

        using var frame = new Mat();
        using var fg = new Mat();

        while (!_cancellationTokenSource.Token.IsCancellationRequested)
        {
            capture.Read(frame);
            if (frame.Empty())
                break;

            mog.Apply(frame, fg, 0.01);

            // 将Mat转换为BitmapImage并在UI线程更新
            Application.Current.Dispatcher.Invoke(() =>
            {
                OriginalImage = MatToBitmapImage(frame);
                ProcessedImage = MatToBitmapImage(fg);
            });

            Thread.Sleep(50); // 控制帧率
        }
    }, _cancellationTokenSource.Token);

    IsProcessing = false;
}
全部代码:
<UserControl x:Class="OpenCVLearning.Views.BgSubtractorMOGView"
             xmlns="http://schemas.microsoft.com/winfx/2006/xaml/presentation"
             xmlns:x="http://schemas.microsoft.com/winfx/2006/xaml"
             xmlns:d="http://schemas.microsoft.com/expression/blend/2008"
             xmlns:mc="http://schemas.openxmlformats.org/markup-compatibility/2006"
             xmlns:local="clr-namespace:OpenCVLearning.Views"
             xmlns:prism="http://prismlibrary.com/"
             mc:Ignorable="d"
             prism:ViewModelLocator.AutoWireViewModel="True"
             d:DesignHeight="450" d:DesignWidth="800">
    <UserControl.Resources>
        <BooleanToVisibilityConverter x:Key="BooleanToVisibilityConverter"/>
    </UserControl.Resources>
    <Grid Margin="10">
        <Grid.RowDefinitions>
            <RowDefinition Height="Auto"/>
            <RowDefinition Height="Auto"/>
            <RowDefinition Height="*"/>
        </Grid.RowDefinitions>

        <!-- 第一行:选择视频文件按钮和路径显示 -->
        <StackPanel Grid.Row="0" Orientation="Horizontal" HorizontalAlignment="Left" Margin="0,0,0,10">
            <Button Content="选择视频文件" Command="{Binding SelectVideoCommand}" Width="120" Height="30" Margin="0,0,10,0"/>
            <TextBlock Text="{Binding VideoPath}" VerticalAlignment="Center" Foreground="Gray"/>
        </StackPanel>

        <!-- 第二行:运行和停止按钮 -->
        <StackPanel Grid.Row="1" Orientation="Horizontal" HorizontalAlignment="Left" Margin="0,0,0,10">
            <Button Content="运行" Command="{Binding RunCommand}" Width="100" Height="30" Margin="0,0,10,0"/>
            <Button Content="停止" Command="{Binding StopCommand}" Width="100" Height="30"/>
        </StackPanel>

        <!-- 第三行:视频处理结果显示区域 - 分为两列 -->
        <Border Grid.Row="2" BorderBrush="Gray" BorderThickness="1">
            <Grid>
                <Grid.ColumnDefinitions>
                    <ColumnDefinition Width="*"/>
                    <ColumnDefinition Width="*"/>
                </Grid.ColumnDefinitions>

                <!-- 左列:原始图像 -->
                <Border Grid.Column="0" BorderBrush="LightGray" BorderThickness="0,0,1,0" Padding="5">
                    <Grid>
                        <Image Source="{Binding OriginalImage}" Stretch="Uniform"
                               Visibility="{Binding HasProcessedImage, Converter={StaticResource BooleanToVisibilityConverter}}"/>
                        <TextBlock Text="原始图像" HorizontalAlignment="Center" VerticalAlignment="Center"
                                   Visibility="{Binding HasNoProcessedImage, Converter={StaticResource BooleanToVisibilityConverter}}"/>
                    </Grid>
                </Border>

                <!-- 右列:处理后图像 -->
                <Border Grid.Column="1" BorderBrush="LightGray" Padding="5">
                    <Grid>
                        <Image Source="{Binding ProcessedImage}" Stretch="Uniform"
                               Visibility="{Binding HasProcessedImage, Converter={StaticResource BooleanToVisibilityConverter}}"/>
                        <TextBlock Text="处理后图像" HorizontalAlignment="Center" VerticalAlignment="Center"
                                   Visibility="{Binding HasNoProcessedImage, Converter={StaticResource BooleanToVisibilityConverter}}"/>
                    </Grid>
                </Border>
            </Grid>
        </Border>
    </Grid>
</UserControl>
using Microsoft.Win32;
using OpenCvSharp;
using OpenCvSharp.Extensions;
using Prism.Commands;
using Prism.Mvvm;
using System;
using System.IO;
using System.Threading;
using System.Threading.Tasks;
using System.Windows;
using System.Windows.Input;
using System.Windows.Media.Imaging;

namespace OpenCVLearning.ViewModels
{
    public class BgSubtractorMOGViewModel : BindableBase
    {
        private string _videoPath;
        private BitmapImage _originalImage;
        private BitmapImage _processedImage;
        private bool _hasProcessedImage;
        private bool _isProcessing;
        private CancellationTokenSource _cancellationTokenSource;

        public string VideoPath
        {
            get { return _videoPath; }
            set { SetProperty(ref _videoPath, value); }
        }

        public BitmapImage OriginalImage
        {
            get { return _originalImage; }
            set { SetProperty(ref _originalImage, value); }
        }

        public BitmapImage ProcessedImage
        {
            get { return _processedImage; }
            set { SetProperty(ref _processedImage, value); }
        }

        public bool HasProcessedImage
        {
            get { return _hasProcessedImage; }
            set
            {
                SetProperty(ref _hasProcessedImage, value);
                RaisePropertyChanged(nameof(HasNoProcessedImage));
            }
        }

        public bool HasNoProcessedImage
        {
            get { return !_hasProcessedImage; }
        }

        public bool IsProcessing
        {
            get { return _isProcessing; }
            set
            {
                SetProperty(ref _isProcessing, value);
                RaisePropertyChanged(nameof(CanRun));
                RaisePropertyChanged(nameof(CanStop));
            }
        }

        public ICommand SelectVideoCommand { get; private set; }
        public ICommand RunCommand { get; private set; }
        public ICommand StopCommand { get; private set; }

        public BgSubtractorMOGViewModel()
        {
            SelectVideoCommand = new DelegateCommand(SelectVideo);
            RunCommand = new DelegateCommand(async () => await RunAsync(), CanRun).ObservesProperty(() => VideoPath).ObservesProperty(() => IsProcessing);
            StopCommand = new DelegateCommand(Stop, CanStop).ObservesProperty(() => IsProcessing);
        }

        private void SelectVideo()
        {
            OpenFileDialog openFileDialog = new OpenFileDialog
            {
                Filter = "视频文件|*.mp4;*.avi;*.mov;*.mkv;*.wmv;*.flv|所有文件|*.*",
                Title = "选择视频文件"
            };

            if (openFileDialog.ShowDialog() == true)
            {
                VideoPath = openFileDialog.FileName;
            }
        }

        private bool CanRun()
        {
            return !string.IsNullOrEmpty(VideoPath) && File.Exists(VideoPath) && !IsProcessing;
        }

        private bool CanStop()
        {
            return IsProcessing;
        }

        private void Stop()
        {
            _cancellationTokenSource?.Cancel();
        }

        private async Task RunAsync()
        {
            IsProcessing = true;
            HasProcessedImage = true;
            _cancellationTokenSource = new CancellationTokenSource();

            await Task.Run(() =>
            {
                using var capture = new VideoCapture(VideoPath);
                using var mog = BackgroundSubtractorMOG.Create();

                using var frame = new Mat();
                using var fg = new Mat();

                while (!_cancellationTokenSource.Token.IsCancellationRequested)
                {
                    capture.Read(frame);
                    if (frame.Empty())
                        break;

                    mog.Apply(frame, fg, 0.01);

                    // 将Mat转换为BitmapImage并在UI线程更新
                    Application.Current.Dispatcher.Invoke(() =>
                    {
                        OriginalImage = MatToBitmapImage(frame);
                        ProcessedImage = MatToBitmapImage(fg);
                    });

                    Thread.Sleep(50); // 控制帧率
                }
            }, _cancellationTokenSource.Token);

            IsProcessing = false;
        }

        private BitmapImage MatToBitmapImage(Mat mat)
        {
            // 将Mat转换为Bitmap
            var bitmap = mat.ToBitmap();

            // 将Bitmap转换为BitmapImage
            var bitmapImage = new BitmapImage();
            using (var stream = new System.IO.MemoryStream())
            {
                bitmap.Save(stream, System.Drawing.Imaging.ImageFormat.Bmp);
                stream.Position = 0;
                bitmapImage.BeginInit();
                bitmapImage.StreamSource = stream;
                bitmapImage.CacheOption = BitmapCacheOption.OnLoad;
                bitmapImage.EndInit();
                bitmapImage.Freeze();
            }

            return bitmapImage;
        }

    }
}
应用
我们大概知道怎么使用了之后,关键是要知道在哪些场景下可能会用到这个东西,现在我们可以配合AI去测试一下几个可能能用上的场景。
我测试了两个场景,一个是运动物体检测,另一个是背景图像转换。
运动物体检测效果:
可以发现其实结果也不是很准确,也是比较一般。
背景图像转换效果:
可以发现其实效果不是很好,现在直播背景图像替换可能更推荐MediaPipe Selfie Segmentation与OpenCV结合起来。
虽然说这两个Demo效果不是很好,但是可以学习一些OpenCVSharp的用法。

 浙公网安备 33010602011771号