4-1-1 Spring基础-Spring IoC容器与Bean管理
IoC控制反转
IoC控制反转,全称Inverse of Control,是一种设计理念
由代理人来创建与管理对象,消费者通过代理人来获取对象
IoC的目的是降低程序与程序之间直接耦合
为什么要IoC控制反转
对象直接引用导致对象硬性关联,程序难以维护
例如:顾客直接采购苹果
加入IoC对象统一管理,让对象关联变为弱耦合
例如:果商冷冻仓库批发苹果,然后快递给顾客
DI依赖注入
IoC是设计理念,是现代程序设计遵循的标准,是宏观目标
DI(Dependency Injection)是具体技术实现,是微观实现
DI在Java中利用反射技术实现对象注入(Injection)
Spring的含义
狭义的Spring是指Spring框架(Spring Fremework)
广义的Spring是指Spring生态体系
狭义的Spring框架
Spring框架是企业开发复杂性的一站式解决方案
Spring框架的核心是IoC容器与AOP面向切面编程
Spring IoC负责创建与管理系统对象,并在此基础上扩展功能
Spring IoC容器职责
对象的控制权交由第三方统一管理(IoC)控制反转
利用Java反射技术实现运行时对象创建与关联(DI依赖注入)
基于配置提高应用程序的可维护性与扩展性
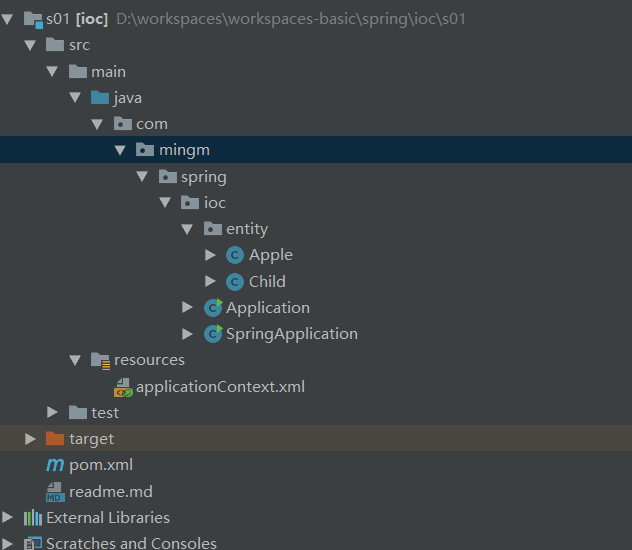
Spring IoC的简单Demo
工程目录
pom.xml文件如下:
 1 <?xml version="1.0" encoding="UTF-8"?>
 2 <project xmlns="http://maven.apache.org/POM/4.0.0"
 3          xmlns:xsi="http://www.w3.org/2001/XMLSchema-instance"
 4          xsi:schemaLocation="http://maven.apache.org/POM/4.0.0 http://maven.apache.org/xsd/maven-4.0.0.xsd">
 5     <modelVersion>4.0.0</modelVersion>
 6
 7     <groupId>com.mingm.spring</groupId>
 8     <artifactId>ioc</artifactId>
 9     <version>1.0-SNAPSHOT</version>
10     <repositories>
11         <repository>
12             <id>aliyun</id>
13             <name>aliyun</name>
14             <url>https://maven.aliyun.com/repository/public</url>
15         </repository>
16     </repositories>
17     <dependencies>
18         <dependency>
19             <groupId>org.springframework</groupId>
20             <artifactId>spring-context</artifactId>
21             <version>5.2.6.RELEASE</version>
22         </dependency>
23     </dependencies>
24
25 </project>
applicationContext.xml文件如下:
 1 <?xml version="1.0" encoding="UTF-8"?>
 2 <beans xmlns="http://www.springframework.org/schema/beans"
 3        xmlns:xsi="http://www.w3.org/2001/XMLSchema-instance"
 4        xsi:schemaLocation="http://www.springframework.org/schema/beans
 5         https://www.springframework.org/schema/beans/spring-beans.xsd">
 6     <!-- 在IoC容器启动时,自动由Spring实例化Apple对象,取名sweetApple放入到容器中 -->
 7     <bean id="sweetApple" class="com.mingm.spring.ioc.entity.Apple">
 8         <property name="title" value="红富士"></property>
 9         <property name="origin" value="欧洲"></property>
10         <property name="color" value="红色"></property>
11     </bean>
12
13     <bean id="sourApple" class="com.mingm.spring.ioc.entity.Apple">
14         <property name="title" value="青苹果"></property>
15         <property name="origin" value="中亚"></property>
16         <property name="color" value="绿色"></property>
17     </bean>
18
19     <bean id="softApple" class="com.mingm.spring.ioc.entity.Apple">
20         <property name="title" value="金帅"></property>
21         <property name="origin" value="中国"></property>
22         <property name="color" value="黄色"></property>
23     </bean>
24
25     <bean id="rdApple" class="com.mingm.spring.ioc.entity.Apple">
26         <property name="title" value="蛇果"></property>
27         <property name="origin" value="美国"></property>
28         <property name="color" value="红色"></property>
29     </bean>
30
31     <bean id="lily" class="com.mingm.spring.ioc.entity.Child">
32         <property name="name" value="莉莉"/>
33         <property name="apple" ref="softApple"/>
34     </bean>
35
36     <bean id="andy" class="com.mingm.spring.ioc.entity.Child">
37         <property name="name" value="安迪"/>
38         <property name="apple" ref="rdApple"/>
39     </bean>
40
41     <bean id="luna" class="com.mingm.spring.ioc.entity.Child">
42         <property name="name" value="露娜"/>
43         <property name="apple" ref="sweetApple"/>
44     </bean>
45 </beans>
SpringApplication.java用于启动Spring IoC容器
 1 import com.mingm.spring.ioc.entity.Apple;
 2 import com.mingm.spring.ioc.entity.Child;
 3 import org.springframework.context.ApplicationContext;
 4 import org.springframework.context.support.ClassPathXmlApplicationContext;
 5
 6 public class SpringApplication {
 7     public static void main(String[] args) {
 8         //创建Spring IoC容器,并根据配置文件在容器中实例化对象
 9         ApplicationContext context = new ClassPathXmlApplicationContext("classpath:applicationContext.xml");
10         Apple sweetApple = context.getBean("sweetApple" , Apple.class);
11         System.out.println(sweetApple.getTitle());
12         //从IoC容器中提取beanId=lily的对象
13         Child lily = context.getBean("lily", Child.class);
14         lily.eat();
15         Child andy = context.getBean("andy", Child.class);
16         andy.eat();
17         Child luna = context.getBean("luna", Child.class);
18         luna.eat();
19
20     }
21 }
初始化IoC容器
三种配置方式
基于XML配置Bean
基于注解配置Bean
基于Java代码配置Bean
Xml方式创建IoC容器
核心代码如下:
1 //创建Spring IoC容器,并根据配置文件在容器中实例化对象
2 ApplicationContext context = new ClassPathXmlApplicationContext("classpath:applicationContext.xml");
实例化Bean的三种方式
基于构造方法对象实例化
基于静态工厂实例化
基于工厂实例方法实例化
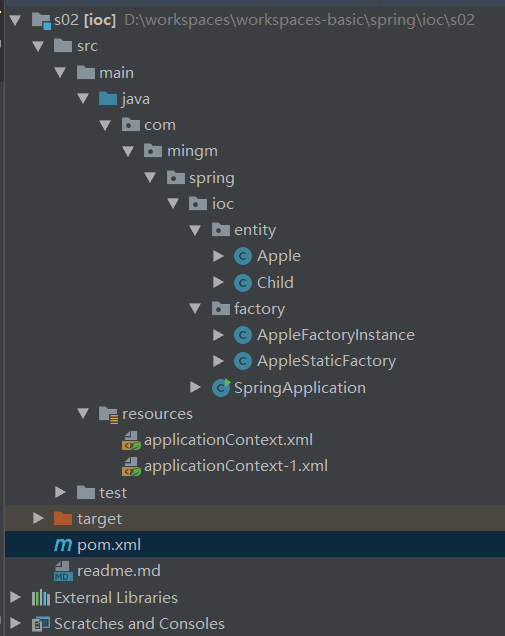
示例工程
工程目录
实体类
 1 package com.mingm.spring.ioc.entity;
 2
 3 public class Apple {
 4     private String title;
 5     private String color;
 6     private String origin;
 7     private Float price;
 8
 9     public Apple() {
10         System.out.println("Apple对象已创建," + this);
11     }
12
13     public Apple(String title, String color, String origin) {
14         System.out.println("通过带参构造方法创建对象, " + this);
15         this.title = title;
16         this.color = color;
17         this.origin = origin;
18     }
19
20     public Apple(String title,  String origin ,String color, Float price) {
21         System.out.println("通过带参构造方法创建对象, " + this);
22         this.title = title;
23         this.color = color;
24         this.origin = origin;
25         this.price = price;
26     }
27
28     public String getTitle() {
29         return title;
30     }
31
32     public void setTitle(String title) {
33         this.title = title;
34     }
35
36     public String getColor() {
37         return color;
38     }
39
40     public void setColor(String color) {
41         this.color = color;
42     }
43
44     public String getOrigin() {
45         return origin;
46     }
47
48     public void setOrigin(String origin) {
49         this.origin = origin;
50     }
51 }
 1 package com.mingm.spring.ioc.entity;
 2
 3 public class Child {
 4     private String name;
 5     private Apple apple;
 6
 7     public Child(){
 8
 9     }
10
11     public Child(String name, Apple apple) {
12         this.name = name;
13         this.apple = apple;
14     }
15
16     public String getName() {
17         return name;
18     }
19
20     public void setName(String name) {
21         this.name = name;
22     }
23
24     public Apple getApple() {
25         return apple;
26     }
27
28     public void setApple(Apple apple) {
29         this.apple = apple;
30     }
31
32     public void eat(){
33         System.out.println(name + "吃到了" + apple.getOrigin() + "种植的" + apple.getTitle());
34     }
35 }
工厂方法对象
 1 package com.mingm.spring.ioc.factory;
 2
 3 import com.mingm.spring.ioc.entity.Apple;
 4
 5 /**
 6  * 静态工厂通过静态方法创建对象,隐藏创建对象的细节
 7  */
 8 public class AppleStaticFactory {
 9     public static Apple createSweetApple(){
10         //logger.info("")
11         Apple apple = new Apple();
12         apple.setTitle("红富士");
13         apple.setOrigin("欧洲");
14         apple.setColor("红色");
15         return apple;
16     }
17 }
 1 package com.mingm.spring.ioc.factory;
 2
 3 import com.mingm.spring.ioc.entity.Apple;
 4
 5 /**
 6  * 工厂实例方法创建对象是指IoC容器对工厂类进行实例化并调用对应的实例方法创建对象的过程
 7  */
 8 public class AppleFactoryInstance {
 9     public Apple createSweetApple(){
10         Apple apple = new Apple();
11         apple.setTitle("红富士");
12         apple.setOrigin("欧洲");
13         apple.setColor("红色");
14         return apple;
15     }
16 }
applicationContext.xml文件配置
 1 <?xml version="1.0" encoding="UTF-8"?>
 2 <beans xmlns="http://www.springframework.org/schema/beans"
 3        xmlns:xsi="http://www.w3.org/2001/XMLSchema-instance"
 4        xsi:schemaLocation="http://www.springframework.org/schema/beans
 5         https://www.springframework.org/schema/beans/spring-beans.xsd">
 6     <!--bean标签默认通过默认构造方法创建对象-->
 7     <bean id="apple1" class="com.mingm.spring.ioc.entity.Apple">
 8
 9     </bean>
10     <!--使用带参构造方法实例化对象-->
11     <bean name="apple2" class="com.mingm.spring.ioc.entity.Apple">
12         <constructor-arg name="title" value="红富士"/>
13         <constructor-arg name="color" value="红色"/>
14         <constructor-arg name="origin" value="欧洲"/>
15         <constructor-arg name="price" value="19.8"/>
16     </bean>
17
18     <bean id="apple3" class="com.mingm.spring.ioc.entity.Apple">
19         <constructor-arg index="0" value="红富士"/>
20         <constructor-arg index="1" value="欧洲"/>
21         <constructor-arg index="2" value="红色"/>
22         <constructor-arg index="3" value="19.8"/>
23     </bean>
24
25     <!--利用静态工厂获取对象-->
26     <bean id="apple4" class="com.mingm.spring.ioc.factory.AppleStaticFactory"
27           factory-method="createSweetApple"/>
28
29     <!--利用工厂实例方法获取对象-->
30     <bean id="factoryInstance" class="com.mingm.spring.ioc.factory.AppleFactoryInstance"/>
31     <bean id="apple5" factory-bean="factoryInstance" factory-method="createSweetApple"/>
32 </beans>
从IoC容器获取Bean
1 //第一种方法 推荐,符合现在java编码规范
2 Apple apple1 = context.getBean("apple1", Apple.class);
3 //第二种方法
4 Apple apple2 = (Apple)context.getBean("apple2");
id与name属性相同点和区别
相同点:
1.bean id与name都是设置对象在IoC容器的唯一标识
2.两者在同一配置文件中都不允许重复
3.两者允许在多个配置文件中出现重复,新对象覆盖旧对象
1 //初始化多个配置文件,如果两个配置文件有共同的id或name,那么获取bean会从后一个配置文件中获取,新对象覆盖旧对象
2 String[] configLocations = new String[]{"classpath:applicationContext.xml","classpath:applicationContext-1.xml"};
3 //初始化IoC容器并实例化对象
4 ApplicationContext context = new ClassPathXmlApplicationContext(configLocations);
区别:
1.id更为严格,一次只能定义一个对象标识
2.name更为宽松,一次允许定义多个对象标识
1     <bean name="apple2,apple7" class="com.mingm.spring.ioc.entity.Apple">
2         <constructor-arg name="title" value="红富士2号"/>
3         <constructor-arg name="color" value="红色"/>
4         <constructor-arg name="origin" value="欧洲"/>
5         <constructor-arg name="price" value="29.8"/>
6     </bean>
3.id与name命名要有意义,按驼峰命名书写
路径表达式
加载单个配置文件
1 //创建Spring IoC容器,并根据配置文件在容器中实例化对象
2 ApplicationContext context = new ClassPathXmlApplicationContext("classpath:applicationContext.xml");
classpath指的就是类路径
| 表达式实例 | 说明 |
| classpath:config.xml | 扫描classpath根路径下(不包含jar)的config.xml |
| classpath:com/mingm/config.xml | 扫描classpath根路径下(不包含jar)com.mingm包中的config.xml |
| classpath*:com/mingm/config.xml | 扫描classpath根路径下(包含jar)com.mingm包中的config.xml |
| classpath:config-*.xml | 扫描classpath根路径下(不包含jar)所有以config-开头的xml文件 |
| classpath:com/**/config.xml | 扫描classpath根路径下(不包含jar)com包(包含任何子包)的config.xml |
| file:c/config.xml | 扫描c盘根路径下的config.xml |
对象依赖注入
依赖注入是指运行时将容器内对象利用反射赋值给其他对象的操作
基于setter方法注入对象
基于构造方法注入对象(前文已经说明)
基于setter方法注入对象
 1 <?xml version="1.0" encoding="UTF-8"?>
 2 <beans xmlns="http://www.springframework.org/schema/beans"
 3        xmlns:xsi="http://www.w3.org/2001/XMLSchema-instance"
 4        xsi:schemaLocation="http://www.springframework.org/schema/beans
 5         https://www.springframework.org/schema/beans/spring-beans.xsd">
 6     <bean id="sweetApple" class="com.mingm.spring.ioc.entity.Apple">
 7         <!-- IoC容器自动利用反射机制运行时调用setXXX方法为属性赋值 -->
 8         <property name="title" value="红富士"/>
 9         <property name="color" value="红色"/>
10         <property name="origin" value="欧洲"/>
11         <property name="price" value="19.8"/>
12     </bean>
13
14     <bean id="lily" class="com.mingm.spring.ioc.entity.Child">
15         <property name="name" value="莉莉"/>
16         <!-- 利用ref注入依赖对象 -->
17         <property name="apple" ref="sweetApple"/>
18     </bean>
19
20     <bean id="sourApple" class="com.mingm.spring.ioc.entity.Apple">
21         <property name="title" value="青苹果"/>
22         <property name="color" value="绿色"/>
23         <property name="origin" value="中亚"/>
24         <property name="price" value="9.8"/>
25     </bean>
26
27     <bean id="andy" class="com.mingm.spring.ioc.entity.Child">
28         <constructor-arg name="name" value="安迪"/>
29         <constructor-arg name="apple" ref="sourApple"/>
30     </bean>
31
32 </beans>
注入集合对象
注入List
 1 <bean id="company" class="com.mingm.spring.ioc.entity.Company">
 2     <property name="rooms">
 3         <list>
 4             <!-- 注入引用对象用ref -->
 5             <value>2001-总裁办</value>
 6             <value>2003-总经理办公室</value>
 7             <value>2010-研发部会议室</value>
 8             <value>2010-研发部会议室</value>
 9         </list>
10     </property>
11 </bean>
注入Set
 1 <bean id="company" class="com.mingm.spring.ioc.entity.Company">
 2     <property name="rooms">
 3         <set>
 4                         <!-- 注入引用对象用ref -->
 5             <value>2001-总裁办</value>
 6             <value>2003-总经理办公室</value>
 7             <value>2010-研发部会议室</value>
 8             <value>2010-研发部会议室</value>
 9         </set>
10     </property>
11 </bean>
注入Map
 1 <bean id="company" class="com.mingm.spring.ioc.entity.Company">
 2     <property name="computers">
 3         <map>
 4             <entry key="dev-88172" value-ref="c1"/>
 5             <entry key="dev-88173">
 6                 <bean class="com.mingm.spring.ioc.entity.Computer">
 7                     <constructor-arg name="brand" value="联想"/>
 8                     <constructor-arg name="type" value="笔记本"/>
 9                     <constructor-arg name="sn" value="1280258012"/>
10                     <constructor-arg name="price" value="5060"/>
11                 </bean>
12             </entry>
13         </map>
14     </property>
15 </bean>
注入Properties
1 <bean id="company" class="com.mingm.spring.ioc.entity.Company">
2     <property name="info">
3         <props>
4             <prop key="phone">010-12345678</prop>
5             <prop key="address">北京市朝阳区XX路XX大厦</prop>
6             <prop key="website">http://www.xxx.com</prop>
7         </props>
8     </property>
9 </bean>
        ApplicationContext context = new ClassPathXmlApplicationContext("classpath:applicationContext.xml");
        Company company = context.getBean("company", Company.class);
        System.out.println(company);
        String website = company.getInfo().getProperty("website");
        System.out.println(website);
查看容器内对象
 1 import com.mingm.spring.ioc.entity.Company;
 2 import com.mingm.spring.ioc.entity.Computer;
 3 import org.springframework.context.ApplicationContext;
 4 import org.springframework.context.support.ClassPathXmlApplicationContext;
 5
 6 public class SpringApplication {
 7     public static void main(String[] args) {
 8         ApplicationContext context = new ClassPathXmlApplicationContext("classpath:applicationContext.xml");
 9         //获取容器内所有beanId数组
10         String[] beanNames = context.getBeanDefinitionNames();
11         for (String beanName:beanNames){
12             System.out.println(beanName);
13             System.out.println("类型:" + context.getBean(beanName).getClass().getName());
14             System.out.println("内容:" + context.getBean(beanName));
15         }
16
17         Computer computer = context.getBean("com.mingm.spring.ioc.entity.Computer", Computer.class);
18         System.out.println(computer.getBrand());
19         Computer computer1 = context.getBean("com.mingm.spring.ioc.entity.Computer#1", Computer.class);
20         System.out.println(computer1.getBrand());
21     }
22 }
bean对象的作用域
bean scope属性
bean scope属性用于决定对象何时被创建与作用范围
bean scope配置将影响容器内对象的数量
默认情况下bean会在IoC容器创建后自动实例化,全局唯一
scope用法
1 <bean id="userDao" class="com.mingm.spring.ioc.dao.UserDao" scope="prototype"/>
bean scope属性清单
| scope属性 | 说明 |
| singleton | 单例(默认值),每一个容器有且只有唯一的实例,实例被全局共享 |
| prototype | 多例,每次使用都是创建一个实例 |
| request | web环境下,每一次独立请求存在唯一实例 |
| session | web环境下,每一个session存在唯一实例 |
| application | web环境下,ServletContext存在唯一实例 |
| websocket | web环境下,WebSocket连接中存在唯一实例 |
singleton与prototype
singleton:
1.在容器中是单例多线程执行,存在线程安全风险,所以该实例不能存在有状态的对象
2.被singleton修饰的bean会在IoC容器启动时实例化
protoytype:
1.在容器中多实例,占用更多资源,不存在线程安全问题
2.被prototype修饰的bean会在getBean()或者对象注入时实例化
bean生命周期
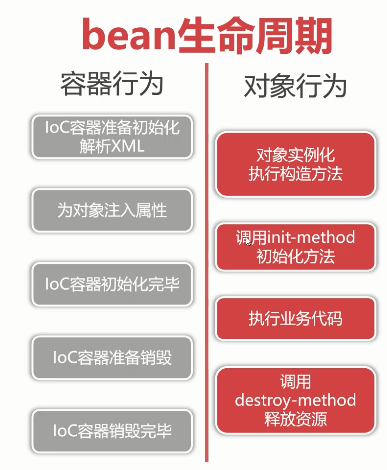
注意:对象执行构造方法时,该对象没有注入属性值,只有IoC容器为对象注入属性,对象调用init-method初始化方法对象才完成初始化
代码举例
对象实例
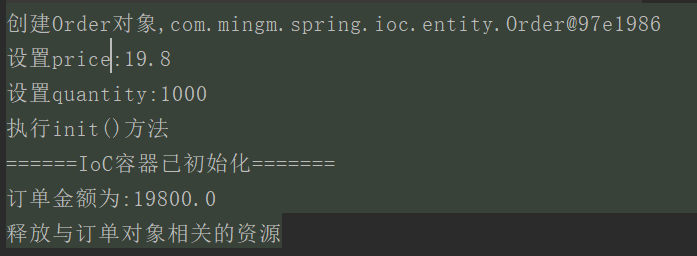
 1 package com.mingm.spring.ioc.entity;
 2
 3 public class Order {
 4     private Float price;
 5     private Integer quantity;
 6     private Float total;
 7
 8     public Order(){
 9         System.out.println("创建Order对象," + this);
10     }
11
12     public void init(){
13         System.out.println("执行init()方法");
14         total = price * quantity;
15     }
16     public void pay(){
17         System.out.println("订单金额为:" + total);
18     }
19     public Float getPrice() {
20         return price;
21     }
22
23     public void setPrice(Float price) {
24         System.out.println("设置price:" + price);
25         this.price = price;
26     }
27
28     public Integer getQuantity() {
29         return quantity;
30     }
31
32     public void setQuantity(Integer quantity) {
33         System.out.println("设置quantity:" + quantity);
34         this.quantity = quantity;
35     }
36
37     public Float getTotal() {
38         return total;
39     }
40
41     public void setTotal(Float total) {
42         this.total = total;
43     }
44
45     public void destroy(){
46         System.out.println("释放与订单对象相关的资源");
47     }
48 }
在applicationContext.xml文件中配置
1     <bean id="order1" class="com.mingm.spring.ioc.entity.Order" init-method="init" destroy-method="destroy">
2         <property name="price" value="19.8"/>
3         <property name="quantity" value="1000"/>
4     </bean>
主方法
 1 package com.mingm.spring.ioc;
 2
 3 import com.mingm.spring.ioc.entity.Order;
 4 import com.mingm.spring.ioc.service.UserService;
 5 import org.springframework.context.ApplicationContext;
 6 import org.springframework.context.support.ClassPathXmlApplicationContext;
 7
 8 public class SpringApplication {
 9     public static void main(String[] args) {
10         ApplicationContext context = new ClassPathXmlApplicationContext("classpath:applicationContext.xml");
11         System.out.println("======IoC容器已初始化=======");
12
13         Order order1 = context.getBean("order1", Order.class);
14         order1.pay();
15         //销毁IoC容器
16         ((ClassPathXmlApplicationContext) context).registerShutdownHook();
17     }
18 }
运行结果
其他细节
prototype时对象创建与init-method延迟至执行业务代码阶段
prototype时对象不再受IoC对象管理,不再触发destory-method
延迟加载lazy-init属性可让对象创建与初始化延迟到执行代码阶段
基于注解配置IoC容器
基于注解的优势
摆脱繁琐的XML形式的bean与依赖注入
基于声明式的原则,更适合轻量级的现代企业应用
让代码可读性变得更好,研发人员拥有更好的开发体验
开启组件扫描
1     <!-- XML配置开启组件扫描,才能使用注解 -->
2     <context:component-scan base-package="com.mingm">
3         <!-- 排除不需要扫描的包 -->
4         <context:exclude-filter type="regex" expression="com.mingm.exl.*"/>
5     </context:component-scan>
三类注解
组件类型注解 - 声明当前类的功能与职责
自动装配注解 - 根据属性特征自动注入对象
元数据注解 - 更细化的辅助IoC容器管理对象的注解
四种组件类型注解
| 注解 | 说明 |
| @Component | 组件注解,通用注解,被该注解描述的类将被IoC容器管理并实例化 |
| @Controller | 语义注解,说明当前类是MVC应用中的控制器类 |
| @Service | 语义注解,说明当前类是Service业务服务类 |
| @Repository | 语义注解,说明当前类用于业务持久层,通常描述对应Dao类 |
两类自动装配注解
| 分类 | 注解 | 说明 |
| 按类型装配 | @Autowored | 按容器内对象类型动态注入属性,由Spring机构提供 |
| @Inject | 基于JSR-330(Dependency Injection for java)标准,其他同@AutoWired,但不支持required属性 | |
| 按名称装配 | @Named | 与@Inject配合使用,JSR-330规范,按属性名自动装配属性 |
| @Resource | 基于JSR-250规范,优先按名称,再按类型匹配 |
元数据注解
| 注解 | 说明 |
| @Primary | 按类型装配时出现多个相同类型对象,拥有此注解对象优先被注入 |
| @PostConstruct | 描述方法,相当于XNL中init-method配置的注解版本 |
| @PreDestory | 描述方法,相当于XML中destory-method配置的注解版本 |
| @Scope | 设置对象的scope属性 |
| @Value | 为属性注入静态数据 |
演示@Value
config.properties文件
1 metaData=mingm.com
2 connection.driver=xxxxx
3 connection.url=xxx
4 connection.username=xxx
5 connection.password=xxx
applicationContext.xml
 1 <?xml version="1.0" encoding="UTF-8"?>
 2 <beans xmlns="http://www.springframework.org/schema/beans"
 3        xmlns:xsi="http://www.w3.org/2001/XMLSchema-instance"
 4        xmlns:context="http://www.springframework.org/schema/context"
 5        xsi:schemaLocation="http://www.springframework.org/schema/beans
 6         https://www.springframework.org/schema/beans/spring-beans.xsd
 7         http://www.springframework.org/schema/context
 8         https://www.springframework.org/schema/context/spring-context.xsd">
 9     <!--通知Spring IoC容器初始化时加载属性文件-->
10     <context:property-placeholder location="classpath:config.properties"/>
11     <!-- 在IoC容器初始化时自动扫描四种组件类型注解并完成实例化
12         @Repository
13         @Service
14         @Controller
15         @Component
16      -->
17     <context:component-scan base-package="com.mingm"/>
18 </beans>
UserService.java
 1 package com.mingm.spring.ioc.service;
 2
 3 import com.mingm.spring.ioc.dao.IUserDao;
 4 import org.springframework.beans.factory.annotation.Autowired;
 5 import org.springframework.beans.factory.annotation.Value;
 6 import org.springframework.context.annotation.Scope;
 7 import org.springframework.stereotype.Service;
 8
 9 import javax.annotation.PostConstruct;
10
11 @Service
12 @Scope("prototype")//设置单例/多例,XML中 bean scope完全相同
13 public class UserService {
14     @Value("${metaData}")//读取config.properties的metaData属性值
15     private String metaData ;
16     @Value("${connection.password}")
17     private String password;
18
19     public UserService(){
20         System.out.println("正在创建UserService:" + this);
21     }
22
23     @PostConstruct //XML中bean init-method完全相同
24     public void init(){
25         System.out.println("初始化UserService对象,metaData=" + metaData);
26     }
27
28     //Spring IoC容器会自动通过反射技术将属性private修饰符自动改为public,直接进行赋值
29     //不再执行set方法
30     @Autowired
31     private IUserDao udao ;
32
33     public IUserDao getUdao() {
34         return udao;
35     }
36
37
38     /*@Autowired
39     //如果装配注解放在set方法上,则自动按类型/名称对set方法参数进行注入
40     public void setUdao(UserDao udao) {
41         System.out.println("setUdao:" + udao);
42         this.udao = udao;
43     }*/
44 }
使用Java Config方式实现Spring IoC
Java Config核心注解
| 注解 | 说明 |
| @Configuration | 描述类,说明当前类是Java Config配置类,完全替代XML文件 |
| @Bean | 描述方法,方法返回对象将被IoC容器管理,beanI默认方法名 |
| @ImportResource | 描述类,加载静态文件,可以使用@Value注解获取 |
| @ComponentScan | 描述类,同XML的<context:compoment-scan>标签 |
例如:
 1 import com.mingm.spring.ioc.controller.UserController;
 2 import com.mingm.spring.ioc.dao.EmployeeDao;
 3 import com.mingm.spring.ioc.dao.UserDao;
 4 import com.mingm.spring.ioc.service.UserService;
 5 import org.springframework.context.annotation.*;
 6
 7 @Configuration //当前类是一个配置类,用于替代applicationContext.xml
 8 @ComponentScan(basePackages = "com.mingm")
 9 public class Config {
10     @Bean //Java Config利用方法创建对象,将方法返回对象放入容器,beanId=方法名
11     public UserDao userDao(){
12         UserDao userDao = new UserDao();
13         System.out.println("已创建" + userDao);
14         return userDao;
15     }
16
17     @Bean //Java Config利用方法创建对象,将方法返回对象放入容器,beanId=方法名
18     @Primary
19     public UserDao userDao1(){
20         UserDao userDao = new UserDao();
21         System.out.println("已创建" + userDao);
22         return userDao;
23     }
24
25     @Bean
26     //先按name尝试注入,name不存在则按类型注入
27     public UserService userService(UserDao udao , EmployeeDao employeeDao){
28         UserService userService = new UserService();
29         System.out.println("已创建" + userService);
30         userService.setUserDao(udao);
31         System.out.println("调用setUserDao:" + udao);
32         userService.setEmployeeDao(employeeDao);
33         return userService;
34     }
35
36     @Bean //<bean id="xxx" clas="xxx">
37     @Scope("prototype")
38     public UserController userController(UserService userService){
39         UserController userController = new UserController();
40         System.out.println("已创建" + userController);
41         userController.setUserService(userService);
42         System.out.println("调用setUserService:" + userService);
43         return userController;
44     }
45 }
启动类
 1 import org.springframework.context.ApplicationContext;
 2 import org.springframework.context.annotation.AnnotationConfigApplicationContext;
 3
 4 public class SpringApplication {
 5     public static void main(String[] args) {
 6         //基于Java Config配置IoC容器的初始化
 7         ApplicationContext context = new AnnotationConfigApplicationContext(Config.class);
 8         System.out.println("=========================");
 9         String[] ids = context.getBeanDefinitionNames();
10         for(String id : ids){
11             System.out.println(id + ":" + context.getBean(id));
12         }
13     }
14 }

 浙公网安备 33010602011771号