2-1-2 前端基础--CSS
样式
背景样式
背景颜色
background-color 属性定义了元素的背景颜色.
 1 <!DOCTYPE html>
 2 <html>
 3 <head>
 4 <meta charset="utf-8">
 5 <title>背景样式</title>
 6 <style>
 7 body
 8 {
 9     background-color:#b0c4de;
10 }
11 </style>
12 </head>
13     <p>背景样式</p>
14 <body>
15 </body>
16 </html>
CSS中,颜色值通常以以下方式定义:
- 十六进制 - 如:"#ff0000"
- RGB - 如:"rgb(255,0,0)"
- 颜色名称 - 如:"red"
背景图像
background-image 属性描述了元素的背景图像.
默认情况下,背景图像进行平铺重复显示,以覆盖整个元素实体.
 1 <!DOCTYPE html>
 2 <html>
 3 <head>
 4 <meta charset="utf-8">
 5 <title>背景图片</title>
 6 <style>
 7 body
 8 {
 9     background-image:url('https://ss2.bdstatic.com/70cFvnSh_Q1YnxGkpoWK1HF6hhy/it/u=3418866984,2025474024&fm=26&gp=0.jpg');
10     background-color:#cccccc;
11 }
12 </style>
13 </head>
14
15 <body>
16 <h1>背景图片</h1>
17 </body>
18
19 </html>
背景图片的重复方向
如果你不想让图像平铺,你可以使用 background-repeat 属性
 1 <!DOCTYPE html>
 2 <html>
 3 <head>
 4 <meta charset="utf-8">
 5 <title>背景图片的重复方向</title>
 6 <style>
 7 body
 8 {
 9     background-image:url('https://ss2.bdstatic.com/70cFvnSh_Q1YnxGkpoWK1HF6hhy/it/u=3418866984,2025474024&fm=26&gp=0.jpg');
10     background-repeat:no-repeat;
11 }
12 </style>
13 </head>
14
15 <body>
16 <h1>Hello World!</h1>
17 <p>runoob 背景图片实例。</p>
18 <p>背景图片只显示一次</p>
19 </body>
20
21 </html>
背景图像设置位置
background-position 属性改变图像在背景中的位置:
 1 <!DOCTYPE html>
 2 <html>
 3 <head>
 4 <meta charset="utf-8">
 5 <title>背景图片位置</title>
 6 <style>
 7 body
 8 {
 9     background-image:url('https://ss2.bdstatic.com/70cFvnSh_Q1YnxGkpoWK1HF6hhy/it/u=3418866984,2025474024&fm=26&gp=0.jpg');
10     background-repeat:no-repeat;
11     background-position:right top;
12     margin-right:200px;
13 }
14 </style>
15
16 </head>
17
18 <body>
19 <h1>Hello World!</h1>
20 <p>背景图片不重复,设置 position 实例。</p>
21 <p>背景图片只显示一次,并与文本分开。</p>
22 <p>实例中还添加了 margin-right 属性用于让文本与图片间隔开。</p>
23 </body>
24
25 </html>
背景是否随滚动条滚动
background-attachment 有可以选scroll,fixed
背景- 简写属性
为了简化这些属性的代码,我们可以将这些属性合并在同一个属性中.
 1 <!DOCTYPE html>
 2 <html>
 3 <head>
 4 <meta charset="utf-8">
 5 <title>背景</title>
 6 <style>
 7 body
 8 {
 9     background:#ffffff url('https://ss2.bdstatic.com/70cFvnSh_Q1YnxGkpoWK1HF6hhy/it/u=3418866984,2025474024&fm=26&gp=0.jpg') no-repeat right top;
10     margin-right:200px;
11 }
12 </style>
13
14 </head>
15
16 <body>
17 <h1>Hello World!</h1>
18 <p>背景图片只显示一次,但它位置离文本比较远。</p>
19 <p>在这个例子中我们添加了一个右边距,所以背景图像不会打扰到文本。</p>
20 </body>
当使用简写属性时,属性值的顺序为
background-color
background-image
background-repeat
background-attachment
background-position
以上属性无需全部使用,你可以按照页面的实际需要使用.
外部样式表
外部样式表就是新建一个文档,里面全写css
1 <link rel="stylesheet" type="text/css" href="index.css">
文本样式
| 属性 | 属性值 | 作用 |
| color | 表示颜色的内容 | 设置文本颜色 |
| direction | ltr,rtl | 文本的方向/书写方向 |
| letter-spacing | npx | 字符间距 |
| line-height | npx | 行高 |
| text-align | left,right,center,justify | 文本对齐方式 |
| text-decoration | none,underline,overline,line-through | 文本的修饰:例如:下划线 |
| text-shadow | h-shadow,v-shadow,blur,color | 文本设置阴影 |
| text-transform | none,capitalize,uppercase,lowercase | 改变字母大小写 |
| text-indent | npx,nem | 首行缩进 |
字体样式
| 属性 | 属性值 | 作用 |
| font-family | 隶书,仿宋,楷体等字体 | 设置字体 |
| font-style | normal,italic,oblique | 规定斜体文本 |
| font-weight | normal,bold,100-900 | 文本的粗细 |
| font-size | npx | 字体大小 |
列表样式
| 属性 | 属性值 | 作用 |
| list-style-type | none,disc,circle,square,decimal | 设置列表项目的外观 |
| list-style-position | inside,outside | 列表符号的位置 |
| list-style-image | url,none | 把图像设置为列表项目的标记 |
| list-style | 同前面三个 | 简写属性,涵盖以上三个列表样式属性 |
伪类选择器
通常超级链接设置的样式,称为伪类
| 属性 | 作用 |
| a:link | 未访问的链接 |
| a:visited | 已访问的链接 |
| a:hover | 鼠标移动到链接上(浮动,悬停) |
| a:active | 向被激活的元素添加样式 |
| :focus | 选择拥有键盘输入焦点的元素 |
结构性伪类选择器
| 属性 | 作用 |
| :first-child | 选择元素的第一个子元素 |
| :last-child | 选择某个元素的最后一个子元素 |
| :nth-child() | 选择某个元素的一个或多个特定的子元素 |
| :nth-last-child() |
选择某个元素的一个或多个特定的子元素, 从这个元素的最后一个子元素开始算 |
| :first-of-type | 选择一个上级元素下的第一个同类子元素 |
html文件
 1 <!DOCTYPE html>
 2 <html lang="en">
 3 <head>
 4     <meta charset="UTF-8">
 5     <title>Document</title>
 6     <link rel="stylesheet" type="text/css" href="index.css">
 7 </head>
 8 <body>
 9
10     <p>测试文字测试文字</p>
11
12     <p>测试文字1</p>
13     <p>测试文字2</p>
14     <h1>测试文字测试文字</h1>
15     <table border="1" width="500px">
16       <tr>
17         <td>1</td>
18         <td>1</td>
19         <td>1</td>
20         <td>1</td>
21       </tr>
22       <tr>
23         <td>1</td>
24         <td>1</td>
25         <td>1</td>
26         <td>1</td>
27       </tr>
28       <tr>
29         <td>1</td>
30         <td>1</td>
31         <td>1</td>
32         <td>1</td>
33       </tr>
34     </table>
35 </body>
36 </html>
css文件
1 p:nth-child(2){
2     background-color: red;
3 }
4
5 td:nth-last-child(2){
6     background-color: green;
7 }
伪元素选择器
| 属性 | 作用 |
| ::selection | 选择指定元素中被用户选中的内容 |
| ::before | 可以在内容之前插入新内容 |
| ::after | 可以在内容之后插入新内容 |
| ::first-line | 选择指定选择器的首行 |
| ::first-letter | 选择文本的第一个字符 |
示例:
html文件
 1 <!DOCTYPE html>
 2 <html lang="en">
 3 <head>
 4     <meta charset="UTF-8">
 5     <title>Document</title>
 6     <link rel="stylesheet" type="text/css" href="index.css">
 7 </head>
 8 <body>
 9
10     <p>测试测试测试测试测试测试测试测试测试测试</p>
11
12     <p>测试测试</p>
13     <p>测试测试</p>
14     <h1>测试测试测试测试</h1>
15     <p>
16         测试测试测试测试测试测试测试测试测试测试测试测试测试测试测试测试测试测试测试测试</p>
17     <table border="1" width="500px">
18       <tr>
19         <td>1</td>
20         <td>1</td>
21         <td>1</td>
22         <td>1</td>
23       </tr>
24       <tr>
25         <td>1</td>
26         <td>1</td>
27         <td>1</td>
28         <td>1</td>
29       </tr>
30       <tr>
31         <td>1</td>
32         <td>1</td>
33         <td>1</td>
34         <td>1</td>
35       </tr>
36     </table>
37 </body>
38 </html>
css文件
 1 /*可以将p换成h1*/
 2 p::before{
 3     content: "终于找到你,";
 4 }
 5 /*可以将body也换成h1*/
 6 body::after{
 7     content: "依依不舍离开你,";
 8 }
 9 p::first-line{
10     background-color: yellow;
11 }
12 p::first-letter{
13     font-size: 30px;
14 }
15 p::selection{
16     background-color: red;
17 }
CSS其他选择器
| 选择器 | 作用 |
| id , * | 选择指定元素中被用户选中的内容 |
| 逗号选择器 | 联合选择器 |
| 空格选择器 | 子孙(后代)选择器 |
| >选择器 | 子选择器(不是子孙后代) |
| +选择器 | 相邻兄弟选择器 |
| [] | 属性选择器 |
div溢出效果处理(overflow属性设置)
| 属性 | 作用 |
| visible | 默认值.内容不会被修剪,会呈现在元素框之外. |
| hidden | 超出部分被隐藏 |
| scroll | 不论是否需要,都显示滚动条 |
| auto | 按需显示滚动条以便查看其余内容 |
css轮廓(outline)
绘制元素周围的一条线
dashed(虚线轮廓),dotted(点状轮廓),solid(实线),double(双线)
css边框:border-left,border-right,border-top,border-bottom
制作只有下边框的文本框
html文件
 1 <!DOCTYPE html>
 2 <html lang="en">
 3 <head>
 4    <meta charset="UTF-8">
 5    <title>Document</title>
 6    <link rel="stylesheet" href="index.css">
 7 </head>
 8 <body>
 9    <div id="div2">
10     <label>姓名:</label> <input type="text">
11    </div>
12 </body>
13 </html>
css文件
1 input{
2    border:none;
3    border-bottom: solid;
4    outline: none;
5 }
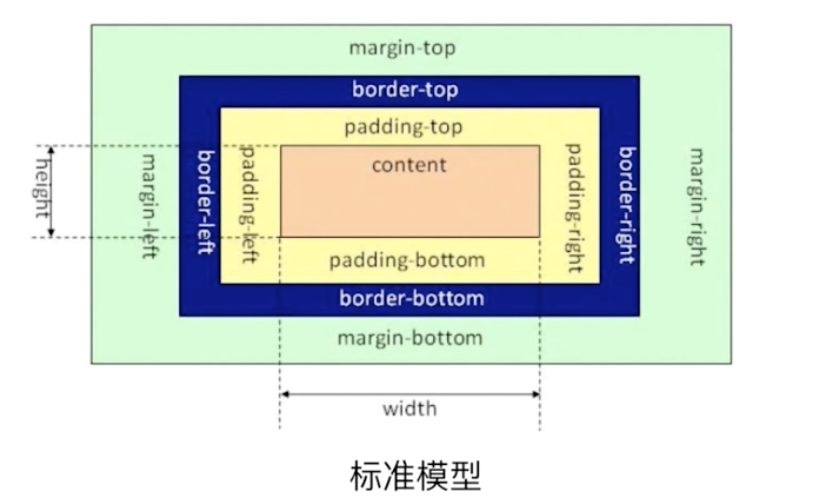
盒子模型
行级元素
行内元素和其他元素都会在一条水平线上排列,都是同一行的
a标签,label,img,span等
块级元素
块级元素在默认情况下,会独占一行
div,h标签,li,table等
定位机制
(标准)文档流
特点:空白折叠现象;高矮不起,底边对齐;自动换行,一行写满,换行写
脱标流(float, position:absolute)
float属性设置
| 属性 | 作用 |
| left | 元素向左浮动 |
| right | 元素向右浮动 |
| none | 默认值.元素不浮动 |
float清除浮动
清除浮动的原因:
为了父元素不会出现"高度崩塌"
如果强制规定外层容器的尺寸,则显得就那么灵活,高度就不能自适应了
从某个元素开始,不需要浮动效果了
一般两种方法
clear:both;
zoom:1;
定位
相对定位
position:relative
相对定位的偏移参考是元素本身,不会使元素脱离文档流.元素的初始位置占据空间会被保留.
绝对定位
position:absolute
相对于已定位的最近的祖先元素,如果没有已定位的最近的祖先元素,那么它的位置就相对于最初包含块(如body)
固定定位
position:fixed
相对于浏览器窗口定位
z-index
元素的堆叠顺序,数字大的元素会处于数字小的元素前面

 浙公网安备 33010602011771号