实验7:基于REST API的SDN北向应用实践
实验7:基于REST API的SDN北向应用实践
一、实验目的
- 能够编写程序调用OpenDaylight REST API实现特定网络功能;
- 能够编写程序调用Ryu REST API实现特定网络功能。
二、实验环境
- 下载虚拟机软件Oracle VisualBox或VMware;
- 在虚拟机中安装Ubuntu 20.04 Desktop amd64,并完整安装Mininet、OpenDaylight(Carbon版本)、Postman和Ryu;
三、实验要求
(一)基本要求
-
OpenDaylight
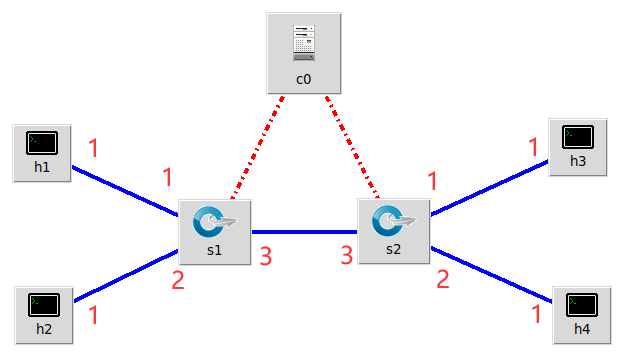
(1) 利用Mininet平台搭建下图所示网络拓扑,并连接OpenDaylight;

构建拓扑并连接OpenDaylight

(2) 编写Python程序,调用OpenDaylight的北向接口下发指令删除s1上的流表数据。
#!/usr/bin/python
import requests
from requests.auth import HTTPBasicAuth

if __name__ == "__main__":
    url = 'http://127.0.0.1:8181/restconf/config/opendaylight-inventory:nodes/node/openflow:1/'
    headers = {'Content-Type': 'application/json'}
    res = requests.delete(url, headers=headers, auth=HTTPBasicAuth('admin', 'admin'))
    print (res.content)
(3) 编写Python程序,调用OpenDaylight的北向接口下发硬超时流表,实现拓扑内主机h1和h3网络中断20s。
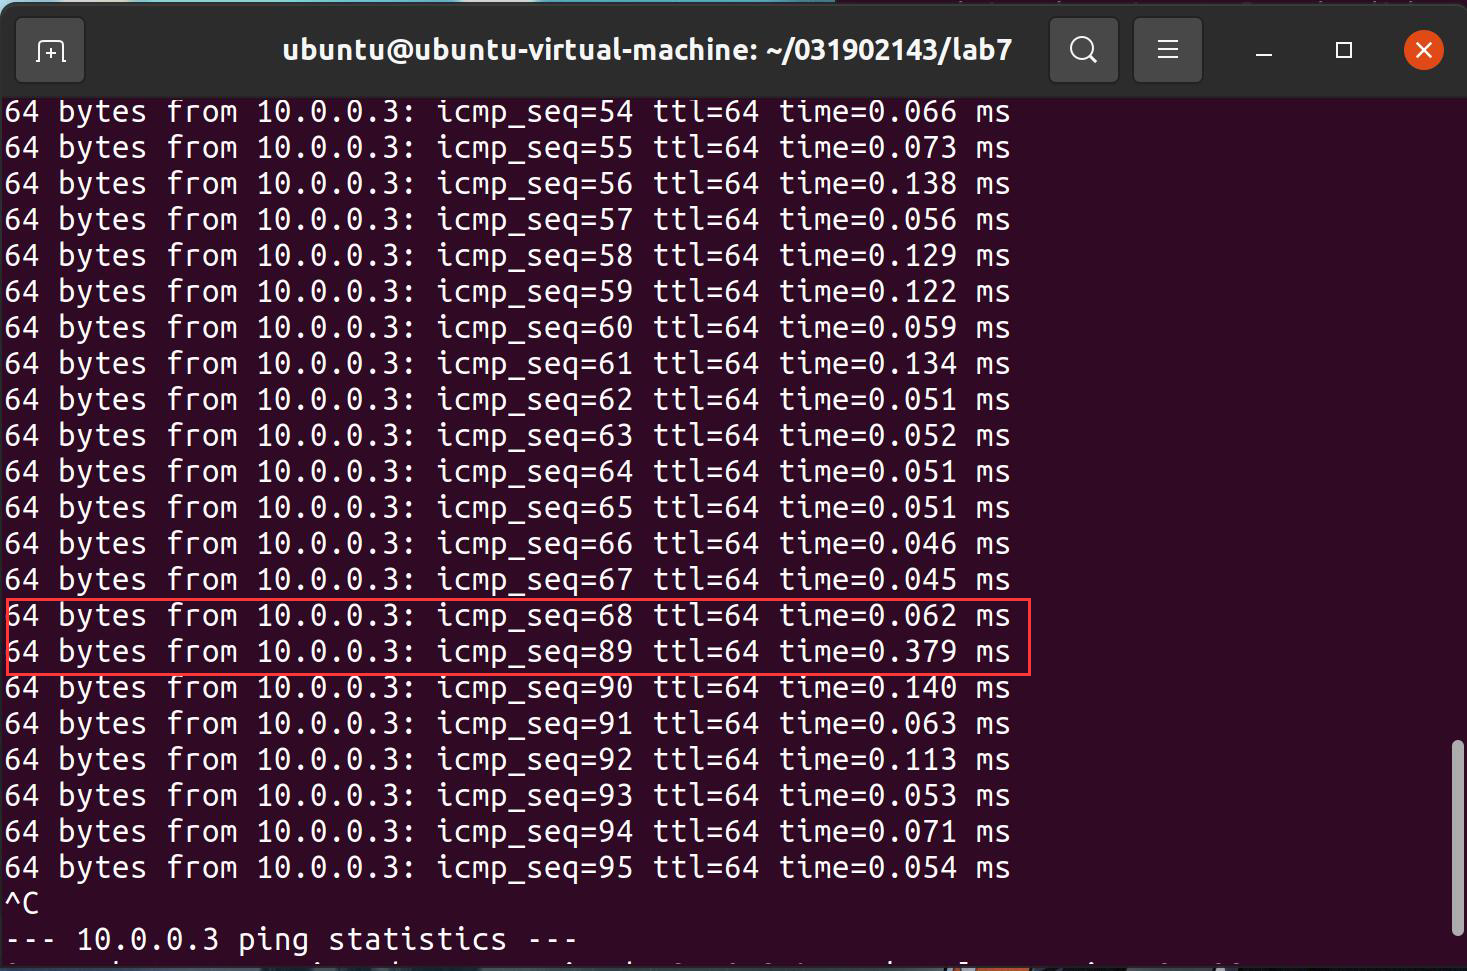
#!/usr/bin/python
import requests
from requests.auth import HTTPBasicAuth

if __name__ == "__main__":
    url = 'http://127.0.0.1:8181/restconf/config/opendaylight-inventory:nodes/node/openflow:1/flow-node-inventory:table/0/flow/1'
    with open("./flow.json") as f:
        jstr = f.read()
    headers = {'Content-Type': 'application/json'}
    res = requests.put(url, jstr, headers=headers, auth=HTTPBasicAuth('admin', 'admin'))
    print (res.content)
{ "flow": [ { "id": "1", "match": { "in-port": "1", "ethernet-match": { "ethernet-type": { "type": "0x0800" } }, "ipv4-destination": "10.0.0.3/32" }, "instructions": { "instruction": [ { "order": "0", "apply-actions": { "action": [ { "order": "0", "drop-action": {} } ] } } ] }, "flow-name": "flow1", "priority": "65535", "hard-timeout": "20", "cookie": "2", "table_id": "0" } ] }flow.json文件结果如下图
(4) 编写Python程序,调用OpenDaylight的北向接口获取s1上活动的流表数。
  #!/usr/bin/python
  import requests
  from requests.auth import HTTPBasicAuth
  def http_get(url):
      url= url
      headers = {'Content-Type':'application/json'}
      resp = requests.get(url,headers=headers,auth=HTTPBasicAuth('admin','admin'))
      return resp

  if __name__ == "__main__":
      url='http://127.0.0.1:8181/restconf/operational/opendaylight-inventory:nodes/node/openflow:1/flow-node-inventory:table/0/opendaylight-flow-table-statistics:flow-table-statistics'
      resp = http_get(url)
      print(resp.content)
结果如下

-
Ryu
运行Ryu
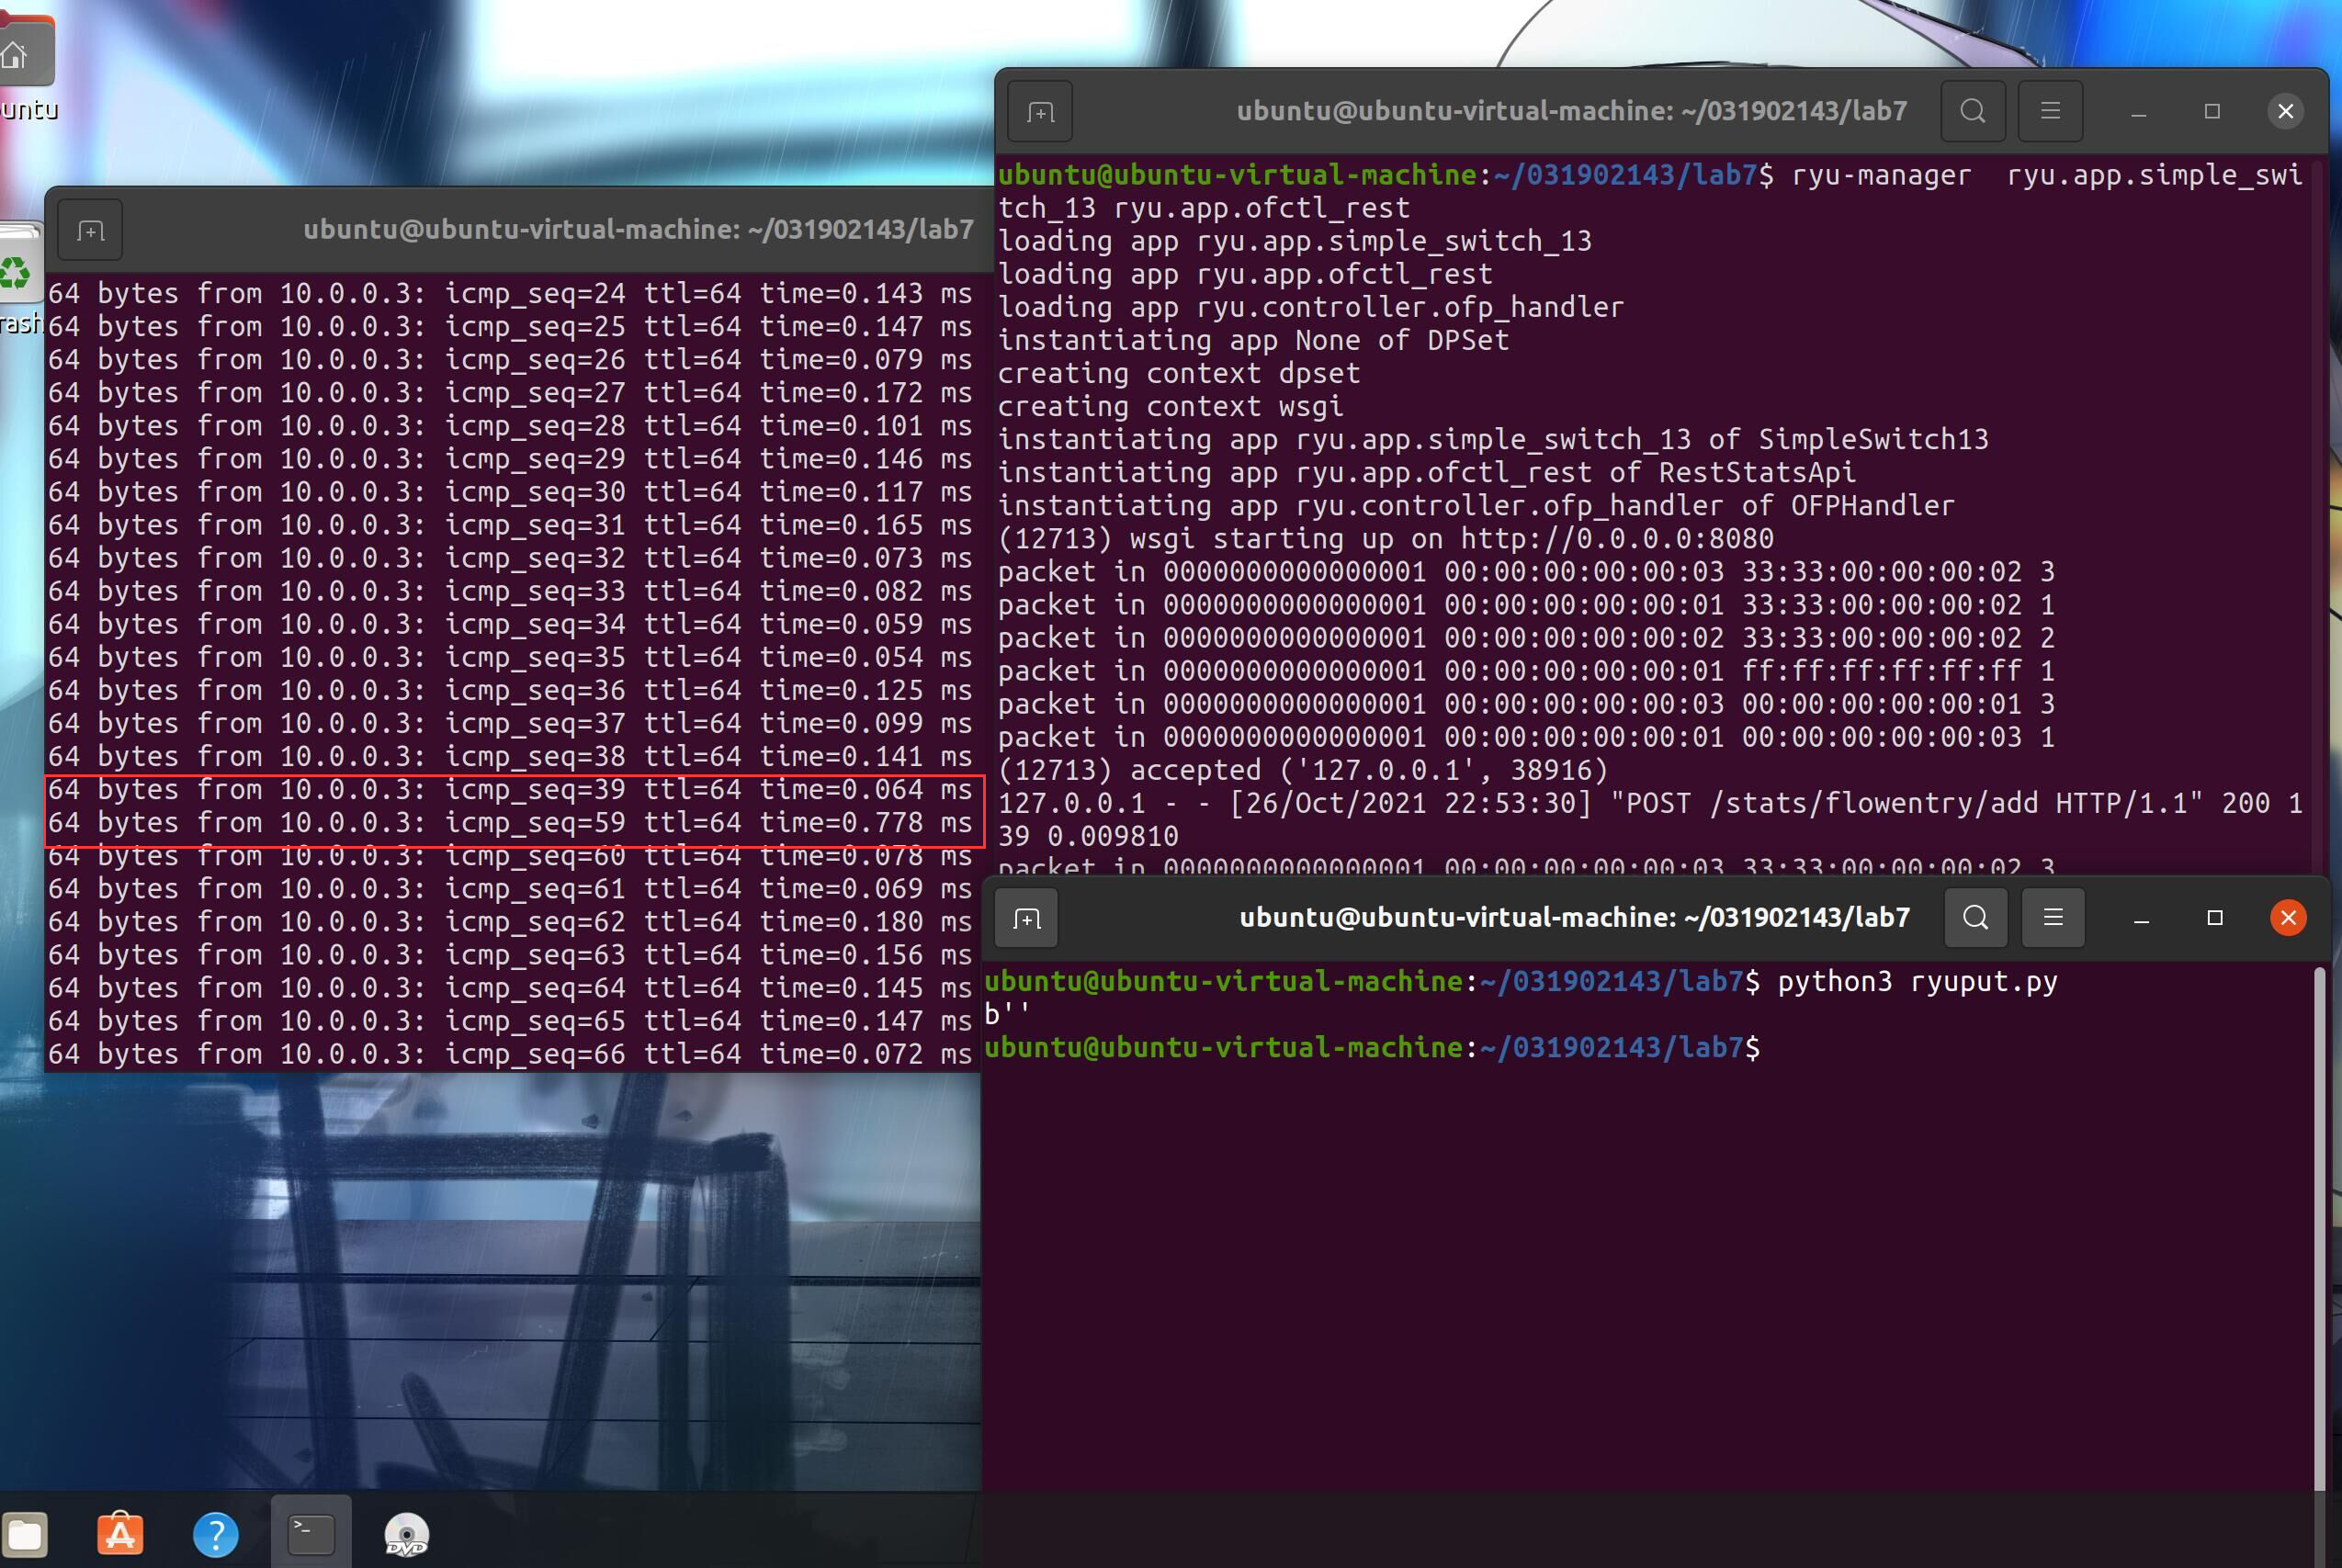
ryu-manager ryu.app.simple_switch_13 ryu.app.ofctl_rest(1) 编写Python程序,调用Ryu的北向接口,实现上述OpenDaylight实验拓扑上相同的硬超时流表下发。
#!/usr/bin/python import requests if __name__ == "__main__": url = 'http://127.0.0.1:8080/stats/flowentry/add' with open("./ryu.json") as f: jstr = f.read() headers = {'Content-Type': 'application/json'} res = requests.post(url, jstr, headers=headers) print (res.content)ryu.json{ "dpid": 1, "cookie": 1, "cookie_mask": 1, "table_id": 0, "hard_timeout": 20, "priority": 65535, "flags": 1, "match":{ "in_port":1 }, "actions":[ { "type":"OUTPUT", "port": 2 } ] }执行结果
(2) 利用Mininet平台搭建下图所示网络拓扑,要求支持OpenFlow 1.3协议,主机名、交换机名以及端口对应正确。拓扑生成后需连接Ryu,且Ryu应能够提供REST API服务。
构建拓扑:
topo.py#!/usr/bin/env python from mininet.topo import Topo class MyTopo(Topo): def __init__(self): # initilaize topology Topo.__init__(self) self.addSwitch("s1") self.addSwitch("s2") self.addHost("h1") self.addHost("h2") self.addHost("h3") self.addHost("h4") self.addLink("s1", "h1") self.addLink("s1", "h2") self.addLink("s2", "h3") self.addLink("s2", "h4") self.addLink("s1", "s2") topos = {'mytopo': (lambda: MyTopo())}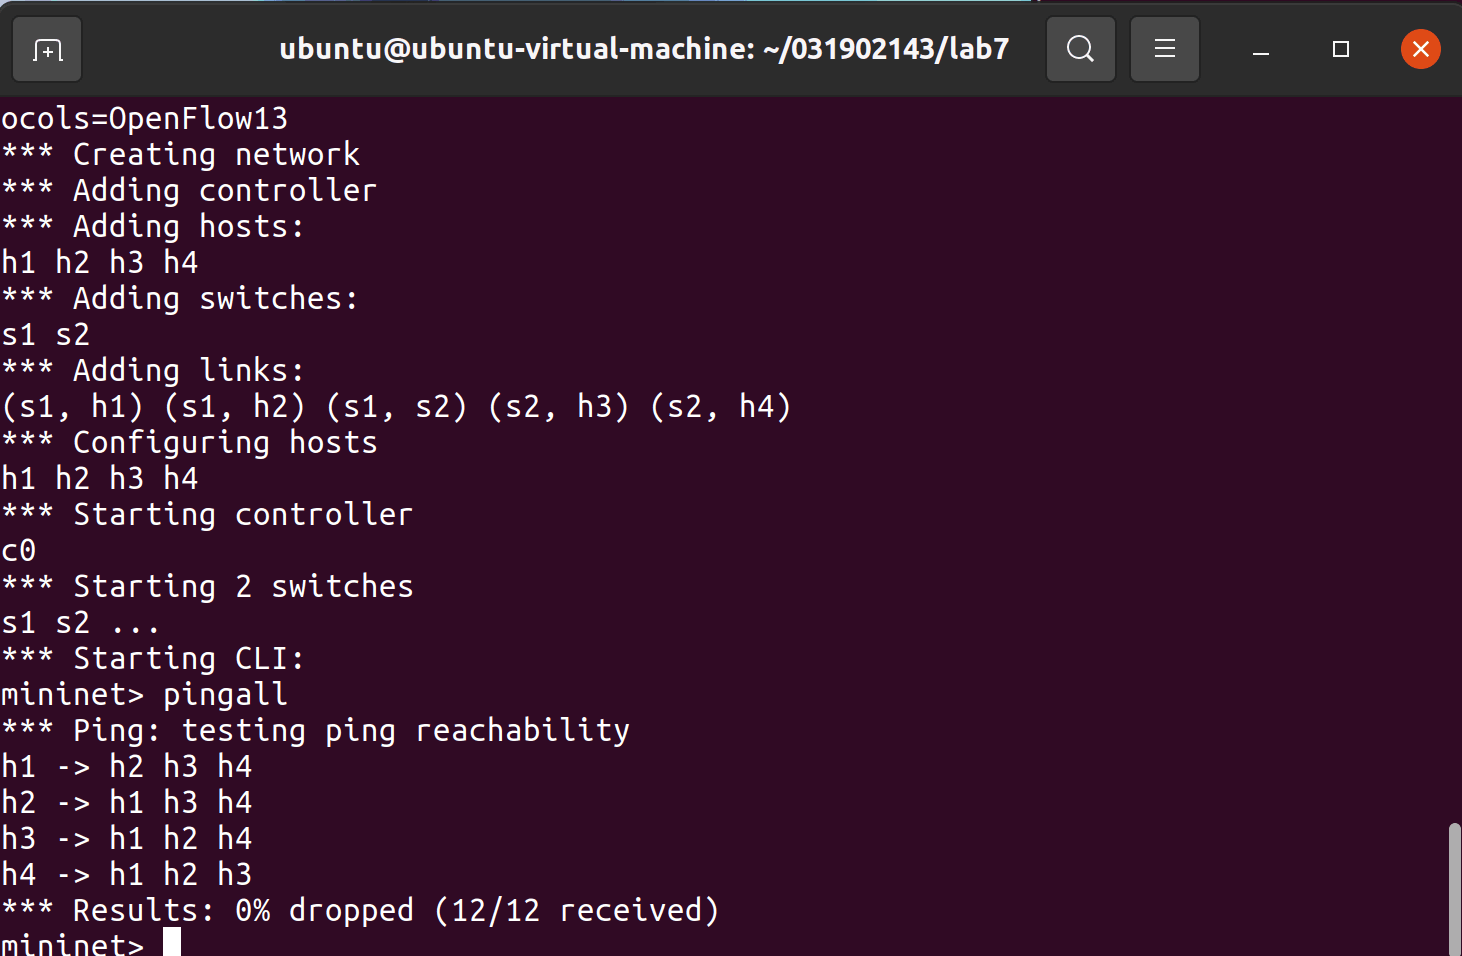
(3) 整理一个Shell脚本,参考Ryu REST API的文档,利用curl命令,实现和实验2相同的VLAN。
执行命令
curl -X DELETE http://localhost:8080/stats/flowentry/clear/1curl -X DELETE http://localhost:8080/stats/flowentry/clear/2shell脚本
shell.sh# 将主机1,2发送来的数据包打上vlan标记 curl -X POST -d '{ "dpid": 1, "priority": 1, "match":{ "in_port": 1 }, "actions":[ { "type": "PUSH_VLAN", "ethertype": 33024 }, { "type": "SET_FIELD", "field": "vlan_vid", "value": 4096 }, { "type": "OUTPUT", "port": 3 } ] }' http://localhost:8080/stats/flowentry/add curl -X POST -d '{ "dpid": 1, "priority": 1, "match":{ "in_port": 2 }, "actions":[ { "type": "PUSH_VLAN", "ethertype": 33024 }, { "type": "SET_FIELD", "field": "vlan_vid", "value": 4097 }, { "type": "OUTPUT", "port": 3 } ] }' http://localhost:8080/stats/flowentry/add # 将主机3,4发送来的数据包取出vlan标记 curl -X POST -d '{ "dpid": 1, "priority": 1, "match":{ "vlan_vid": 0 }, "actions":[ { "type": "POP_VLAN", "ethertype": 33024 }, { "type": "OUTPUT", "port": 1 } ] }' http://localhost:8080/stats/flowentry/add curl -X POST -d '{ "dpid": 1, "priority": 1, "match":{ "vlan_vid": 1 }, "actions":[ { "type": "POP_VLAN", "ethertype": 33024 }, { "type": "OUTPUT", "port": 2 } ] }' http://localhost:8080/stats/flowentry/add # 将主机3,4发送来的数据包打上vlan标记 curl -X POST -d '{ "dpid": 2, "priority": 1, "match":{ "in_port": 1 }, "actions":[ { "type": "PUSH_VLAN", "ethertype": 33024 }, { "type": "SET_FIELD", "field": "vlan_vid", "value": 4096 }, { "type": "OUTPUT", "port": 3 } ] }' http://localhost:8080/stats/flowentry/add curl -X POST -d '{ "dpid": 2, "priority": 1, "match":{ "in_port": 2 }, "actions":[ { "type": "PUSH_VLAN", "ethertype": 33024 }, { "type": "SET_FIELD", "field": "vlan_vid", "value": 4097 }, { "type": "OUTPUT", "port": 3 } ] }' http://localhost:8080/stats/flowentry/add curl -X POST -d '{ "dpid": 2, "priority": 1, "match":{ "vlan_vid": 0 }, "actions":[ { "type": "POP_VLAN", "ethertype": 33024 }, { "type": "OUTPUT", "port": 1 } ] }' http://localhost:8080/stats/flowentry/add curl -X POST -d '{ "dpid": 2, "priority": 1, "match":{ "vlan_vid": 1 }, "actions":[ { "type": "POP_VLAN", "ethertype": 33024 }, { "type": "OUTPUT", "port": 2 } ] }' http://localhost:8080/stats/flowentry/addVLAN_ID Hosts 0 h1 h3 1 h2 h4
结果

(二)进阶要求
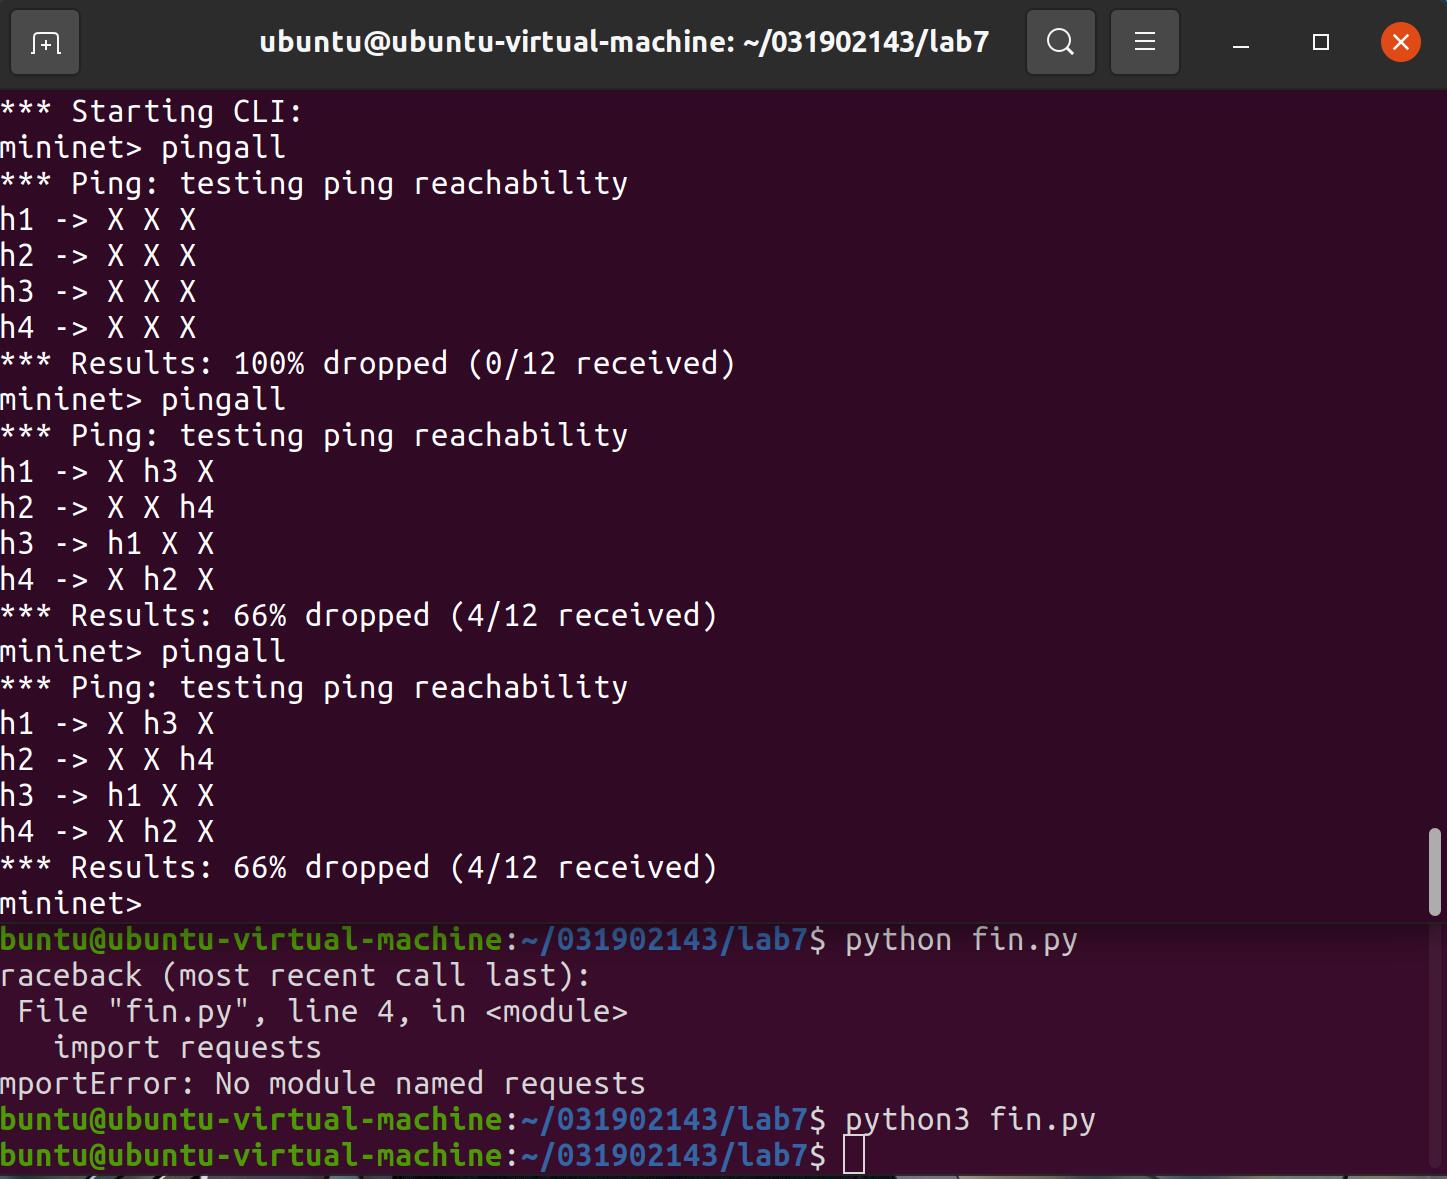
编程实现基本要求第2部分Ryu(3)中的VLAN划分。
fin.py
#!/usr/bin/python
import json

import requests

if __name__ == "__main__":
    url = 'http://127.0.0.1:8080/stats/flowentry/add'
    headers = {'Content-Type': 'application/json'}
    flow1 = {
        "dpid": 1,
        "priority": 1,
        "match":{
            "in_port": 1
        },
        "actions":[
            {
                "type": "PUSH_VLAN",
                "ethertype": 33024
            },
            {
                "type": "SET_FIELD",
                "field": "vlan_vid",
                "value": 4096
            },
            {
                "type": "OUTPUT",
                "port": 3
            }
        ]
    }
    flow2 = {
        "dpid": 1,
        "priority": 1,
        "match":{
            "in_port": 2
        },
        "actions":[
            {
                "type": "PUSH_VLAN",
                "ethertype": 33024
            },
            {
                "type": "SET_FIELD",
                "field": "vlan_vid",
                "value": 4097
            },
            {
                "type": "OUTPUT",
                "port": 3
            }
        ]
    }
    flow3 = {
        "dpid": 1,
        "priority": 1,
        "match":{
            "vlan_vid": 0
        },
        "actions":[
            {
                "type": "POP_VLAN",
                "ethertype": 33024
            },
            {
                "type": "OUTPUT",
                "port": 1
            }
        ]
    }
    flow4 = {
        "dpid": 1,
        "priority": 1,
        "match": {
            "vlan_vid": 1
        },
        "actions": [
            {
                "type": "POP_VLAN",
                "ethertype": 33024
            },
            {
                "type": "OUTPUT",
                "port": 2
            }
        ]
    }
    flow5 = {
        "dpid": 2,
        "priority": 1,
        "match": {
            "in_port": 1
        },
        "actions": [
            {
                "type": "PUSH_VLAN",
                "ethertype": 33024
            },
            {
                "type": "SET_FIELD",
                "field": "vlan_vid",
                "value": 4096
            },
            {
                "type": "OUTPUT",
                "port": 3
            }
        ]
    }
    flow6 = {
        "dpid": 2,
        "priority": 1,
        "match": {
            "in_port": 2
        },
        "actions": [
            {
                "type": "PUSH_VLAN",
                "ethertype": 33024
            },
            {
                "type": "SET_FIELD",
                "field": "vlan_vid",
                "value": 4097
            },
            {
                "type": "OUTPUT",
                "port": 3
            }
        ]
    }
    flow7 = {
        "dpid": 2,
        "priority": 1,
        "match": {
            "vlan_vid": 0
        },
        "actions": [
            {
                "type": "POP_VLAN",
                "ethertype": 33024
            },
            {
                "type": "OUTPUT",
                "port": 1
            }
        ]
    }
    flow8 = {
        "dpid": 2,
        "priority": 1,
        "match": {
            "vlan_vid": 1
        },
        "actions": [
            {
                "type": "POP_VLAN",
                "ethertype": 33024
            },
            {
                "type": "OUTPUT",
                "port": 2
            }
        ]
    }
    res1 = requests.post(url, json.dumps(flow1), headers=headers)
    res2 = requests.post(url, json.dumps(flow2), headers=headers)
    res3 = requests.post(url, json.dumps(flow3), headers=headers)
    res4 = requests.post(url, json.dumps(flow4), headers=headers)
    res5 = requests.post(url, json.dumps(flow5), headers=headers)
    res6 = requests.post(url, json.dumps(flow6), headers=headers)
    res7 = requests.post(url, json.dumps(flow7), headers=headers)
    res8 = requests.post(url, json.dumps(flow8), headers=headers)
(三)实验总结
3.1 实验难度:较大,实验涉及到OpenDaylight以及Ryu的使用,由于对它们使用的不够熟练,所以要重温之前的实验复习OpenDaylight以及Ryu的使用。
3.2 遇到的困难以及解决办法:
Q:
A:出现这种原因就是因为安装了多个版本的python,而且之前利用pip3 install requests给python3安装了requests模块,而python2.7没有安装requests模块,在终端输入 python 发现python配置的是2.7的环境变量,所以找不到requests模块。解决办法:将 python delete.py 改成 python3 delete.py
Q:
A:还未创建拓扑,应该先创建拓扑。
Q: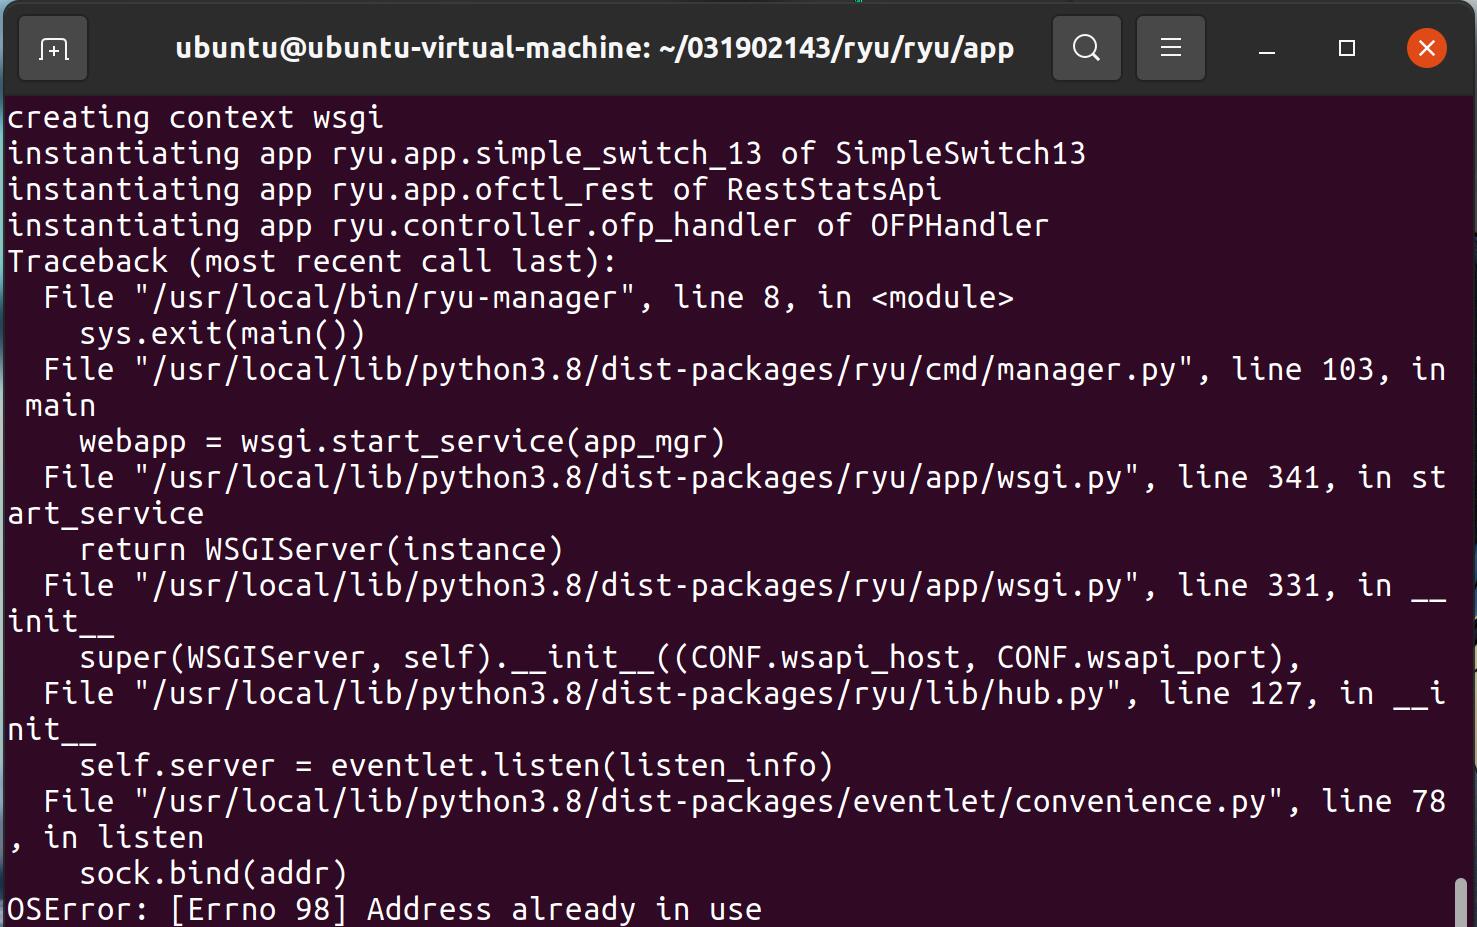
A:kill 掉占用端口号6633的程序
3.3 个人感想:通过实验复习了OpenDaylight以及Ryu的使用,学会编写程序调用OpenDaylight REST API实现特定网络功能以及学会编写程序调用Ryu REST API实现特定网络功能。

 浙公网安备 33010602011771号