Spring中的Bean
可以把Spring容器看做一个大型的工厂,而Spring容器中的Bean就是该工厂的产品
Spring容器支持两种格式的配置文件,分别为Properties文件格式和XML文件格式。
bean的配置
一个<bean>元素中包含很多属性,具体如下。
id:是一个Bean的唯一 标识符, Spring容器对Bean的配置、管理都通过该属性来完成
name:Spring容器同样可以通过此属性对容器中的Bean进行配置和管理,name属性中可以为Bean指定多个名称,每个名称之间用逗号或分号隔开(由于Bean的id属性在Spring容器中是唯一的,如果想给Bean添加别名
或者想使用些不合法的XML字符,如“/”,就可以通过name属性进行设定)
class:该属性指定了Bean的具体实现类,它必须是一个完整的类名,使用类的全限定名。
scope:用来设定Bean实例的作用域,其属性值有singleton(单例)、prototype(原型)、request.session和global Session。其默认值是singleton
constructor arg: bean 元素的子元素,可以使用此元素传人构造参数进行实例化。该元素的index属性指定构造参数的序号(从0开始),type属性指定构造参数的类型,其参数值可以通过ref属性或者value 属性直接指定,也可以通过ref 或value 元素指定
数值可以通过ref属性或者value 属性直接指定,也可以通过ref 或value素指定
property:bean元素的子元素.用于调用Bean实例中的Setter方法完成属性赋值从而完成依赖注入。该元素的name属性指定Bean实例中的相应属性名,属性值可通过ref或value属性直接指定。
ref:property、constructor-arg等元素的子元素,该元素中的 bean属性用于指定对Bean工厂中某个Bean实例的引用。
value: property 、constructor-arg等元素的子元素,用来直接指定一个 常量值。
list::用于封装List或数组类型的依赖注人。
set:用于封装Set类型属性的依赖注人。
map:用于封装Map类型属性的依赖注人。
entry::map元素的子元素,用于设置一一个键值对。其key属性指定字符串类型的键值,ref或value 子元素指定其值。
在配置文件文件中,通常一个普通Bean只需要定义Id(或者name)和class两个属性即可,定义Bean的方式如下:
<?xml version="1.0" encoding="UTF-8"?>
<beans xmlns="http://www.springframework.org/schema/beans"
    xmlns:context="http://www.springframework.org/schema/context" xmlns:p="http://www.springframework.org/schema/p"
    xmlns:aop="http://www.springframework.org/schema/aop" xmlns:tx="http://www.springframework.org/schema/tx"
    xmlns:xsi="http://www.w3.org/2001/XMLSchema-instance"
    xsi:schemaLocation="http://www.springframework.org/schema/beans http://www.springframework.org/schema/beans/spring-beans-4.0.xsd
    http://www.springframework.org/schema/context http://www.springframework.org/schema/context/spring-context-4.0.xsd
    http://www.springframework.org/schema/aop http://www.springframework.org/schema/aop/spring-aop-4.0.xsd http://www.springframework.org/schema/tx http://www.springframework.org/schema/tx/spring-tx-4.0.xsd
    http://www.springframework.org/schema/util http://www.springframework.org/schema/util/spring-util-4.0.xsd">
    <bean id="bean" class="cn.itcast.bean"></bean>
</beans>
Bean的实例化
在面向对象的程序中,要想使用某个对象,就需要先实例化这个对象。在Spring中,实例化Bean有三种方式,分别为构造器实例化、静态工厂实例化和实例化工厂方式实例化。
构造器实例化 构造器实例化是指Spring容器通过Bean对应的类中默认的构造函数来实例化Bean。
1.Bean.java
package cn.itcast.instance.controller
public class Bean{
}
2.Bean.xml
<?xml version="1.0" encoding="UTF-8"?>
<beans xmlns="http://www.springframework.org/schema/beans"
    xmlns:context="http://www.springframework.org/schema/context" xmlns:p="http://www.springframework.org/schema/p"
    xmlns:aop="http://www.springframework.org/schema/aop" xmlns:tx="http://www.springframework.org/schema/tx"
    xmlns:xsi="http://www.w3.org/2001/XMLSchema-instance"
    xsi:schemaLocation="http://www.springframework.org/schema/beans http://www.springframework.org/schema/beans/spring-beans-4.0.xsd
    http://www.springframework.org/schema/context http://www.springframework.org/schema/context/spring-context-4.0.xsd
    http://www.springframework.org/schema/aop http://www.springframework.org/schema/aop/spring-aop-4.0.xsd http://www.springframework.org/schema/tx http://www.springframework.org/schema/tx/spring-tx-4.0.xsd
    http://www.springframework.org/schema/util http://www.springframework.org/schema/util/spring-util-4.0.xsd">
    <bean id="bean" class="cn.itcast.instance.countroller.Bean"></bean>
</beans>
3.InstanceTest.java
public class InstanceTest{
@Test
  public void   Test{
ClassPathXmlApplicationContext applicationContext = new ClassPathXmlApplicationContext("applicationContext.xml");

}}
静态工厂方式实例化
1.MyBeanFactory.java
package cn.itcast.instance.static_factory
 public class MyBeanFactory{
    public static Bean createBean(){
      return new Bean;
}

}
2.Bean.xml
 <?xml version="1.0" encoding="UTF-8"?>
<beans xmlns="http://www.springframework.org/schema/beans"
    xmlns:context="http://www.springframework.org/schema/context" xmlns:p="http://www.springframework.org/schema/p"
    xmlns:aop="http://www.springframework.org/schema/aop" xmlns:tx="http://www.springframework.org/schema/tx"
    xmlns:xsi="http://www.w3.org/2001/XMLSchema-instance"
    xsi:schemaLocation="http://www.springframework.org/schema/beans http://www.springframework.org/schema/beans/spring-beans-4.0.xsd
    http://www.springframework.org/schema/context http://www.springframework.org/schema/context/spring-context-4.0.xsd
    http://www.springframework.org/schema/aop http://www.springframework.org/schema/aop/spring-aop-4.0.xsd http://www.springframework.org/schema/tx http://www.springframework.org/schema/tx/spring-tx-4.0.xsd
    http://www.springframework.org/schema/util http://www.springframework.org/schema/util/spring-util-4.0.xsd">
    <bean id="bean" class="cn.itcast.instance.static_factory.MyBeanFactory"
     factory-method = "createBean"></bean>
</beans>
3.InstanceTest.java
public class InstanceTest{
@Test
  public void   Test{
ClassPathXmlApplicationContext applicationContext = new ClassPathXmlApplicationContext("applicationContext.xml");

}}
实例工厂方式实例化
1.MyBeanFactory.java
package cn.itcast.instance.static_factory
 public class MyBeanFactory{
    public Bean createBean(){
      return new Bean;
}

}
2.bean.xml
 <?xml version="1.0" encoding="UTF-8"?>
<beans xmlns="http://www.springframework.org/schema/beans"
    xmlns:context="http://www.springframework.org/schema/context" xmlns:p="http://www.springframework.org/schema/p"
    xmlns:aop="http://www.springframework.org/schema/aop" xmlns:tx="http://www.springframework.org/schema/tx"
    xmlns:xsi="http://www.w3.org/2001/XMLSchema-instance"
    xsi:schemaLocation="http://www.springframework.org/schema/beans http://www.springframework.org/schema/beans/spring-beans-4.0.xsd
    http://www.springframework.org/schema/context http://www.springframework.org/schema/context/spring-context-4.0.xsd
    http://www.springframework.org/schema/aop http://www.springframework.org/schema/aop/spring-aop-4.0.xsd http://www.springframework.org/schema/tx http://www.springframework.org/schema/tx/spring-tx-4.0.xsd
    http://www.springframework.org/schema/util http://www.springframework.org/schema/util/spring-util-4.0.xsd">
    <bean id="MyBeanFactory" class="cn.itcast.instance.factory.MyBeanFactory"/>
    <bean id = "bean" factory-bean = "myBeanFactory"
factory-method = "createBean"></bean>
</beans>
3.InstanceTest.java
public class InstanceTest{
@Test
  public void   Test{
ClassPathXmlApplicationContext applicationContext = new ClassPathXmlApplicationContext("applicationContext.xml");

}}
Bean的作用域
1.singleton:单例模式,使用singleton定义的Bean在Spring容器中将只有一个实例,也就是说,无论有多少个Bean引用它,始终指向同一个对象。这也是spring容器默认的作用域。
2.prototype:原型模式.每次通过Spring容器获取的prototype定义的Bean时,容器都将创建一个新的Bean实例。
3.request::在一-次HTTP请求中,容器会返回该Bean的同一个实例。而对不同的HTTP请求则会产生一个新的Bean, 而且该Bean仅在当前HTTP Request 内有效。
4.session:session: 在一一次HTTP Session中,容器会返回该Bean的同一个实例。而对不同的HTTP请求则会产生一个新的Bean,而且该Bean仅在当前HTTP Session内有效。
5.globalSession:在-个全局的HTTP Session中,容器会返回该Bean 的同一个实例。仅在使用protlet context 时有效。
Bean的生命周期
spring容器可以管理singleton作用域下Bean的生命周期,在此作用域下,Spring能够精确的知道该Bean何时被创建,何时初始化完成,以及何时被销毁,而对于prototype作用
域的Bean,spring只负责创建,当容器创建了Bean实例后,Bean的实例就交给客户端代码来管理,spring容器不在跟踪其生命周期
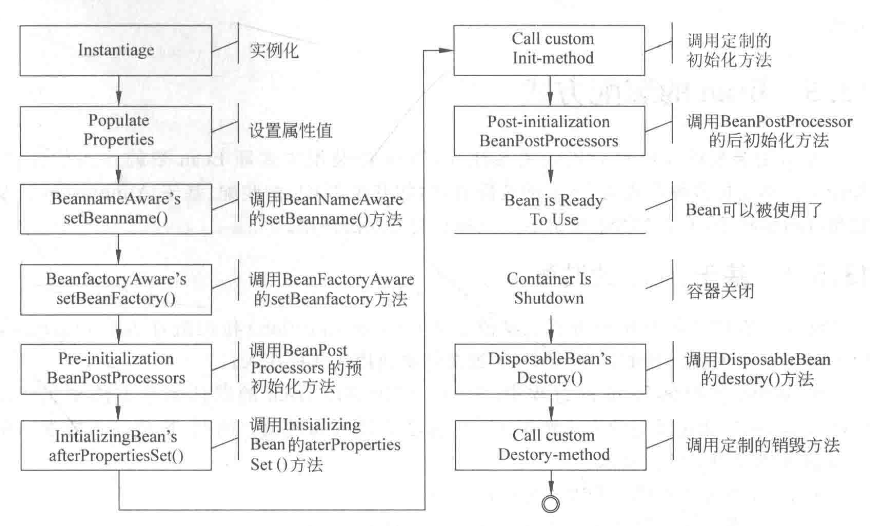
(1) Spring 实例化Bean。
(2)利用依赖注人来配置Bean中的所有属性值。
(3)如果Bean实现了BeanNameAware接口,则Spring调用Bean的setBeanName()方法传入当前Bean的ID值。
(4)如果Bean实现了BeanFactoryAware接口,则Spring调用setBeanFactory()方法传入当前工厂实例的引用。.
(5)如果Bean实现了ApplicationContextAware接口,则Spring调用setApplicationContext()方法传入当前ApplicationContext实例的引用。
(6)如果Bean实现了BeanPostProcessor 接口,则Spring 会调用postProcessBeforeInitialzation()方法。
(7)如果Bean实现了InitializingBean 接口,则Spring会调用afterpropertiesSet()方法。
(8)如果在配置文件中通过init-method属性指定了初始化方法,则调用该初始化方法。
(9)如果Bean实现了BeanPostProcessor 接口,则Spring 会调用postProcessAfterInitialization()方法。
(10)此时, Bean实例化完成,就可以被使用了,它将一直存在于Spring容器中,直到被销毁。
(11)如果Bean实现了DisposableBean接口,则Spring会调用destory()方法。
(12)如果在配置文件中通过destory-method属性指定了Bean的销毁方法,则可调用该方法。
Bean的装配方式
Bean的装配可以理解为依赖关系注人,Bean的装配方式即Bean 依赖注人的方式。Spring容器支持多种形式的Bean的装配方式,如基于XML的装配、基于Annotation的装
配和自动装配等。
基于XML的装配
Spring依赖注人有两种方式:设值注人( Setter Injection) 和构造注入( ConstructorInjection)。下面就讲解如何在XML配置文件中使用这两种注入。
在Spring实例化Bean的过程中,Spring首先调用Bean的默认构造方法来实例化Bean对象,然后通过反射的方式调用setter 方法来注人属性值。因此,设值注人要求一个
Bean必须满足以下两点要求:
●Bean类必须提供--个默认的构造方法。
●Bean类必须为需要注人的属性提供对应的setter方法。
使用设值注人时,在Spring配置文件中,需要使用< bean>元素的子元素< property>元素来为每个属性注入值。而使用构造注入时,在配置文件里,主要是使用< constructor-
arg>标签来定义构造方法的参数,可以使用其value属性(或子元素)来设置该参数的值。
 <?xml version="1.0" encoding="UTF-8"?>
<beans xmlns="http://www.springframework.org/schema/beans"
    xmlns:context="http://www.springframework.org/schema/context" xmlns:p="http://www.springframework.org/schema/p"
    xmlns:aop="http://www.springframework.org/schema/aop" xmlns:tx="http://www.springframework.org/schema/tx"
    xmlns:xsi="http://www.w3.org/2001/XMLSchema-instance"
    xsi:schemaLocation="http://www.springframework.org/schema/beans http://www.springframework.org/schema/beans/spring-beans-4.0.xsd
    http://www.springframework.org/schema/context http://www.springframework.org/schema/context/spring-context-4.0.xsd
    http://www.springframework.org/schema/aop http://www.springframework.org/schema/aop/spring-aop-4.0.xsd http://www.springframework.org/schema/tx http://www.springframework.org/schema/tx/spring-tx-4.0.xsd
    http://www.springframework.org/schema/util http://www.springframework.org/schema/util/spring-util-4.0.xsd">
   <bean id="user1" class= "cn. itcast.assemble .User">
< constructorrarg index= "0* value="jack"/>
<constructor-arg index="1" value= "1234"/>
< /bean>
<!--使用Set方式装配user实例-->
<bean id="user2" class= "cn. itcast.assemble.User">
<property name="username" value="tom">< /property>
< property name= "password"value "4321">< /property>
< /bean>
</beans>
基于Annotation的装配
在Spring中,尽管使用XML配置文件可以实现Bean的装配工作,但如果应用中有很多Bean时,会导致XML配置文件过于臃肿,给后续的维护和升级工作带来一定的困难,为此,congJDK 以后, 提供了Annotation(注解)功能,Spring也提供了对Annotation技术的全面支持。 @Component:可以使用此注解描述Spring中的Bean,但它是一个泛化的概念,仅仅表示一个组件(Bean),并且可以作用在任何层次。使用时只需将该注解标注在相
应类.上即可。 1.
@Repository:用于将数据访问层(DAO层)的类标识为Spring中的Bean,其功能与@Component相同。
@Service:通常作用在业务层(Service层),用于将业务层的类标识为Spring中的Bean,其功能与@Component相同。
@Constroller:通常作用在控制层(如Struts2的Action),用于将控制层的类标识为Spring中的Bean,其功能与@Component相同。
@Autowired:用于对Bean的属性变量、属性的Set方法及构造函数进行标注,配合对应的注解处理器完成Bean的自动配置工作。默认按照Bean的类型进行装配。
@Resource: 其作用与Autowired一样。其区别在于@ Autowired默认按照Bean类型装配,而@Resource默认按照Bean实例名称进行装配。@Resource中有两个
重要属性:name和type。Spring将name属性解析为Bean实例名称,type属性解析为Bean实例类型。如果指定name属性,则按实例名称进行装配;如果指定type属性,则按Bean
类型进行装配;如果都不指定,则先按Bean实例名称装配,如果不能匹配,再按照Bean类型进行装配;如果都无法匹配,则抛出NoSuchBeanDefinitionException异常。
@Qualifier:与@Autowired注解配合使用,会将默认的按Bean类型装配修改为按Bean的实例名称装配,Bean的实例名称由@Qualifier注解的参数指定。
自动装配
除了使用XML和Annotation进行装配Bean,还有一种常用的装配方式就是使用自动装配。所谓自动装配,就是将一个Bean注人到其他Bean的Property中。
要使用自动装配,就需要配置< bean>元素的autowire属性。autowire 属性有5个.
byName:根据Property的Name自动装配,如果--个Bean的name,和另一个Bean中的Property的name相同,则自动装配这个Bean到Property中。
byType:根据Property的数据类型(Type)自动装配,如果一个Bean的数据类型,兼容另一个Bean中Property的数据类型,则自动装配。
constructor:根据构造函数参数的数据类型,进行byType模式的自动装配。
autodetect: 如果发现默认的构造函数,用constructor模式,否则用byType模式。.
no:默认情况下,不使用自动装配,Bean依赖必须通过ref元素定义。

 浙公网安备 33010602011771号