【WPF】Prism P1
视频参考:
https://www.bilibili.com/video/BV1nY411a7T8
博客参考:
https://www.cnblogs.com/prism/archive/2010/07/21/1781855.html
一、元素布局
<Window x:Class="WPF_Practical.MainWindow"
        xmlns="http://schemas.microsoft.com/winfx/2006/xaml/presentation"
        xmlns:x="http://schemas.microsoft.com/winfx/2006/xaml"
        xmlns:d="http://schemas.microsoft.com/expression/blend/2008"
        xmlns:mc="http://schemas.openxmlformats.org/markup-compatibility/2006"
        xmlns:local="clr-namespace:WPF_Practical"
        mc:Ignorable="d"
        Title="MainWindow" Height="760" Width="1376">
    <Grid>
        <Grid.RowDefinitions>
            <RowDefinition />
            <RowDefinition />
        </Grid.RowDefinitions>

        <Grid.ColumnDefinitions>
            <ColumnDefinition />
            <ColumnDefinition />
            <ColumnDefinition />
        </Grid.ColumnDefinitions>

        <Grid Grid.Row="0" Grid.Column="0">
            <Grid.RowDefinitions>
                <!-- RowDefinition 适配属性
                    Height="auto" auto表示自适应 取该定义中的最高高度的元素来撑开内容,如果不存在声明高度的元素
                    Height="100" 100表示绝对尺寸
                    Height="2*" 按总栅格占比设置
                -->
                <RowDefinition />
                <RowDefinition />
            </Grid.RowDefinitions>

            <Grid.ColumnDefinitions>
                <!-- ColumnDefinition 适配属性
                    Width="auto" auto表示自适应 取该定义中的最宽度的元素来撑开内容,如果不存在声明高度的元素
                    Height="100" 100表示绝对尺寸
                    Height="2*" 按总栅格占比设置
                -->
                <ColumnDefinition  />
                <ColumnDefinition />
            </Grid.ColumnDefinitions>

            <!--
                标记这个元素所属在哪个行列定义位置上(从0开始,重复定义则覆盖前置元素的定义)
                Grid.Row="下标值" Grid.Column="下标值"
                标记这个元素需要合并多少行列个数 (被合并的元素如果保持声明则失效)
                Grid.ColumnSpan="下标值" Grid.RowSpan="下标值"
            -->
            <Border Grid.Row="0" Grid.Column="0" Grid.ColumnSpan="2" Background="Red" />
            <Border Grid.Row="0" Grid.Column="0" Background="Blue" />
            <Border Grid.Row="1" Grid.Column="0" Background="Yellow" />
            <Border Grid.Row="1" Grid.Column="1" Background="Green" />
        </Grid>

        <!--
            StackPanel 设置Orientation属性,分为水平 Horizontal 和垂直布局 Vertical
            存在缺陷,溢出容器元素后无任何处理
        -->
        <StackPanel Grid.Row="0" Grid.Column="1" Orientation="Horizontal">
            <Button Width="100" Height="40" Content="Button1"  />
            <Button Width="100" Height="40" Content="Button2"  />
            <Button Width="100" Height="40" Content="Button3"  />
            <Button Width="100" Height="40" Content="Button4"  />
            <Button Width="100" Height="40" Content="Button5"  />
            <Button Width="100" Height="40" Content="Button6"  />
            <Button Width="100" Height="40" Content="Button7"  />
            <Button Width="100" Height="40" Content="Button8"  />
        </StackPanel>

        <StackPanel Grid.Row="0" Grid.Column="1" Orientation="Vertical">
            <Button Width="100" Height="40" Content="Button1"  />
            <Button Width="100" Height="40" Content="Button2"  />
            <Button Width="100" Height="40" Content="Button3"  />
            <Button Width="100" Height="40" Content="Button4"  />
            <Button Width="100" Height="40" Content="Button5"  />
            <Button Width="100" Height="40" Content="Button6"  />
            <Button Width="100" Height="40" Content="Button7"  />
            <Button Width="100" Height="40" Content="Button8"  />
            <Button Width="100" Height="40" Content="Button9"  />
            <Button Width="100" Height="40" Content="Button10"  />
        </StackPanel>

        <!--
            DockPanel 停靠面板
            LastChildFill属性, 最后一个元素是否用于填充剩余空间
            DockPanel.Dock="方向值" 设置该元素的停靠位置
        -->
        <DockPanel Grid.Row="1" Grid.Column="0" LastChildFill="False">
            <Button DockPanel.Dock="Top" Width="100" Height="40" Content="ButtonTop"  />
            <Button DockPanel.Dock="Bottom" Width="100" Height="40" Content="ButtonBottom"  />
            <Button DockPanel.Dock="Left" Width="100" Height="40" Content="ButtonLeft"  />
            <Button DockPanel.Dock="Right" Width="100" Height="40" Content="ButtonRight"  />
        </DockPanel>

        <!--
             DockPanel 停靠面板
             LastChildFill属性, 最后一个元素是否用于填充剩余空间
             DockPanel.Dock="方向值" 设置该元素的停靠位置
         -->
        <UniformGrid Grid.Row="1" Grid.Column="1" Columns="3" Rows="3">
            <Button Content="Button1"  />
            <Button Content="Button2"  />
            <Button Content="Button3"  />
            <Button Content="Button4"  />
            <Button Content="Button5"  />
            <Button Content="Button6"  />
            <Button Content="Button7"  />
            <Button Content="Button8"  />
            <Button Content="Button9"  />
        </UniformGrid>

        <UniformGrid Grid.Row="1" Grid.Column="2" Columns="3" Rows="3">
            <Button Width="100" Height="40" Content="Button1"  />
            <Button Width="100" Height="40" Content="Button2"  />
            <Button Width="100" Height="40" Content="Button3"  />
            <Button Width="100" Height="40" Content="Button4"  />
            <Button Width="100" Height="40" Content="Button5"  />
            <Button Width="100" Height="40" Content="Button6"  />
            <Button Width="100" Height="40" Content="Button7"  />
            <Button Width="100" Height="40" Content="Button8"  />
            <Button Width="100" Height="40" Content="Button9"  />
        </UniformGrid>

        <Grid Grid.Row="0" Grid.Column="3">
            <Grid.RowDefinitions>
                <RowDefinition />
                <RowDefinition />
            </Grid.RowDefinitions>

            <WrapPanel Grid.Row="0"  Orientation="Horizontal">
                <Button Width="100" Height="40" Content="Button1"  />
                <Button Width="100" Height="40" Content="Button2"  />
                <Button Width="100" Height="40" Content="Button3"  />
                <Button Width="100" Height="40" Content="Button4"  />
                <Button Width="100" Height="40" Content="Button5"  />
                <Button Width="100" Height="40" Content="Button6"  />
                <Button Width="100" Height="40" Content="Button7"  />
                <Button Width="100" Height="40" Content="Button8"  />
                <Button Width="100" Height="40" Content="Button9"  />
            </WrapPanel>

            <WrapPanel Grid.Row="1" Orientation="Vertical">
                <Button Width="100" Height="40" Content="Button1"  />
                <Button Width="100" Height="40" Content="Button2"  />
                <Button Width="100" Height="40" Content="Button3"  />
                <Button Width="100" Height="40" Content="Button4"  />
                <Button Width="100" Height="40" Content="Button5"  />
                <Button Width="100" Height="40" Content="Button6"  />
                <Button Width="100" Height="40" Content="Button7"  />
                <Button Width="100" Height="40" Content="Button8"  />
                <Button Width="100" Height="40" Content="Button9"  />
                <Button Width="100" Height="40" Content="Button10"  />
            </WrapPanel>
        </Grid>


    </Grid>
</Window>
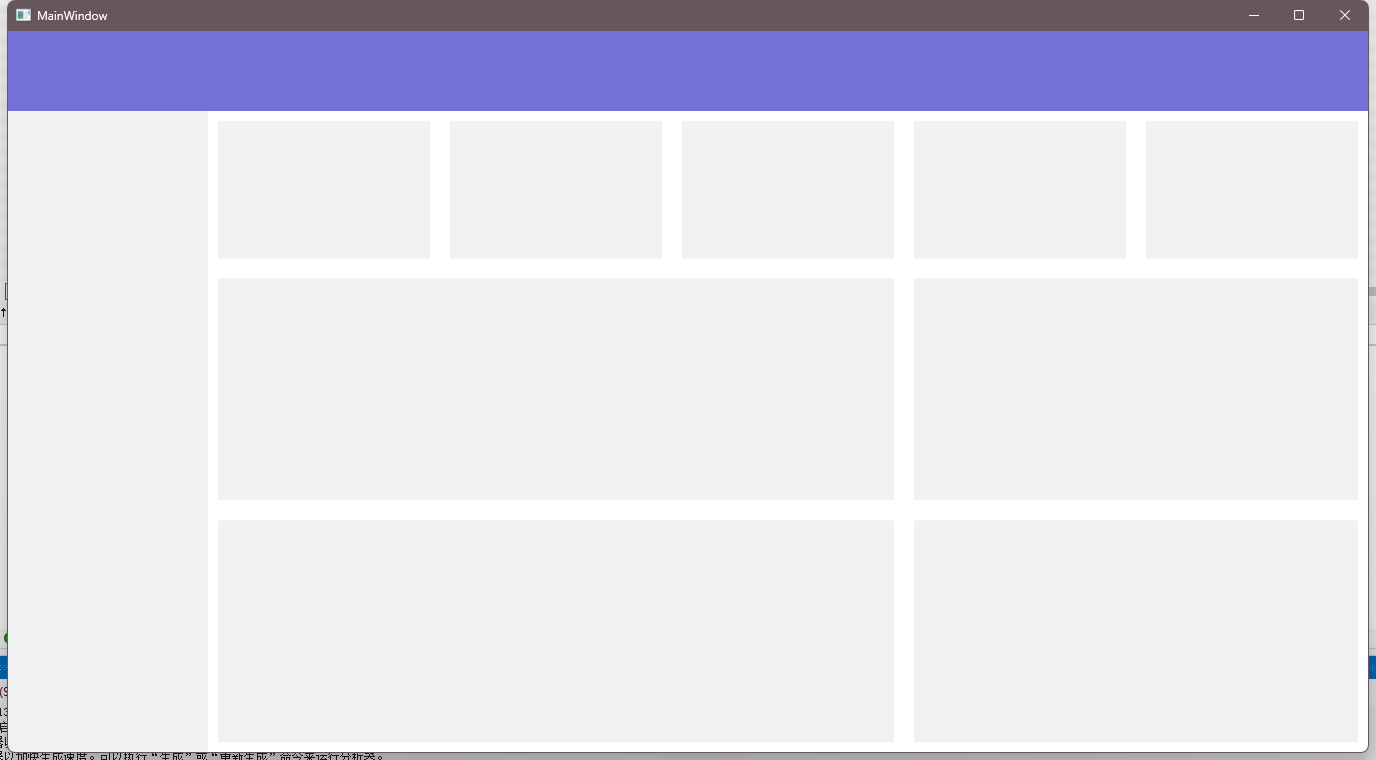
教程提供的几种布局样式列举:

视频中的后台系统布局面板

布局实现使用行列定义嵌套:
XAML标签代码:
<Window x:Class="WPF_Practical.MainWindow"
        xmlns="http://schemas.microsoft.com/winfx/2006/xaml/presentation"
        xmlns:x="http://schemas.microsoft.com/winfx/2006/xaml"
        xmlns:d="http://schemas.microsoft.com/expression/blend/2008"
        xmlns:mc="http://schemas.openxmlformats.org/markup-compatibility/2006"
        xmlns:local="clr-namespace:WPF_Practical"
        mc:Ignorable="d"
        Title="MainWindow" Height="760" Width="1376">
    <Grid>
        <Grid.RowDefinitions>
            <RowDefinition Height="80" />
            <RowDefinition />
        </Grid.RowDefinitions>

        <Grid.ColumnDefinitions>
            <ColumnDefinition Width="200" />
            <ColumnDefinition />
        </Grid.ColumnDefinitions>

        <Border Background="#7471D6" Grid.Row="0" Grid.ColumnSpan="2" />

        <Border Background="#F1F2F3" Grid.Row="1" Grid.Column="0" />

        <Grid Grid.Row="1" Grid.Column="1">
            <Grid.RowDefinitions>
                <RowDefinition Height="0.65*" />
                <RowDefinition />
                <RowDefinition />
            </Grid.RowDefinitions>

            <Grid.ColumnDefinitions>
                <ColumnDefinition />
                <ColumnDefinition />
                <ColumnDefinition />
                <ColumnDefinition />
                <ColumnDefinition />
            </Grid.ColumnDefinitions>

            <Border Margin="10" Grid.Row="0" Grid.Column="0" Background="#F1F2F3" />
            <Border Margin="10" Grid.Row="0" Grid.Column="1" Background="#F1F2F3" />
            <Border Margin="10" Grid.Row="0" Grid.Column="2" Background="#F1F2F3" />
            <Border Margin="10" Grid.Row="0" Grid.Column="3" Background="#F1F2F3" />
            <Border Margin="10" Grid.Row="0" Grid.Column="4" Background="#F1F2F3" />

            <Border Margin="10" Grid.Row="1" Grid.Column="0" Grid.ColumnSpan="3" Background="#F1F2F3" />
            <Border Margin="10" Grid.Row="1" Grid.Column="3" Grid.ColumnSpan="2" Background="#F1F2F3" />
            <Border Margin="10" Grid.Row="2" Grid.Column="0" Grid.ColumnSpan="3" Background="#F1F2F3" />
            <Border Margin="10" Grid.Row="2" Grid.Column="3" Grid.ColumnSpan="2" Background="#F1F2F3" />

        </Grid>

    </Grid>
</Window>
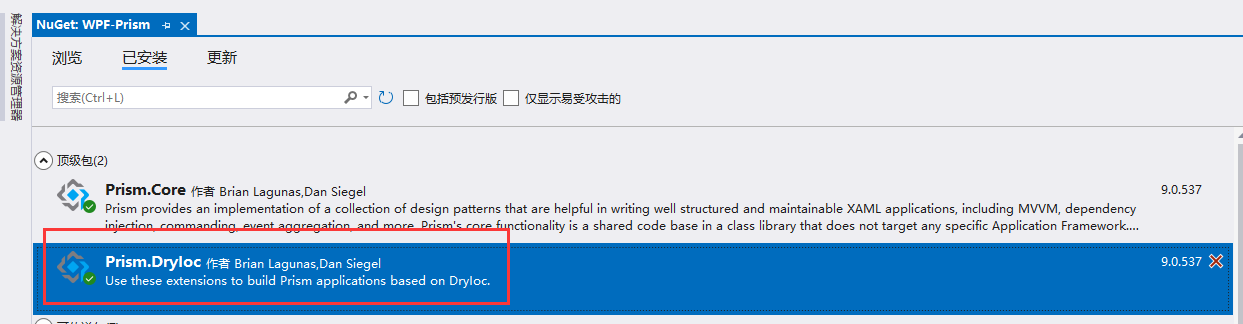
二、Prism框架安装
Step1 NuGet包管理【浏览】搜索 Prism.DryIoc
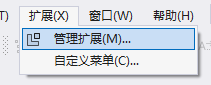
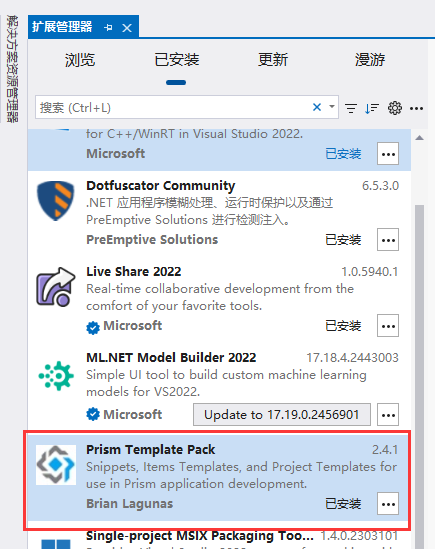
Step2 扩展部分追加 Prism模版包
三、Prism区域和路由
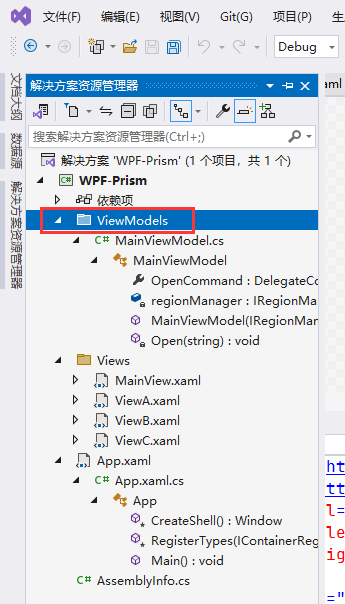
Step1 创建ViewModels目录,编写MainViewModel类
代码部分:
using System;
using System.Collections.Generic;
using System.Linq;
using System.Text;
using System.Threading.Tasks;
using Prism.Commands;
using Prism.Mvvm;
using WPF_Prism.Views;

namespace WPF_Prism.ViewModels
{

    public class MainViewModel : BindableBase
    {

        public DelegateCommand<string> OpenCommand { private set; get; }
        private readonly IRegionManager regionManager;

        /* 初始化时通过构造器注入区域管理器对象 */
        public MainViewModel(IRegionManager regionManager) {
            /* 创建打开窗口 */
            OpenCommand = new DelegateCommand<string>(Open);
            this.regionManager = regionManager;
        }

        private void Open(string obj)
        {
            /* 通过区域管理器对象,指定区域名获取该区域对象,并导航到目标视图控件对象上 */
            regionManager.Regions["ContentRegion"].RequestNavigate(obj);
        }
    }
}
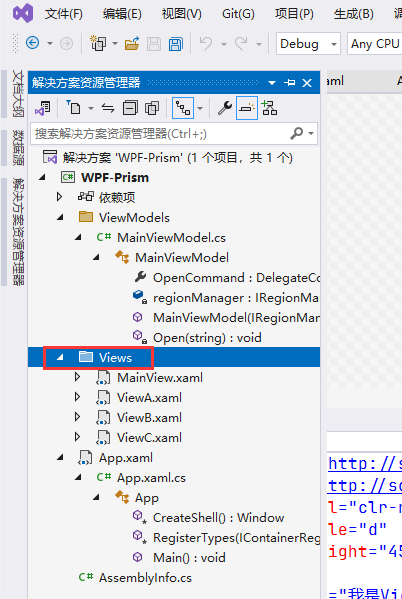
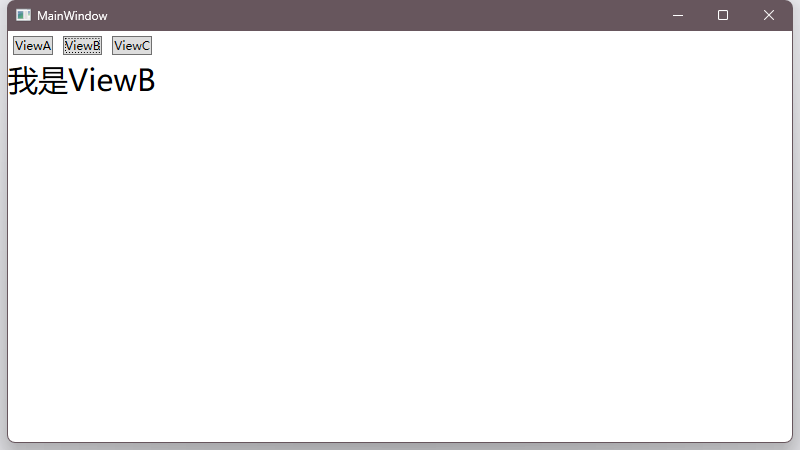
Step2 创建Views目录,编写ViewA\ViewB\ViewC三个视图类
控件简单标记下内容以区分是哪一个View
<UserControl x:Class="WPF_Prism.Views.ViewA"
             xmlns="http://schemas.microsoft.com/winfx/2006/xaml/presentation"
             xmlns:x="http://schemas.microsoft.com/winfx/2006/xaml"
             xmlns:mc="http://schemas.openxmlformats.org/markup-compatibility/2006"
             xmlns:d="http://schemas.microsoft.com/expression/blend/2008"
             xmlns:local="clr-namespace:WPF_Prism.Views"
             mc:Ignorable="d"
             d:DesignHeight="450" d:DesignWidth="800">
    <Grid>
        <TextBlock Text="我是ViewA" FontSize="30" />
    </Grid>
</UserControl>
Step3 把MainWindow更名为MainView,放入到Views中
1 原名称 MainWindow.xaml,放入Views后,更名MainView
2 并且加入Prism的约束,追加自动装配视图支持
3 定义对应三个视图的打开按钮,绑定一个打开命令方法,和对应的参数值
4 定义内容控件,使用区域管理器属性,命名该区域为ContentRegion
<Window x:Class="WPF_Prism.Views.MainView"
        xmlns="http://schemas.microsoft.com/winfx/2006/xaml/presentation"
        xmlns:x="http://schemas.microsoft.com/winfx/2006/xaml"
        xmlns:d="http://schemas.microsoft.com/expression/blend/2008"
        xmlns:mc="http://schemas.openxmlformats.org/markup-compatibility/2006"
        xmlns:local="clr-namespace:WPF_Prism"
        xmlns:prism="http://prismlibrary.com/"
        prism:ViewModelLocator.AutoWireViewModel="True"
        mc:Ignorable="d"
        Title="MainWindow" Height="450" Width="800">
    <Grid>
        <Grid.RowDefinitions>
            <RowDefinition Height="auto" />
            <RowDefinition />
        </Grid.RowDefinitions>

        <StackPanel Orientation="Horizontal">
            <Button Margin="5" Command="{ Binding OpenCommand }" CommandParameter="ViewA">ViewA</Button>
            <Button Margin="5" Command="{ Binding OpenCommand }" CommandParameter="ViewB">ViewB</Button>
            <Button Margin="5" Command="{ Binding OpenCommand }" CommandParameter="ViewC">ViewC</Button>
        </StackPanel>

        <ContentControl Grid.Row="1" prism:RegionManager.RegionName="ContentRegion" />
    </Grid>
</Window>
内部类引用的资源变量名也要调整
using System.Text;
using System.Windows;
using System.Windows.Controls;
using System.Windows.Data;
using System.Windows.Documents;
using System.Windows.Input;
using System.Windows.Media;
using System.Windows.Media.Imaging;
using System.Windows.Navigation;
using System.Windows.Shapes;

namespace WPF_Prism.Views;

/// <summary>
/// Interaction logic for MainWindow.xaml
/// </summary>
public partial class MainView : Window
{
    public MainView()
    {
        InitializeComponent();
    }
}
Step4 App控件调整
App.xaml.cs代码追加依赖注入
改写为继承PrismApplication
using System.Configuration;
using System.Data;
using System.Windows;
using WPF_Prism.Views;

namespace WPF_Prism
{
    /// <summary>
    /// Interaction logic for App.xaml
    /// </summary>
    public partial class App : PrismApplication
    {
        protected override Window CreateShell()
        {

            return Container.Resolve<MainView>();
        }

        /* 注入视图控件依赖 */
        protected override void RegisterTypes(IContainerRegistry containerRegistry)
        {
            /* 可以重命名依赖名称 containerRegistry.RegisterForNavigation<ViewA>("ViewAModule"); */
            containerRegistry.RegisterForNavigation<ViewA>();
            containerRegistry.RegisterForNavigation<ViewB>();
            containerRegistry.RegisterForNavigation<ViewC>();
        }
    }

}
App.xaml 移除StartURI约束,追加Prism约束
<prism:PrismApplication x:Class="WPF_Prism.App"
             xmlns="http://schemas.microsoft.com/winfx/2006/xaml/presentation"
             xmlns:x="http://schemas.microsoft.com/winfx/2006/xaml"
             xmlns:local="clr-namespace:WPF_Prism"
             xmlns:prism="http://prismlibrary.com/">
    <Application.Resources>

    </Application.Resources>
</prism:PrismApplication>
Step5 执行预览:
四、Prism模块化
Step1 创建模块A
按正常项目创建,然后项目名称命名为
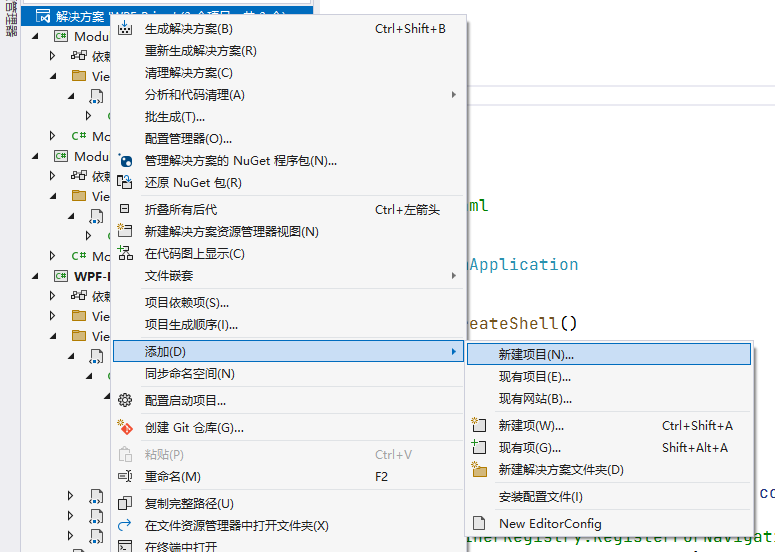
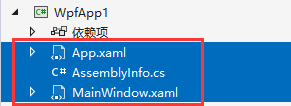
新创建的项目删除掉这些内容:
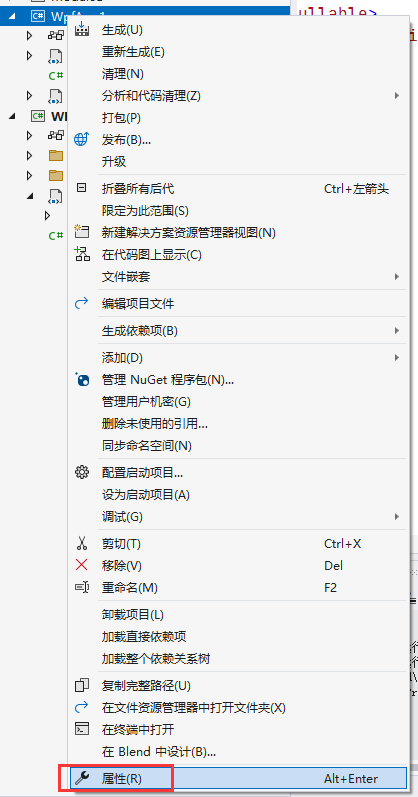
然后右键项目名选择【属性】
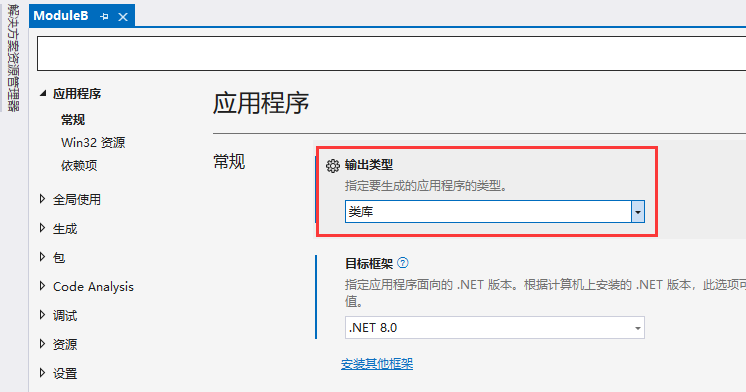
更改类型为【类库】
在更名为类库后,新建Views目录,创建【用户控件】ViewA
<UserControl x:Class="ModuleA.Views.ViewA"
             xmlns="http://schemas.microsoft.com/winfx/2006/xaml/presentation"
             xmlns:x="http://schemas.microsoft.com/winfx/2006/xaml"
             xmlns:mc="http://schemas.openxmlformats.org/markup-compatibility/2006"
             xmlns:d="http://schemas.microsoft.com/expression/blend/2008"
             xmlns:local="clr-namespace:ModuleA.Views"
             mc:Ignorable="d"
             d:DesignHeight="450" d:DesignWidth="800">
    <Grid>
        <TextBlock Text="我是ModuleA中的ViewA" FontSize="40" />
    </Grid>
</UserControl>
NUGET包管理,安装Prism框架,安装方法不赘述了
创建一个模块类声明:
注册区域需要加载的控件资源,
注意,这个模块类,一定要public的才可以
using System;
using System.Collections.Generic;
using System.Linq;
using System.Text;
using System.Threading.Tasks;
using Prism.Modularity;
using ModuleA.Views;

namespace ModuleA
{
    public class ModuleAProfile : IModule
    {
        public void OnInitialized(IContainerProvider containerProvider)
        {

        }

        public void RegisterTypes(IContainerRegistry containerRegistry)
        {
            containerRegistry.RegisterForNavigation<ViewA>("M-ViewA");
        }
    }
}
Step2 创建模块B
重复上述步骤即可
Step3 主项目引入模块注入
主项目 App.xaml.cs
为了区分是主项目控件AB和模块引用的AB,要声明资源名称来区分
using System.Configuration;
using System.Data;
using System.Windows;
using ModuleA;
using ModuleB;
using WPF_Prism.Views;

namespace WPF_Prism
{
    /// <summary>
    /// Interaction logic for App.xaml
    /// </summary>
    public partial class App : PrismApplication
    {
        protected override Window CreateShell()
        {

            return Container.Resolve<MainView>();
        }

        /* 注入视图控件依赖 */
        protected override void RegisterTypes(IContainerRegistry containerRegistry)
        {
            /* 可以重命名依赖名称 containerRegistry.RegisterForNavigation<ViewA>("ViewAModule"); */
            containerRegistry.RegisterForNavigation<ViewA>("L-ViewA");
            containerRegistry.RegisterForNavigation<ViewB>("L-ViewB");
            containerRegistry.RegisterForNavigation<ViewC>();
        }


        /* 引入模块资源进行注入 */
        protected override void ConfigureModuleCatalog(IModuleCatalog moduleCatalog)
        {
            moduleCatalog.AddModule<ModuleAProfile>();
            moduleCatalog.AddModule<ModuleBProfile>();
            base.ConfigureModuleCatalog(moduleCatalog);
        }
    }

}
在主视图追加模块的AB按钮和对应的参数
<Window x:Class="WPF_Prism.Views.MainView"
xmlns="http://schemas.microsoft.com/winfx/2006/xaml/presentation"
xmlns:x="http://schemas.microsoft.com/winfx/2006/xaml"
xmlns:d="http://schemas.microsoft.com/expression/blend/2008"
xmlns:mc="http://schemas.openxmlformats.org/markup-compatibility/2006"
xmlns:local="clr-namespace:WPF_Prism"
xmlns:prism="http://prismlibrary.com/"
prism:ViewModelLocator.AutoWireViewModel="True"
mc:Ignorable="d"
Title="MainWindow" Height="450" Width="800">
<Grid>
<Grid.RowDefinitions>
<RowDefinition Height="auto" />
<RowDefinition />
</Grid.RowDefinitions>
<StackPanel Orientation="Horizontal">
<Button Margin="5" Command="{ Binding OpenCommand }" CommandParameter="L-ViewA">ViewA</Button>
<Button Margin="5" Command="{ Binding OpenCommand }" CommandParameter="L-ViewB">ViewB</Button>
<Button Margin="5" Command="{ Binding OpenCommand }" CommandParameter="ViewC">ViewC</Button>
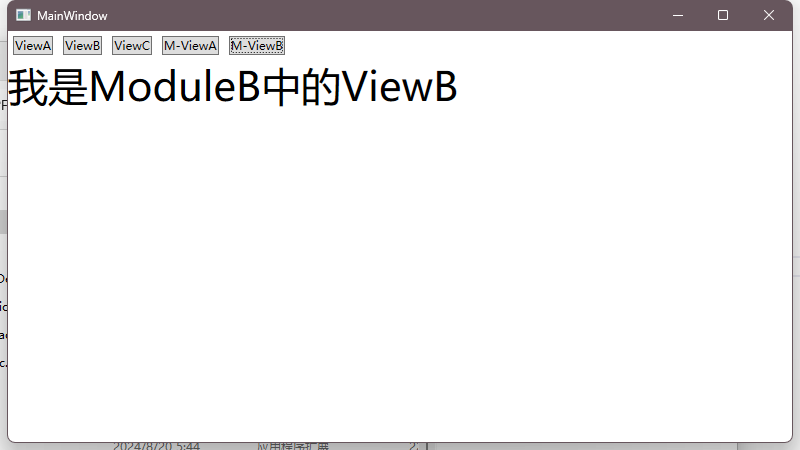
<Button Margin="5" Command="{ Binding OpenCommand }" CommandParameter="M-ViewA">M-ViewA</Button>
<Button Margin="5" Command="{ Binding OpenCommand }" CommandParameter="M-ViewB">M-ViewB</Button>
</StackPanel>
<ContentControl Grid.Row="1" prism:RegionManager.RegionName="ContentRegion" />
</Grid>
</Window>
执行预览:
五、通过指定模块目录注入
Step1 主项目的App.xaml.cs文件改写方法
using System.Configuration;
using System.Data;
using System.Windows;
using WPF_Prism.Views;

namespace WPF_Prism
{
    /// <summary>
    /// Interaction logic for App.xaml
    /// </summary>
    public partial class App : PrismApplication
    {
        protected override Window CreateShell()
        {

            return Container.Resolve<MainView>();
        }

        /* 注入视图控件依赖 */
        protected override void RegisterTypes(IContainerRegistry containerRegistry)
        {
            /* 可以重命名依赖名称 containerRegistry.RegisterForNavigation<ViewA>("ViewAModule"); */
            containerRegistry.RegisterForNavigation<ViewA>("L-ViewA");
            containerRegistry.RegisterForNavigation<ViewB>("L-ViewB");
            containerRegistry.RegisterForNavigation<ViewC>();
        }


        /* 方式1 引入模块资源进行注入 */
        //protected override void ConfigureModuleCatalog(IModuleCatalog moduleCatalog)
        //{
        //    moduleCatalog.AddModule<ModuleAProfile>();
        //    moduleCatalog.AddModule<ModuleBProfile>();
        //    base.ConfigureModuleCatalog(moduleCatalog);
        //}

        /* 方式2 通过指定模块目录读取 */
        protected override IModuleCatalog CreateModuleCatalog()
        {
            return new DirectoryModuleCatalog()
            {
                ModulePath = @".\Modules"
            };
        }
    }

}
Step2 引入模块动态库文件
在主项目这个目录下创建上述声明的模块目录:
C:\Users\Administrator\source\repos\WPF-Prism\WPF-Prism\bin\Debug\net8.0-windows
把另外两个模块的动态库文件拷贝一份到上面的目录里面:
C:\Users\Administrator\source\repos\WPF-Prism\ModuleA\bin\Debug\net8.0-windows
C:\Users\Administrator\source\repos\WPF-Prism\ModuleB\bin\Debug\net8.0-windows
重启预览后发现一样能用:
六、其他方式模块注入
官网代码实例
https://github.com/PrismLibrary/Prism-Samples-Wpf
模块注入是有4种方式,App配置,代码配置,目录配置,手动加载
LoadManual 手动加载
App.xaml.cs
可以看见是把模块资源使用typeof方法转换成元数据对象注入的
using System.Windows;
using ModuleA;
using Modules.Views;
using Prism.Ioc;
using Prism.Modularity;
using Prism.Unity;

namespace Modules
{
    /// <summary>
    /// Interaction logic for App.xaml
    /// </summary>
    public partial class App : PrismApplication
    {
        protected override Window CreateShell()
        {
            return Container.Resolve<MainWindow>();
        }

        protected override void RegisterTypes(IContainerRegistry containerRegistry)
        {

        }

        protected override void ConfigureModuleCatalog(IModuleCatalog moduleCatalog)
        {
            var moduleAType = typeof(ModuleAModule);
            moduleCatalog.AddModule(new ModuleInfo()
            {
                ModuleName = moduleAType.Name,
                ModuleType = moduleAType.AssemblyQualifiedName,
                InitializationMode = InitializationMode.OnDemand
            });
        }
    }
}
Directory 目录读取
见上文即可,这里不再赘述
Code 硬编码配置
App.xaml.cs 是把具体视图资源引用了
using Modules.Views;
using Prism.Ioc;
using Prism.Modularity;
using Prism.Unity;
using System.Windows;

namespace Modules
{
    /// <summary>
    /// Interaction logic for App.xaml
    /// </summary>
    public partial class App : PrismApplication
    {
        protected override Window CreateShell()
        {
            return Container.Resolve<MainWindow>();
        }

        protected override void RegisterTypes(IContainerRegistry containerRegistry)
        {

        }

        protected override void ConfigureModuleCatalog(IModuleCatalog moduleCatalog)
        {
            moduleCatalog.AddModule<ModuleA.ModuleAModule>();
        }
    }
}
但是模块类声明,是在初始化处理了:
由容器提供器来解析完成
using ModuleA.Views;
using Prism.Ioc;
using Prism.Modularity;
using Prism.Navigation.Regions;

namespace ModuleA
{
    public class ModuleAModule : IModule
    {
        public void OnInitialized(IContainerProvider containerProvider)
        {
            var regionManager = containerProvider.Resolve<IRegionManager>();
            regionManager.RegisterViewWithRegion("ContentRegion", typeof(ViewA));
        }

        public void RegisterTypes(IContainerRegistry containerRegistry)
        {

        }
    }
}
AppConfig App配置
多出两个配置文件:
App.config
<?xml version="1.0" encoding="utf-8"?>
<configuration>
  <configSections>
    <section name="modules" type="Prism.Modularity.ModulesConfigurationSection, Prism.Wpf" />
  </configSections>
  <startup>
  </startup>
  <modules>
    <module assemblyFile="ModuleA.dll" moduleType="ModuleA.ModuleAModule, ModuleA, Version=1.0.0.0, Culture=neutral, PublicKeyToken=null" moduleName="ModuleAModule" startupLoaded="True" />
  </modules>
</configuration>
ModuleCatalog.xaml
<m:ModuleCatalog xmlns="http://schemas.microsoft.com/winfx/2006/xaml/presentation"
                    xmlns:x="http://schemas.microsoft.com/winfx/2006/xaml"
                    xmlns:m="clr-namespace:Prism.Modularity;assembly=Prism.Wpf">

    <m:ModuleInfo ModuleName="ModuleAModule" ModuleType="ModuleA.ModuleAModule, ModuleA, Version=1.0.0.0, Culture=neutral, PublicKeyToken=null" />

</m:ModuleCatalog>
App.xaml.cs 改用了Xaml方式读取
using Modules.Views;
using Prism.Modularity;
using Prism.Unity;
using Prism.Ioc;
using System.Windows;
using System;

namespace Modules
{
    /// <summary>
    /// Interaction logic for App.xaml
    /// </summary>
    public partial class App : PrismApplication
    {
        protected override Window CreateShell()
        {
            return Container.Resolve<MainWindow>();
        }

        protected override void RegisterTypes(IContainerRegistry containerRegistry)
        {

        }

        protected override IModuleCatalog CreateModuleCatalog()
        {
            return new XamlModuleCatalog(new Uri("/Modules;component/ModuleCatalog.xaml", UriKind.Relative));
        }
    }
}
七、导航
一、路由参数传递
主项目App.xaml.cs 把模块方式改为编码方式添加
方式2需要手动更新动态库文件,没仔细看还以为哪个步骤写错了
using System.Configuration;
using System.Data;
using System.Windows;
using ModuleB;
using ModuleA;
using WPF_Prism.Views;

namespace WPF_Prism
{
    /// <summary>
    /// Interaction logic for App.xaml
    /// </summary>
    public partial class App : PrismApplication
    {
        protected override Window CreateShell()
        {

            return Container.Resolve<MainView>();
        }

        /* 注入视图控件依赖 */
        protected override void RegisterTypes(IContainerRegistry containerRegistry)
        {
            /* 可以重命名依赖名称 containerRegistry.RegisterForNavigation<ViewA>("ViewAModule"); */
            containerRegistry.RegisterForNavigation<ViewA>("L-ViewA");
            containerRegistry.RegisterForNavigation<ViewB>("L-ViewB");
            containerRegistry.RegisterForNavigation<ViewC>();
        }


        /* 方式1 引入模块资源进行注入 */
        protected override void ConfigureModuleCatalog(IModuleCatalog moduleCatalog)
        {
            moduleCatalog.AddModule<ModuleAProfile>();
            moduleCatalog.AddModule<ModuleBProfile>();
            base.ConfigureModuleCatalog(moduleCatalog);
        }

        /* 方式2 通过指定模块目录读取 */
        //protected override IModuleCatalog CreateModuleCatalog()
        //{
        //    return new DirectoryModuleCatalog()
        //    {
        //        ModulePath = @".\Modules"
        //    };
        //}
    }

}
MainViewModel.cs类的导航方法追加路由参数:
using System;
using System.Collections.Generic;
using System.Linq;
using System.Text;
using System.Threading.Tasks;
using Prism.Commands;
using Prism.Mvvm;
using WPF_Prism.Views;
namespace WPF_Prism.ViewModels
{
public class MainViewModel : BindableBase
{
public DelegateCommand<string> OpenCommand { private set; get; }
private readonly IRegionManager regionManager;
/* 初始化时通过构造器注入区域管理器对象 */
public MainViewModel(IRegionManager regionManager) {
/* 创建打开窗口 */
OpenCommand = new DelegateCommand<string>(Open);
this.regionManager = regionManager;
}
private void Open(string obj)
{
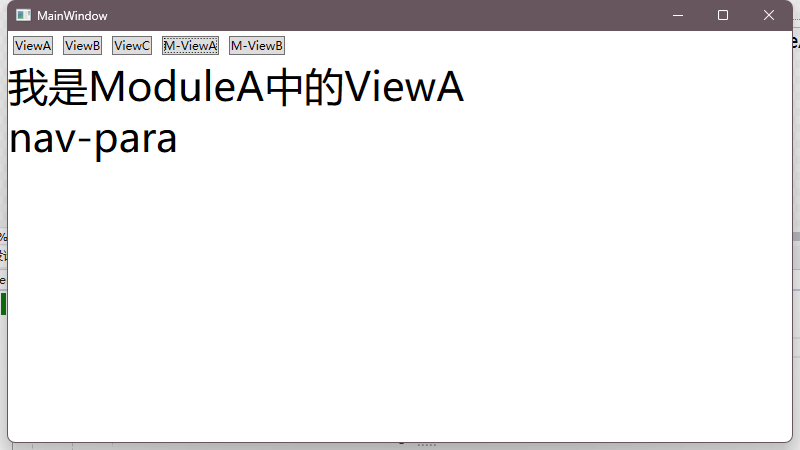
/* 可以向路由传递参数 */
NavigationParameters keys = new NavigationParameters();
keys.Add("Title", "nav-para");
/* 通过区域管理器对象,指定区域名获取该区域对象,并导航到目标视图控件对象上, 附带路由参数 */
regionManager.Regions["ContentRegion"].RequestNavigate(obj, keys);
}
}
}
模块A需要添加Prism的约束配置:
这里绑定一个Title以方便展示传递的路由参数
<UserControl x:Class="ModuleA.Views.ViewA"
             xmlns="http://schemas.microsoft.com/winfx/2006/xaml/presentation"
             xmlns:x="http://schemas.microsoft.com/winfx/2006/xaml"
             xmlns:mc="http://schemas.openxmlformats.org/markup-compatibility/2006"
             xmlns:d="http://schemas.microsoft.com/expression/blend/2008"
             xmlns:prism="http://prismlibrary.com/"
             mc:Ignorable="d"
             d:DesignHeight="450" d:DesignWidth="800">
    <Grid>
        <StackPanel>
            <TextBlock Text="我是ModuleA中的ViewA" FontSize="40" />
            <TextBlock Text="{ Binding Title }" FontSize="40" />
        </StackPanel>

    </Grid>
</UserControl>
创建ViewA对应的Model类,注意目录一定要ViewModels名称
且类名为ViewAViewModel,这样可支持自动装配识别注入

但是视频还是改用编码方式注入:
ModuleAProfile.cs 追加对ViewAViewModel类的注入
using System;
using System.Collections.Generic;
using System.Linq;
using System.Text;
using System.Threading.Tasks;
using Prism.Modularity;
using ModuleA.Views;
using ModuleA.ViewModels;

namespace ModuleA
{
    public class ModuleAProfile : IModule
    {
        public void OnInitialized(IContainerProvider containerProvider)
        {

        }

        public void RegisterTypes(IContainerRegistry containerRegistry)
        {
            containerRegistry.RegisterForNavigation<ViewA, ViewAViewModel>("M-ViewA");
        }
    }
}
ViewAViewModel 继承和实现了 BindableBase, INavigationAware
Aware接口实现,会有一个回调支持,当跳转到此控件时,传递路由的上下文
可以获取到路由参数信息
using System;
using System.Collections.Generic;
using System.Linq;
using System.Text;
using System.Threading.Tasks;

namespace ModuleA.ViewModels
{
    class ViewAViewModel : BindableBase, INavigationAware
    {
        public ViewAViewModel() { }

        public bool IsNavigationTarget(NavigationContext navigationContext)
        {

            return true;
        }

        private string title;

        public string Title
        {
            get { return title; }
            set {
                title = value;
                RaisePropertyChanged();
            }
        }

        public void OnNavigatedFrom(NavigationContext navigationContext)
        {

        }

        public void OnNavigatedTo(NavigationContext navigationContext)
        {
            if (navigationContext.Parameters.ContainsKey("Title"))
                Title = navigationContext.Parameters.GetValue<string>("Title");
        }
    }
}
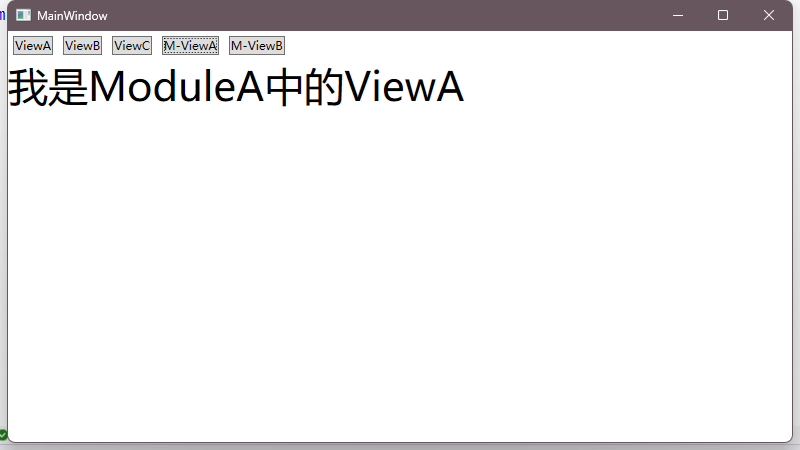
点击模块A的ViewA预览,可以发现参数能接收到:
八、跳转拦截
ViewAViewModel.cs文件调整实现接口
追加一个处理方法
using System;
using System.Collections.Generic;
using System.Linq;
using System.Text;
using System.Threading.Tasks;
using System.Windows;
namespace ModuleA.ViewModels
{
class ViewAViewModel : BindableBase, IConfirmNavigationRequest
// INavigationAware
{
public ViewAViewModel() { }
public bool IsNavigationTarget(NavigationContext navigationContext)
{
return true;
}
private string title;
public string Title
{
get { return title; }
set {
title = value;
RaisePropertyChanged();
}
}
public void OnNavigatedFrom(NavigationContext navigationContext)
{
}
public void OnNavigatedTo(NavigationContext navigationContext)
{
if (navigationContext.Parameters.ContainsKey("Title"))
Title = navigationContext.Parameters.GetValue<string>("Title");
}
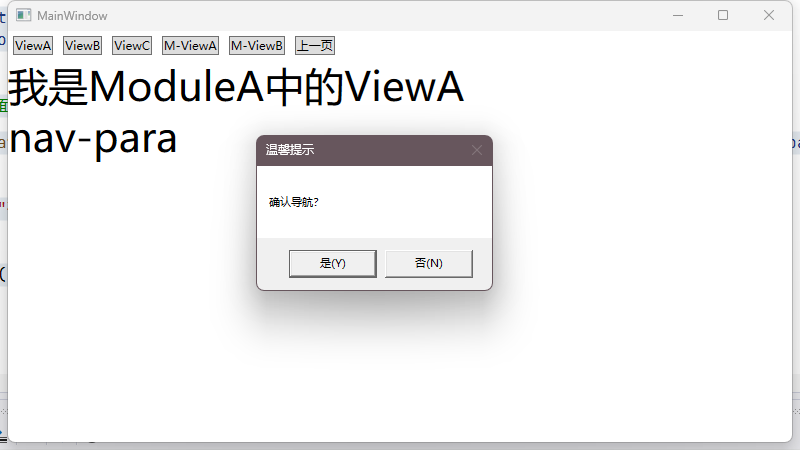
/* 路由从此页面跳转至下一个页面时拦截 */
public void ConfirmNavigationRequest(NavigationContext navigationContext, Action<bool> continuationCallback)
{
bool result = true;
if (MessageBox.Show("确认导航?", "温馨提示", MessageBoxButton.YesNo) == MessageBoxResult.No)
result = false;
continuationCallback(result);
}
}
}
当要从当前模块A的ViewA跳转至下一页面时(包括跳转至自己时),进行拦截:
九、路由日志对象
MainViewModel.cs 文件
1、每次跳转时可以通过路由上下文拿到Journal对象,这个对象不需要频繁赋值,一次就够了
2、返回上一页是通过Journal的GoBack()方法实现
using System;
using System.Collections.Generic;
using System.Linq;
using System.Text;
using System.Threading.Tasks;
using Prism.Commands;
using Prism.Mvvm;
using WPF_Prism.Views;

namespace WPF_Prism.ViewModels
{

    public class MainViewModel : BindableBase
    {

        public DelegateCommand<string> OpenCommand { private set; get; }
        public DelegateCommand BackCommand { private set; get; }
        private readonly IRegionManager regionManager;
        private IRegionNavigationJournal journal;

        /* 初始化时通过构造器注入区域管理器对象 */
        public MainViewModel(IRegionManager regionManager) {
            /* 创建打开窗口 */
            OpenCommand = new DelegateCommand<string>(Open);
            BackCommand = new DelegateCommand(Back);
            this.regionManager = regionManager;
        }

        private void Open(string obj)
        {
            /* 可以向路由传递参数 */
            NavigationParameters keys = new NavigationParameters();
            keys.Add("Title", "nav-para");

            /* 通过区域管理器对象,指定区域名获取该区域对象,并导航到目标视图控件对象上, 附带路由参数 */
            regionManager.Regions["ContentRegion"].RequestNavigate(obj, navigationCallback =>
            {
                /* 只需要传递一次即可 */
                if (journal == null && navigationCallback != null && navigationCallback.Success)
                    journal = navigationCallback.Context.NavigationService.Journal;
            }, keys);
        }

        private void Back()
        {
            if (journal != null && journal.CanGoBack)
            {
                journal.GoBack();
            }
        }
    }


}
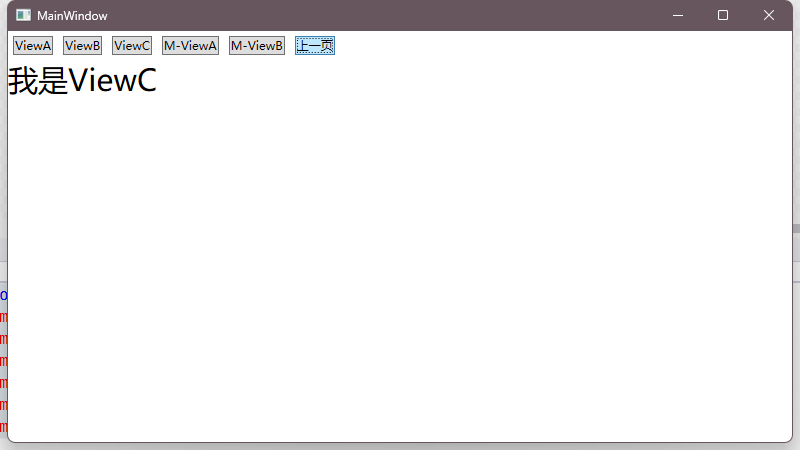
主窗体界面追加返回上一步:
<Window x:Class="WPF_Prism.Views.MainView"
        xmlns="http://schemas.microsoft.com/winfx/2006/xaml/presentation"
        xmlns:x="http://schemas.microsoft.com/winfx/2006/xaml"
        xmlns:d="http://schemas.microsoft.com/expression/blend/2008"
        xmlns:mc="http://schemas.openxmlformats.org/markup-compatibility/2006"
        xmlns:local="clr-namespace:WPF_Prism"
        xmlns:prism="http://prismlibrary.com/"
        prism:ViewModelLocator.AutoWireViewModel="True"
        mc:Ignorable="d"
        Title="MainWindow" Height="450" Width="800">
    <Grid>
        <Grid.RowDefinitions>
            <RowDefinition Height="auto" />
            <RowDefinition />
        </Grid.RowDefinitions>

        <StackPanel Orientation="Horizontal">
            <Button Margin="5" Command="{ Binding OpenCommand }" CommandParameter="L-ViewA">ViewA</Button>
            <Button Margin="5" Command="{ Binding OpenCommand }" CommandParameter="L-ViewB">ViewB</Button>
            <Button Margin="5" Command="{ Binding OpenCommand }" CommandParameter="ViewC">ViewC</Button>
            <Button Margin="5" Command="{ Binding OpenCommand }" CommandParameter="M-ViewA">M-ViewA</Button>
            <Button Margin="5" Command="{ Binding OpenCommand }" CommandParameter="M-ViewB">M-ViewB</Button>
            <Button Margin="5" Command="{ Binding BackCommand }">上一页</Button>
        </StackPanel>

        <ContentControl Grid.Row="1" prism:RegionManager.RegionName="ContentRegion" />
    </Grid>
</Window>
效果预览:

 浙公网安备 33010602011771号